
download sample images
Download Assets
This tutorial includes sample images and a PDF guide. Downloads are free with a PHLEARN account.
- Free sample files with every tutorial on PHLEARN
- New tutorials published every week
- Unlimited downloads with your free PHLEARN account
description
2020 Edition
This lesson is from the original 30 Days of Photoshop. Photoshop has changed a great deal since — there is an updated version of this lesson in the 2025 Edition: How to Use Smart Objects in Photoshop, Day 16.
A non-destructive workflow will save you a lot of time and frustration while you edit–and Smart Objects make working non-destructively easier than ever! Learn how Smart Objects can allow you to transform and scale images without ever losing resolution, and can let you apply filters that can be changed or removed at any time.
This is Day 13 of our 30 Days of Photoshop series. Follow along with all 30 episodes as we explore the magic of Photoshop together!
Continue Watching 30 Days of Photoshop
Enjoying This Free Tutorial?
We publish a new free tutorial every week, each one with sample images and PSDs you can download and follow along with. Sign up and they land straight in your inbox, along with early word on sales, events and subscriber-only offers.
Why Smart Objects Will Change Your Workflow
Smart Objects are one of the most important tools for working non-destructively in Photoshop. Instead of editing the pixels of a layer directly, a Smart Object stores a reference to the original image, so every transformation and filter you apply can be undone or adjusted later. Two benefits stand out: you can scale a layer down and back up without losing any resolution, and every filter becomes a Smart Filter that you can switch off, fade or re-edit at any time.
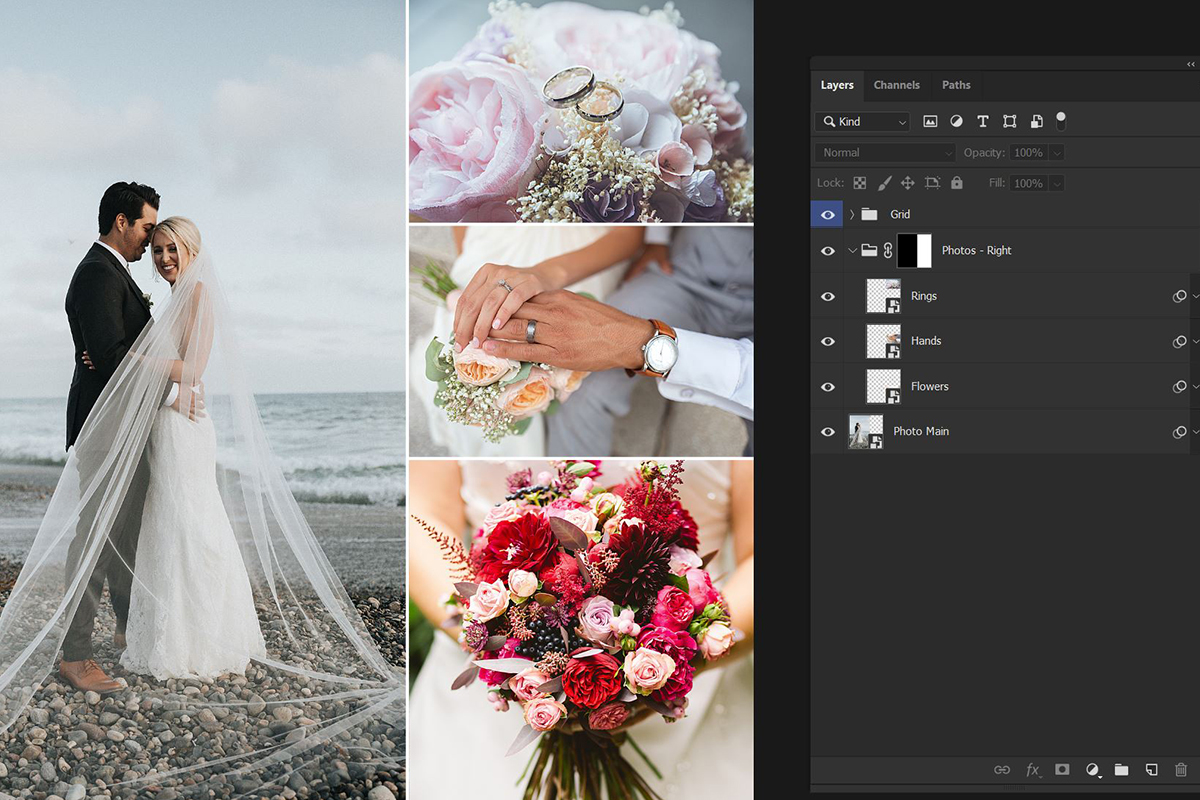
In this lesson you will build a small four-photo collage that shows both benefits side by side.
Bring the Photos Together
-
Open and Arrange the Images
Open all four photos. Press Ctrl/Cmd + Minus a few times so you can see all the document windows at once.
-
Drag Them Into One Document
With the Move Tool (V), drag each image from its own window onto the main document, then close the others. Press F to go full screen.
-
Crop to a Square
Press C for the Crop Tool and choose the 1:1 (Square) ratio. Make sure Delete Cropped Pixels is unchecked so nothing outside the crop is thrown away, then commit the crop.
Smart Object vs. Regular Layer
-
Duplicate a Layer
Select one photo and press Ctrl/Cmd + J to duplicate it. Drag the copy to one side so both versions are visible. Name one “Regular” and the other “Smart.”
-
Convert One to a Smart Object
Right-click the “Smart” layer and choose Convert to Smart Object. A small icon appears in the corner of its thumbnail; the “Regular” layer has none.
-
Shrink Both Dramatically
Select both layers, press Ctrl/Cmd + T, hold Shift and scale them down to a tiny fraction of their size. Press Enter.
-
Scale Them Back Up
Press Ctrl/Cmd + T again and scale both back to their original size. Zoom in. The regular layer is now a blurry mess because its pixels were discarded when it shrank. The Smart Object looks exactly as sharp as it started. This is why you should convert any layer to a Smart Object before resizing it.
-
Convert the Rest
Delete the regular copy, then right-click each remaining photo layer and convert it to a Smart Object so none of them lose resolution during layout.
Build the Collage
-
Mask a Group to One Side
Position the main photo on the left. With the Rectangular Marquee Tool (M), select the right-hand strip where the other three photos will live. Select those three layers, press Ctrl/Cmd + G to group them, and click the Add Layer Mask button. The whole group is now confined to that strip.
-
Scale and Arrange
Press Ctrl/Cmd + T on each of the three photos, hold Shift and scale them down to stack in the strip. Change your mind freely: swap which image is the large one, enlarge a small one, shrink it again. Because they are Smart Objects, no amount of resizing costs you quality.
-
Add Divider Lines
On a new layer at the top, draw a thin marquee selection and press Shift + Delete to fill it with white. Press Ctrl/Cmd + J to duplicate and Ctrl/Cmd + T to rotate and reposition the copies between the photos.
Smart Filters
-
Make a Rasterized Copy for Comparison
Duplicate the main Smart Object, right-click the copy and choose Rasterize Layer. Name it “Normal.” Hide the other layers for now so you have one Smart Object and one normal layer.
-
Over-Sharpen Both
On the Smart Object go to Filter > Sharpen > Unsharp Mask and push the settings far too high. Apply the identical settings to the normal layer.
-
Try to Undo It
On the normal layer the sharpening is baked in; short of starting over there is nothing to do. On the Smart Object the filter appears as a Smart Filter beneath the layer. Click its eye icon to toggle it, or double-click its name to reopen the dialog and dial the amount down to something sensible.
-
Copy Smart Filters to Other Layers
Turn the other layers back on. Hold Alt/Option and drag the Smart Filters entry from the main photo onto each of the other Smart Objects. The same sharpening is applied to all of them, and each copy can still be toggled or edited independently.
Keep Your Options Open
With everything as Smart Objects, you can pull any photo out of the grid, enlarge it to fill the canvas, crop back in and still have the full original resolution and an editable filter stack. Once you start working this way it is hard to go back.
Key Takeaways
- Right-click > Convert to Smart Object before scaling, rotating or filtering a layer.
- Smart Objects transform a reference to the original, so resizing never discards pixels.
- Filters applied to Smart Objects become Smart Filters that can be toggled, faded or re-edited.
- Alt/Option-drag Smart Filters to copy them between layers.
- Leave Delete Cropped Pixels unchecked so crops stay reversible too.
Related Tutorials






Enjoying This Free Tutorial? Go Further with PRO.
200+ PRO courses. 1,000+ practice files. One membership.

Unlimited access to every PRO course
New PRO courses every month
Layered PSDs and RAW files to follow along
100+ Lightroom Presets, LUTs, Actions and Brushes
Stream in up to 4K, with captions and chapters
Watch on any device: desktop, tablet or phone
4.93 average from 3,900+ reviews · 2M+ students