


Download Assets
This tutorial includes 1 sample image, 1 sample PSD and 1 PDF guide. Downloads are free with a PHLEARN account.
- Download the sample images and PSDs from every free tutorial on PHLEARN
- New free tutorials published every week
- One free account — sign up once, then download anything
Free PDF Guide · 2 Pages
This Tutorial as a Step-by-Step PDF
The 2-page guide walks through all 14 steps: Layer > New Adjustment Layer > Hue/Saturation, switching Master to Greens and clicking with the eyedropper, widening the range sliders, painting missed spots in Color blend mode, a second layer set to Yellows for the flowers, then one group mask painted black over the subject. Keep it next to your keyboard.
description
Learn how to change the color of plants and flowers in Photoshop to match the colors already in your subject’s clothing. This tutorial uses a Hue/Saturation adjustment layer targeted at the Greens with the eyedropper, widens the range with the falloff sliders, paints any missed spots on a layer set to the Color blend mode, recolors the flowers with a second targeted Hue/Saturation layer, and masks the whole group so the effect stays off the subject’s skin.
Enjoying This Free Tutorial?
We publish a new free tutorial every week, each one with sample images and PSDs you can download and follow along with. Sign up and they land straight in your inbox, along with early word on sales, events and subscriber-only offers.
Image Source
Photo by Denner Trindade via Pexels
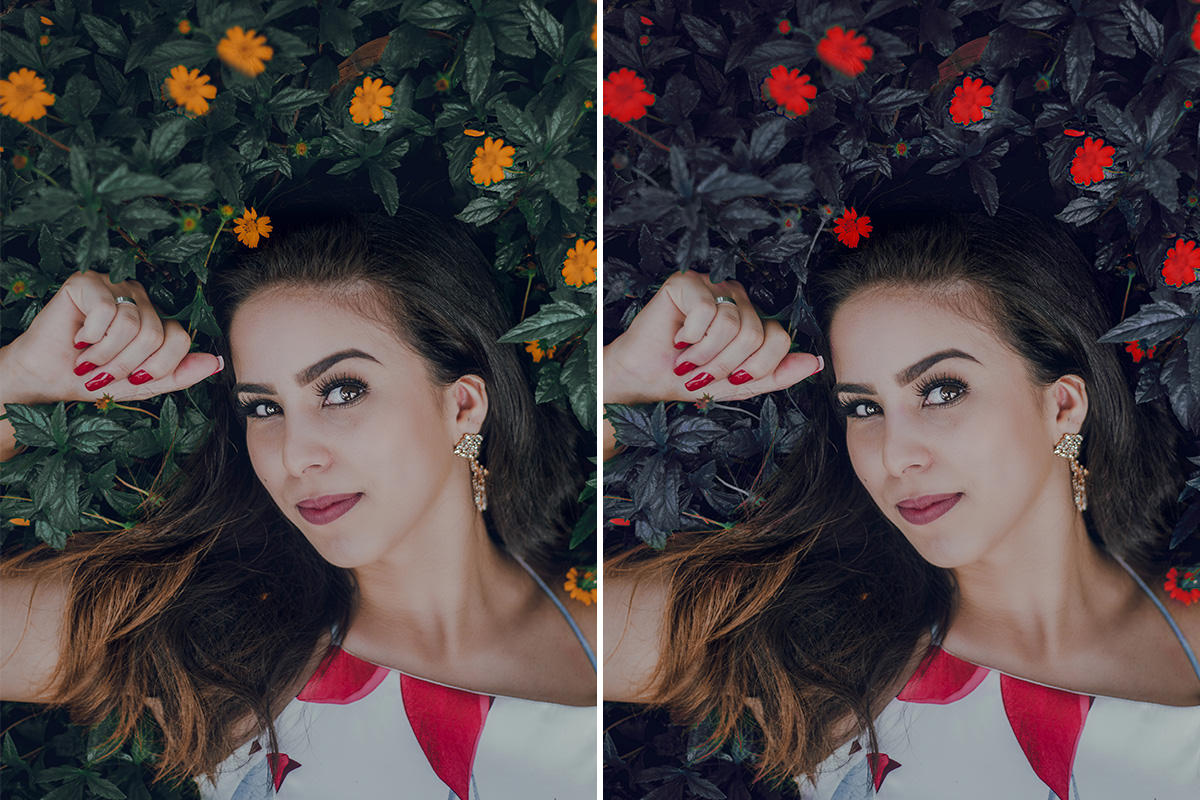
BEFORE
How to Change the Color of Flowers and Plants in Photoshop
Recoloring plants and flowers is a quick, high-impact artistic effect — here, matching greenery and blooms to the colors already present in a subject’s clothing, using two targeted Hue/Saturation adjustment layers and a group-level mask to keep the effect off the subject’s skin.
Targeting the Green with Hue/Saturation
Rather than shifting every color in the photo, Hue/Saturation can be pointed at just one specific color range.
-
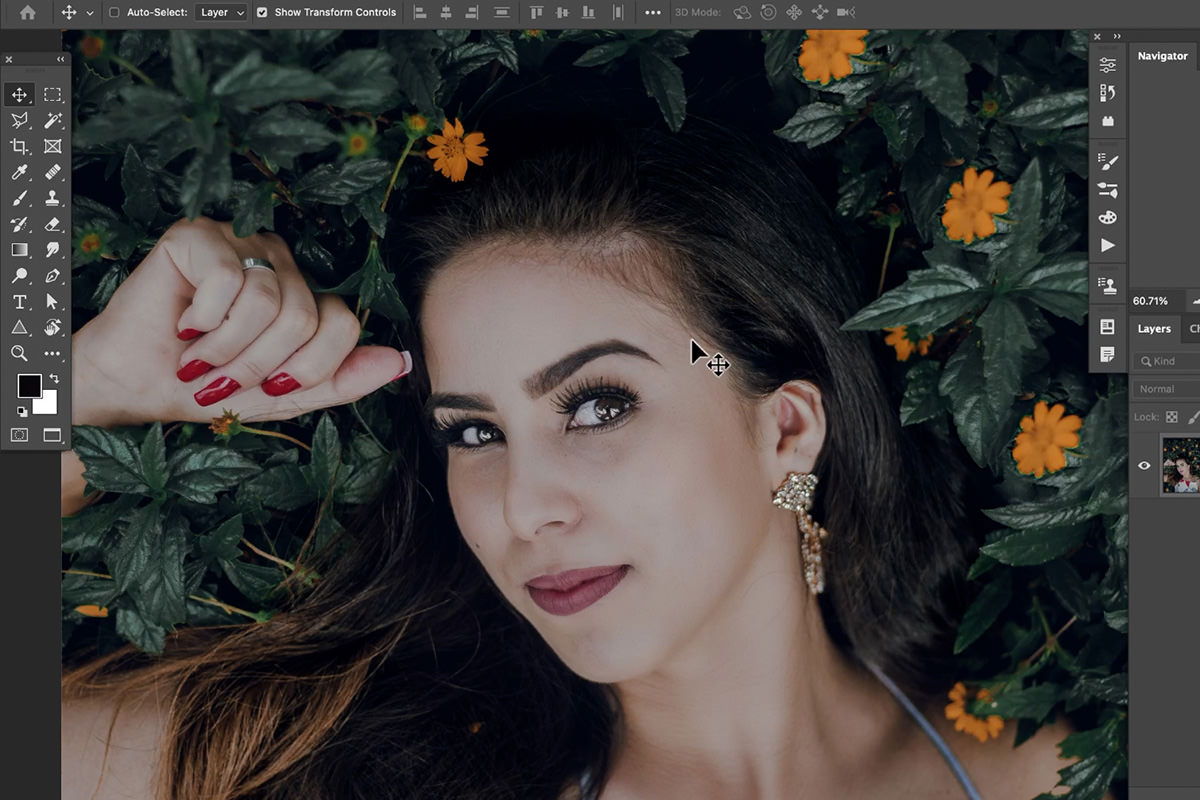
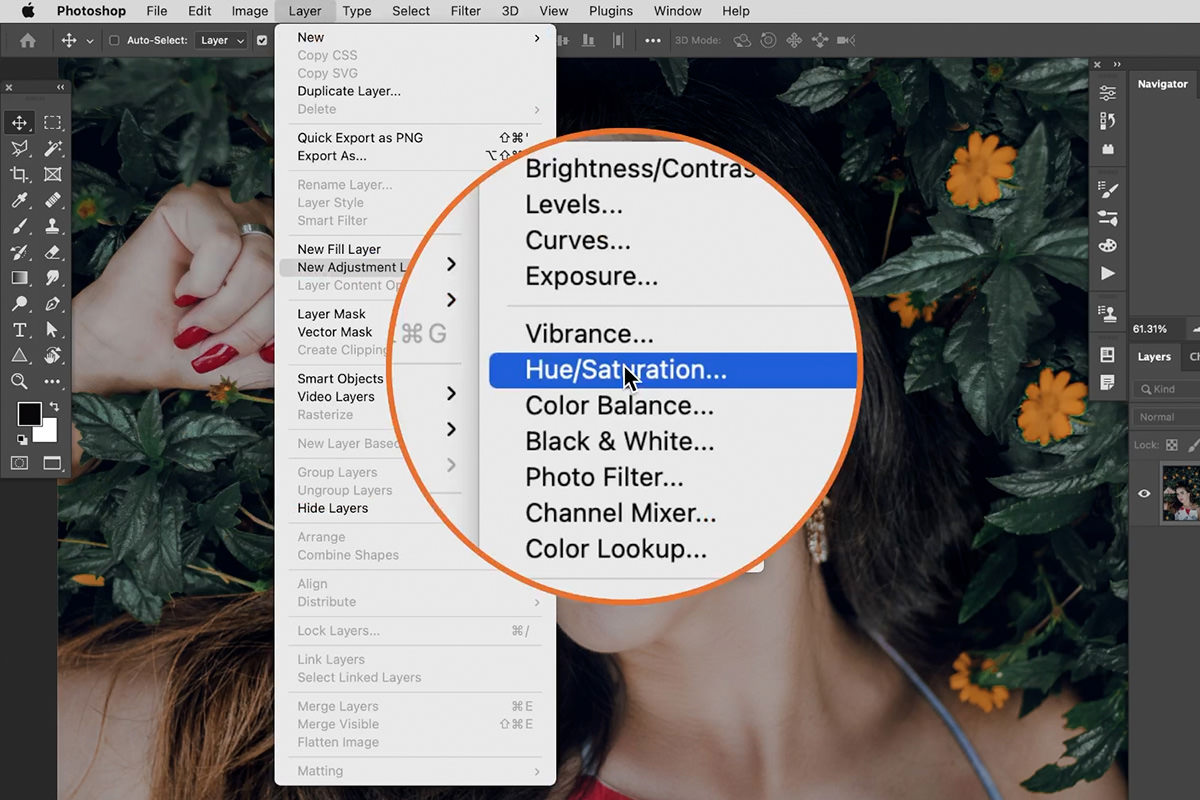
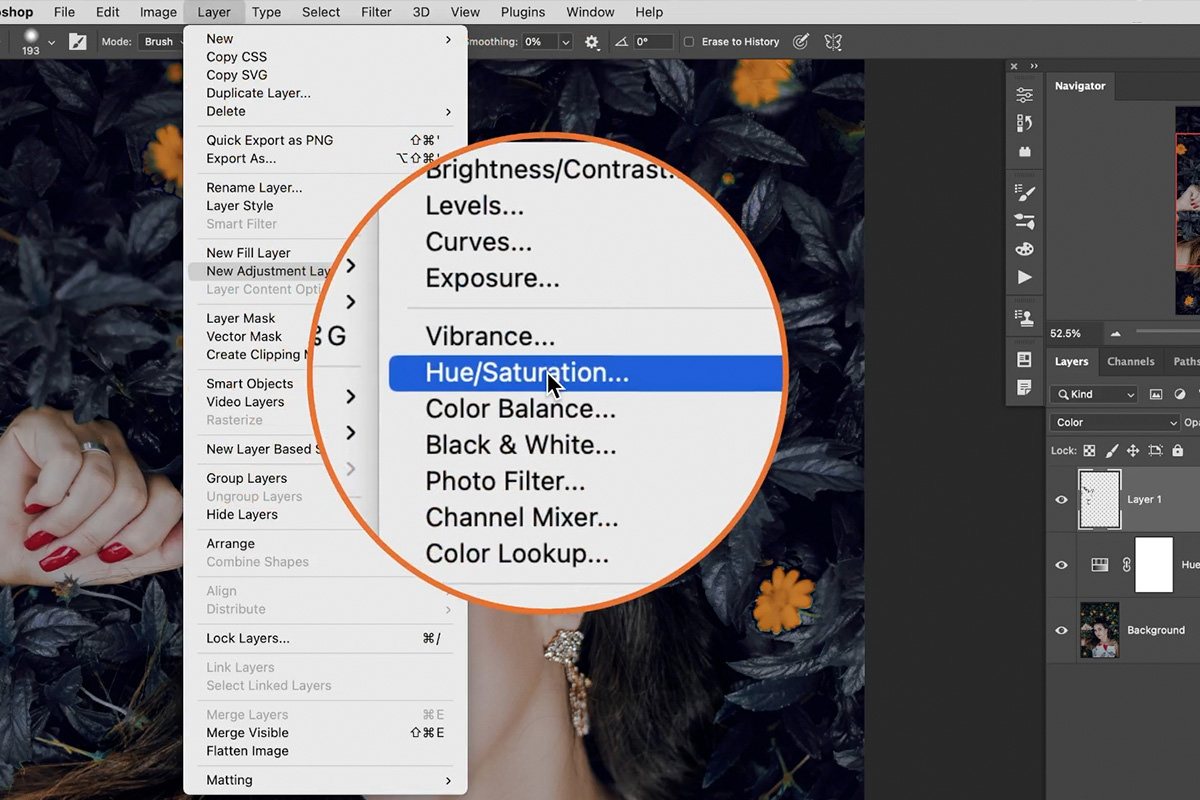
Add a Hue/Saturation Adjustment Layer
Go to Layer > New Adjustment Layer > Hue/Saturation.
-
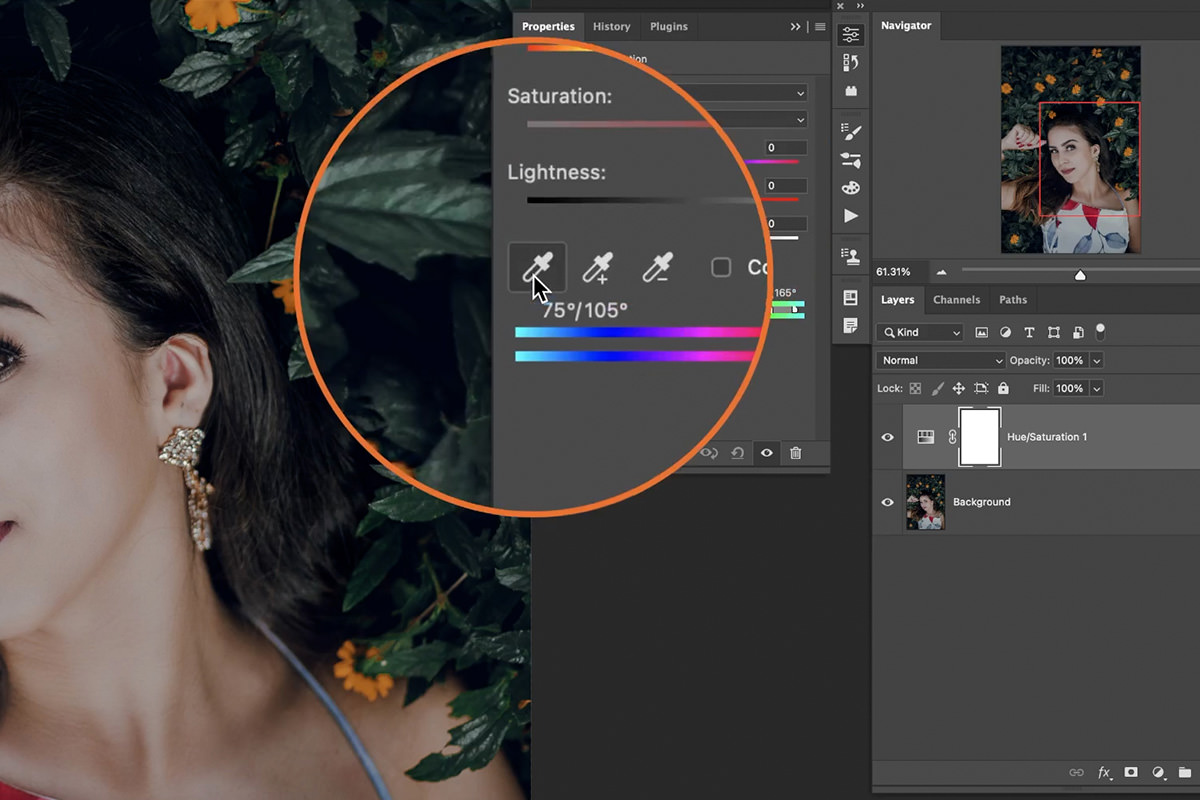
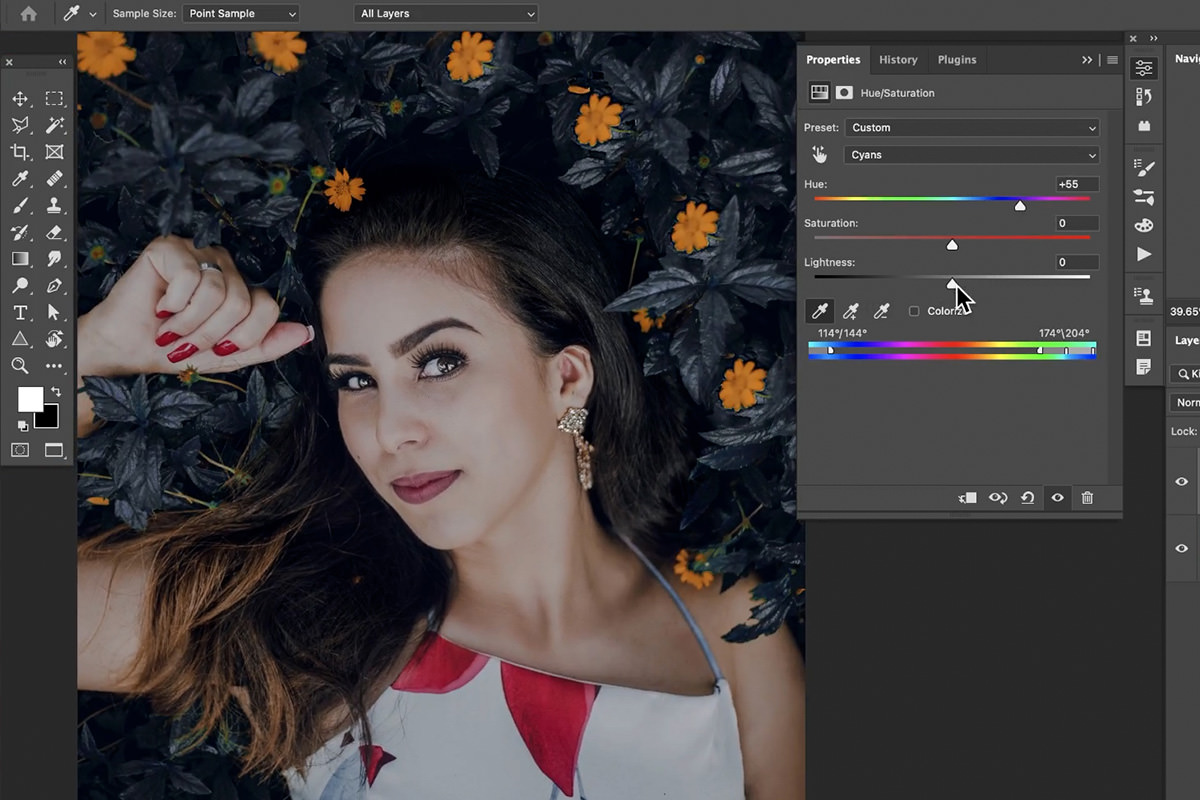
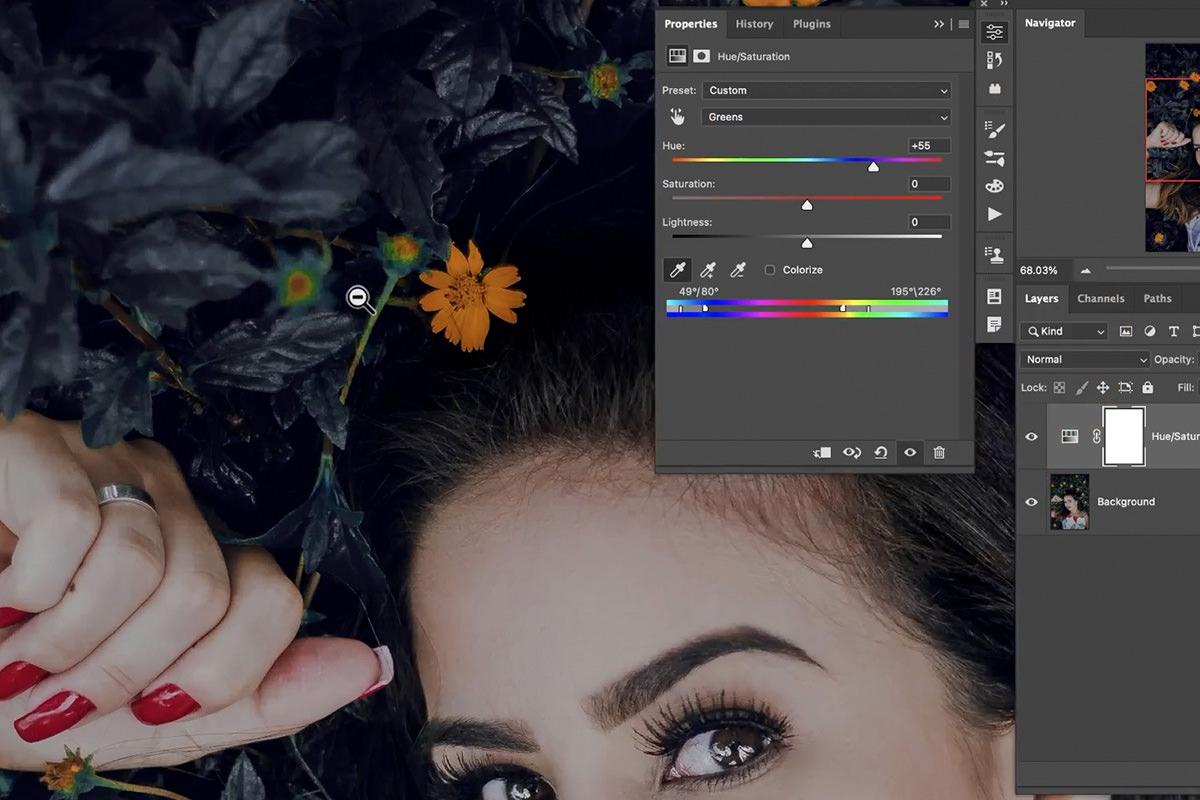
Target the Greens
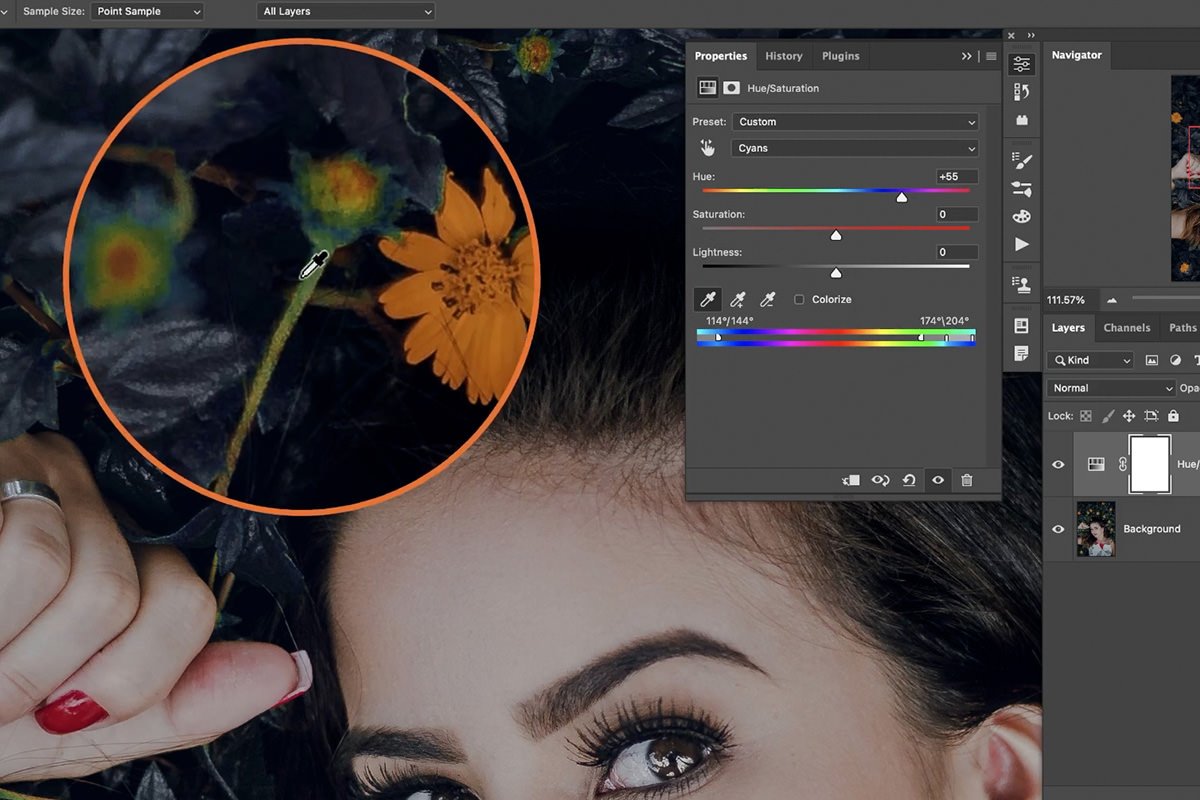
Instead of leaving the target set to Master, click the dropdown, choose Greens, then use the eyedropper to click directly on the plant color you want to change — this automatically fine-tunes exactly which shade of green gets targeted.
-
Shift the Hue to Match Your Subject
Drag the Hue slider until the plant color matches a color already present elsewhere in the photo — the subject’s clothing, in this case.
Why Target a Specific Color Instead of Master
Leaving Hue/Saturation set to Master shifts every color in the image simultaneously, which is rarely what you want for a selective recolor like this. Targeting Greens specifically, and refining it further with the eyedropper, means the Hue slider only ever touches the plant color you clicked on, leaving skin tones, sky, and every other color in the photo completely untouched.
Widening the Range with the Falloff Sliders
A single eyedropper click won’t always capture every shade of green in a plant, especially one with a lot of tonal variation.
-
Check for Missed Areas
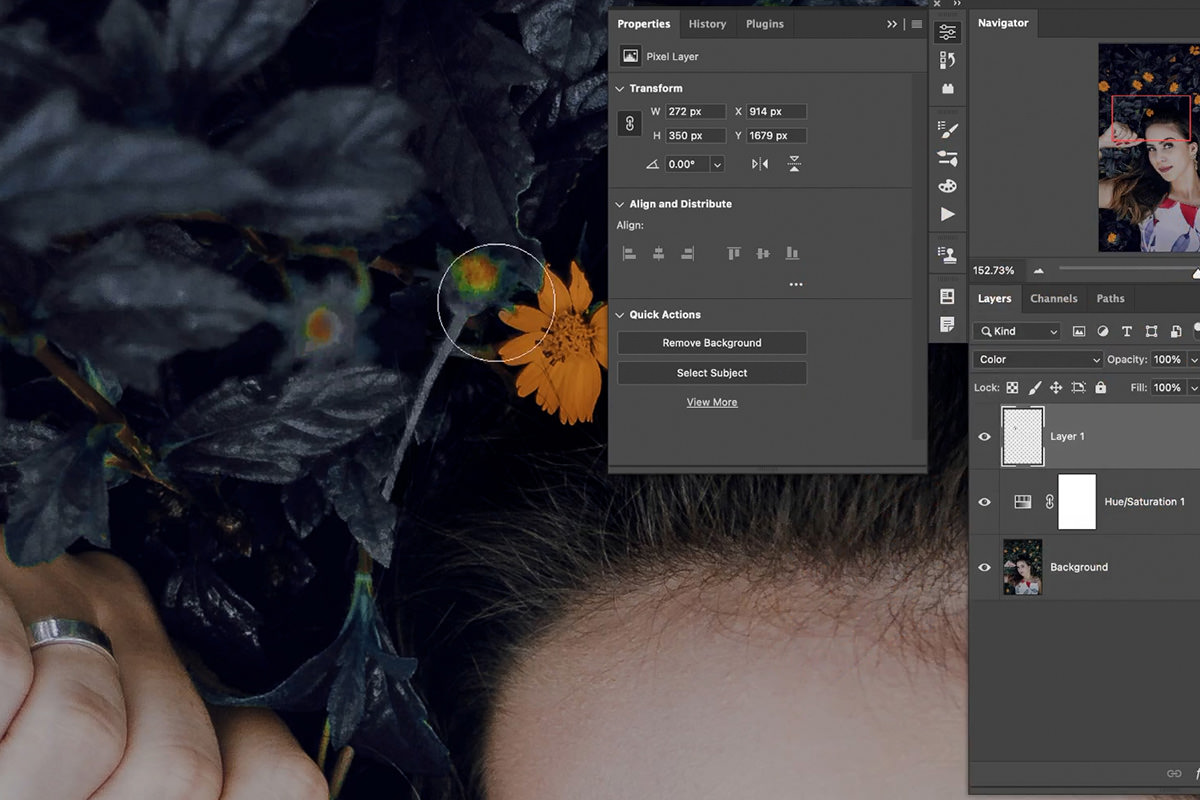
Toggle the adjustment layer’s visibility off and on and look for any green areas that weren’t affected by the hue shift.
-
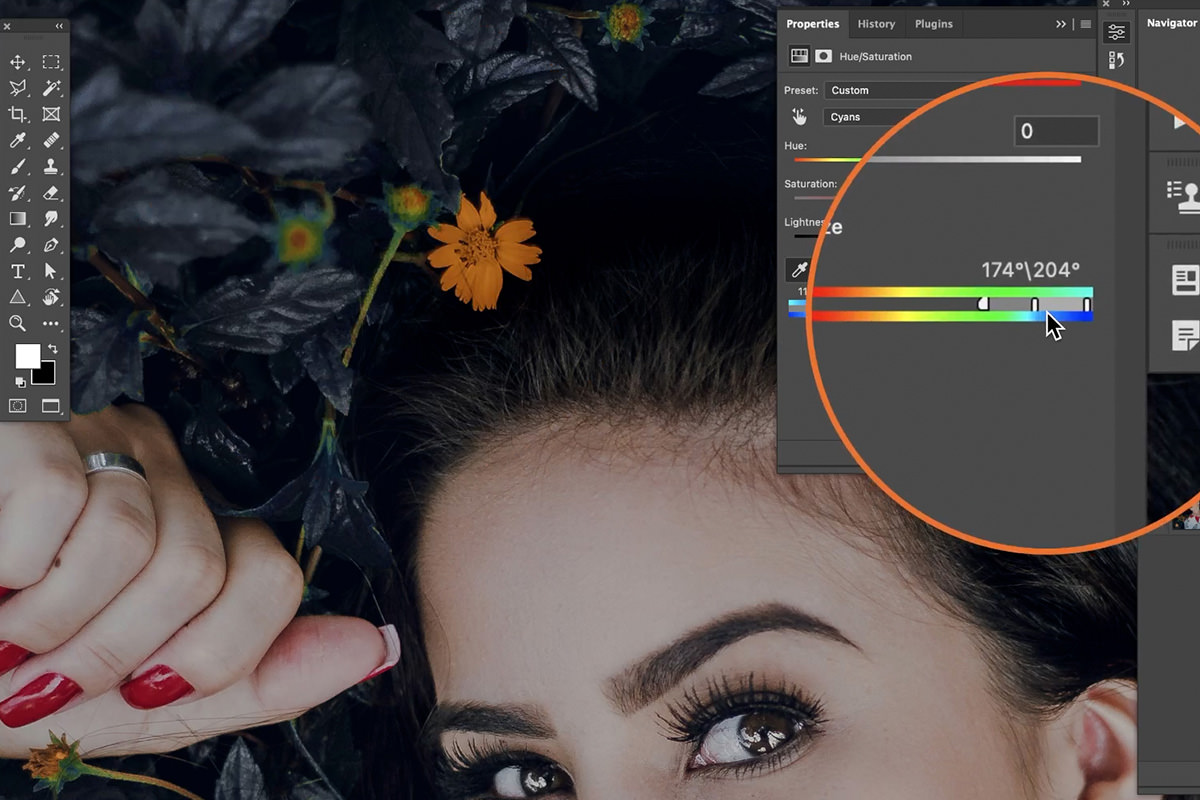
Widen the Color Range
Drag the small triangular falloff handles on the color range bar at the bottom of the panel outward, to the left and right, to include a broader range of similar greens in the effect.
Manually Painting Color Where the Adjustment Misses
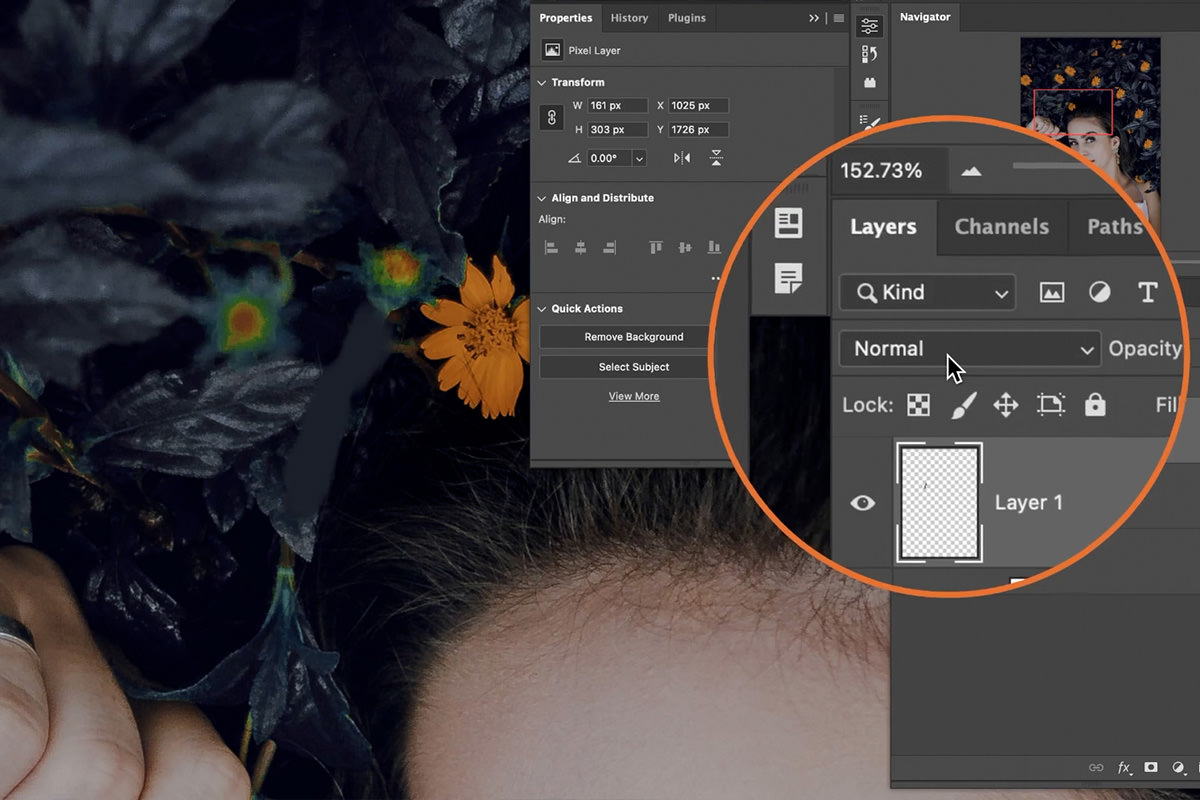
Even after widening the range, a few small spots may still resist the Hue/Saturation adjustment, and those are easiest to just paint by hand.
-
Create a New Layer and Sample Your Target Color
Add a new layer, press B for the Brush tool, and hold Alt on PC (Option on Mac) to sample the color you’re matching to.
-
Paint Over the Missed Area
Paint directly over the stubborn spot with your sampled color.
-
Set the Layer’s Blend Mode to Color
Change the new layer’s blending mode from Normal down to Color, near the bottom of the list, so the paint only affects hue and saturation while preserving the original texture and shading underneath.
Why Color Blend Mode for Manual Painting
Painting at Normal blend mode would flatten out all the natural shading and texture of the leaf or petal underneath. Color mode applies only the hue and saturation of your painted color while leaving the original luminosity intact, so a hand-painted touch-up blends in with the automated Hue/Saturation work instead of looking like a flat patch of paint.
Recoloring the Flowers with a Second Adjustment Layer
The same targeted approach works for a second color elsewhere in the photo — the flowers, in this case.
-
Add Another Hue/Saturation Layer
Repeat the process with a second Hue/Saturation adjustment layer.
-
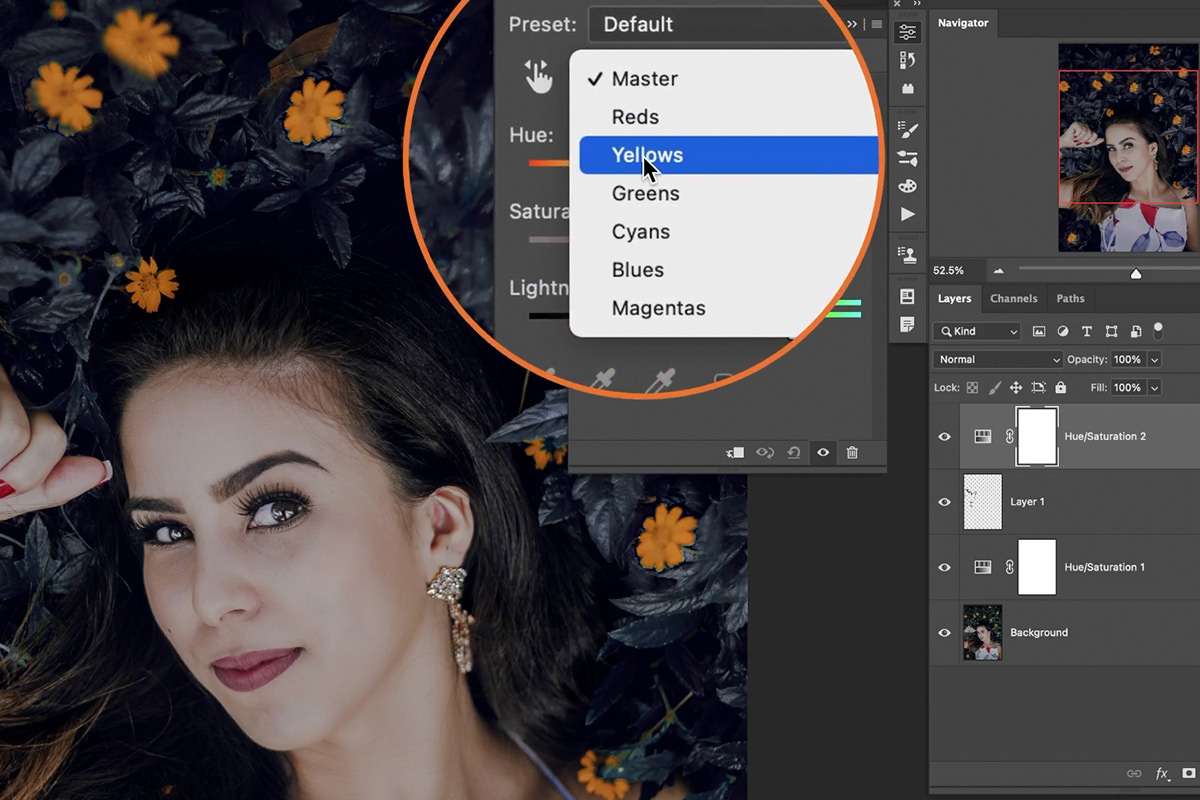
Target the Flower Color
Set the target to Yellows (or whichever range matches your flowers), use the eyedropper to click on the flower color, and shift the Hue to match another color from your subject’s clothing.
Masking the Effect Off Your Subject
Targeted color ranges can still bleed onto areas you didn’t intend to change, especially skin tones that share hues with your target colors.
-
Group Your Color Layers
Select both Hue/Saturation adjustment layers (and any manual paint layers) and group them together with Ctrl + G on PC (Cmd + G on Mac).
-
Add a Mask to the Group
Click the Add Layer Mask icon on the group itself, rather than on each individual layer.
-
Paint Black Over the Subject
Press B for the Brush tool, set your color to black, and paint over your subject — especially their skin — to hide the recoloring effect everywhere it shouldn’t apply.
Why Mask the Group Instead of Each Layer
Masking the group once, rather than adding and painting an identical mask on every individual adjustment layer, means one pass of painting protects the subject from every color effect inside that group at once. Add a third or fourth recolor layer later, and it’s automatically covered by the same group mask without any extra work.
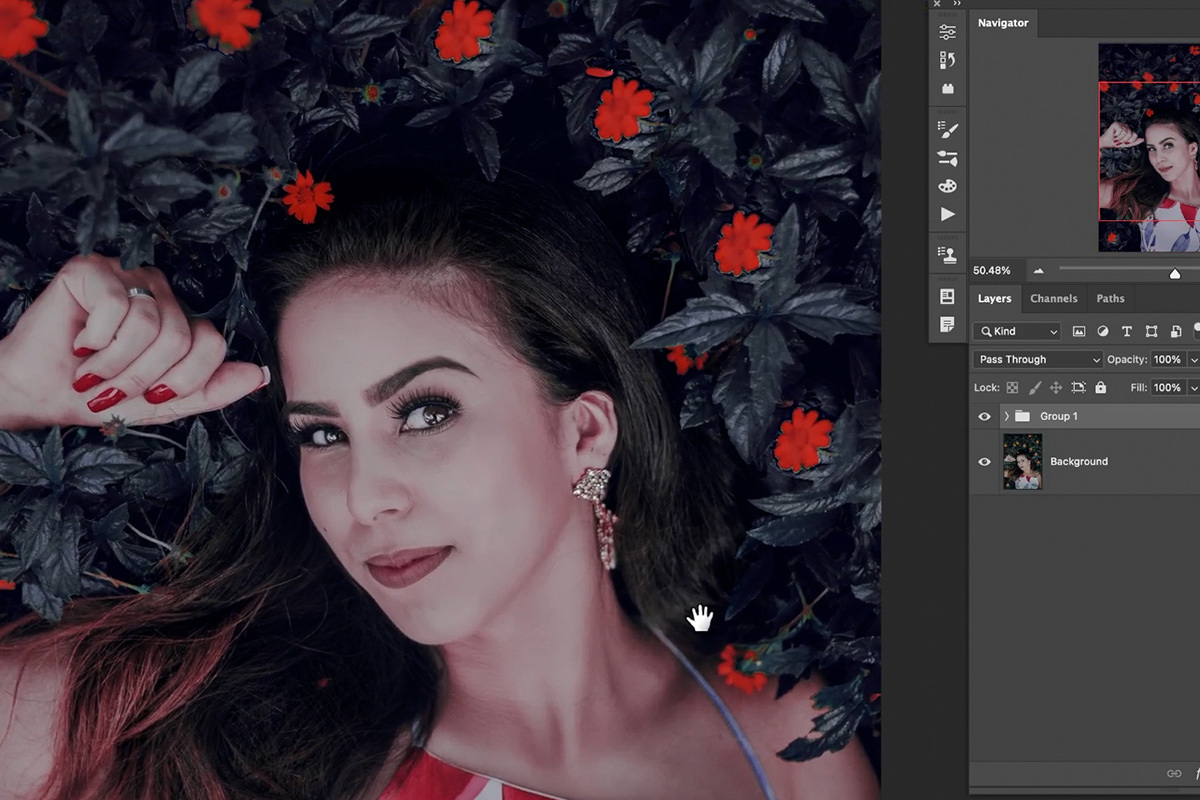
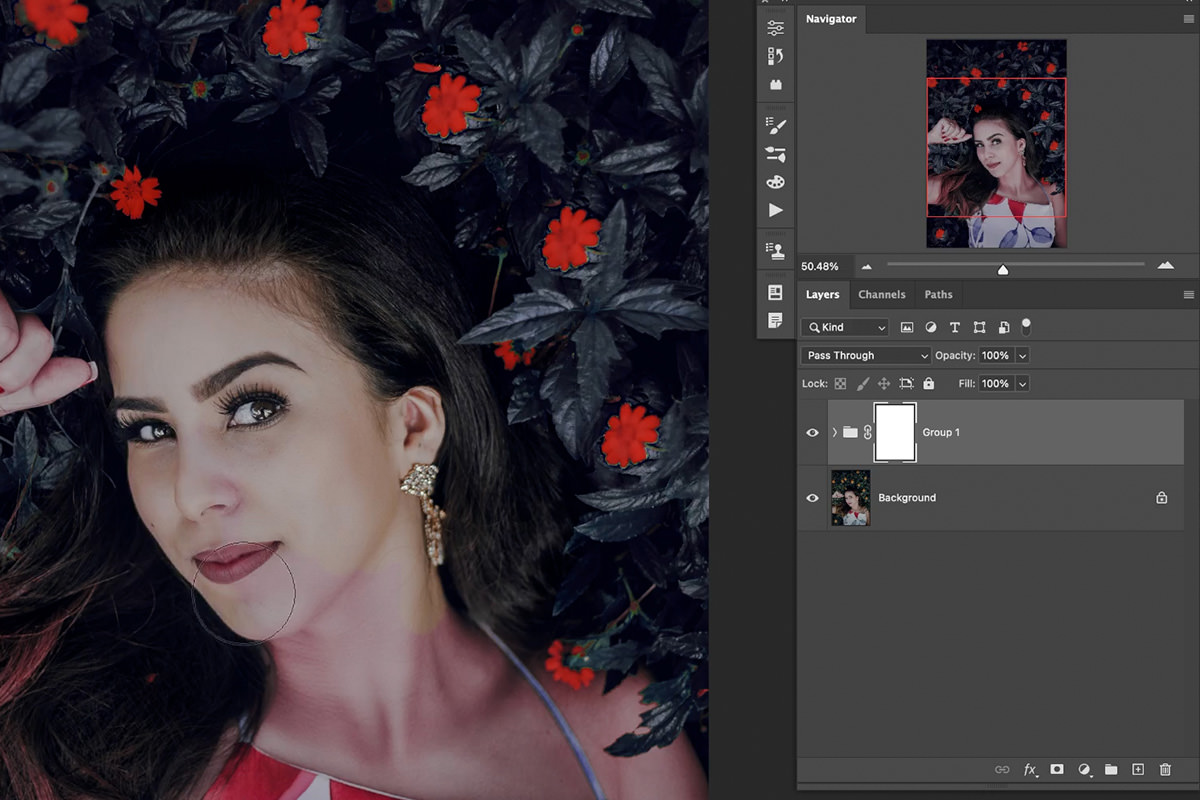
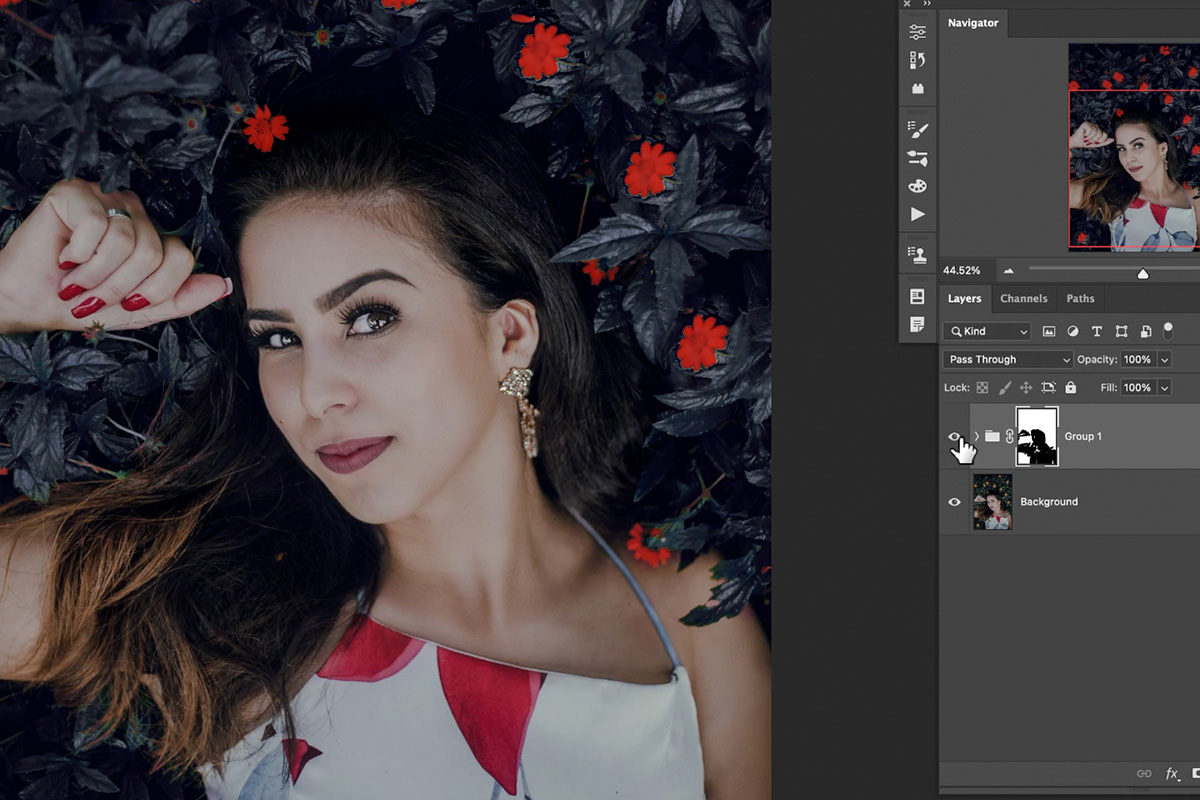
Why This Approach Works
This effect works because each Hue/Saturation layer is scoped to one narrow color range rather than the whole image, which is what allows two completely different recolors — plants shifted one way, flowers shifted another — to run independently on the same photo without interfering with each other. Manually painting the rare missed spot in Color blend mode extends that same targeted logic to places the automatic tool couldn’t fully reach, without ever risking the original texture underneath. And masking the whole group at once, rather than each layer separately, keeps the workflow scalable: any additional color layer added later inherits the same protection over the subject with zero extra masking work.
Final Thoughts
Matching plant and flower colors to a subject’s outfit is a small effect, but it’s a good demonstration of how targeted, layered adjustments beat one broad edit — each Hue/Saturation layer does exactly one job, the manual touch-up covers what the automated tool missed, and a single group mask keeps everything contained to the right area. The same targeted-color-plus-group-mask approach applies just as well to recoloring anything else in a photo that has a distinct, isolatable color range of its own.
Quick Reference: Keys, Menus and Settings
- Add the adjustmentLayer > New Adjustment Layer > Hue/Saturation
- Target one colorProperties: click Master, choose Greens (Yellows for the flowers), click the color with the eyedropper, drag Hue
- Catch missed greensDrag the range sliders on the color bar at the bottom of the panel outward
- Paint missed spotsNew layer, B, Alt/Option-click to sample, paint, blend mode: Color
- Group the color layersCmd/Ctrl + G
- Protect the subjectLayer mask icon on the group, B, paint black over the skin, arm and hand
No AI, no generative credits.

Free Downloads
Follow Along on the Same Photo
Get the sample photo of the subject among the leaves and flowers, the sample PSD and the 2-page PDF guide. Free with a PHLEARN account.
Changing Plant Colors: Common Questions
How do I change the color of just the plants?
Go to Layer > New Adjustment Layer > Hue/Saturation. In the Properties panel, click Master and choose Greens, click the leaves with the eyedropper, then drag Hue left or right.
Why not leave Hue/Saturation on Master?
Master shifts every color in the image at once. Picking Greens, then refining it with the eyedropper, means the Hue slider only touches the plant color you clicked.
How do I pick a color that looks good?
Match a color already in the photo. Here the leaves are shifted to match the subject’s dress, and the flowers to the red in it.
Some of the leaves didn’t change. How do I include them?
Turn the adjustment layer off and on with its eyeball to spot what it missed. Then drag the range sliders on the color bar at the bottom of the panel a little to the left and right to take in more greens.
How do I fix spots the adjustment still misses?
Make a new layer, press B for the Brush, Alt/Option-click to sample the color you’re matching, and paint over the spot. Then set that layer’s blend mode to Color, at the bottom of the list.
Why set the paint layer to Color blend mode?
Color applies only the hue and saturation of your paint and keeps the shading and texture underneath. At Normal the paint would sit on the leaf as a flat patch.
How do I change the flowers to a different color?
Add a second Hue/Saturation layer and change Master to Yellows, the color the flowers are now, not the color you want. Click a flower with the eyedropper and drag Hue.
Why is my subject’s skin changing color too?
Skin can share hues with the colors you target. Group the color layers with Cmd/Ctrl + G, add a layer mask to the group, and paint black over the subject to hide the effect there.
Why mask the group instead of each layer?
All the color layers sit in one group, so one mask covers them all. One pass of painting protects the subject from every recolor inside it.
Are the sample files free?
Yes, with a free PHLEARN account. You get 1 sample image, 1 sample PSD and 1 PDF guide: the photo used in the video, the PSD and the 2-page step-by-step guide.
From the Magazine View all
Stories, interviews and guides for photographers, new every week.
 EditingLightCraft vs Lightroom: I Edited the Same RAW Files in BothThe free clone on the same RAW files: what matches, what breaks and who should switch.
 InspirationRare Historical Photos: 13 of the Rarest Pictures Ever TakenFrom the earliest surviving picture of a person to the last passenger pigeon: who took each one and why it survives.
 EditingArtCraft: Photoshop Cloned by AI in Two Weeks. Is It Legal?ArtCraft cloned Photoshop and Lightroom with AI and gave them away. Any good? Legal? Safe?
Master Photoshop, Lightroom and Photography
Join PHLEARN PRO for $12.99 a month, or $99.99 a year (save 36%). Cancel anytime, with a 100% money-back guarantee.





