

Download Assets
This tutorial includes sample images and a PDF guide. Downloads are free with a PHLEARN account.
- Download the sample images and PSDs from every free tutorial on PHLEARN
- New free tutorials published every week
- One free account — sign up once, then download anything
description
Photographer Elise Swopes builds a surreal skyline composite entirely on her phone, starting from an iPhone photo and layering in stock clouds, stars and a moon. The workflow spans three free mobile apps rather than one: Art Studio does the layering and masking that Photoshop would normally handle, then VSCO and Lightroom CC finish the edit. Covers gradient masks, stacking cloud copies for depth, Screen mode for the moon, and exporting for Instagram.
Enjoying This Free Tutorial?
We publish a new free tutorial every week, each one with sample images and PSDs you can download and follow along with. Sign up and they land straight in your inbox, along with early word on sales, events and subscriber-only offers.


Create Composite Images with Your Phone! ft. Elise Swopes
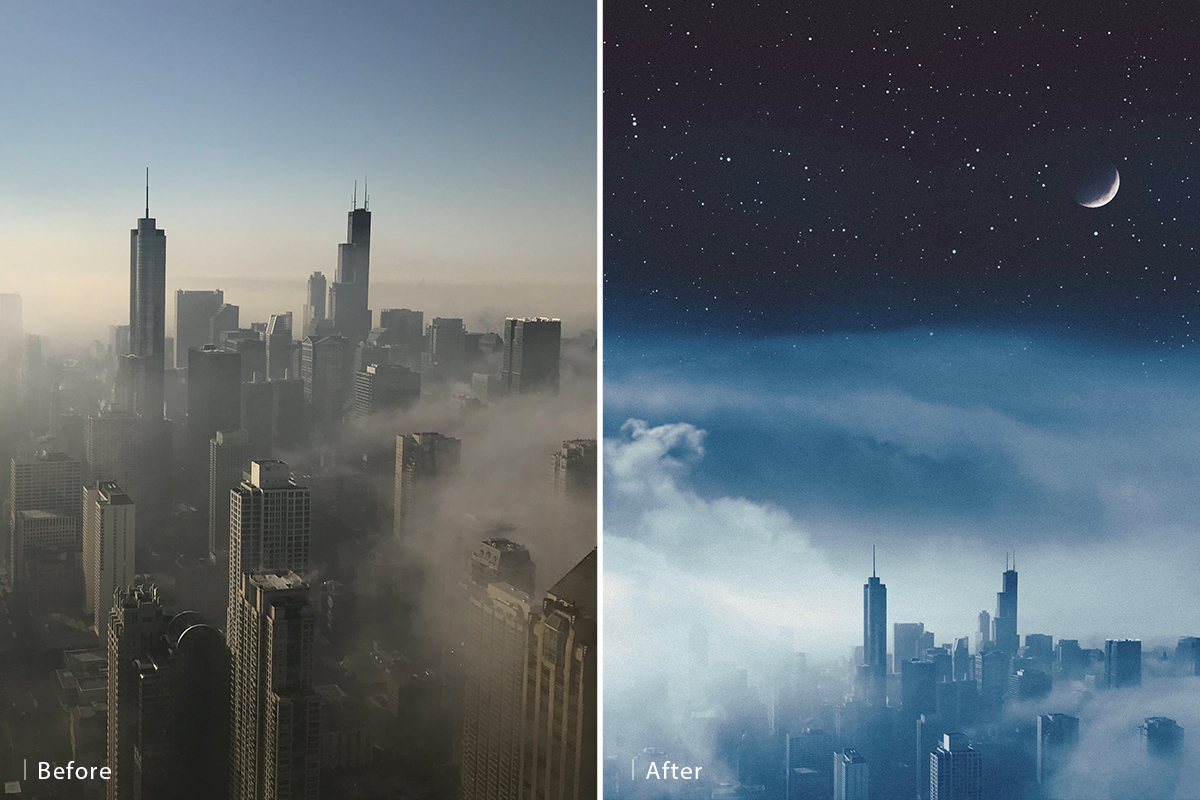
In this tutorial, photographer Elise Swopes shows how she builds a surreal skyline composite entirely on her phone, starting from an iPhone photo and layering in stock clouds, stars, and a moon using the mobile app Art Studio, before finishing the edit with VSCO and Lightroom CC.
Compositing on Mobile with Art Studio, VSCO, and Lightroom
The full workflow spans three separate free mobile apps rather than one: Art Studio handles the actual layering and masking work that Photoshop would normally do on desktop, VSCO applies a filter for an initial stylistic pass, and Lightroom CC finishes with tone, color grading, and grain. Each app plays to a specific strength rather than trying to do everything in one place.
Importing Your Base Image as a Layer
In Art Studio, go to File, then Import, and choose Import as a Layer rather than Import as a New Photo, since importing as a new photo would replace the entire document’s dimensions instead of adding a layer on top of the existing canvas. Select the iPhone photo to use as the base skyline image, then use Edit, Transform Layer, to move and scale it into the correct position within the frame.
Choosing a Mobile-Friendly Aspect Ratio
A 4 by 5 aspect ratio is the preferred canvas size for this kind of composite, since it fills most of the screen on Instagram and helps catch a viewer’s eye while scrolling compared to a standard square or landscape crop.
Adding Clouds and Stars with a Gradient Mask
Add a new layer by going to File, then Import, Insert as a Layer, Import from Photos, and choose a stock image of clouds and stars. Use Edit, Transform, Move and Scale to roughly match its scale to the background skyline, then add a layer mask and select the Gradient tool, making sure Color 1 to Color 2 is selected so the gradient fades smoothly between fully visible and fully hidden, blending the cloud layer down into the base photo.
Matching Color with a Blend-Mode Fill Layer
Even with a good gradient blend, the cloud image’s blue tone often won’t match the original photo’s whites exactly. Use the eyedropper tool to sample a blue directly from the cloud layer, add a new layer filled with that color, then experiment with blend modes in the Layers panel, trying Multiply and Screen to see which one pulls the two images’ colors together most convincingly, checking the result by toggling that layer’s visibility on and off for comparison.
Layering Multiple Cloud Copies for Depth
To make it look like some clouds sit in front of the city skyline and others sit behind it, duplicate the cloud layer, then tap into its gradient mask and adjust it so the duplicate masks in differently than the original, building a sense of depth between the two cloud layers and the skyline sandwiched between them. If a stray star ends up somewhere distracting, like directly over a building, open the Heal tool, make sure the correct layer (not a mask) is selected, zoom in, and hold down over a nearby clean area to sample it before drawing over the unwanted star to remove it.
Adding the Moon with Screen Blend Mode
Import a moon photo the same way as a new layer, then change its blend mode to Screen, which removes the black background of the moon image entirely and leaves only its bright white and gray tones visible. Use Edit, Transform, Move, Scale, Rotate to position the moon near the top of the composite. Since the moon photo may bring along a few of its own background stars, create a new layer, sample the sky color from the base image with the eyedropper, increase the brush size, and paint over any unwanted stray stars directly on the background layer to clean them up. Finally, add a layer mask to the moon layer and apply a gentle gradient over it, which softens its edge slightly and helps it feel less like a flat, perfectly round cutout.
Finishing in VSCO and Lightroom Mobile
Export the finished composite from Art Studio and open it in VSCO, tapping the plus icon to import it, then browse the available filters, since different filters suit different edits and it’s worth trying a few. The A7 or A8 filter worked well here; save the result, then use the camera roll export option at the largest available size to preserve as much detail as possible. From there, open the filtered image in Lightroom CC to fine-tune Highlights and Shadows, pushing the color panel toward blue and specifically adjusting the blue mixer toward a more teal tone for a cohesive night-sky feel.
Why Grain Matters When Stacking Layers
Adding a bit of grain in the Effects tab is a deliberate finishing step, since a composite built from several completely different source images can otherwise look like a collection of separate layers rather than one cohesive photograph; a consistent grain across the whole image helps tie those different sources together. The Geometry tab’s Constrain Crop and Upright tools are also worth checking at this stage in case any straight architectural lines in the skyline ended up slightly off after all the transforming and scaling.
Exporting and Sharing to Instagram
Once the edit is finished in Lightroom, tap the export icon and choose Save to Camera Roll at the maximum available resolution, though options to save directly to files or open in another app are available too depending on where the image needs to go next. From there the finished composite is ready to post directly to Instagram.
More Free Photoshop Tutorials
- Select Subject and Refine Edges in Photoshop
- Three Ways to Use Blend If
- Curves vs Levels: Learn the Difference
The Apps and Stock Image Behind This Composite
This composite is built entirely with free-to-download mobile tools: Art Studio Pro for layering and masking, available on iOS or as Adobe Photoshop Mix on Android, VSCO for filtering, available on iOS or Android, and Lightroom CC for final tone and grain, available on iOS or Android. The Stars & Clouds stock image used for the sky layer is available through Shutterstock. For more of Elise Swopes’s mobile editing process, see Mobile Editing with Elise Swopes.
Final Thoughts
This composite proves a full layering, masking, and color-grading workflow doesn’t require a desktop computer at all: Art Studio handles the compositing work Photoshop normally would, VSCO adds a quick stylistic filter pass, and Lightroom CC finishes with tone, color, and grain. All three apps have free versions, which makes this entire workflow accessible from a phone alone, no desktop software required.
Related Tutorials
From the Magazine View all
Stories, interviews and guides for photographers, new every week.
 BusinessHow to Compete With AI: Give Your Clients MoreEveryone has the same tools now, and your clients know it. The way to compete is to give them more.
 EditingLightCraft vs Lightroom: Is the Free Clone Any Good?The free clone on the same RAW files: what matches, what breaks and who should switch.
 EditingHow to Tell If a Photo Is AI, and Prove Yours Is RealThe tells that still work in 2026, why detectors disagree, and how to prove your own photos.
Master Photoshop, Lightroom and Photography
Join PHLEARN PRO for $12.99 a month, or $99.99 a year (save 36%). Cancel anytime, with a 100% money-back guarantee.





