
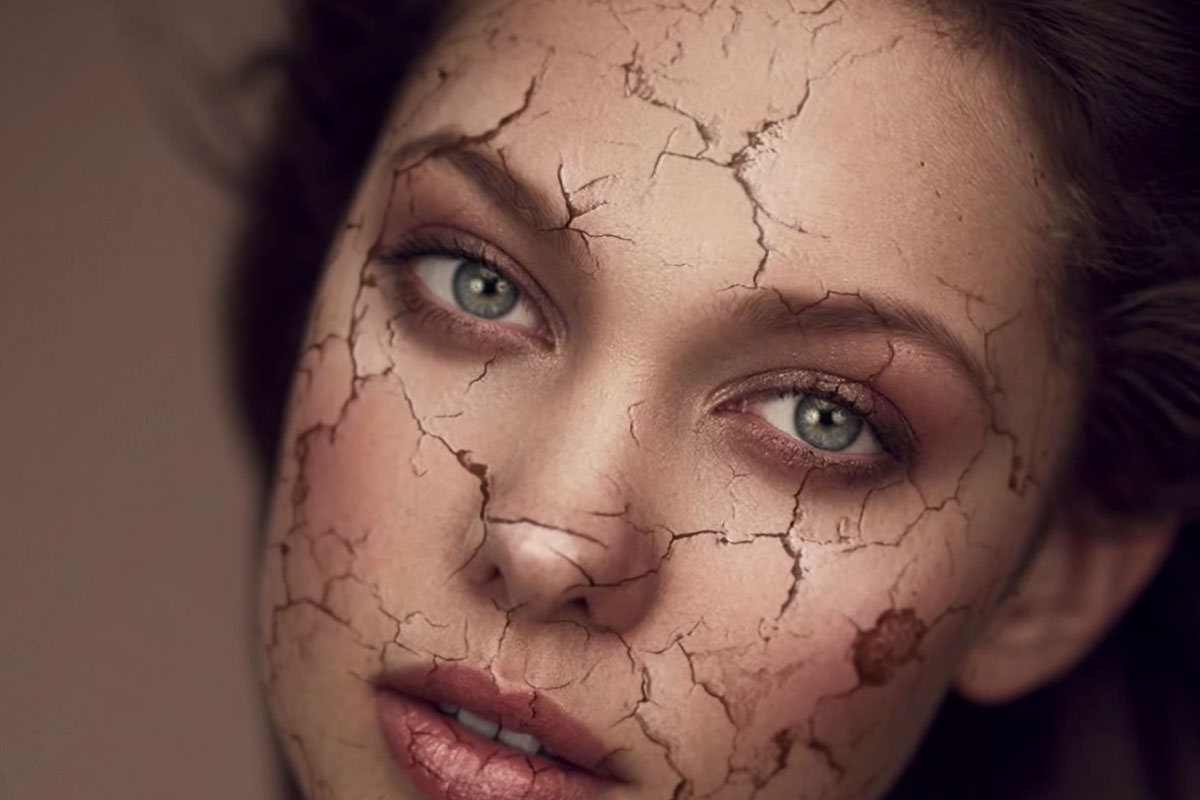

description
Part 2 of the cracked skin effect in Photoshop is where it stops looking flat. Blend If tightens the crack layer from Part 1, an inverted, desaturated copy set to Screen becomes an offset edge highlight, and hand-painted Soft Light shapes cut off along the cracks with the Lasso tool read as skin peeling up or sinking in. A hand-painted blur on its own layer then matches the photo depth of field without flattening any of the blend modes underneath.
Enjoying This Free Tutorial?
We publish a new free tutorial every week, each one with sample images and PSDs you can download and follow along with. Sign up and they land straight in your inbox, along with early word on sales, events and subscriber-only offers.


How to Create an Amazing Cracked Skin Effect in Photoshop, Part 2
Part 1 got a cracked-paint texture warped, liquefied, and blended onto a portrait, but the result still looked flat and uniformly sharp. This second half adds real dimension with custom highlight and shadow layers, defines peeling and sinking edges with the Lasso tool, and finishes with a gradual blur that matches the photo’s own depth of field.
Toning Down the Cracks From Part One
Restricting the crack layer further with Blend If and a quick layer mask pass keeps the effect looking like defined cracks rather than an overwhelming, uniform texture.
-
Open Blending Options on the Crack Layer
Double-click the multiply crack layer from Part 1 to open its Blending Options.
-
Restrict Lighter Areas With Blend If
Hold Option/Alt and drag the white This Layer slider to split it, so the lighter parts of the crack layer become invisible, leaving just the darker cracks.
-
Clean Up Remaining Areas With a Layer Mask
Paint black on the layer mask over any remaining spots that read more like dirt than defined cracks.
Building a Highlight Layer From an Inverted Copy
Inverting and desaturating a duplicate of the crack layer, then switching it to Screen, turns the dark cracks into glowing white lines that can be used as highlights.
-
Duplicate the Crack Layer
Press Cmd/Ctrl+J to duplicate the crack layer and move the copy to the top of the layer stack.
-
Reset the Layer to Normal
Change the duplicate’s blend mode back to Normal and remove any blending options carried over from the original.
-
Invert and Desaturate the Layer
Press Cmd/Ctrl+I to invert the layer’s colors, then press Shift+Cmd/Ctrl+U to desaturate it, turning dark cracks on white into white cracks on black.
-
Change the Blend Mode to Screen
Change the layer’s blend mode to Screen so the white cracks glow while the black areas disappear.
Restricting the Highlight Layer to the Crack Edges
Nudging this glowing layer slightly out of alignment and restricting it with Blend If turns it into a subtle edge highlight on just one side of each crack.
-
Offset the Highlight Layer
Move the inverted highlight layer slightly out of alignment with the original cracks, choosing a direction consistent with where the image’s light source comes from.
-
Restrict It With Blend If
Double-click the layer, hold Option/Alt, and drag the underlying layer’s darker-area slider from left to right so the highlight becomes invisible directly over the cracks themselves.
-
Reposition for Different Areas of the Face
Move and adjust the offset highlight layer as needed, since a position that works well on the forehead may need adjusting for the cheek or other areas.
Why Repositioning the Highlight Layer Matters
Keeping the highlight and crack layers separate rather than merging them means the offset highlight can be dragged around independently to find where it reads most convincingly for each specific area of the face. Since the same technique won’t necessarily look ideal everywhere at once, that flexibility to reposition is what makes it practical to apply across an entire face.
Painting Custom Peeling Highlights and Shadows
Hand-painted white and black shapes on a Soft Light layer, restricted to areas outside the cracks themselves, create the look of skin peeling up or sinking in.
-
Create a New Soft Light Layer
Create a new layer and set its blend mode to Soft Light.
-
Paint a Soft White Shape for a Peeling Look
Using a soft-edged brush, paint a fuzzy white shape along one edge of a crack to suggest that area lifting up.
-
Restrict It Away From the Cracks With Blend If
Double-click the layer, hold Option/Alt, and drag the underlying layer’s darker-area slider so this painted highlight doesn’t show up directly inside the cracks.
-
Paint Black Shapes for a Sinking Look
Paint with black instead of white in other areas to suggest skin sinking inward rather than peeling up.
Defining Sharp Edges With Lasso Selections
Making a rough Lasso selection along one side of a painted highlight or shadow and deleting it creates a crisp, defined edge that lines up with the actual crack.
-
Make a Rough Lasso Selection
Press L for the Lasso tool and make a rough selection along one side of the painted soft shape, right where it meets the crack.
-
Delete Half the Painted Shape
Press Delete to remove that portion of the soft-edged paint, leaving a defined edge exactly along the crack line.
-
Repeat Across Multiple Cracks
Repeat this paint-and-delete process across several cracks, alternating between highlight and shadow versions as appropriate.
Why Deleting Half the Shape Creates a Believable Edge
A soft, fuzzy painted shape on its own just looks like a vague glow with no real relationship to the crack beneath it. Cutting that shape off cleanly along the crack’s actual edge with a Lasso selection is what turns a vague blob of light or shadow into something that reads as a genuine physical edge, like skin actually lifting or sinking at that exact seam.
Keeping the Effect Subtle
Lowering opacity and erasing overly obvious spots keeps the added highlights and shadows feeling like a natural part of the texture rather than an obvious paint job.
-
Lower the Opacity of the Dimension Layers
Reduce the opacity of the painted highlight and shadow layers until the effect feels subtle rather than overpowering.
-
Erase Any Spots That Are Too Visible
Use the Eraser tool to soften or remove any individual highlight or shadow that stands out too much.
Understanding Why Grouping and Blurring Directly Fails
Merging all the effect layers together to apply one simple blur destroys the various blend modes and Blend If settings that make the whole effect work in the first place.
-
Consider Merging the Layers
Consider merging all the crack, highlight, and shadow layers together in order to blur them as one unit.
-
Recognize the Problem With Merging
Recognize that merging destroys the special blend modes and Blend If restrictions each layer relies on, breaking the effect entirely.
Adding a Gradual Blur With the Blur Tool
The Blur tool, set to sample all layers on a fresh layer, paints in a gradual blur that matches the photo’s own shallow depth of field without disturbing any of the underlying effect layers.
-
Check the Original Photo’s Depth of Field
Look at how the original photo goes from sharp near the eyes to gradually out of focus elsewhere.
-
Create a New Layer for the Blur
Create a new, empty layer above everything else.
-
Select the Blur Tool and Enable Sample All Layers
Select the Blur tool, found alongside the Smudge and Sharpen tools, and check Sample All Layers so it reads everything beneath the new layer.
-
Paint In the Blur Gradually
Set the strength to around 50%, choose a larger brush, and paint the blur in gradually, matching where the original photo naturally goes soft.
Why the Blur Tool Beats Flattening and Using Gaussian Blur
Flattening every layer and applying a single Gaussian Blur would apply the same amount of blur everywhere, which doesn’t match a photo that gradually shifts from sharp to soft across the frame. Painting the blur in on its own layer with Sample All Layers checked keeps every underlying effect layer intact while still recreating that same gradual, uneven falloff the original photo actually has.
Why This Approach Works
Building highlights and shadows as separate offset layers, restricted with Blend If, is what makes it possible to reposition and fine-tune where light and shadow fall on each individual crack rather than committing to one fixed result. Defining edges by deleting half a soft painted shape with the Lasso tool is what turns vague painted glows into something that reads as an actual physical seam in the skin. Painting the final blur in by hand with Sample All Layers checked is what keeps every special blend mode intact while still matching the photo’s own uneven depth of field.
Final Thoughts
Between the offset highlights, the hand-defined peeling edges, and the gradual blur, this second half is what turns a flat wrapped texture into something that genuinely looks three-dimensional and photographed. The same layered approach, cracks, offset highlights and shadows, defined edges, and a hand-painted blur, works for any similarly dramatic texture effect, not just this one.
Quick Reference: Keys, Menus and Settings
- Tone down the cracksDouble-click the layer, Alt/Option-drag the white This Layer slider; black on the mask
- Highlight layerCmd/Ctrl + J, Normal, Cmd/Ctrl + I, Shift + Cmd/Ctrl + U, blend mode Screen
- Out of the cracksAlt/Option-drag the black Underlying Layer slider left to right
- Peel and sinkNew layer, Soft Light, soft brush in white (up) or black (down)
- Sharp edgeL for the Lasso, select one side along the crack, Delete
- Gradual blurNew layer, Blur tool, Sample All Layers, Strength about 50%
No AI, no generative credits.
Cracked Skin Effect, Part 2: Common Questions
The cracks from part 1 look like dirt. How do I tone them down?
Double-click the Multiply crack layer and, under Blend If, hold Alt/Option and drag the white This Layer slider so its lighter parts disappear. Then paint black on the layer mask over any spots that still look like dirt.
How do I make highlights that follow the cracks?
Duplicate the crack layer with Cmd/Ctrl + J, set it back to Normal and clear its blending options. Press Cmd/Ctrl + I to invert it, Shift + Cmd/Ctrl + U to desaturate it, and set it to Screen so the cracks turn into white lines.
Why move the highlight layer out of line with the cracks?
A crack is lighter on one side and darker on the other. Nudging the white lines a little toward the light source puts a highlight on one edge of each crack, which adds depth.
How do I keep the highlight out of the cracks themselves?
Double-click the layer, hold Alt/Option and drag the black Underlying Layer slider from left to right. The highlight then hides wherever the layer below is darker, which is where the cracks are.
How do I make parts of the skin look like they’re peeling up?
Make a new layer set to Soft Light and paint a soft white shape along a crack. Use the same Underlying Layer Blend If trick to keep it out of the cracks, then cut one side away with the Lasso tool.
How do I make an area look like it sinks in?
Do the same thing with black instead of white on a Soft Light layer, then cut a clean edge along the crack with the Lasso tool.
Why delete half of each painted shape?
A soft shape alone looks like a vague glow. Selecting one side with the Lasso tool (L) and pressing Delete gives it a sharp edge right on the crack, so it reads as skin lifting or sinking at that seam.
My highlights and shadows look too strong. What now?
Lower the opacity of those layers until the effect is subtle, and use the Eraser tool on any single spot that stands out, like on the nose.
How do I make the cracks go out of focus like the photo?
Merging the layers to blur them would throw away the blend modes and Blend If settings. Instead, make a new layer on top, pick the Blur tool with Sample All Layers checked and Strength around 50%, and paint the blur where the photo goes soft.
From the Magazine View all
Stories, interviews and guides for photographers, new every week.
 BusinessHow to Compete With AI: Give Your Clients MoreEveryone has the same tools now, and your clients know it. The way to compete is to give them more.
 EditingLightCraft vs Lightroom: Is the Free Clone Any Good?The free clone on the same RAW files: what matches, what breaks and who should switch.
 EditingHow to Tell If a Photo Is AI, and Prove Yours Is RealThe tells that still work in 2026, why detectors disagree, and how to prove your own photos.
Master Photoshop, Lightroom and Photography
Join PHLEARN PRO for $12.99 a month, or $99.99 a year (save 36%). Cancel anytime, with a 100% money-back guarantee.





