Add Stars to Any Image – Photoshop Brush
-

-
Add to
favorites
-
DifficultyEasy
-
Length15 mins
-
Software
-
CompatibilityPhotoshop CS6 & Newer
Photoshop Brush Download
DESCRIPTION
Add realistic stars to any night sky in seconds! Designed to recreate the natural variation of real stars, this custom Photoshop brush is a powerful way to take your nighttime landscape photos to the next level.
Share
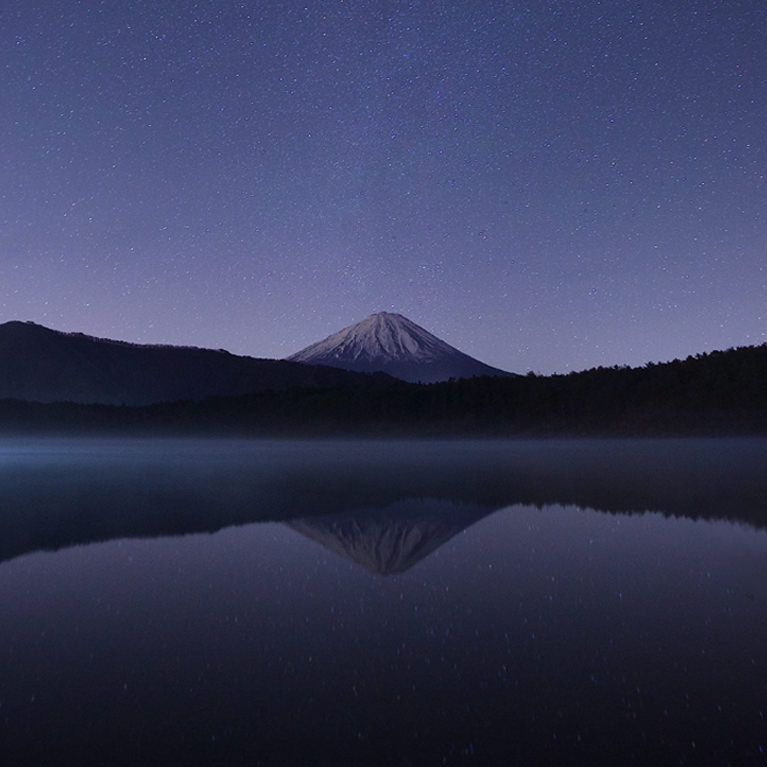
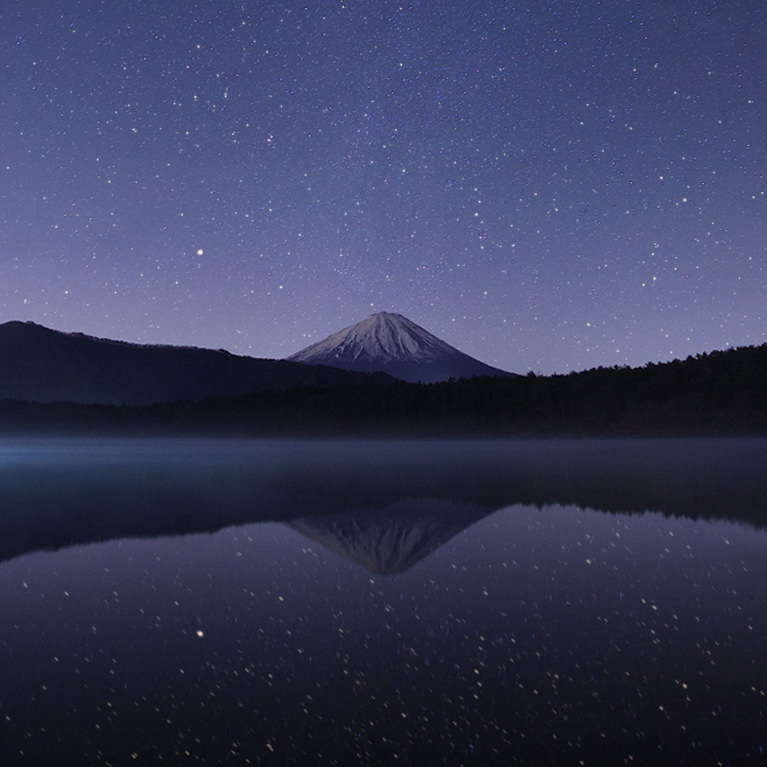
AFTER
BEFORE
Add Stars with a Click!

Your Very Own Starry Night
Add interest to any night sky with realistic stars! Easy to setup and install, this custom Photoshop brush can help you enhance any evening or nighttime landscape.
Getting Started
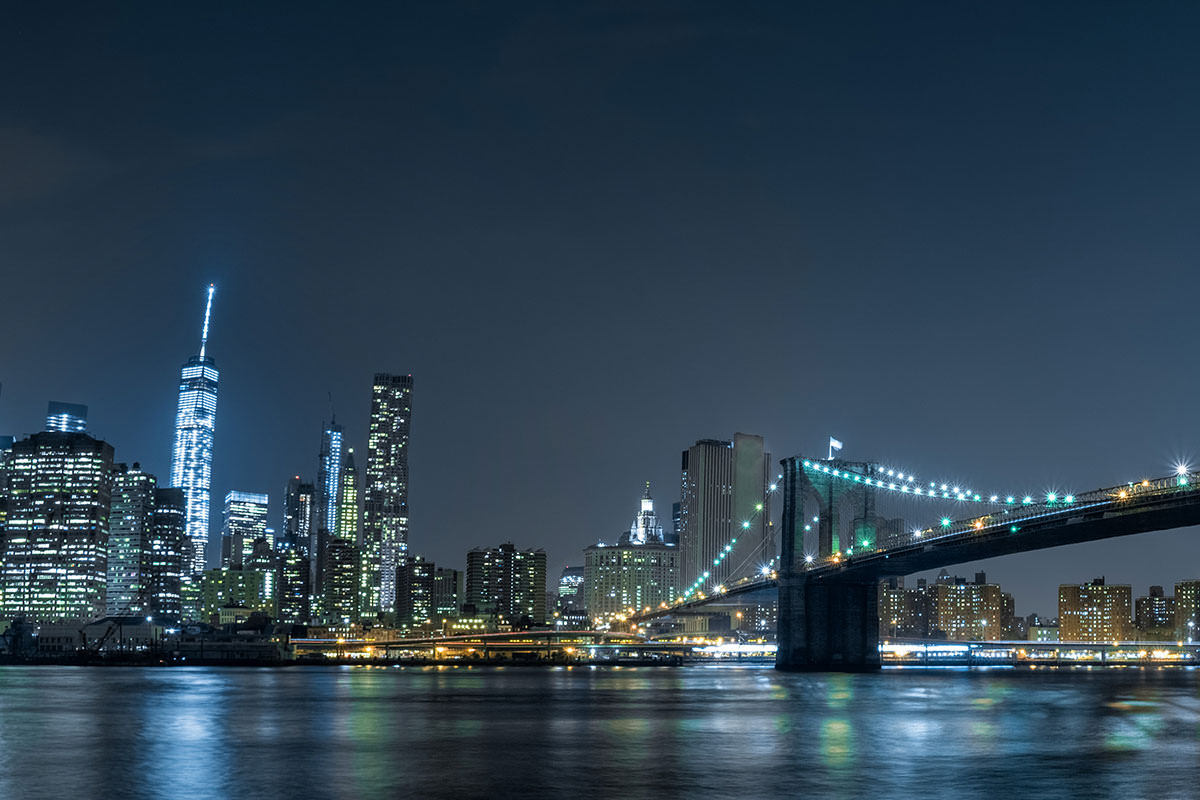
We start off by selecting our image. We choose a beautiful panoramic image of the New York Skyline. Now in our original photo, there are no stars in the sky.
This is perfect because it gives us room to operate in Photoshop. Some people might approach this process by creating a tiny brush and manually placing the stars into the skyline.
This might not be the best approach for two simple reasons:
- It would take you a great amount of time to position stars manually in Photoshop.
- It won’t look realistic, all the stars would look exactly the same.
We knew that we had to approach creating stars with a different mindset if we wanted it to be time efficient and look realistic.
Creating a Custom Brush
We start off with creating a Custom Brush. We bring up a new document and make the Size 500 x 500 pixels. After we have our new document, we focus on the details of our Custom Brush.
Whenever creating a Custom Brush, make sure the Background is white and the Brush Color is black. We paint two tiny dots on opposite ends of our document. This will give the stars more Variation when we actually place them on our image.
Now that we have our Star Brush created we are halfway done. We need to change our Brush Settings in order to get our Star Brush to where we want it. We adjust our Shape Dynamics, Angle Jitter, and even Brush Size until our Star Brush is perfect. Scattering and Transfer also help with the Spacing and visibility of our Star Brush.
The goal is for our stars to look realistic, there should be no specific Pattern or predictability. We finalize everything by saving a New Brush Preset. Make sure you name your Brush something easy to remember. Now that you’ve saved your new Brush, it’ll always be available for you!
Painting Stars
We begin painting stars over our image. We play around with the settings by making the size a bit larger and smaller. This helps us add Variation to our stars. We then go back in and apply a Layer Mask to the image.
We paint black every on the image that we don’t want our stars showing up. We decided to add a glow to our stars. Using our Layer Effects, we click on Outer Glow and choose the Color of the glow. We bring the size of our stars up a bit and bring the Opacity down a bit as well. We finish things off by adding a Motion Blur to our stars.
We adjust the Distance and Angle to our liking and this really helps sell the effect. We zoom out to make sure the stars are to our liking. The great thing about having the Brush saved is that it’s easy to start over if we want. Now get out there and add some stars to some skies!
What are Photoshop Brushes?
At its most basic, the Photoshop brush tool is used for drawing lines and shapes in any color on a layer in your document using strokes.
After selecting a brush, you can draw simply by clicking the left mouse button a single time, or by holding it down and dragging your cursor around the page to create multiple marks with a single stroke.
Install Video


Reviews
New & Popular Tutorials


Training Site in
the World
Tutorials!
Ratings
and Counting
Subscribers
Is there a problem with this brush file? I’ve downloaded it twice, and the brush seems to have no data – effectively a blank brush! I’ve left the 5 star rating intact for you guys; I don’t want to affect that for a glitch
click to view the stars . love this brush . Thank you
Thank you it is an awesome brush, I used it with a evening shot at the bay
I used the brush to create fireflies in a “on the river at dusk” portrait. Loved it – thank you so much!
I sent in the wrong version of my sample the first time! Please look at the second version LOL. Thank you!! Love you guys!!
Awesome tutorial and brush! I used the starts brush in combo with the atmosphere brush and really like the effect! Thanks Phlearn people! <3 <3