
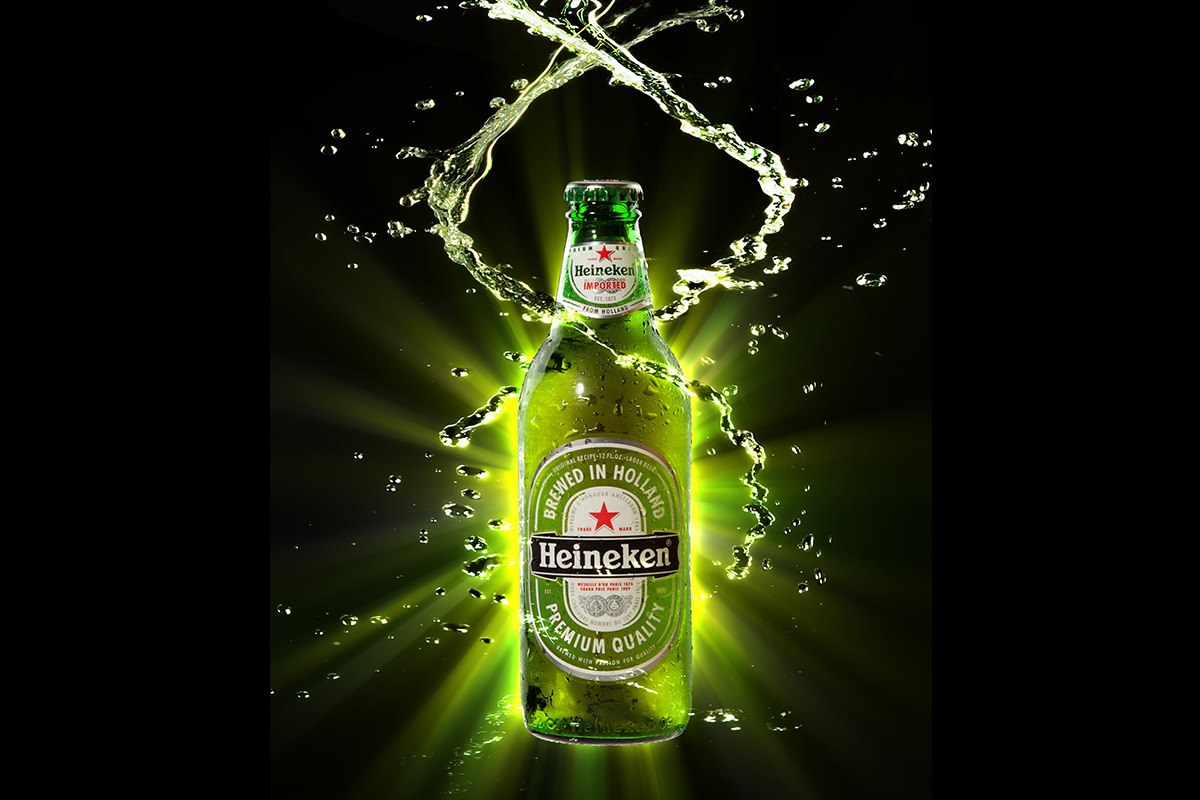

The bottle is lit and shot, and now the Photoshop work starts. Learn how to blend two separate exposures into one evenly lit bottle by moving the Free Transform pivot point, cut the bottle cleanly off a black background, and build a glowing starburst backdrop from colors sampled out of the bottle itself using a Radial Blur set to Zoom.
We publish a new free tutorial every week, each one with sample images and PSDs you can download and follow along with. Sign up and they land straight in your inbox, along with early word on sales, events and subscriber-only offers.

How to Edit Beer in Photoshop: Part 1
With the bottle lit and shot from the How to Light Beer setup, the Photoshop work begins: combining two separate exposures into one clean bottle, cutting it out cleanly, and building a glowing, colorful background from scratch to make the final ad pop.
Combining Two Exposures Into One Bottle
Because the bottle was shot in two separate frames, one exposed for the top and one for the bottom, the first job in Photoshop is blending those two images together into a single, evenly lit bottle.
-
Bring Both Images Into One Document
Hold Shift and drag both photos together into the same file so they sit on separate layers, ready to be aligned and blended.
Rotating Around a Custom Pivot Point
Lining up two photos that were shot slightly differently often requires rotating one layer around a specific point rather than its default center.
-
Move the Transform Pivot Point
Enter Free Transform and drag the pivot point icon to a spot on the image that is already lined up between the two layers, in this case the top of the bottle.
-
Rotate Around That Pivot
With the pivot point relocated, rotating the layer now pivots around that specific point rather than the center of the image, making it much easier to align the rest of the bottle.
Why Moving the Pivot Point Helps
By default, rotating a layer spins it around its exact center, which is rarely where you actually want the pivot to happen when aligning two photos of the same subject. Relocating the pivot to a point that is already matched between the two layers means the rotation naturally brings the rest of the image into alignment instead of throwing it further off.
Masking the Two Layers Together
Once roughly aligned, a layer mask blends the two exposures at a natural transition point.
-
Add a Layer Mask and Paint the Transition
Add a layer mask to the top layer, invert it with Command + I so it starts hidden, then paint white with a relatively hard-edged brush to reveal the better-exposed layer at a natural transition point on the bottle.
Why a Hard Brush Edge Matters Here
A heavily feathered mask edge can leave small details, like a half-visible water droplet, looking cut off and unnatural. A harder edge makes a cleaner, more definitive choice about what is and is not visible, which reads better than a soft, ambiguous blend in this kind of detail work.
Keeping the Bottle Perfectly Vertical
A bottle that leans even slightly is an easy mistake for viewers to spot, so checking and correcting verticality is worth the extra minute.
-
Turn On Rulers and Add a Guide
Press Command + R to show rulers, then drag a vertical guide down through the center of the bottle to check straightness.
-
Rotate to Correct Any Lean
If the bottle leans against the guide, use Free Transform with the pivot point moved to where the two layers join, and rotate slightly until the bottle reads as perfectly vertical.
Cutting Out the Bottle
Because the bottle was photographed against a black background, cutting it out is more straightforward than it would be against a busier backdrop.
-
Select Outside the Bottle With the Magic Wand
Choose the Magic Wand tool, check Sample All Layers, and click just outside the bottle to select the black background area.
-
Group and Mask Your Layers
Convert the background layer to a regular layer, select both bottle layers, group them with Command + G, then add a layer mask and invert it with Command + I so the previously selected background area becomes hidden.
-
Clean Up Remaining Background With the Lasso
Use the Lasso tool to select and remove any remaining background area the Magic Wand missed, inverting the selection and filling with black on the mask using Command + Delete.

A Useful Lasso Tool Trick
While using the standard Lasso tool, holding Option (or Alt on a PC) mid-selection temporarily switches to the Polygonal Lasso, letting you draw a straight-edged segment. Releasing Option switches back to the freehand Lasso, which makes it easy to mix curved and straight selection edges without switching tools manually.
Refining the Cutout Edge
A rough cutout can leave a thin, unwanted fringe of background color along the bottle’s edge, which Photoshop’s edge-refinement tools can clean up.
-
Open Refine Mask on the Layer Mask
With the layer mask selected, go to Select > Refine Mask, then increase feathering slightly, boost contrast, and shift the edge inward a touch to eliminate any leftover fringe.
Building a Glowing Background From Scratch
With the bottle cut out and centered, the next phase creates an entirely new, glowing starburst-style background behind it.
-
Center the Bottle Using Guides
Use Free Transform on a black background layer to bring up center guides, then use rulers to drag a guide to the exact center and align the bottle to it.
-
Paint a Cluster of Colors on a New Layer
With the Brush tool, hold Option to sample a dark color, a light color and white from the bottle, and dab them onto a new layer so you can keep sampling from them. Then paint the starburst colors on a separate layer, lighter in the middle and darker toward the edges.
-
Apply a Radial Blur Set to Zoom
Go to Filter > Blur > Radial Blur, switch the method from Spin to Zoom, and set the amount to somewhere around 70 to 85. This stretches your painted color cluster into a glowing starburst effect.
-
Build Up the Effect With Repeated Filter Applications
Sample additional colors, paint more strokes, and press Command + F repeatedly to reapply the Radial Blur, layering up the glow until it feels rich and full.
Why Sampling Colors From the Bottle Matters
Painting the starburst using colors pulled directly from the bottle itself means the finished glow reads as though it is genuinely emanating from the product, rather than looking like an unrelated background effect pasted in behind it.
Adding a Glow With Curves and Blend Modes
A final glow directly around the bottle itself ties the background effect back into the product.
-
Paint on a Curves Layer’s Mask
Add a Curves adjustment layer, fill its mask with black, then paint white around the bottle and boost the curve for added brightness. Press Command + F to run the same Radial Blur over that mask.
-
Add Color With a Color Dodge Layer
Paint a sampled color near the bottle on a new layer set to Color Dodge blending mode, which intensifies and lights up that area. Press Command + F a couple of times to blur it like the background; if it gets too strong, erase some of it and press Command + F again.
-
Build an Outer Glow Layer Style
Load the bottle’s mask as a selection, create a new layer filled with black, and apply an Outer Glow layer style set to Color Dodge. Set that layer’s Fill to zero, rather than its Opacity, so the black disappears while the glow effect remains fully visible.
Fill vs. Opacity for Layer Styles
Lowering a layer’s Opacity hides both the layer’s own pixels and any layer styles applied to it. Lowering Fill instead hides only the layer’s own pixels while leaving layer styles like Outer Glow fully visible, which is exactly why a layer filled with black can disappear while its glow effect stays on screen.
Continue With Part 2
From here, the next stage brings in the splash and liquid elements that finish the ad: How to Edit Beer in Photoshop Part 2.
Why This Approach Works
Nearly every technique here relies on the same underlying principle: build effects on separate layers using masks and blending modes rather than editing pixels directly. Combining two exposures with a masked transition, cutting the bottle out with a masked selection, and building the glow with Fill set to zero on a dedicated layer all keep every step fully non-destructive and independently adjustable. That matters especially in product work like this, where getting the color, glow, and cutout each exactly right usually takes several rounds of small adjustments, something that is far easier to do when nothing has been permanently baked into a single flattened layer along the way.
Final Thoughts
This first stage sets up everything the rest of the ad depends on: a clean, straight, well-composited bottle sitting in front of a glowing background built from its own colors. The layer-mask and blend-mode techniques used here, combining exposures, cutting out a subject, and building a glow with Fill instead of Opacity, come up constantly in product photography well beyond just bottles.
Quick Reference: Keys, Menus and Settings
- Rotate around a pointCmd/Ctrl + T, drag the pivot point, then rotate
- Check it’s straightCmd/Ctrl + R for rulers, drag a guide through the center
- Cut outMagic Wand with Sample All Layers, Cmd/Ctrl + G to group, add a mask, Cmd/Ctrl + I
- Straight Lasso linesHold Alt/Option while drawing for the Polygonal Lasso
- Clean the edgeSelect > Refine Mask: a little Feather and Contrast, shift the edge in
- StarburstFilter > Blur > Radial Blur, Zoom, about 70 to 85; Cmd/Ctrl + F to repeat
- Outer glowCmd/Ctrl-click the bottle mask, fill a new layer with black, Outer Glow in Color Dodge, Fill 0%
No AI, no generative credits.
Editing a Beer Product Shot: Common Questions
Why combine two photos of the same bottle?
One frame was shot for the top of the bottle and one for the bottom, because what held the bottle blocked some light from below. Shift-drag both into one document and mask them together at a transition point.
How do I rotate a layer around a point other than its center?
In Free Transform (Cmd/Ctrl + T), drag the pivot point to a spot that already lines up, like the top of the bottle. The layer then rotates around that point, which makes the rest easier to line up.
Should the mask between the two shots be soft or hard?
Fairly hard. A soft edge leaves half-visible water droplets; a harder brush decides clearly what is there and what is not.
How do I check that the bottle is straight?
Press Cmd/Ctrl + R for rulers and drag a guide down through the center of the star on the label. If the bottle leans, rotate it with Free Transform, pivot moved to where the two shots join.
How do I cut out a bottle shot on a black background?
Click the background with the Magic Wand, Sample All Layers checked. Double-click the Background layer to unlock it, group both layers with Cmd/Ctrl + G, add a mask and press Cmd/Ctrl + I so the selected background is hidden.
Can I draw straight lines with the regular Lasso tool?
Yes. While drawing, hold Alt/Option and it switches to the Polygonal Lasso for straight segments; let go and it goes back to the freehand Lasso. It works the other way around on the Polygonal Lasso too.
How do I get rid of the fringe around the cutout?
Click the layer mask and go to Select > Refine Mask, the CS6 tool used in the video. Raise Feather and Contrast a little and shift the edge in slightly.
How do I make the glowing starburst background?
Paint colors sampled from the bottle, light in the middle and darker toward the edges, then use Filter > Blur > Radial Blur with Zoom instead of Spin, about 70, then about 85. Paint more and press Cmd/Ctrl + F to build it up.
Why set the glow layer’s Fill to zero instead of its Opacity?
Opacity at zero hides the black and the Outer Glow. Fill at zero hides only the black pixels, so the Color Dodge glow around the bottle stays.
From the Magazine View all
Stories, interviews and guides for photographers, new every week.
 EditingLightCraft vs Lightroom: I Edited the Same RAW Files in BothThe free clone on the same RAW files: what matches, what breaks and who should switch.
 InspirationRare Historical Photos: 13 of the Rarest Pictures Ever TakenFrom the earliest surviving picture of a person to the last passenger pigeon: who took each one and why it survives.
 EditingArtCraft: Photoshop Cloned by AI in Two Weeks. Is It Legal?ArtCraft cloned Photoshop and Lightroom with AI and gave them away. Any good? Legal? Safe?
Master Photoshop, Lightroom and Photography
Join PHLEARN PRO for $12.99 a month, or $99.99 a year (save 36%). Cancel anytime, with a 100% money-back guarantee.





