
Download Assets
description
Discover the Latest Update for the Remove Tool in Photoshop! We’ll show you how to find and categorize distractions with one click, use Generative Expand to fix your composition, and add a professional finish in Adobe Camera Raw. Plus, we’ll explore the new Cleanup Layers feature to help you stay organized.
Go PRO:
Dive deeper on non-destructive editing with our in-depth PRO tutorial The Ultimate Guide to Non-Destructive Editing in Photoshop . We’ll cover everything from mastering masks and smart objects to building an unbreakable raw pipeline, all while preserving your original image intact..
Image Source
- Fellipe Ditadi
Images sourced from Unsplash.
Share


AFTER
BEFORE
Refine Your Focus
The Remove Tool now automatically finds and categorizes distractions, saving you hours of manual cloning. Combined with Generative Expand, these AI features streamline your workflow so you can focus on the art of storytelling.
Getting Started
1. Start by selecting the Remove Tool from the toolbar or by hitting J on your keyboard.
2. In the top options bar, you’ll find a new feature called Find Distractions. While Photoshop previously focused on wires and people, the new “General Distractions” option uses AI to analyze your entire image for clutter like trash, signs, or vehicles.
3. Simply click “Find”, let the tool color-code the objects, and hit the checkmark to watch them vanish.
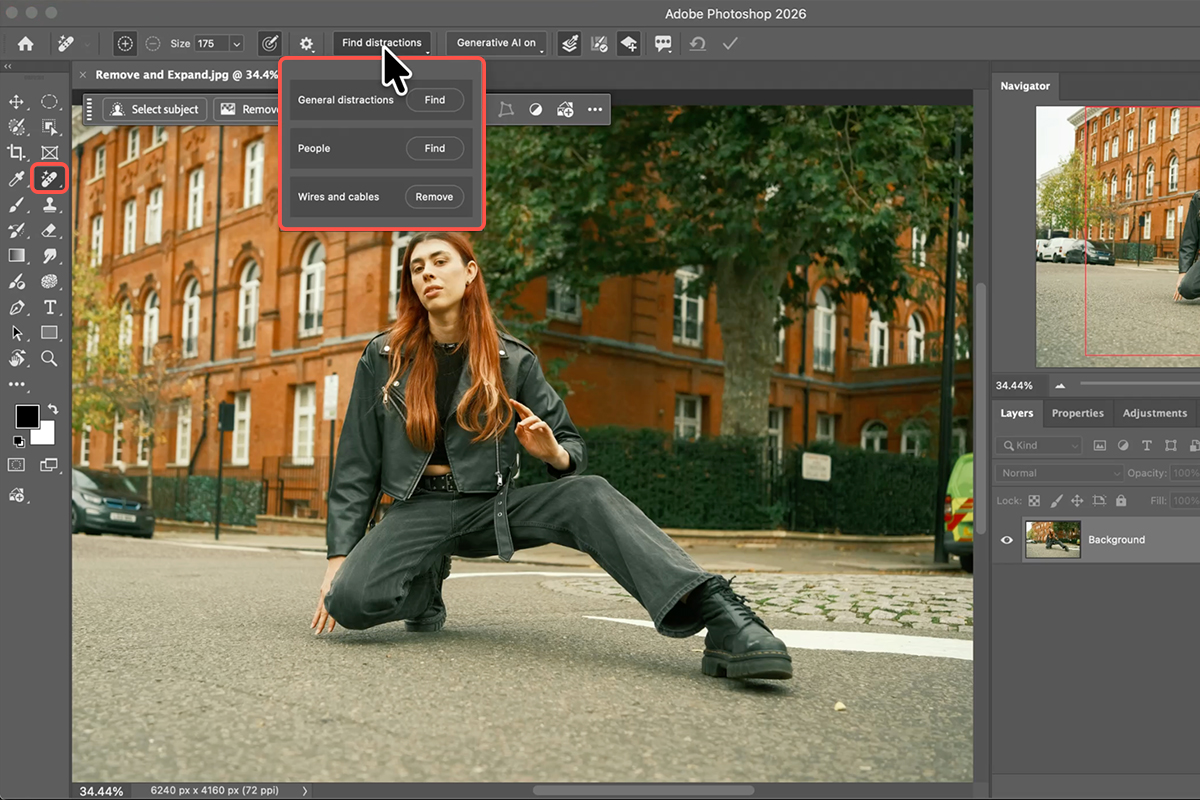
To keep things professional and non-destructive, always ensure Sample All Layers and Create New Layer are checked before you begin.
Refine Your Composition
Once the background is clean, use the Crop Tool (Keyboard Shortcut “C”) to improve the visual balance. If your subject is too centered, use the Rule of Thirds overlay to reposition them at a natural focal point. To fill in the gaps created by a wider crop, select Generative Expand in the Contextual Task Bar. Ensure you are using the latest Firefly Fill and Expand model for the best results. This allows you to add realistic pixels to the edges of your frame without having to reshoot, giving your subject more room to breathe.
Final Touches
To unify your composite, create a stamped layer of your visible work by hitting Cmd/Ctrl + Alt/Option + Shift + E (or use the Apply Image method). Convert this to a Smart Object so your edits remain flexible, then open the Camera Raw Filter (Cmd/Ctrl + Shift + A). Here, you can add a touch of grain to blend the generative pixels, apply a subtle Lens Blur to separate your subject from the background, and use a Radial Gradient (M) to lift the exposure on your subject’s face for a final, high-end look.
Organize Your Workflow
The best workflow is a clean workflow, and the new Clean Up Layers feature (look for the broom icon) makes organization effortless! This AI tool analyzes your document to delete empty layers and intelligently rename your edits—changing generic names to descriptive titles like “Woman Kneeling” or “Remove Tool Edits”. Finally, group your layers with Cmd/Ctrl + G to keep your project manageable.


