
Download Assets
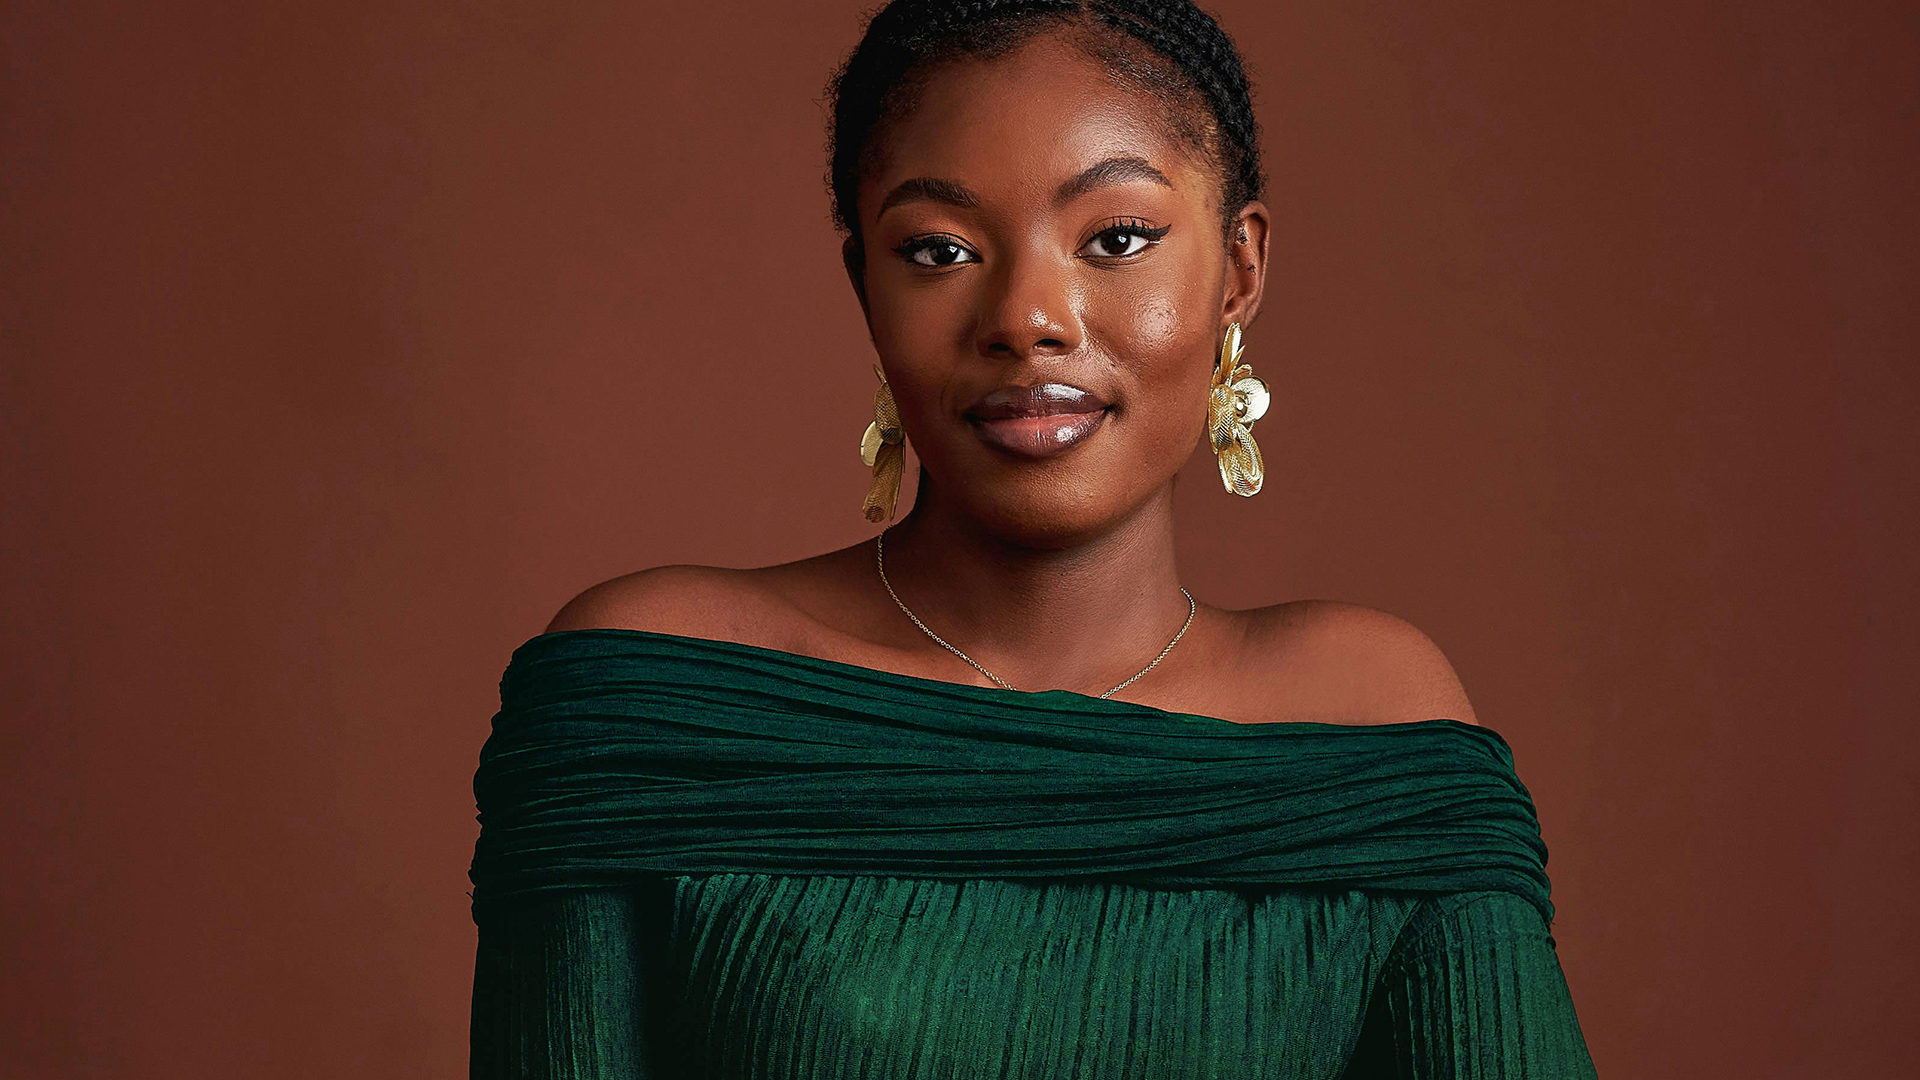
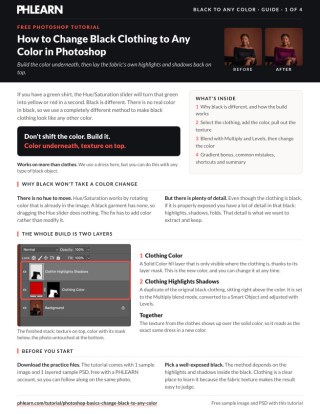
This tutorial includes 1 sample image, 1 sample PSD and 1 PDF guide. Downloads are free with a PHLEARN account.
- Download the sample images and PSDs from every free tutorial on PHLEARN
- New free tutorials published every week
- One free account — sign up once, then download anything
Free PDF Guide · 4 Pages
This Tutorial as a Step-by-Step PDF
Every step from the video in order: Select People with upper and lower clothes, the Solid Color fill layer, Cmd/Ctrl-clicking the mask to reload the selection, Cmd/Ctrl+J for the highlights and shadows, Multiply, Convert to Smart Object, Levels with the white point pulled in, and the gradient with a copied mask. Keep it next to your keyboard.
description
Change black clothing to any color and the usual recoloring tools let you down because there is no hue in black for Hue/Saturation to rotate. The fix is to stop editing color and start building it: a Solid Color fill layer goes underneath the garment, and the fabric’s own highlights and shadows get duplicated and blended back on top.
You’ll select the clothing with the Object Selection Tool, recover its texture with a Multiply blend mode and a Levels adjustment, then change the garment to any color with a double-click. A gradient variation closes it out, and every step stays editable.
Enjoying This Free Tutorial?
We publish a new free tutorial every week, each one with sample images and PSDs you can download and follow along with. Sign up and they land straight in your inbox, along with early word on sales, events and subscriber-only offers.
Image Source
How to Change Black Clothing to Any Color in Photoshop
Recoloring a green shirt is easy. Recoloring a black dress is not, and the reason catches people out constantly: there is no color in black to shift. Hue/Saturation works by rotating existing color information, so when you drag the Hue slider on a black garment, nothing happens. This tutorial uses a completely different approach — build the color underneath, then borrow the fabric’s own highlights and shadows and lay them back on top.
Why Black Clothing Won’t Take a Color Change
Every color-shifting tool in Photoshop is really a color-editing tool. It needs a hue to work with. Black is the absence of one, so Hue/Saturation, Selective Color and Replace Color all have nothing to grab. That is why the usual advice fails on black clothing and why the fix has to add color rather than modify it.
What Black Fabric Does Still Have
A properly exposed black garment is not a flat black shape. It carries a full set of highlights and shadows — the folds, the sheen along a sleeve, the darker creases where fabric gathers. That luminosity detail is the entire trick. Strip it off, hold it aside, drop a color underneath, then put the detail back and the eye reads real fabric instead of a painted shape.
Getting Started
Open an image with black clothing you want to recolor. The technique works on any black object — a car, a chair, a bag — but clothing is the clearest place to learn it because the fabric texture makes success and failure obvious at a glance.
Select the Black Clothing
-
Grab the Object Selection Tool
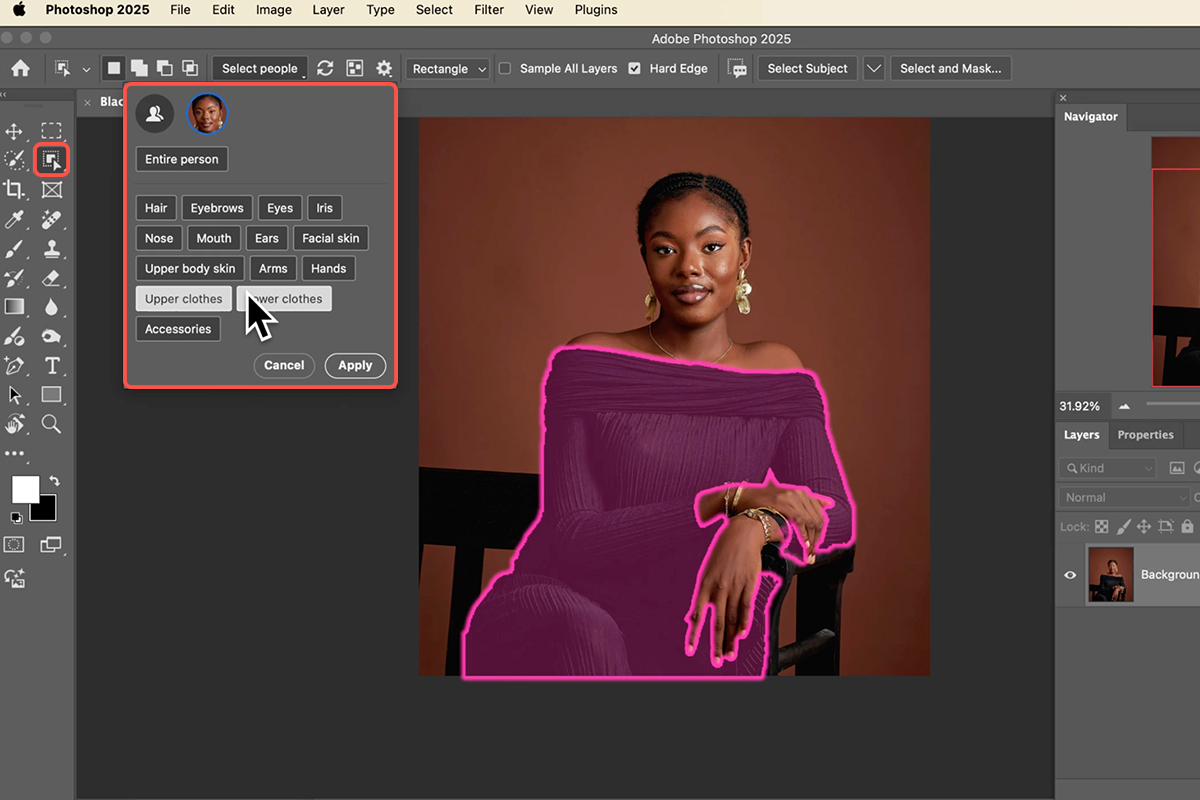
Select the Object Selection Tool (Keyboard Shortcut “W”). In the options bar at the top, set the mode to Select People.
-
Let Photoshop find the person
Click the refresh icon and Photoshop analyzes the frame and finds the people in it. Rather than taking the entire person, choose only Upper clothes and Lower clothes, then press Apply. You now have a selection of just the garment.
-
Check the edges before moving on
Zoom out and confirm both halves of the outfit came through. This step takes seconds and saves you from discovering a missing sleeve four layers later.
Lay Down the New Color
-
Create a Solid Color fill layer
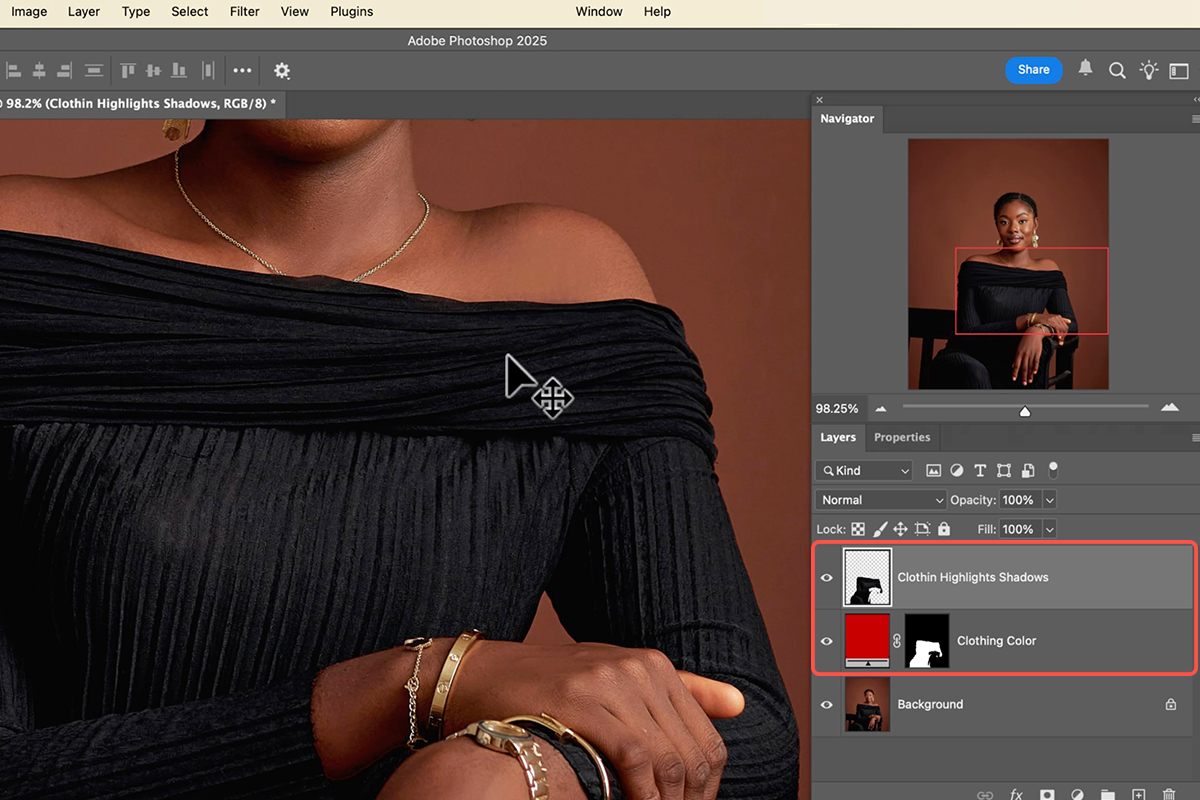
With the selection active, go to Layer > New Fill Layer > Solid Color and click OK. Pick any color to start — a dark red is easy to judge against. Your selection becomes the layer mask automatically, so the color only appears on the clothing.
-
Clean up what the selection missed
The automatic selection is good, not perfect. On this image it grabbed part of the chair and missed a section of the garment. Take the Brush Tool (Keyboard Shortcut “B”) and paint directly on the fill layer’s mask — white to add color, black to remove it.
-
Rename the layer
Call it Clothing Color. You will be coming back to this layer repeatedly, and it is worth being able to find it.
Why It Looks Terrible Right Now
At this point the result is a flat red blob sitting over the clothing, and that is the correct outcome for this stage. There is no texture, no highlight, no shadow — just opaque color. Everything from here is about putting the fabric back.
Bring Back the Highlights and Shadows
-
Reload the selection from the mask
Hold Cmd on Mac (Ctrl on PC) and click the layer mask thumbnail on your Clothing Color layer. This reloads the exact selection — including the brush corrections you made in step 5, which is why this is better than reselecting from scratch.
-
Duplicate the original fabric
Click the Background layer to select it, then press Cmd + J on Mac (Ctrl + J on PC). That copies only what is inside the selection onto its own layer — the original black clothing, texture and all.
-
Name it and stack it correctly
Call the new layer Clothing Highlights and Shadows, and make sure it sits above the Clothing Color layer. If your color is covering the texture, the two are in the wrong order.
Blend It In and Dial It Back
-
Change the blend mode to Multiply
With the highlights and shadows layer selected, change the blend mode dropdown from Normal to Multiply. The black fabric detail now darkens the color underneath instead of hiding it.
-
Convert it to a Smart Object
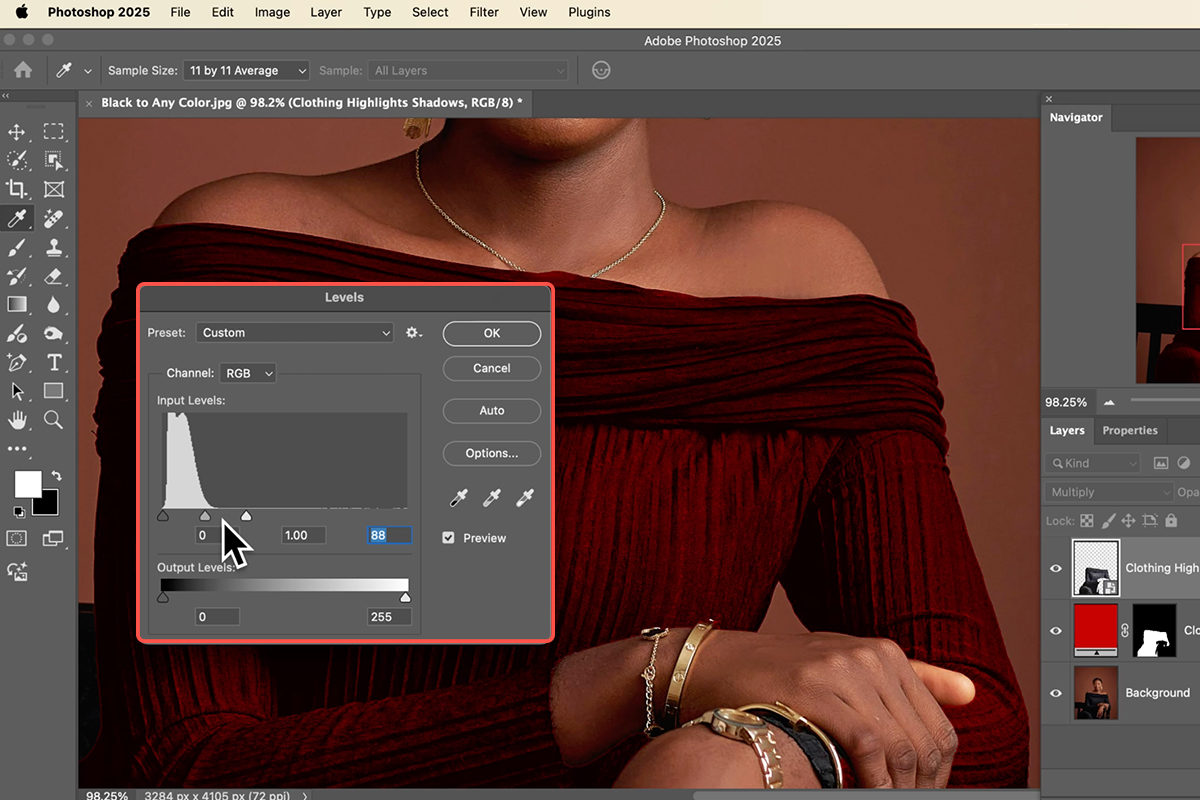
Go to Layer > Smart Objects > Convert to Smart Object. This is what keeps the next step editable — the Levels adjustment becomes a Smart Filter you can reopen and change at any point.
-
Open Levels and lift the whites
Press Cmd + L on Mac (Ctrl + L on PC). Drag the white input point to the left. You are choosing how much of the original highlight and shadow detail shows through the color — further left is lighter and more colorful, further right holds more of the original darkness.
-
Find the balance and click OK
Nudge the midtone slider either way to taste. Holding Option on Mac (Alt on PC) turns Cancel into Reset if you want to start the adjustment over.
-
Double-click the fill layer swatch
Double-click the color thumbnail on the Clothing Color layer and the picker opens. Drag through the spectrum and the clothing updates live — green, blue, anything you land on. The highlights and shadows sitting above keep it reading as fabric no matter which hue you choose.
-
Pull the saturation back a touch
Straight-from-the-picker colors often sit too saturated to look like real dyed fabric, a judgment call that sits squarely in color theory and composition. Dropping saturation slightly is usually the difference between a costume and a garment.
Everything Stays Editable
Nothing in this build is baked in — it is non-destructive from start to finish. The color is a fill layer, the mask is paintable, and the Levels adjustment is a Smart Filter. You can hand this file to a client, change the dress from burgundy to teal in four seconds, and change it back.
Bonus: Swap the Solid Color for a Gradient
-
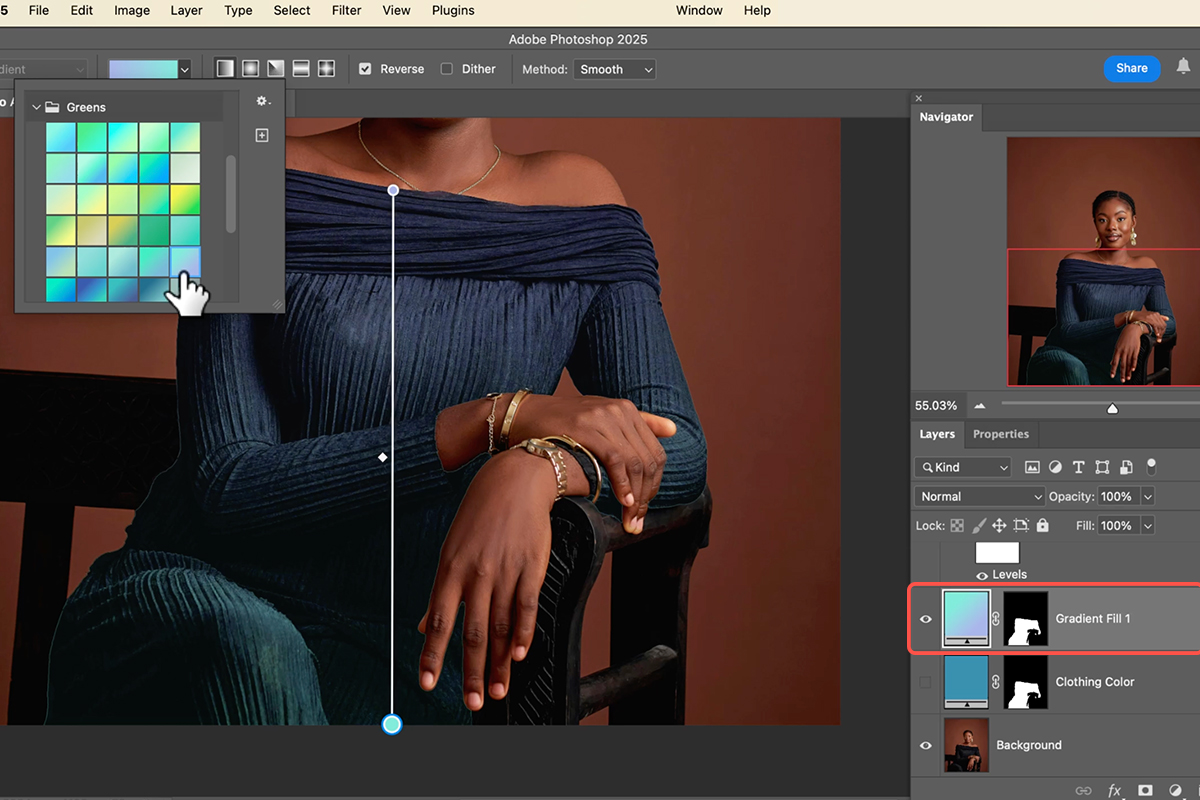
Add a Gradient Fill layer
Take the Gradient Tool (Keyboard Shortcut “G”), choose a gradient you like, and drag from the top of the garment downward for a linear blend.
-
Copy the mask across
Hold Option on Mac (Alt on PC) and drag the layer mask from the Clothing Color layer onto the gradient layer. That duplicates the mask rather than moving it, so the gradient is confined to the clothing.
-
Audition gradients freely
With the mask in place, click through gradient presets and watch the garment shift from pink-to-purple to a run of blues and greens. The highlights and shadows layer above continues doing its job on every one.
Where This Usually Goes Wrong
Reaching for Hue/Saturation First
It is the instinct, and it will waste your time. If the garment is genuinely black, no hue-based adjustment has anything to act on. Go straight to the fill layer.
Stacking the Layers the Wrong Way Around
The color must sit below the highlights and shadows. Reversed, the flat color covers the texture and you get the plastic look this whole technique exists to avoid.
Skipping the Smart Object
Applying Levels directly to the duplicated layer works exactly once. Convert to a Smart Object first, as in step 11, and the adjustment stays live for as long as the file exists.
What Makes the Result Look Real
The illusion holds because color and luminosity are being handled separately. The fill layer supplies hue and saturation; the duplicated fabric supplies every fold, sheen and crease exactly where the camera recorded them. Recoloring tools fail on black because they try to do both jobs with one control. Split them apart and the fabric keeps its own lighting no matter what color sits underneath.
Make It Your Own
Clothing is the obvious use, but the method is really about any black object with visible detail — a car, a sofa, a pair of boots, packaging in a product shot. Color underneath, texture on top, blend mode joining them. Once that shape is in your head you will start noticing how many jobs it solves.
Quick Reference: Keys, Menus and Settings
- Select the clothingObject Selection tool > Select People > tick Upper Clothes and Lower Clothes > Apply
- Lay down the colorLayer > New Fill Layer > Solid Color; fix the mask with a black or white brush
- Reload the selectionCmd/Ctrl-click the fill layer’s mask
- Lift the textureClick the Background, Cmd/Ctrl + J; move the color fill below it
- BlendTexture layer to Multiply (Hard Light, Overlay and Soft Light also work)
- Dial it inLayer > Smart Objects > Convert to Smart Object, then Cmd/Ctrl + L and pull the white point left; Alt/Option turns Cancel into Reset
- Change the colorDouble-click the fill layer’s swatch
- Gradient insteadG, pick a preset, drag top to bottom; Alt/Option-drag the fill layer’s mask onto the gradient layer
Select People uses AI to find the clothes but spends no credits.
Free Downloads
Follow Along on the Same Photo
Get the portrait from the video, the PSD with the color fill, the highlights-and-shadows layer and the gradient bonus, and the PDF guide. Free with a PHLEARN account.
Black to Any Color: Common Questions
Why can’t I use Hue/Saturation on black clothing?
There’s no hue in black to shift. A green shirt can become red with a slider; black needs color laid down and then the clothing’s own highlights and shadows put back on top.
What’s the fastest way to select the clothes?
The Object Selection tool’s Select People. Tick only Upper Clothes and Lower Clothes and click Apply. Fix any misses by painting on the fill layer’s mask.
The color looks like a flat blob. What’s missing?
The texture. Reload the selection from the fill layer’s mask, click the Background layer and press Cmd/Ctrl+J to copy the clothing onto its own layer. Put that above the color and set it to Multiply.
Now it’s too dark. How do I fix that?
Levels on the texture layer. Convert it to a Smart Object first, press Cmd/Ctrl+L and pull the white point to the left until the highlights read through the color. Double-click Levels later to adjust.
Can I change the color afterwards?
Yes. Double-click the fill layer’s swatch and pick anything. Because the texture sits on top, every color looks right; lower the saturation if one is too loud.
Is Multiply the only blend mode that works?
No. Hard Light, Overlay and Soft Light also work; Multiply looked best in the video once the Levels were set.
How do I make the clothing a gradient?
Draw a gradient with the Gradient tool, then Alt/Option-drag the fill layer’s mask onto the gradient layer. Switch presets in the options bar to try different looks.
Does this work on things other than clothes?
Yes. Any black object: color underneath, its own highlights and shadows on top in a blend mode.
Are the sample files free?
Yes, with a free PHLEARN account. You get the portrait, the layered PSD and the PDF guide.
Master Photoshop, Lightroom and Photography
Join PHLEARN PRO for $12.99 a month or $99.99 a year. Cancel anytime, with a 100% money-back guarantee.





