

Create stunning depth with Photoshop’s Dynamic Text tool by wrapping typography seamlessly around your subject. Learn to warp text into an arch, mask it behind your subject, and link the layers so it stays editable.
Free practice files
Practice Files for This Tutorial
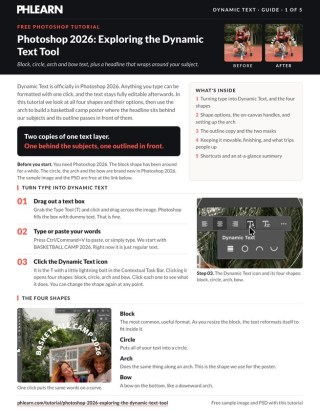
The sample image, the layered PSD and the 5-page PDF guide from the video, so you can follow every step on the same files.
This tutorial includes 1 sample image, 1 sample PSD and 1 PDF guide.


Create a free PHLEARN account to download, or log in if you already have one. One account gets you the files for every free tutorial.
description
Enjoying This Free Tutorial?
Image Source


Wrap Text Around a Subject With Dynamic Text
The look where a headline arcs behind someone’s head and the outline of the same word passes in front of them is everywhere — album covers, festival posters, brand campaigns. It reads as expensive design work. It’s actually two copies of one text layer, one mask, and a stroke.
Photoshop 2026’s Dynamic Text handles the curve on a live path, so the type stays fully editable the whole way through. Change the word at the end and the entire effect updates.
How the Dynamic Text Tool Builds the Illusion
Two Copies, Not Two Words
The solid text sits behind your subject. An identical copy sits in front, but with its fill turned off and only a stroke visible. Where the subject blocks the back copy, the hollow outline in front carries the word across. Your eye stitches them into one piece of type occupying real space.
The Type Stays Live
Dynamic Text curves along an editable path rather than baking a warp into the layer. Retype the headline, change the font, adjust the arc — everything downstream still works.
The Whole Thing Stays Movable
With one small extra step at the end, you can drag the finished text anywhere on the canvas and the front/back relationship holds. That’s what makes this usable for real layout work rather than a one-position trick.
Curve the Dynamic Text on a Path
-
Create a Text Box
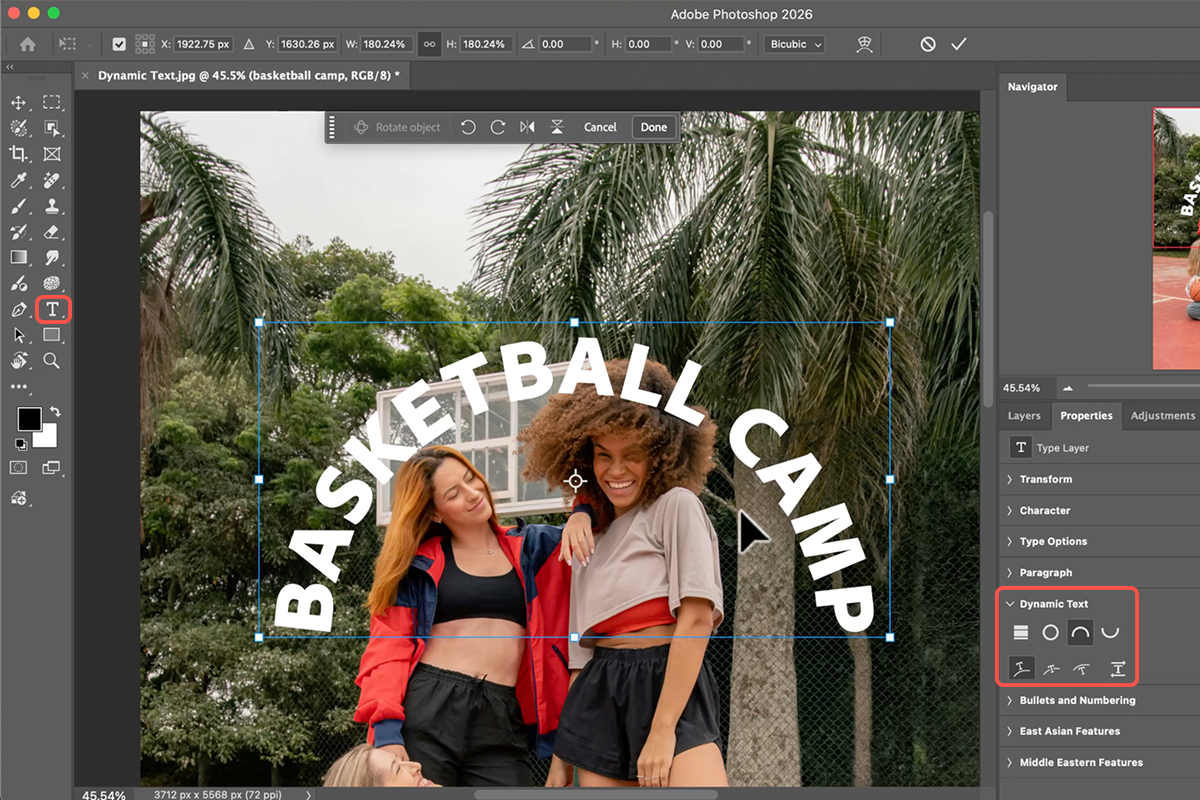
Press T for the Type Tool, then click and drag to draw a text box rather than clicking once. Type your headline.
-
Open Dynamic Text
Look at the Contextual Taskbar and select Dynamic Text, which gives you a set of shape options for the path.
-
Choose Arch
Arch curves the type along a bow. To change where the text starts and ends on that curve, hold Cmd/Ctrl to switch to the white or black arrow cursor, then drag the small X and O markers along the path. Zoom in before you try — those handles are tiny and the interface is fiddly at normal zoom.
Push One Copy Behind the Subject
Centre the type first — it’s much harder to correct alignment once the mask exists.
-
Centre It on the Canvas
Press Cmd/Ctrl + A to select all, switch to the Move Tool (V), and click Align Horizontal Centers in the options bar. Then press Cmd/Ctrl + D to deselect.
-
Duplicate the Text Layer
Cmd/Ctrl + J. You now have the two copies the effect needs.
-
Mask the Bottom Copy Behind Your Subject
Hide the top layer for a moment. Select the bottom text layer and go to Select > Subject — Photoshop outlines the people automatically. With that selection live, hold Alt/Option and click the Layer Mask icon to create an inverted mask. The text drops behind your subjects in one move. If the automatic selection struggles with hair, our free guide to isolating subjects and cleaning up edges covers the fix.
Turn the Front Copy Into an Outline
Two settings do all the work here, and the second one is the one nobody finds on their own.
-
Open Layer Style on the Top Copy
Turn the top text layer back on and double-click the grey area beside its name in the Layers panel.
-
Fill Opacity 0%, White Stroke, Position Inside
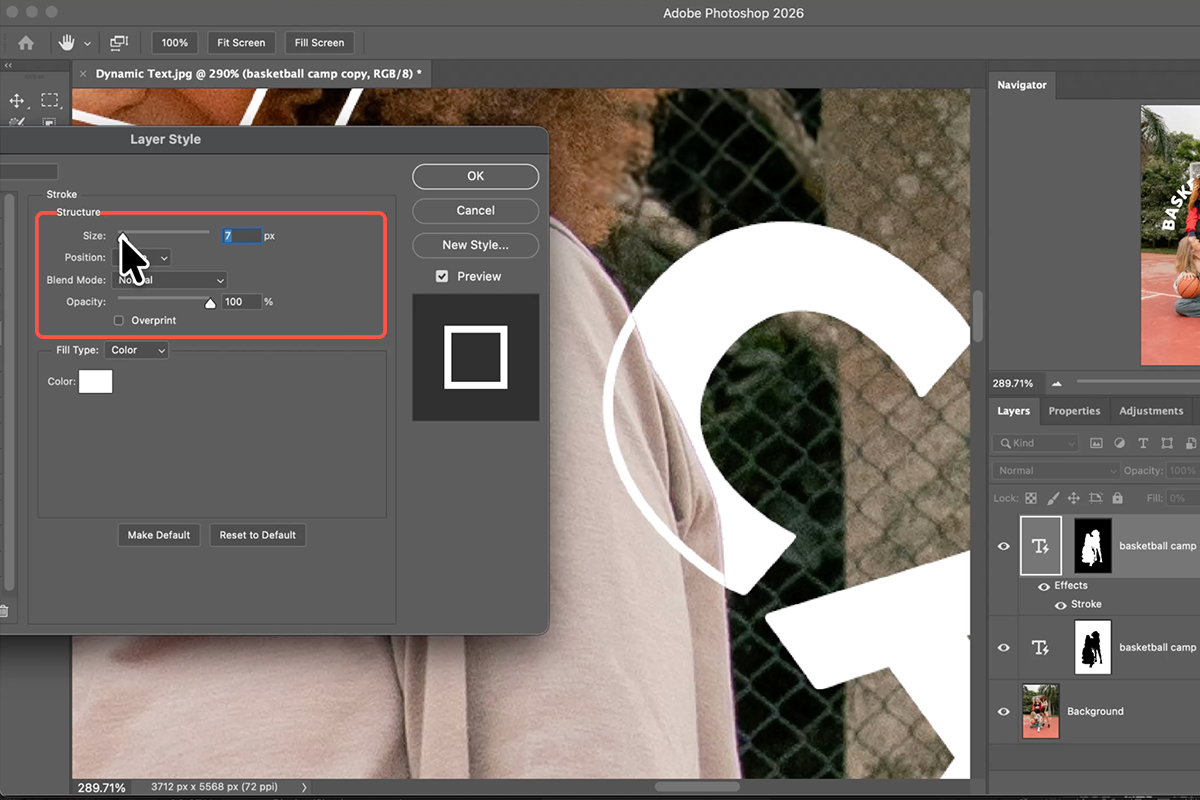
Drop Fill Opacity to zero so the letterforms disappear but effects remain, then add a white Stroke. Set its Position to Inside — that keeps the outline aligned exactly with the solid text behind, which is what makes the two copies read as one word.
-
Enable Layer Mask Hides Effects
In the Blending Options tab, tick Layer Mask Hides Effects. Without it the stroke renders over the masked areas and looks ragged and pixelated around hair. With it, the edges stay clean. This single checkbox is the difference between a convincing result and an obviously fake one.

Keep the Dynamic Text Movable
As built, dragging the text drags its mask along with it and the illusion collapses instantly. Two clicks fix that permanently.
-
Unlink Each Layer From Its Mask
Click the small chain icon between the layer thumbnail and the mask thumbnail on both text layers. The mask now stays put while the text moves independently.
-
Link the Two Text Layers Together
Cmd/Ctrl-click both text layers to select them, then click the link icon at the bottom of the Layers panel. They now move as a pair.
-
Move With the Thumbnail Selected
Make sure you have the layer thumbnail active rather than the mask thumbnail, then drag. The hollow stroke stays in front, the solid text stays behind, and the mask holds its position on the subject.
The Things That Break It
Forgetting Layer Mask Hides Effects
The most common failure. Your stroke bleeds through the masked region and the effect looks like two overlapping words instead of one wrapped one.
Stroke Position Set to Outside
Outside pushes the outline beyond the letterforms, so it no longer registers with the solid copy behind. The word looks doubled. Inside, every time.
Dragging With the Mask Thumbnail Active
Even after unlinking, if the mask thumbnail is the selected one you’ll move the mask rather than the text. Click the layer thumbnail before you drag.
Aligning After Masking
Centre the text before duplicating. Fixing alignment afterwards means realigning two layers and their masks independently.
Why Depth Reads So Strongly
Occlusion — one thing blocking another — is the fastest depth cue your visual system has. It runs before you’ve consciously identified anything in the frame. That’s why this effect works even though nothing about the type is actually three-dimensional: the moment part of a word disappears behind a shoulder, your brain files it as being in space.
The hollow stroke in front is doing something subtler. It tells you the word continues across the subject without competing with their face, which is the compromise that makes this usable on real portraits rather than just silhouettes.
Build One Tonight
Type Tool, Dynamic Text with Arch, centre, duplicate, invert-mask the bottom copy with Select > Subject, then Fill 0% plus an inside white stroke and Layer Mask Hides Effects on the top. Unlink the masks, link the layers, and it’s finished and movable. Download the free sample image and PSD to work through it — then swap in your own portrait and headline, because the whole thing takes about three minutes once you’ve done it once. For a deeper look at type-led design, our PRO Beginner’s Guide to Graphic Photography covers the composition side.
Quick Reference: Keys, Menus and Settings
- Make text dynamicType tool, drag a box, type, then Dynamic Text in the Contextual Task Bar: Block, Circle, Arch or Bow
- Above, centered or below the pathProperties > Dynamic Text; text direction is there too
- Move text around the circleClick into the text, hold Cmd/Ctrl and drag near the diamond; the X and O move the start and end
- Center on the imageCmd/Ctrl + A, Move tool, Align Horizontal Centers, then deselect
- Outline-only copyCmd/Ctrl + J, double-click the layer: Stroke on, Fill Opacity 0, stroke position Inside
- In front of the subjectSelect Subject on the Background, select the text layer, click Add Layer Mask; turn on Layer Mask Hides Effects
- Behind the subjectSelect Subject again, Option/Alt-click Add Layer Mask (or Cmd/Ctrl + I after)
- Move both as oneUnlink each mask (the chain), select both layers, click Link Layers; click the layer, not the mask, before moving
- More room on the leftC, drag the edge, Generative Expand > Generate
Mac first, then Windows where they differ.
Image source
Photo by Fellipe Ditadi via Unsplash
Free Downloads
Follow Along on the Same Photo
Get the sample image, the layered PSD with both text layers, and the PDF guide, and build the same poster. Free with a PHLEARN account.
Dynamic Text: Common Questions
What is Dynamic Text in Photoshop 2026?
Text that reformats itself to a shape. Type as usual, click Dynamic Text in the Contextual Task Bar and choose Block, Circle, Arch or Bow. Block refits the text as you resize the box; Circle, Arch and Bow are new in Photoshop 2026, and the text stays fully editable.
Can the text sit inside or outside the curve?
Yes. In the Properties panel, under Dynamic Text, choose above, centered or below the path, and flip the text direction.
How do I move the text around the circle or arch?
Click into the text, hold Cmd/Ctrl and drag near the diamond to slide all of it around the path, or near the X and O to move the start and end points. The handles are small and hard to grab, so zoom way in.
How do I center the text on the whole image?
Select > All, choose the Move tool and click Align Horizontal Centers in the options bar, then deselect. The text centers on the selection, which is the whole canvas.
How is the outlined version made?
Duplicate the text layer, double-click it to open Layer Style, add a white Stroke and set Fill Opacity to 0. Set the stroke position to Inside so it lines up with the solid copy. You now have a filled layer and an outline layer.
How does one copy go in front of the subject and one behind?
Run Select Subject on the Background. For the front copy, add a layer mask: the outline shows only over the subject. For the back copy, run Select Subject again and Option/Alt-click the Add Layer Mask icon to get the inverted mask, so the text shows everywhere except the subject. Cmd/Ctrl+I inverts a mask if you forget.
The stroke looks messy at the hair. Why?
The stroke is following the layer mask. In Layer Style under Blending Options, turn on Layer Mask Hides Effects and the stroke ignores the mask edge.
How do I move the text without breaking the effect?
Click the chain to unlink each layer from its mask so the masks stay put, select both text layers and click Link Layers at the bottom of the Layers panel. Then click the layer itself (white outline around the layer, not the mask) and move; both copies travel together.
Are the sample files free?
Yes, with a free PHLEARN account. You get the sample image, the layered PSD with both text layers, and the PDF guide.
Master Photoshop, Lightroom and Photography
Join PHLEARN PRO for $12.99 a month, or $99.99 a year (save 36%). Cancel anytime, with a 100% money-back guarantee.





