


description
Under-eye bags and small blemishes rarely need complicated retouching. This free tutorial pairs the Patch tool with Photoshop’s often-overlooked Fade command: circle the area, drag it onto cleaner skin nearby, then immediately fade the result to around half strength so the new texture blends partway back into the original. It covers where to sample from, patching between two separate photos, and why working on a duplicate layer takes all the risk out of it.
Enjoying This Free Tutorial?
We publish a new free tutorial every week, each one with sample images and PSDs you can download and follow along with. Sign up and they land straight in your inbox, along with early word on sales, events and subscriber-only offers.
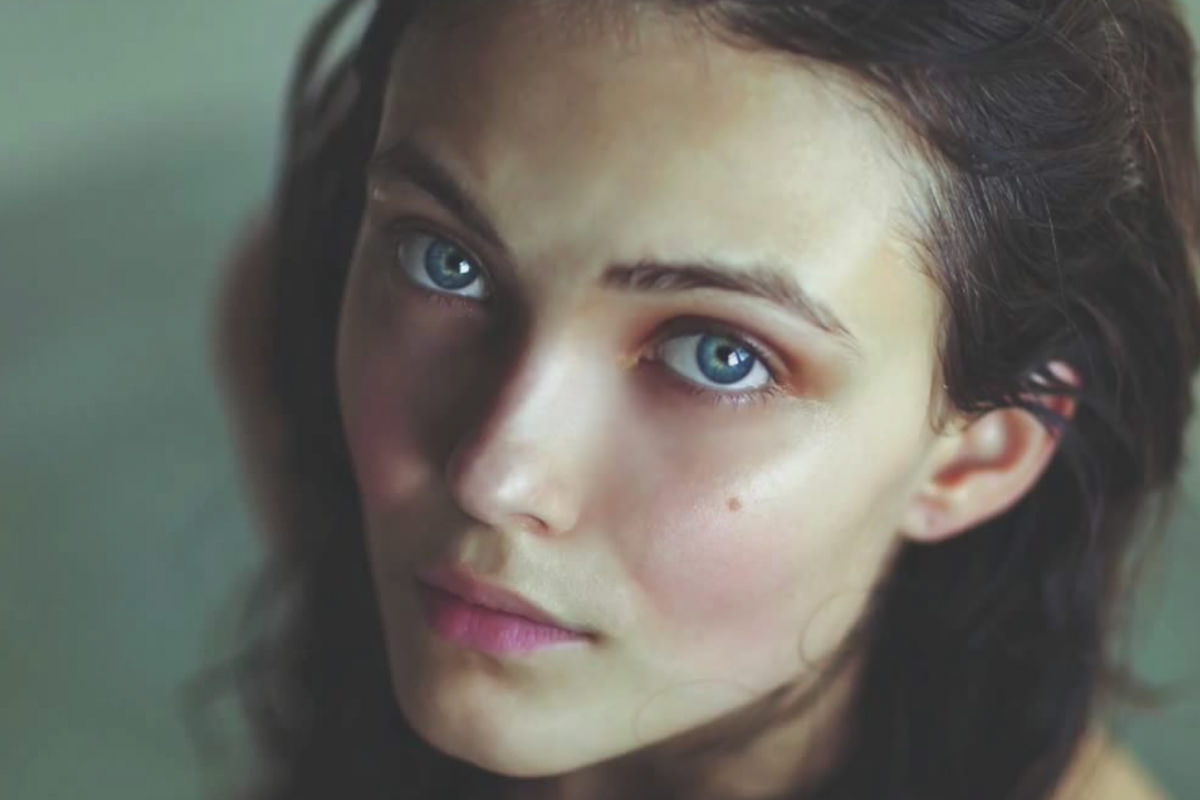
How to Remove Under-Eye Bags and Blemishes in Photoshop
Under-eye bags, dark patches, and small blemishes don’t need complex retouching to disappear convincingly. This tutorial uses the Patch tool paired with the often-overlooked Fade command to clean up skin quickly, in a way that stays looking natural rather than obviously edited.
Duplicating the Layer Before Retouching
Working on a copy of the background keeps the original image safe while you experiment.
-
Duplicate the Background Layer
Press Cmd/Ctrl+J to duplicate the background layer, and do all of the retouching work on this new layer instead.
Understanding How the Patch Tool Works
Before tackling anything specific, it helps to see the Patch tool’s basic behavior on a small, simple blemish.
-
Select the Patch Tool
Find the Patch tool grouped with the Spot Healing and Healing Brush tools, and make sure it’s set to Normal mode rather than Content-Aware.
-
Circle the Area to Fix
Draw a selection around a small blemish or area that needs to change.
-
Drag to a Cleaner Area
Click inside the selection and drag it to a nearby area with cleaner skin, then release to blend that cleaner texture over the selected spot.
-
Deselect
Press Cmd/Ctrl+D to deselect once the patch looks right.
Removing Under-Eye Bags With the Patch Tool
The same basic technique scales up to handle a larger area like an under-eye bag.
-
Circle the Under-Eye Area
Draw a selection loosely around the darker under-eye area that needs to be softened.
-
Drag to a Cleaner Reference Area
Click and drag the selection to a nearby area of skin that doesn’t have the same darkness or puffiness, then release.
-
Hide the Selection to Check the Result
Press Cmd/Ctrl+H to hide the selection’s marching ants so you can judge the actual result more clearly.
Softening the Result With the Fade Command
A Patch tool result can look a little too perfect right at its edges, which is where the Fade command comes in.
-
Open the Fade Command
Immediately after applying a patch, go to Edit > Fade, or press Shift+Cmd/Ctrl+F.
-
Lower the Opacity Slider
Drag the opacity slider down from 100%, watching how the effect blends back toward the original as you lower it, typically landing somewhere around 50–60%.
-
Confirm the Fade
Click OK once the transition looks natural rather than obviously patched.
Why the Fade Command Makes the Patch Tool Look More Natural
The Patch tool at full strength often replaces texture too completely, leaving an edge that doesn’t quite match its surroundings. Because Fade can reduce the opacity of literally the last action performed, including a Patch tool edit, it blends the new texture partway back with the original, which is exactly what keeps the result from looking obviously retouched.
Cleaning Up Dark Areas Around the Nose
The same Patch-and-Fade combination works just as well on other common trouble spots, like shadowed areas around the nose.
-
Select the Dark Area
Draw a selection around a dark patch or shadowed area near the nose.
-
Patch and Fade
Drag the selection to a cleaner nearby area, then immediately apply Shift+Cmd/Ctrl+F to fade the result to a natural-looking strength.
-
Repeat on Other Areas as Needed
Continue the same process on any other small imperfection or harsh shadow, such as around the mouth or expression lines.
Sampling From Nearby Skin That Actually Matches
Where you sample from matters more for a convincing result than getting the initial selection perfectly precise.
-
Choose a Reference Area Close By
Drag the patch to an area of skin that’s genuinely close to the area being fixed, rather than a distant area like the forehead when working near the nose.
Why Sampling Nearby Skin Matters More Than a Precise Selection
Skin texture and tone vary across different parts of a face, so pulling a patch from a mismatched area, like the forehead to fix something near the nose, can introduce a subtle but noticeable texture mismatch. Staying close to the area being fixed keeps the borrowed texture consistent, which matters more to the final result than getting the original selection shape exactly right.
Patching Between Two Different Photos
The Patch tool isn’t limited to working within a single image.
-
Place Two Photos as Layers in One Document
Bring a second photo, ideally of the same subject with cleaner skin, into the same document as a separate layer.
-
Patch Across the Two Layers
Use the Patch tool to drag a selection from the layer with the imperfection onto the layer with cleaner skin, borrowing texture directly from the other photo.
Working Non-Destructively Without Fear of Mistakes
Because every edit happens on a duplicated layer, there’s very little risk in experimenting freely.
-
Undo or Restart Freely
If a patch doesn’t look right, press Cmd/Ctrl+Z to undo, or delete the working layer entirely and duplicate the background again to start over.
Why Working on a Duplicate Layer Removes the Fear of Mistakes
Retouching directly on the background layer means every mistake is permanent unless caught immediately. Working on a duplicate instead means the absolute worst outcome is deleting that one layer and starting fresh, which makes it much easier to experiment freely with the Patch tool rather than being overly cautious with every click.
Why This Approach Works
The Patch tool alone tends to leave an edge that’s a little too clean and obvious, so pairing it with the Fade command right afterward is what turns a slightly heavy-handed fix into something that reads as untouched skin. Staying close to the area you’re fixing when choosing where to sample from matters more than getting the initial selection shape perfect, since texture consistency is what a viewer’s eye actually notices. Working on a duplicated layer throughout removes any real risk from the process, which is exactly why this technique is worth practicing freely rather than treating every click as precious.
Final Thoughts
This Patch-and-Fade combination is about as low-effort as effective retouching gets: circle an area, drag it to cleaner skin, fade the result to taste, and repeat. It works on under-eye bags, blemishes, dark patches around the nose, or nearly any other small skin imperfection, and it’s worth having in your toolkit for any portrait that needs a quick, natural-looking cleanup.
Quick Reference: Keys, Menus and Settings
- Work on a copyCmd/Ctrl + J to duplicate the background
- Patch toolWith the Spot Healing and Healing Brush tools; Normal, Source
- Patch a spotCircle it, drag to clean skin nearby; Cmd/Ctrl + D to deselect
- Hide the selectionCmd/Ctrl + H
- Fade the patchEdit > Fade or Shift + Cmd/Ctrl + F, opacity about 50 to 60%
- Start overCmd/Ctrl + Z, or delete the copy and duplicate again
No AI, no generative credits.
Eye Bags and Blemishes: Common Questions
How does the Patch tool remove a blemish?
Draw a selection around the blemish, click inside it and drag it to a patch of clean skin. When you let go, the selected area takes on the clean skin. Press Cmd/Ctrl + D to deselect.
Where is the Patch tool?
It’s grouped with the Spot Healing Brush and Healing Brush in the toolbar. Set it to Normal rather than Content-Aware, with Source chosen.
Should I retouch on the background layer?
No. Press Cmd/Ctrl + J to duplicate it and work on the copy. If something goes wrong, undo or delete that layer and start over.
How do I remove bags under the eyes?
Circle the dark under-eye area with the Patch tool and drag it just below, to skin without the bag. Then fade the patch so it doesn’t look too perfect.
What does Edit > Fade do?
It lowers the opacity of the last thing you did, whether a patch or a brush stroke. Use it right after the patch, or press Shift + Cmd/Ctrl + F.
How much should I fade the patch?
At 100% it usually looks too much. Aaron finds somewhere between 50 and 60% works well, but go by what looks natural.
How do I see the result without the selection lines?
Press Cmd/Ctrl + H to hide the marching ants while the selection is still active.
Where should I drag the patch from?
From skin close to the problem. Near the nose, don’t borrow from the forehead, because the skin texture there is different.
What else can I fix this way?
Dark patches around the nose, uneven skin and harsh lines around the mouth. Patch, press Shift + Cmd/Ctrl + F and fade, then repeat.
From the Magazine View all
Stories, interviews and guides for photographers, new every week.
 BusinessHow to Compete With AI: Give Your Clients MoreEveryone has the same tools now, and your clients know it. The way to compete is to give them more.
 EditingLightCraft vs Lightroom: Is the Free Clone Any Good?The free clone on the same RAW files: what matches, what breaks and who should switch.
 EditingHow to Tell If a Photo Is AI, and Prove Yours Is RealThe tells that still work in 2026, why detectors disagree, and how to prove your own photos.
Master Photoshop, Lightroom and Photography
Join PHLEARN PRO for $12.99 a month, or $99.99 a year (save 36%). Cancel anytime, with a 100% money-back guarantee.





