


Download Assets
This tutorial includes 1 PDF guide. Downloads are free with a PHLEARN account.
- Download the sample files from every free tutorial on PHLEARN
- New free tutorials published every week
- One free account: sign up once, then download anything
Free PDF Guide · 2 Pages
This Tutorial as a Step-by-Step PDF
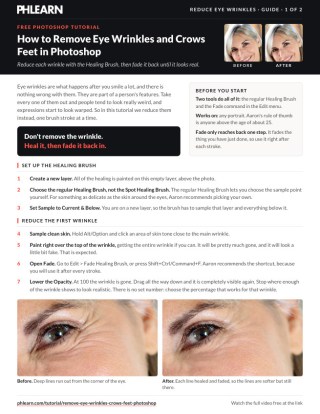
The guide walks through reducing crows feet on a new layer with the regular Healing Brush set to Current and Below: Alt/Option-click nearby skin, paint over the wrinkle, then Edit > Fade Healing Brush (Shift+Ctrl/Command+F) and lower Opacity until it looks real, with a 20% Eraser to dial back. Use it on any portrait.
description
Take every wrinkle out around the eyes and a face stops looking like a face. Aaron reduces them instead, using the regular Healing Brush so the sample point is chosen by hand rather than guessed, then pressing Shift+Cmd/Ctrl+F after each stroke to fade a percentage of the original wrinkle back in. Every stroke gets its own fade amount, which is what keeps the result believable.
Enjoying This Free Tutorial?
We publish a new free tutorial every week, each one with sample images and PSDs you can download and follow along with. Sign up and they land straight in your inbox, along with early word on sales, events and subscriber-only offers.


Removing eye wrinkles completely tends to make people look really weird, with their expressions warped, so the goal here is reducing them just enough to keep a realistic result, using the regular Healing Brush combined with Photoshop’s Fade command. This tutorial covers sampling and painting over wrinkles with the Healing Brush, fading each brush stroke individually for fine control, and applying the same technique to any other small blemish on a face.
Setting Up the Regular Healing Brush on a New Layer
Working on a new layer with the regular Healing Brush, rather than the Spot Healing Brush, allows a specific sample point to be chosen carefully in the delicate skin around the eyes.
-
Create a New Layer
Add a new layer to work on.
-
Select the Regular Healing Brush
Choose the regular Healing Brush tool rather than the Spot Healing Brush, since it allows manually choosing the sample point.
-
Set Sample to Current and Below
Set the tool’s sample option to Current & Below so it pulls texture from the layers beneath the new empty layer.
Why the Regular Healing Brush Is Chosen Over the Spot Healing Brush
The Spot Healing Brush automatically selects its own sample point, which can easily land on an area that doesn’t match the delicate, specific skin texture right around the eyes. The regular Healing Brush requires manually Alt/Option-clicking to choose the sample point, giving full control over exactly which nearby skin gets used to reduce a particular wrinkle.
Sampling Nearby Skin and Painting Over a Wrinkle
Alt/Option-clicking a clean area of skin near a wrinkle, then painting directly over the wrinkle, initially removes it completely before the next step brings some of it back.
-
Sample Nearby Skin
Hold Alt/Option and click on an area of skin near the wrinkle to set the sample point.
-
Paint Directly Over the Wrinkle
Paint over the entire wrinkle to remove it completely for now.
Fading Each Healing Brush Stroke Individually
The Fade command, applied right after each healing stroke, brings back a chosen percentage of the original wrinkle, keeping the result realistic instead of completely smooth.
-
Open the Fade Command
Press Shift+Cmd/Ctrl+F immediately after painting, or go to Edit > Fade Healing Brush.
-
Choose a Fade Percentage
Lower the opacity slider in the Fade dialog until enough of the original wrinkle becomes visible again to look natural.
-
Repeat on the Next Wrinkle
Sample and paint over the next wrinkle, then apply Fade again with a percentage suited to that specific stroke.
Why Fading Each Stroke Beats Lowering the Whole Layer’s Opacity
Reducing the opacity of the entire healing layer at once would fade every wrinkle correction by the same fixed amount, even though some wrinkles need more reduction than others. Applying Fade individually to each brush stroke allows every single wrinkle to be brought back by its own specific percentage, giving far more precise, brushstroke-by-brushstroke control over the final result.
Working Carefully Around and Under the Eye
Dark creases at the inside of the eye, which look dark because wrinkles catch light and shadow, benefit from lightening with the same sample-and-fade technique rather than trying to erase them entirely.
-
Find the Dark Creases
Look for the dark creases at the inside of the eye. The goal is a lighter version of what is there, not a blank patch of skin.
-
Paint to Lighten the Area
Paint over the dark area to lighten it while still keeping some natural definition.
-
Fade to Restore Natural Definition
Apply Fade to bring back enough of the original shadow and shape so the area still looks like real skin, not flattened.
Why Lighten Dark Creases Instead of Removing Them
Wrinkles catch light and shadow, and that is what makes them look so dark. Painting over a dark crease and then fading it keeps the shape and definition of the eye while making the area look a lot less dark, so the result still reads as real skin.
Correcting Mistakes and Adjusting Overall Strength
Undoing a stroke you do not like, or erasing back some of a healing layer’s effect afterward, keeps the whole process forgiving and easy to fine-tune.
-
Undo a Stroke or Split It in Two
Press Cmd/Ctrl+Z to undo any stroke you do not like, then paint it again. If a stroke smudges because the sample point went outside the face, heal the wrinkle in two shorter strokes: do part of it, stop, and get the rest with the next stroke.
-
Reduce Effect Afterward With a Low-Opacity Eraser
Press E for the Eraser tool, lower its opacity to around 20%, and paint over an area to bring back more of the original detail if the wrinkle reduction looks too strong overall.
Undoing a whole healing layer just because the effect looks slightly too strong wastes work that was mostly fine. A low-opacity eraser removes only a small part of the healing with each pass, so it brings back just enough original detail without losing the progress already made.
Repeating the Technique on the Other Eye and Other Areas
A separate new layer for the second eye keeps the two sides of the face independently adjustable, and the same sample-paint-fade technique applies to any small wrinkle or blemish anywhere on a face.
-
Create a Separate Layer for the Other Eye
Add another new layer to work on the second eye independently of the first.
-
Repeat Sample, Paint, and Fade
Use the same Alt/Option-sample, paint, and Shift+Cmd/Ctrl+F fade process on the wrinkles around the second eye.
-
Apply the Same Technique Anywhere on the Face
Use the identical technique on any other small wrinkle or blemish elsewhere on the face, such as near the nose.
Why This Approach Works
Choosing the regular Healing Brush over the Spot Healing Brush is what allows a carefully matched sample point right around the delicate eye area instead of leaving that choice to an automatic algorithm. Fading each individual stroke, rather than the whole layer at once, is what gives every single wrinkle its own precisely tuned amount of reduction instead of one uniform adjustment across the entire face. Reducing wrinkles instead of erasing them completely is what keeps a subject’s natural expression and features intact, since a face with every wrinkle removed tends to look distractingly artificial.
Final Thoughts
The combination of the Healing Brush and the Fade command is simple, but the real skill is knowing how much of each wrinkle to bring back rather than removing them entirely. The same sample-paint-fade technique works on any wrinkle, blemish, or small imperfection anywhere on a face, not just around the eyes.
Quick Reference: Keys, Menus and Settings
- Set upNew layer; Healing Brush (not Spot Healing), Sample: Current & Below
- Sample skinAlt/Option-click clean skin next to the wrinkle, then paint over the whole wrinkle
- Fade the strokeShift + Cmd/Ctrl + F or Edit > Fade Healing Brush; lower Opacity
- Undo a bad strokeCmd/Ctrl + Z
- Dial it backE for the Eraser, 2 for 20% opacity, paint over the area
- Second eyeA new layer for the other eye, then the same sample, paint and fade
No AI, no generative credits.
Free Downloads
Take the Guide With You
Get the PDF guide to reducing eye wrinkles with the regular Healing Brush and the Fade command, one stroke at a time on its own layer. Free with a PHLEARN account.
Reducing Eye Wrinkles: Common Questions
Should I remove eye wrinkles completely?
No. Removing every wrinkle tends to look strange and can warp expressions. Reduce them instead so the smile lines stay and the result looks realistic.
Should I use the Healing Brush or the Spot Healing Brush?
Use the regular Healing Brush. It lets you choose the sample point yourself, which matters in the delicate skin around the eyes.
Can I heal on an empty layer?
Yes. Create a new layer and set the Healing Brush’s Sample option to Current & Below so it samples that layer and everything beneath it.
How do I paint out a wrinkle?
Hold Alt/Option and click clean skin near the wrinkle, then paint over the whole wrinkle. Size the brush to about the width of the wrinkle.
How do I bring some of the wrinkle back?
Right after the stroke, press Shift + Cmd/Ctrl + F or go to Edit > Fade Healing Brush. Lower the Opacity until enough of the wrinkle shows to look natural.
Why fade each stroke instead of lowering the layer opacity?
Lowering the layer opacity fades every correction by the same amount. Fade works stroke by stroke, so each wrinkle gets its own amount.
How do I lighten dark areas near the eye?
Paint right over the dark crease at the inside of the eye, then use Fade so it keeps its definition but looks less dark.
A stroke picked up the wrong texture. What do I do?
Press Cmd/Ctrl + Z to undo it. A smudge like that usually means the sample point went outside the face; try the wrinkle again in two shorter strokes.
The whole result looks too smooth. Can I dial it back?
Press E for the Eraser, press 2 for 20% opacity and paint over the area on the healing layer to bring back some of the original detail.
Is there a free download?
Yes, with a free PHLEARN account. You get 1 PDF guide with the Healing Brush, Fade and eraser steps from the video.
From the Magazine View all
Stories, interviews and guides for photographers, new every week.
 EditingHow to Color Grade Photos in Photoshop and LightroomCorrect the photo first, then put color in the shadows, midtones and highlights. Aaron Nace on the order, the tools and skin.
 BusinessHow to Compete With AI: Give Your Clients MoreEveryone has the same tools now, and your clients know it. The way to compete is to give them more.
 EditingLightCraft vs Lightroom: I Edited the Same RAW Files in BothThe free clone on the same RAW files: what matches, what breaks and who should switch.
Master Photoshop, Lightroom and Photography
Join PHLEARN PRO for $12.99 a month, or $99.99 a year (save 36%). Cancel anytime, with a 100% money-back guarantee.





