The Ultimate Guide to Manual Compositing in Photoshop
-

-
Add to
favorites
-
DifficultyAdvanced
-
Length3.25 hours
-
Videos5
-
Software
Description
Discover the world of advanced compositing in Photoshop! This tutorial covers four creative projects, where you’ll learn to blend images, master complex lighting, and perfect your masking skills.
While we explore new AI features like Harmonize and Nano Banana, our main focus will be on manual techniques. You will learn how to hand-mask subjects, create custom brushes, and match colors manually, giving you full creative control without needing to spend extra AI credits.
This tutorial includes sample images and even two custom brushes, so that you have everything needed to follow along.
Note:
This tutorial features FREE Adobe Stock images. Due to copyright restrictions, we cannot package the full-resolution files directly; however, we’ve included low-res samples in your download folder. You’ll also find a PDF guide with direct links to download the high-resolution versions for free.
THIS COURSE INCLUDES
- 13 Sample Images
- 2 Photoshop Brushes
Share
Course Downloads
Craft Perfect Composites

The World of Compositing
At PHLEARN, conceptual compositing is our passion. While custom photoshoots are ideal, they aren’t always practical. That’s why this tutorial focuses on building world-class composites using only free stock images, teaching you how to transform everyday assets into extraordinary works of art through manual techniques.
Non-Destructive Editing
In compositing, non-destructive editing is your safety net. In this tutorial we’ll show you how to use Smart Objects and Layer Masks to keep original pixels intact, allowing you to refine edges or tweak lighting as the piece evolves. This flexibility is vital for blending multiple sources, ensuring you can always make adjustments without losing quality.
Manual Over AI
While we briefly cover tools like Generative Expand and Harmonize, our main focus is on manual techniques. Mastering these skills won’t just save you credits; it will give you total creative control over your vision. You’ll learn to blend, light, and mask by hand, ensuring you never have to rely solely on AI.
AFTER
BEFORE
Master Your Workflow
Compositing involves dozens of layers, making it easy to get lost in the clutter. In this tutorial, we teach you to stay organized by grouping background elements, cutouts, and expanded areas into structured folders. Learning these habits keeps your workspace clean and fast. When your layers are organized, you can spend your time being creative instead of hunting for a lost file.
Match Light & Color
The hardest part of compositing with stock photos is that every image has different lighting and color. To make your final piece look like a single, cohesive scene, you need to tie those elements together. In this tutorial, you’ll learn to master Levels and Channel-specific adjustments, allowing you to manually match light and color for a completely seamless result.
Building Immersive Depth
Great images build depth by layering elements in the foreground, midground, and background. We’ll show you how to use light, color, and atmospheric effects to create a sense of scale, helping you build your own photorealistic worlds from scratch.
Edit Without Limits

Select. Blend. Create.
Learn how to select high-quality stock images that fit your concept. We’ll show you the best way to merge them into a single, seamless artwork.
Atmospheric Color Integration
To make a subject truly belong in a scene, you must account for reflected light. In this tutorial, you’ll learn how to sample background colors and paint them over your subject using a Clipped Layer set to Color blend mode. This professional technique “pushes” the subject into the environment, creating a perfectly unified, photorealistic result.
Environmental Effects
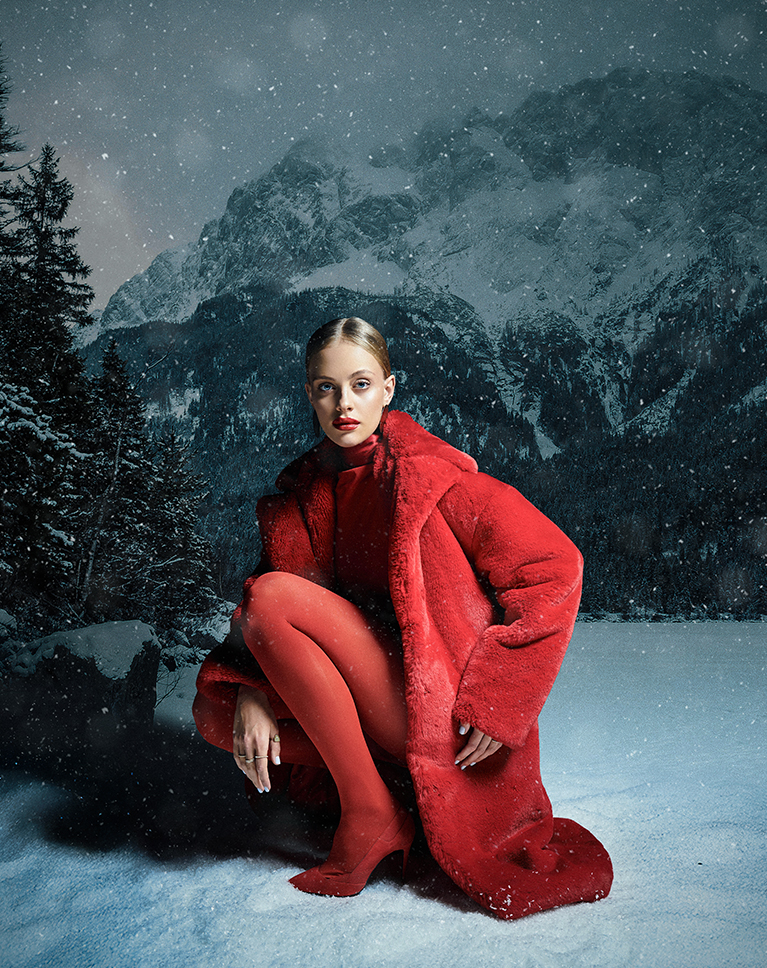
Bring your scenes to life by building a custom snow brush from scratch. We’ll show you how to master Brush Settings—like Scattering and Opacity Jitter—to create natural variety. By adding Motion Blur and layering different flake sizes, you’ll master the art of building immersive, three-dimensional weather effects.
Photoshop Brushes
To help you achieve high-end results, this tutorial includes two exclusive Photoshop brushes. The Download folder includes our custom Snow Brush, specifically designed for atmospheric depth, and our Fog Brush for realistic texture. These tools allow you to apply professional effects instantly, ensuring your composites look polished and immersive.

AFTER
BEFORE
Blending Modes
Blending Modes control how pixels on one layer interact with the layers below, dramatically affecting how light, color, and texture blend. In this tutorial, we’ll show you how to use them properly to instantly integrate elements like a moon or clouds into a scene.
Layer Masks
Layer Masks are the foundation of any great composite. You’ll learn how to seamlessly hide or reveal parts of an image without ever deleting a pixel. By painting with black and white, you’ll gain total control over your compositions, allowing for smooth transitions and flawless blending between even the most complex elements.
Choose Your Path
We love compositing in Photoshop! So much so that it’s become a pillar of our course catalog here on PHLEARN. If you’re new to the craft, we recommend exploring our exclusive Compositing Learning Paths: Everday Compositing, and Magical Compositing. The tutorials in these paths will equip you with a comprehensive toolkit to build and master your own photorealistic worlds.

Aaron Nace
PHLEARN Founder – Class Instructor
Aaron Nace is a photographer, Photoshop artist and founder of PHLEARN. He is the #1 Photoshop instructor in the world with millions of YouTube subscribers.
Reviews
New & Popular Tutorials


Training Site in
the World
Tutorials!
Ratings
and Counting
Subscribers
How do you get images to open as smart objects on a Windows PC?
Hey there! You can navigate to the File menu at the top left of your workspace and select Open as Smart Object… instead of the standard “Open” command. Once you select your file from the explorer window, Photoshop will automatically wrap the image in a protective container, appearing in your Layers panel with a distinct Smart Object icon in the bottom-right corner of the thumbnail.
Now completed 3 projects, ready for the last one. They just get better and better. Great explanation of all the tools used and also explaining the different ways to complete the process. Using AI and without AI to save credits. Fantastic tutorial.
This compositing tutorial is excellent. It’s excellent to learn the manual way of doing things. I feel I accomplish so much more doing steps manually instead of relying on Ai all the time.
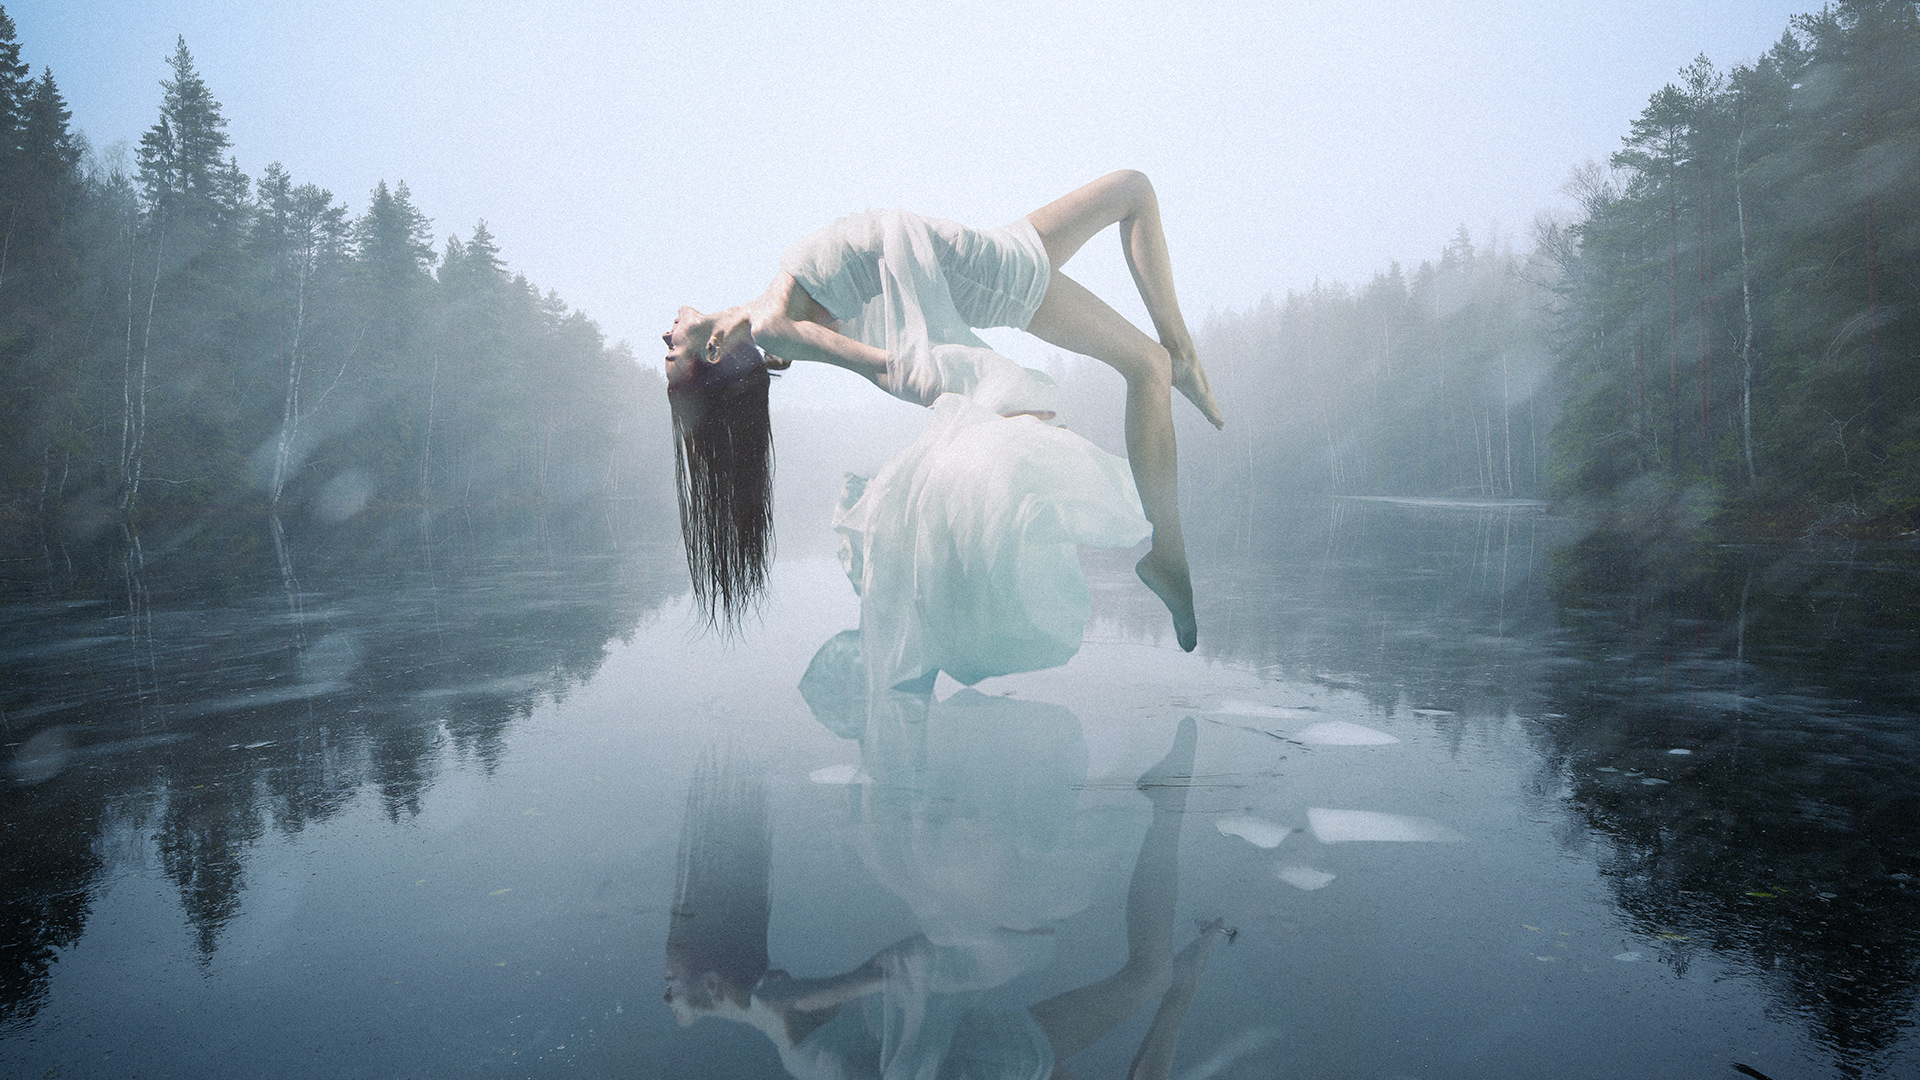
Just finished Lady of the Lake. I am so excited to finally be able to use levels to change colours and brightness- I found it better than Harmonize in some cases and also because I am maxed out of credits with all the home bound snow days 😉 Aaron has taught me so much that I felt comfortable in taking the hair off an Adobe Stock Image to replace the hair on the Lady. His Tutorials are the best. Great explanations of the tools and why he uses one over another. He is a true artist and you really want to learn from the best.
I have just finished Project 1 The Fairy Princess. What a great tutorial. An introduction the new ways of working on a composite image. A great explanation of how to use Apply Image and how it works. Also how to finalize the image in Camera Raw. I am looking forward to the next project. Fantastic.
Incredible course with a lot of technical explanation – really helpful.l
Brilliant tutorials .. always!
These a great tutorials, they combine the precision of ‘old school’ compositing with the time saving newer AI techniques that, combined, give amazing results.
Really cool tutorial. I learned several new things. Aaron goes at a good pace. Then the caffeine kicked in at the very end and I had to just sit back and watch. It was a lot of fun seeing him get caught up in his artistry. Can’t wait to work on the next projects, then I will be prepared to work on my own. Great job!
Thank you
Could not import the clipboard because Photoshop does not recognize this type of file.
Hey there! Our team has reaached out directly via email to helpy you get things sorted out!
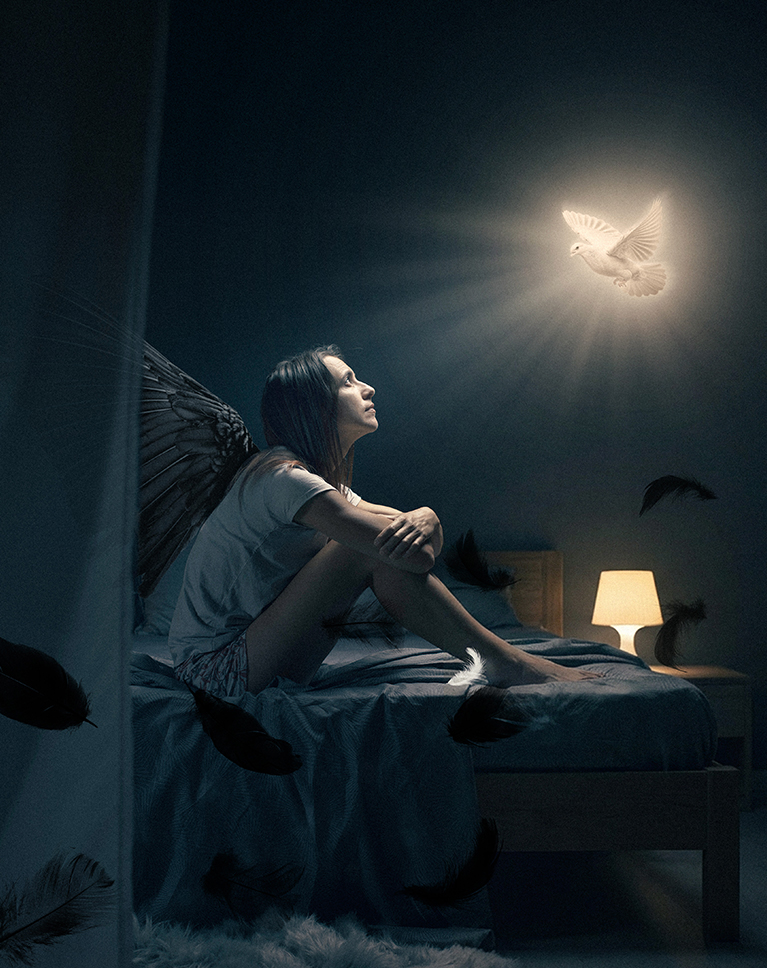
Phew! just watched 02-light dove. What a great idea and super conclusion. So much information and now going to attempt to put this composite together myself. Thank you for a great tutorial.
Wonderful information! thank you!
Just a great course. Aaron is a GREAT teacher!