

Download Assets
This tutorial includes 1 sample image and 1 PDF guide. Downloads are free with a PHLEARN account.
- Download the sample images and PSDs from every free tutorial on PHLEARN
- New free tutorials published every week
- One free account — sign up once, then download anything
Free PDF Guide · 3 Pages
This Tutorial as a Step-by-Step PDF
The guide covers Select > Color Range with the plus eyedropper and Fuzziness, a Hue/Saturation layer to take out the yellow, cleaning its mask with the Brush, the Lasso, Select > Inverse and Edit > Fill, then a Curves layer that shares the same mask. Keep it next to your keyboard.
description
Learn how to whiten teeth in a portrait by treating it as two separate problems — color and brightness — each with its own adjustment layer. We select the teeth with Color Range, tighten the selection with the Lasso tool, pull the yellow out with Hue/Saturation, then reuse that same mask on a Curves layer to brighten them, and cover how to keep the result subtle enough that it reads as a healthy smile rather than an obvious retouch.
Enjoying This Free Tutorial?
We publish a new free tutorial every week, each one with sample images and PSDs you can download and follow along with. Sign up and they land straight in your inbox, along with early word on sales, events and subscriber-only offers.
Image Source
Photo by Andrea Piacquadio via Pexels
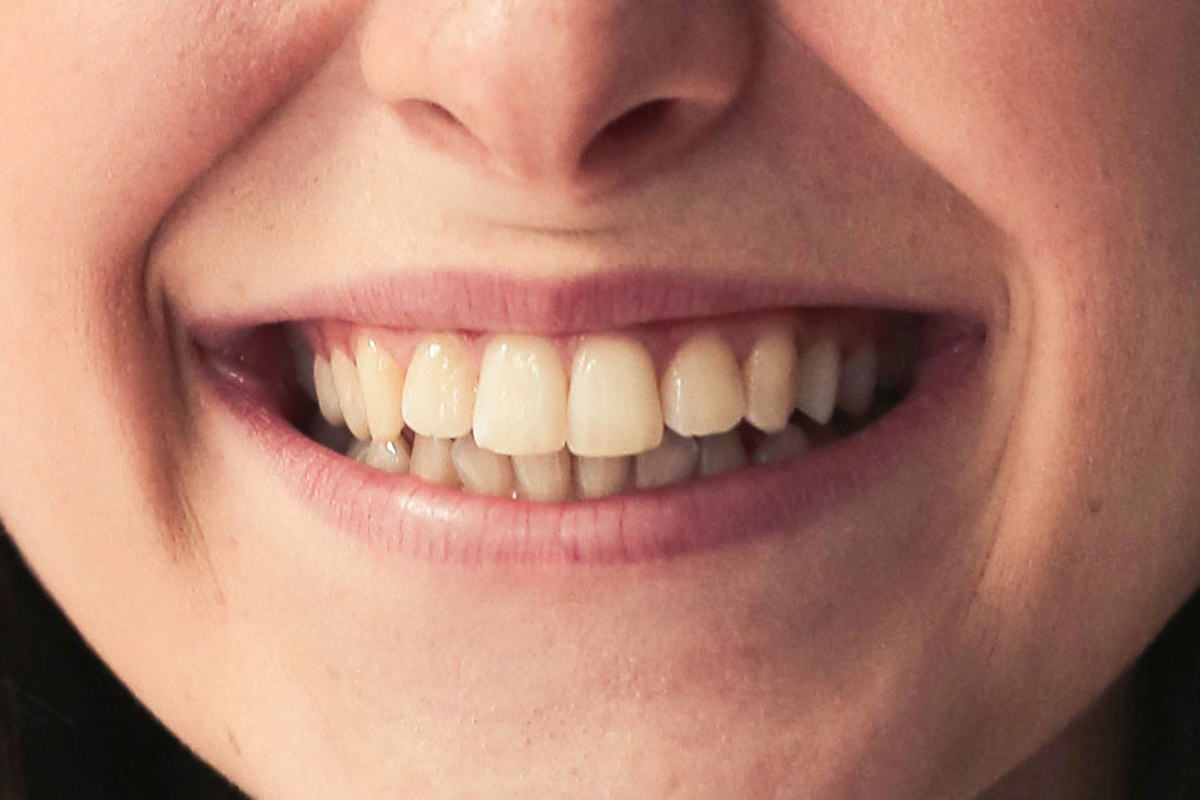
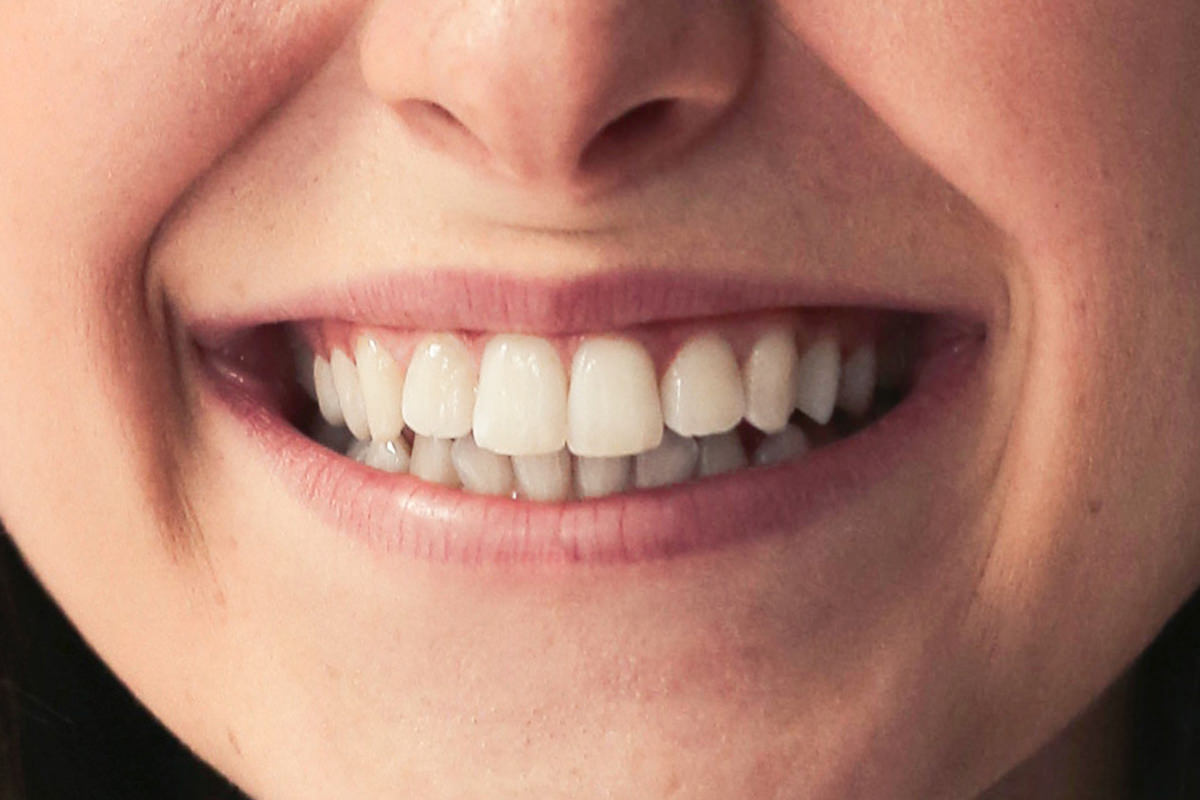
How to Whiten Teeth in Photoshop
Whitening and brightening teeth in a portrait doesn’t need a heavy retouch — a Color Range selection, one Hue/Saturation adjustment to pull out yellow, and one Curves adjustment to add brightness cover the whole effect. The real skill is in the mask work that keeps both adjustments contained to just the teeth.
Selecting the Teeth with Color Range
Rather than tracing around each tooth by hand, Color Range can select every similarly colored pixel across the whole mouth at once.
-
Open Color Range
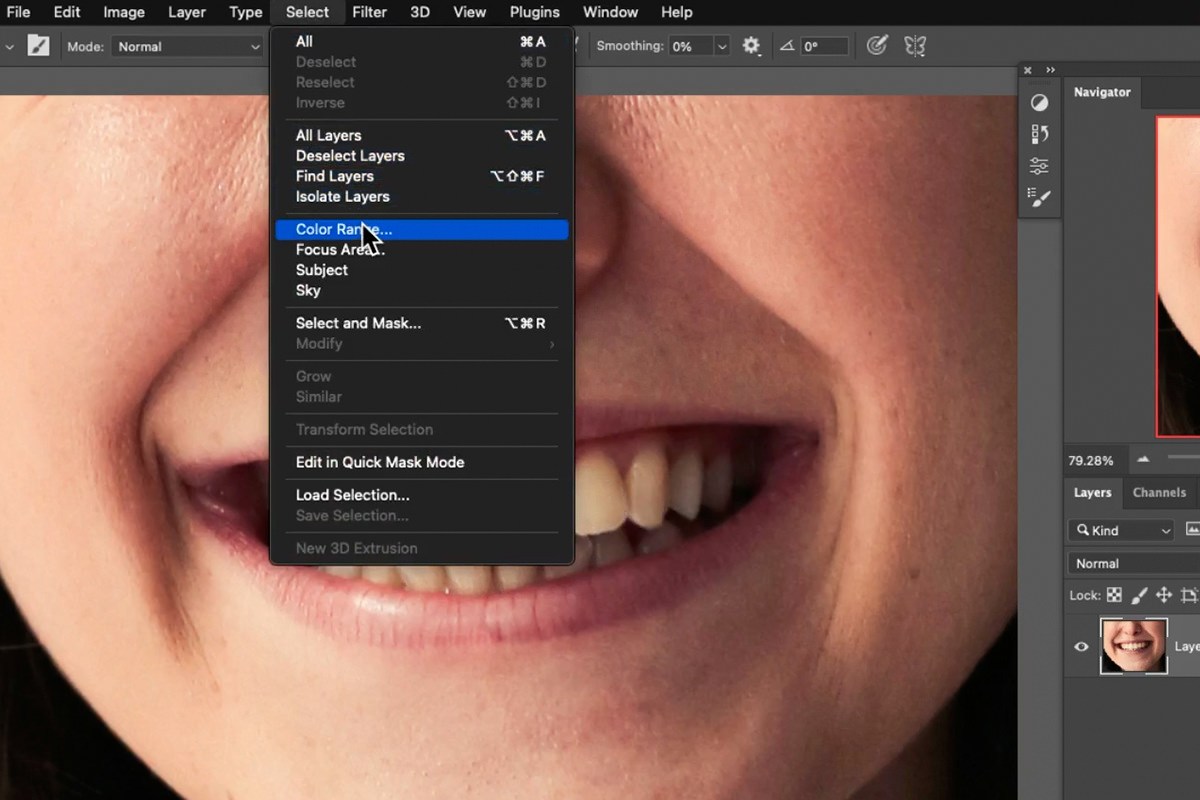
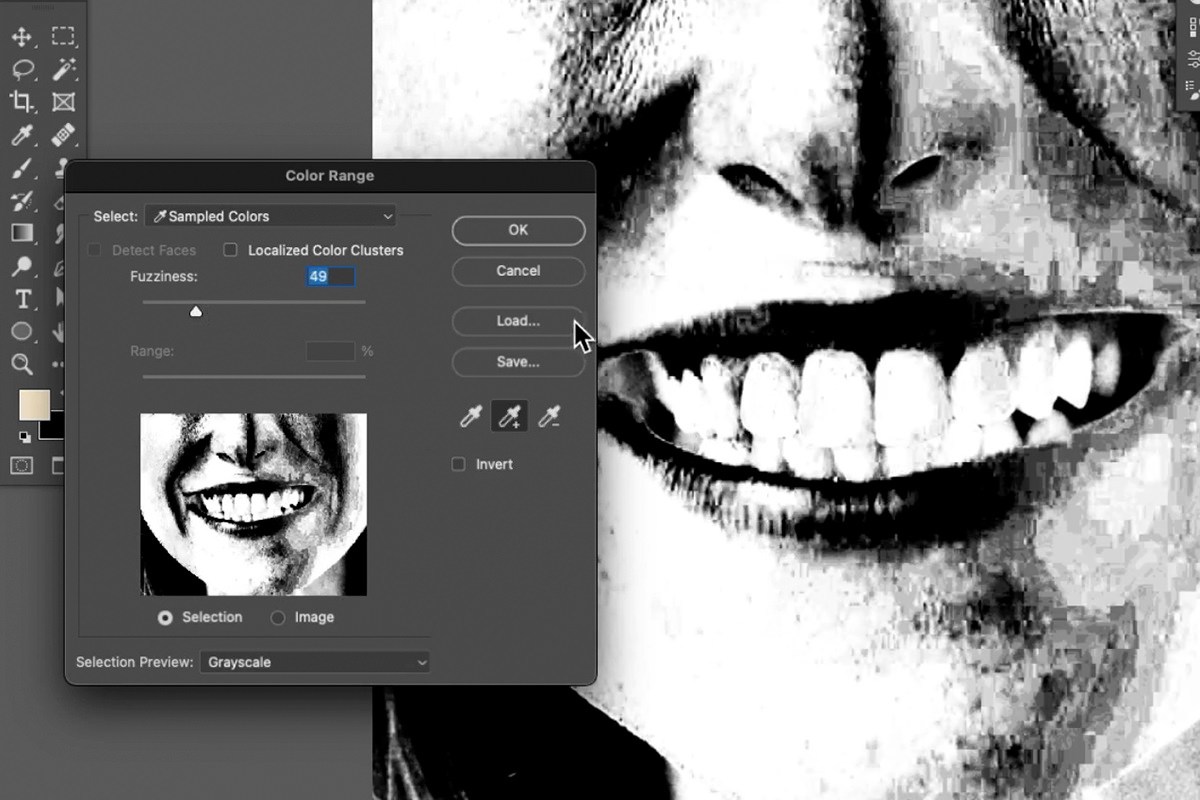
Go to Select > Color Range and use the eyedropper to click on the teeth in your image.
-
Add to the Selection
Switch to the plus eyedropper within the Color Range dialog and click additional tooth areas to make sure the entire set of teeth is included in the selection.
-
Adjust Fuzziness
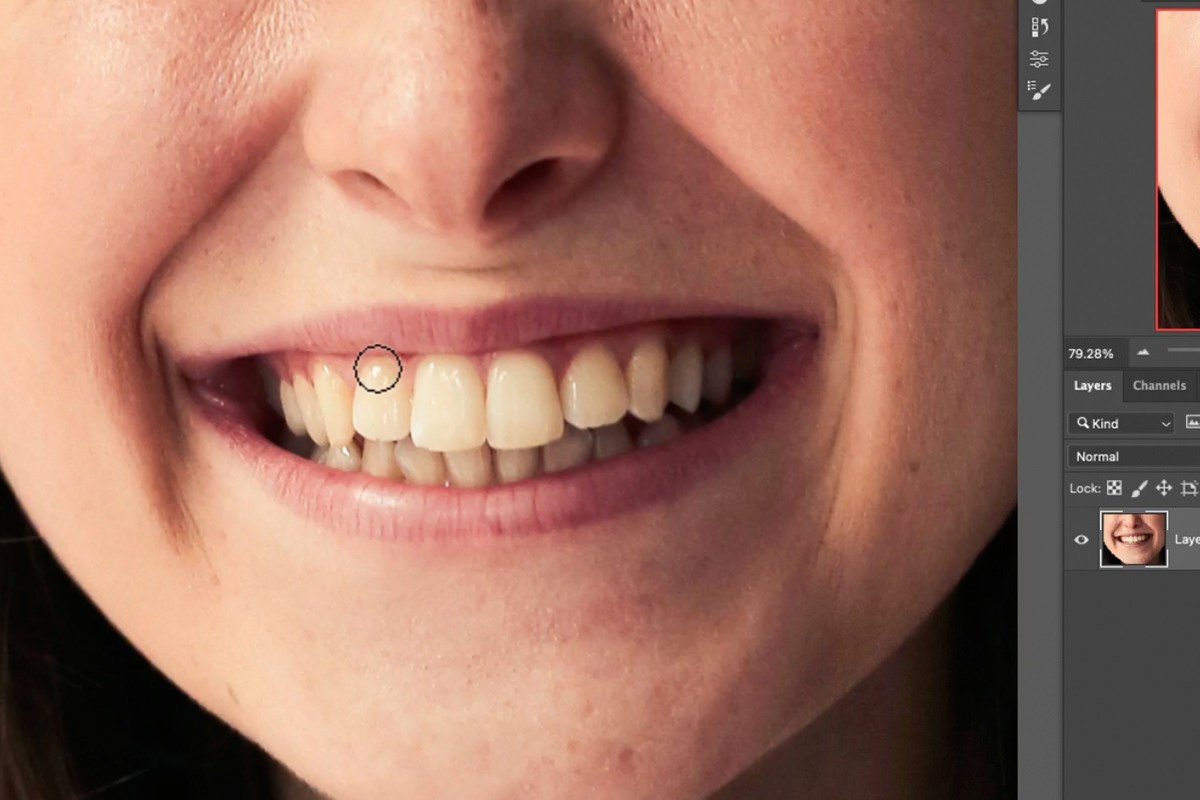
Use the Fuzziness slider to widen or narrow how many similar tones get included. If you don’t see a preview, set Selection Preview at the bottom of the dialog to Grayscale, then check it as you go, until the teeth are well selected without picking up the gums or lips. It doesn’t have to be perfect, and some skin of a similar color will be selected too; you can always adjust this later on the mask. Click OK to turn it into a selection.
Why Fuzziness Needs to Be Just Right
Too little fuzziness leaves parts of the teeth out of the selection, while too much starts pulling in the pink of the gums and lips, which will cause both the color and brightness adjustments to spill outside the teeth later. It’s worth taking an extra moment here, since a clean starting selection means far less mask cleanup afterward.
Cleaning Up the Selection with the Lasso Tool
Color Range gets you most of the way there, but a manual pass with the Lasso tool tightens up the edges.
-
Trace the Teeth with the Lasso Tool
Press L for the Lasso tool. In the video this pass comes after the Hue/Saturation layer is added, not here: once black is painted around the lips on that layer’s mask, the Lasso draws a selection right around the teeth, and that selection is inverted and filled with black (see Isolating the Effect to Just the Teeth below).
Reducing Yellow with a Hue/Saturation Adjustment
Yellow-tinted teeth are largely a saturation problem, which a Hue/Saturation adjustment layer can address directly.
-
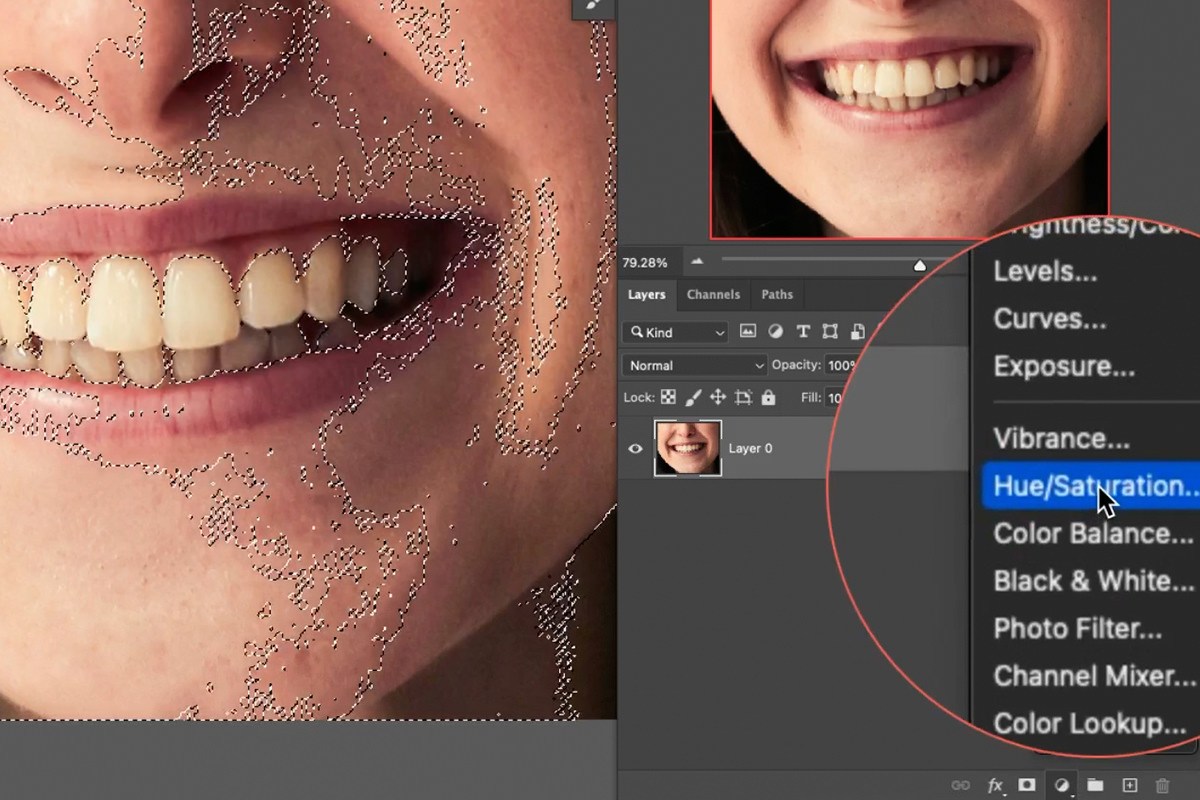
Add a Hue/Saturation Adjustment Layer
With your teeth selection active, add a Hue/Saturation adjustment layer — your selection is automatically loaded into the new layer’s mask.
-
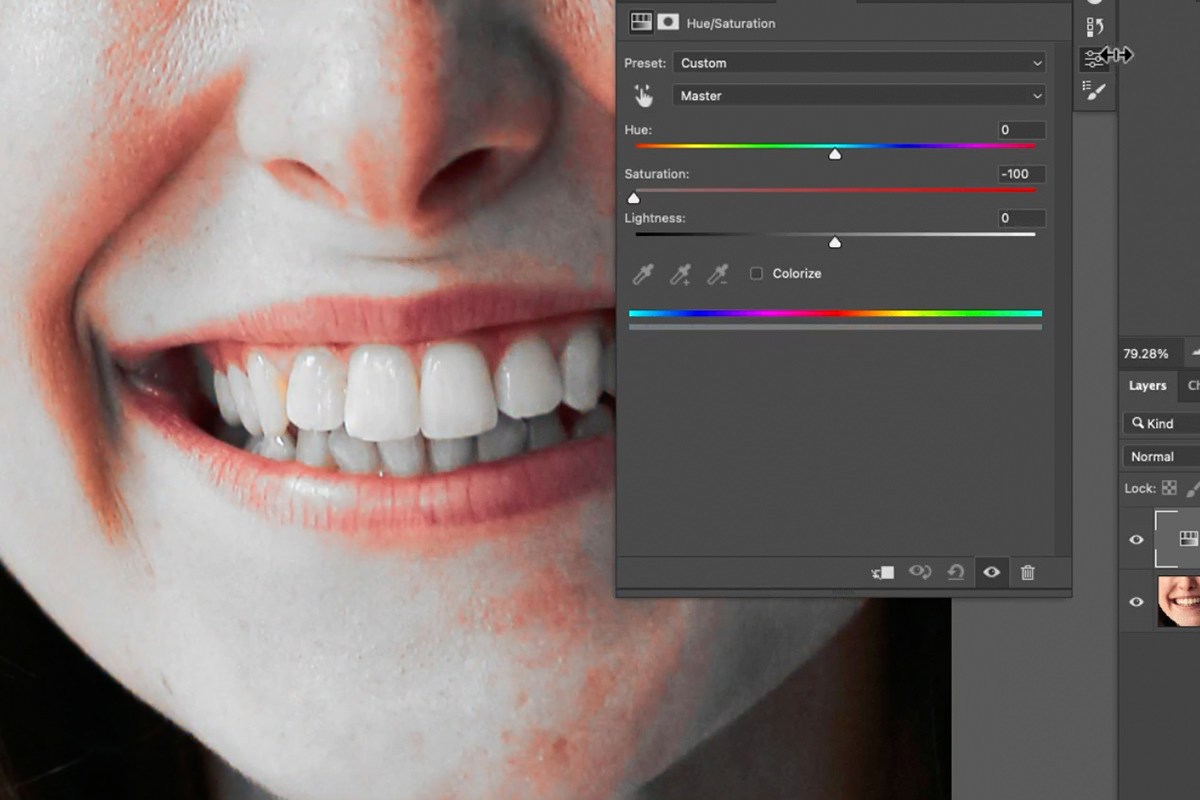
Lower the Saturation
Bring the Saturation slider down to pull the yellow color out of the teeth. You’ll see it reduce the color in the rest of the photo too, because the Color Range selection picked up more than the teeth; the mask cleanup in the next section fixes that.

Isolating the Effect to Just the Teeth
Even with a selection loaded, the adjustment’s mask can end up affecting more of the photo than intended, so it needs to be double-checked and tightened.
-
View and Refine the Mask
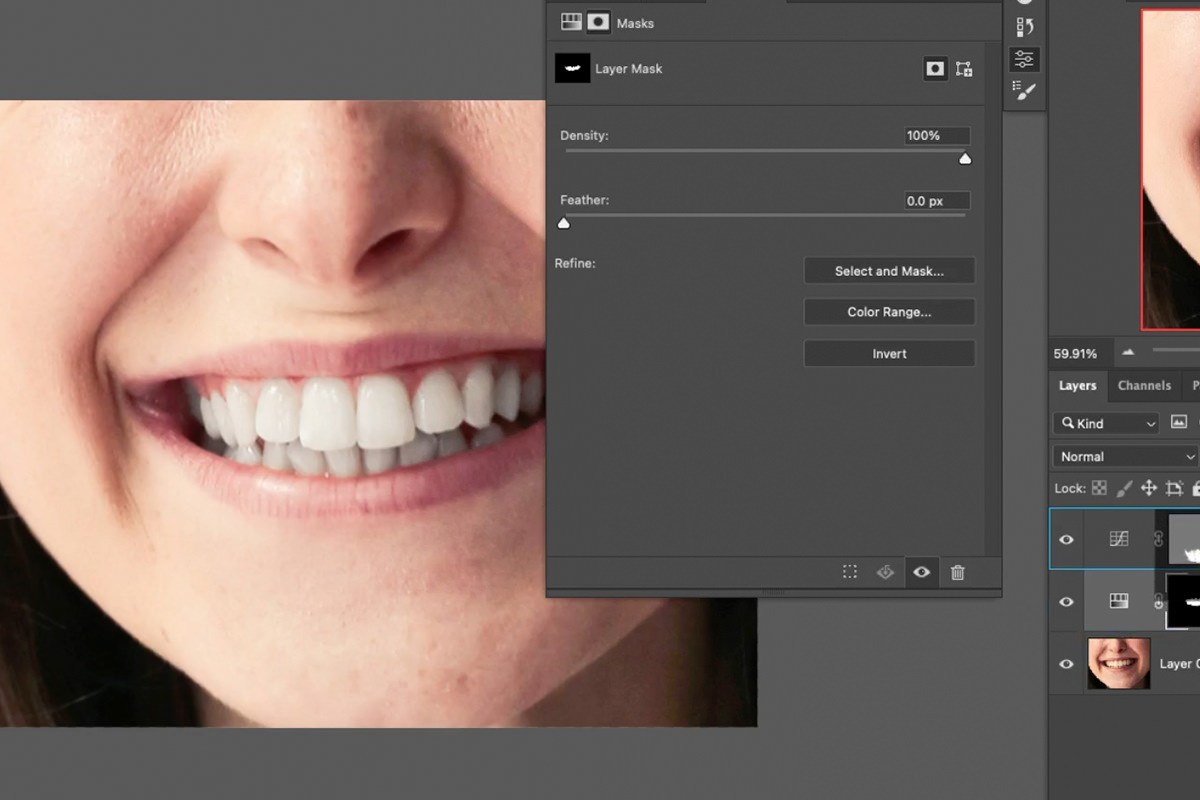
Hold Alt on PC (Option on Mac) and click the layer mask thumbnail to view it directly, then use the Brush tool to paint black right around the lips, so the teeth are separated from everything else. Then press L for the Lasso tool and draw a selection right around the teeth.
-
Invert and Fill to Isolate the Teeth
With that Lasso selection of just the teeth active, go to Select > Inverse, then go to Edit > Fill and fill that inverted selection with black, ensuring the mask shows only the teeth in white.
Why Isolate the Teeth Before Adjusting
A Hue/Saturation or Curves adjustment layer affects everything visible through its mask, so if the mask is loose, the same desaturation or brightening meant for the teeth will bleed onto the lips, gums, or skin around the mouth. Taking the extra step to invert and fill the mask so that only the teeth remain white means the adjustment can be pushed further without any risk of it showing up where it shouldn’t.
Brightening Teeth with a Curves Adjustment
Once the color is fixed, a second adjustment layer adds brightness using the same mask you’ve already built.
-
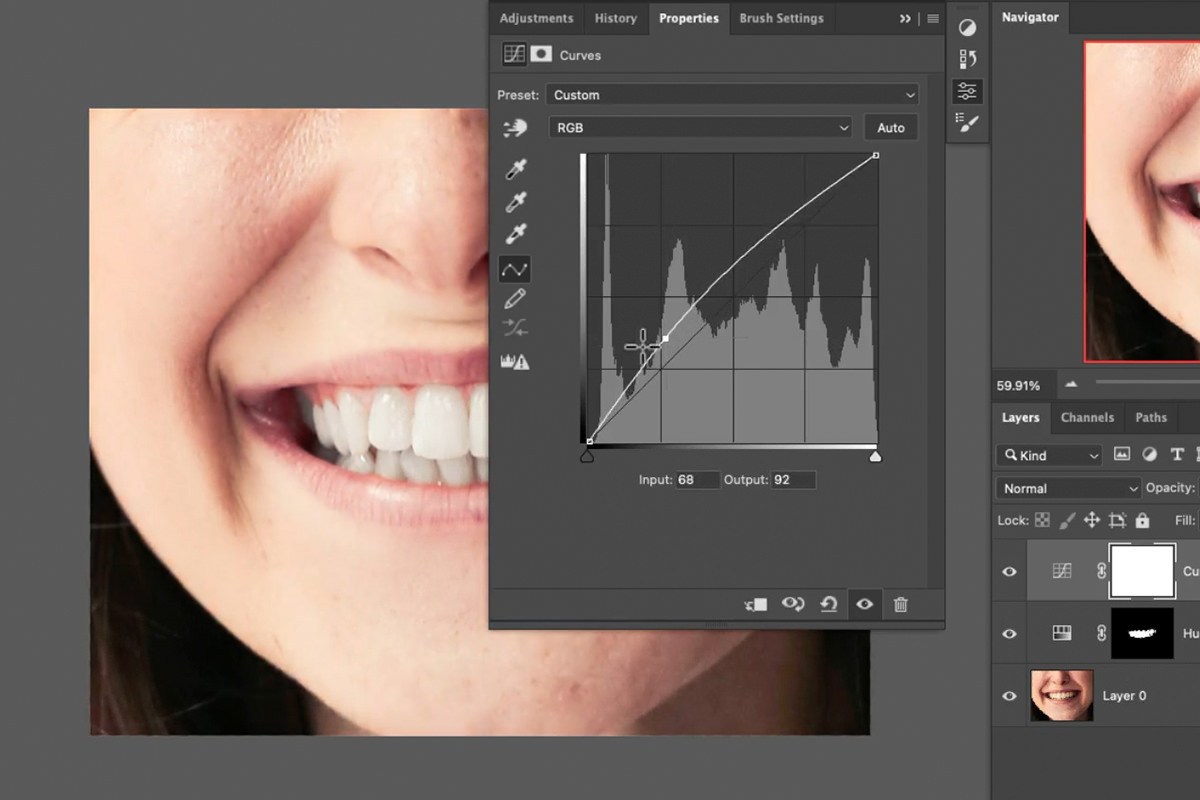
Add a Curves Adjustment Layer
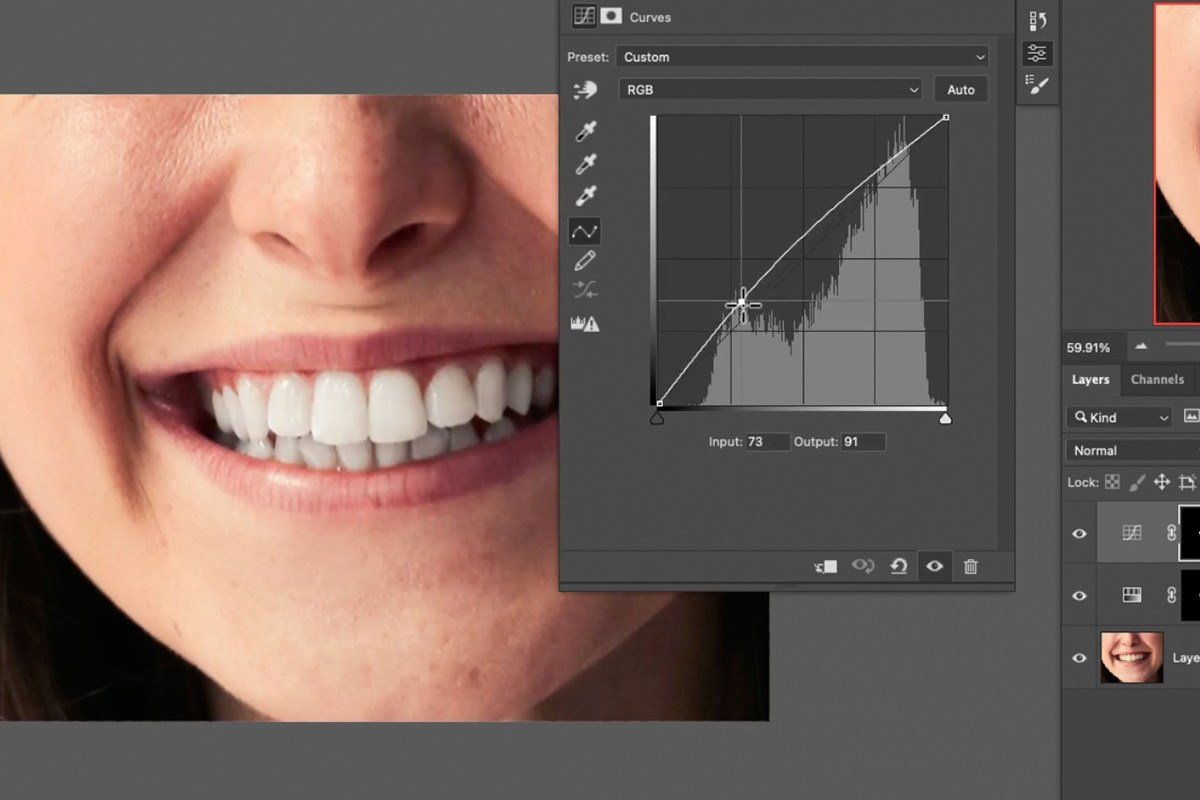
Add a Curves adjustment layer and bring the curve up a little to brighten the image — this will initially be visible across the entire photo.
-
Copy the Mask from Your Hue/Saturation Layer
Hold Alt on PC (Option on Mac) and click-drag the layer mask from your Hue/Saturation layer onto the new Curves layer to duplicate it, instantly restricting the brightening to just the teeth.

Fine-Tuning the Layer Masks
Neither mask needs to be perfect on the first pass — both adjustment layers can be revisited and cleaned up at any point.
-
Touch Up Either Mask as Needed
Click on either adjustment layer’s mask, grab the Brush tool, and paint white to reveal the effect in any missed spots, or black to pull it back from any area it shouldn’t be affecting.
-
Double-Click to Readjust the Sliders
Double-click either adjustment layer’s thumbnail at any time to reopen its sliders and fine-tune the amount of saturation reduction or brightening.

Keeping the Effect Natural and Subtle
The last step is stepping back and checking the overall result rather than judging the effect zoomed in on just the teeth.
-
Zoom Out and Compare
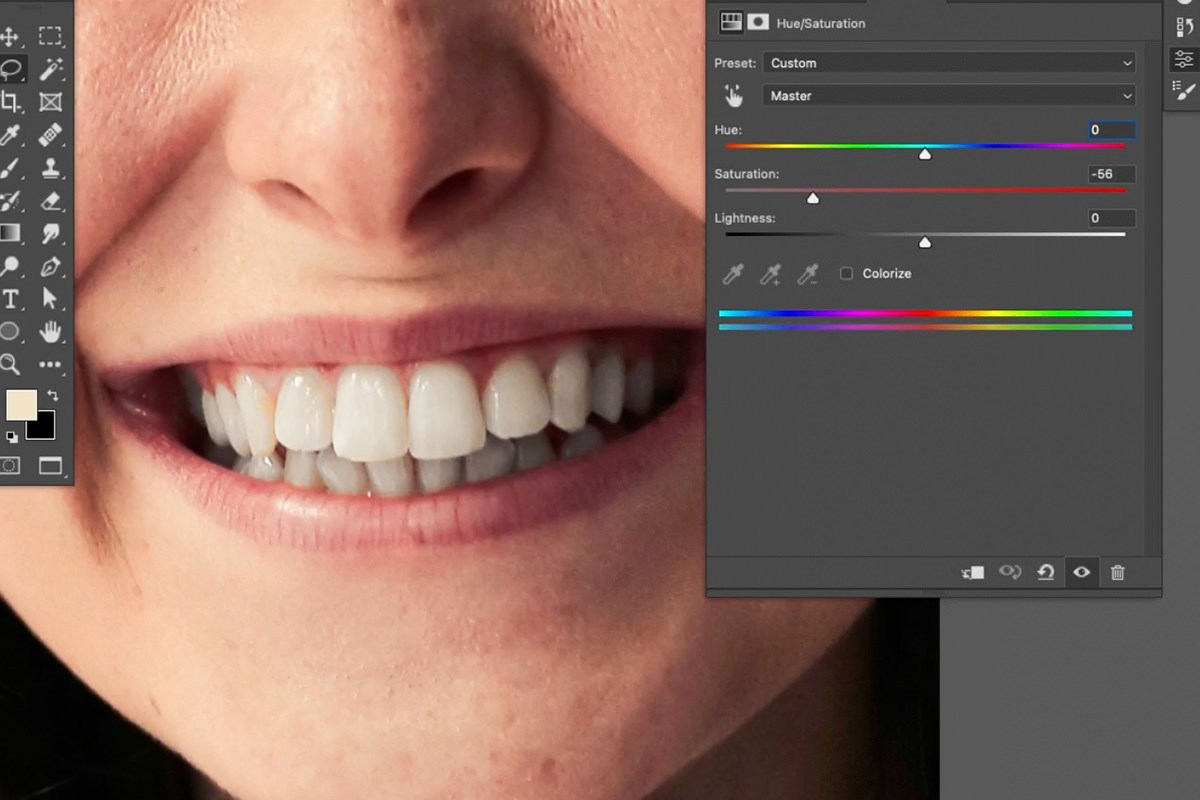
Zoom out to view the full portrait and toggle both adjustment layers on and off to compare the before and after at a normal viewing distance.
-
Pull Back Any Adjustment That Looks Overdone
If the teeth look unnaturally white or bright, lower the saturation reduction or brightening slightly — taking saturation all the way to zero, in particular, tends to look artificial rather than clean.
Why Subtlety Matters More Than Strength
Teeth whitening is one of those retouches where restraint reads as skill and excess reads as an obvious edit — a viewer should notice that a smile looks healthy and bright, not that it’s been visibly retouched. Keeping both the saturation and brightness adjustments modest is what keeps the result looking like the person’s own teeth rather than an artificial white rectangle pasted into the mouth.
Why This Approach Works
This technique works because it separates two distinct problems — unwanted yellow color and insufficient brightness — into two separate, independently adjustable layers, rather than trying to fix both at once with a single blunt adjustment. Building a tight mask once, from an inverted and filled selection, and then reusing that exact mask for the second adjustment layer guarantees both effects land in precisely the same place without any extra mask-painting effort. Because both adjustments live on their own non-destructive layers, the strength of the whitening and the brightening can be revisited and toned down at any time, which matters enormously for a retouch where restraint is what makes it look convincing. The same masking logic — select, isolate, and reuse — comes up constantly elsewhere in portrait work, including in more involved retouching of skin, eyes, hair, and clothing.
Final Thoughts
Whitening teeth convincingly comes down to a tight selection, two simple non-destructive adjustment layers, and the discipline to stop before the effect looks artificial. Once the masking technique here — select, invert, fill, and reuse — feels familiar, it’s directly reusable for isolating any other small, specific area of a portrait that needs its own targeted color or brightness adjustment, whether that’s the whites of the eyes, a blemish, or a stray strand of hair.
For retouching taught in order, our PRO Retouching Learning Path is where to go next.
Quick Reference: Keys, Menus and Settings
- Select the teethSelect > Color Range: click the teeth, plus eyedropper to add, Fuzziness; Selection Preview: Grayscale
- Remove the yellowHue/Saturation adjustment layer, Saturation down
- View the maskAlt/Option-click the layer mask thumbnail
- Isolate the teethPaint black around the lips, L to Lasso the teeth, Select > Inverse, Edit > Fill with black
- BrightenCurves adjustment layer, curve up a little; Alt/Option-drag the mask onto it
- Fine-tunePaint white or black on either mask; double-click a layer to readjust
No AI, no generative credits.

Free Downloads
Follow Along on the Same Photo
Get the close-up smile from the video and the 3-page PDF guide that walks through every step. Free with a PHLEARN account.
Whitening Teeth in Photoshop: Common Questions
How do I select just the teeth?
Go to Select > Color Range and click the teeth with the eyedropper. Switch to the plus eyedropper to add any teeth that were left out, set Fuzziness and click OK.
Why don’t I see a preview in Color Range?
Set Selection Preview at the bottom of the Color Range dialog to Grayscale. Selected areas show white.
How much Fuzziness should I use?
Enough to include the teeth without going so far that it includes the gums or the lips. It doesn’t have to be perfect; you can always adjust this later on the mask.
How does lowering Saturation whiten teeth?
Yellow teeth are a color problem. With the selection active, add a Hue/Saturation adjustment layer and bring Saturation down to reduce the color in the teeth.
Why did the whole face lose color?
Color Range selected skin that’s a similar color to the teeth. Alt/Option-click the mask, paint black around the lips, Lasso around the teeth, then Select > Inverse and Edit > Fill with black.
How do I brighten the teeth too?
Add a Curves adjustment layer and bring the curve up a little. It brightens the whole photo until you Alt/Option-drag the mask from the Hue/Saturation layer onto the Curves layer.
Part of a tooth didn’t get whitened. How do I fix it?
Click the layer mask, take the Brush tool and paint white over the missed area. Paint black to pull the effect off anything it shouldn’t touch.
How white should the teeth be?
Keep it relatively subtle. Zoom out to judge it, and don’t bring Saturation all the way down to zero; it looks really bad.
Can I change the amount later?
Yes. Double-click either adjustment layer to reopen its settings and change the saturation or brightness at any time.
Are the sample files free?
Yes, with a free PHLEARN account. You get 1 sample image and 1 PDF guide: the close-up smile from the video and a 3-page step-by-step guide.
Master Photoshop, Lightroom and Photography
Join PHLEARN PRO for $12.99 a month or $99.99 a year. Cancel anytime, with a 100% money-back guarantee.





