
Download Assets
This tutorial includes 2 sample images, 1 sample PSD and 1 PDF guide. Downloads are free with a PHLEARN account.
- Download the sample images and PSDs from every free tutorial on PHLEARN
- New free tutorials published every week
- One free account — sign up once, then download anything
Free PDF Guide · 3 Pages
This Tutorial as a Step-by-Step PDF
The guide walks through adding a Stroke layer style from the gray bar of the type layer or fx > Blending Options, picking Inside, Outside or Center, raising tracking in Window > Character or lowering the stroke Size, then lowering Fill instead of Opacity to keep only the outline. Keep it next to your keyboard.
description
Photoshop has a deep set of tools for building text-based graphics, and outlining type is one of the most useful. Using the Type Tool together with Layer Styles, you can add a clean stroke around any text while making the interior completely invisible, letting a background image show straight through the letterforms.
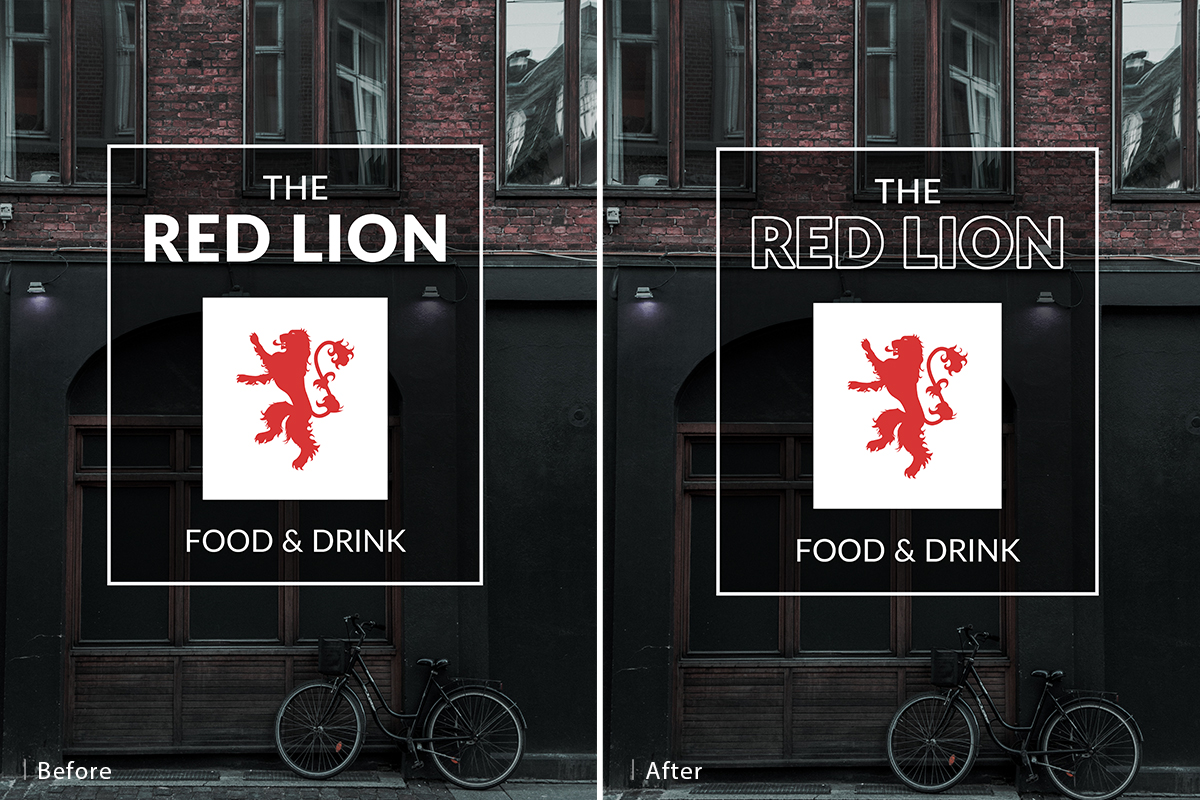
The trick is the difference between Opacity and Fill. Fill makes a layer more transparent but leaves its Layer Styles untouched, so a Type Layer with a stroke applied and Fill lowered to 0% keeps the outline visible while the inside of the text disappears.
Enjoying This Free Tutorial?
We publish a new free tutorial every week, each one with sample images and PSDs you can download and follow along with. Sign up and they land straight in your inbox, along with early word on sales, events and subscriber-only offers.
How to Outline Text in Photoshop
This tutorial shows how to turn ordinary text into outlined text using a Stroke layer style, and then how to hide the letters’ interior entirely so only the outline remains, letting a background photo show through. A PSD of the sample “Red Lion” pub logo design is available as a free download to follow along.
What Outlined Text Can Do
Outlined text is a versatile design effect on its own, but hiding the interior fill so only the outline remains opens up even more possibilities, letting a photo or background show through the letterforms themselves rather than sitting behind a solid block of text.
The sample PSD is a made-up pub logo, The Red Lion, over a storefront photo. Turn its layers off and back on one by one to see how it goes together: a Color Fill layer in a rectangle shape with its opacity lowered, the type layers, two rectangles made with the Rectangle Tool, and a lion icon that was black until a Color Overlay layer style made it red. “The” and “Red Lion” are separate type layers with different font weights, so one can be outlined without the other. Aaron found the lion on The Noun Project (thenounproject.com), a website he recommends for icons.
Adding a Stroke to Text with Layer Styles
Double-click directly on a text layer’s name bar in the Layers panel to open its Layer Style dialog (or go to the FX icon at the bottom of the Layers panel, then Blending Options). Check the Stroke option, then set an initial Size large enough to see clearly, raise the Opacity, and click the color swatch to choose a color that stands out against the text, such as red.
Choosing Stroke Position
The Stroke settings include a Position option: Inside keeps the stroke entirely within the letterforms, Outside places it entirely outside their edges, and Center straddles the edge itself. Which option looks best depends on the specific letters and what the stroke is meant to accomplish, though Outside often reads clearest for this kind of bold outlined-text effect.
Trying Blend Modes and Gradients
The stroke’s Blend Mode can also be changed from Normal to something like Darken, which blends the stroke color with whatever’s beneath it, or Overlay, which blends it with the image so you can barely see it. The video sticks with Normal. Instead of a flat color, clicking into the Gradient option opens the Gradient Editor, where a linear or radial gradient, with adjustable scale, can be used for the stroke instead of one plain color.
Revisiting and Adjusting the Stroke Anytime
Once a Stroke effect has been applied, it appears listed under that layer in the Layers panel; double-clicking directly on the word “Stroke” there reopens the same Layer Style dialog at any time, so the size, color, or any other setting can be revisited and adjusted without starting over.
Fixing Letter Spacing for a Thicker Stroke
A thicker stroke can cause adjacent letters to visually touch or overlap, since the added width extends outward from each character equally. To fix this, select the text layer, go to Window, then Character, and increase the tracking value (letter spacing) in the Character panel, for example from 25 up to 100, to add breathing room between characters without changing their actual size. Going back to 0 is the standard spacing. In the video, after trying 100, Aaron sets the tracking back to 25 and lowers the stroke Size instead, for a slightly smaller outline.
Hiding the Letter Fill to Show Only the Outline
To hide just the letters while keeping their outline fully visible, find the Fill value near the top of the Layers panel, under Opacity, for that text layer and lower it toward zero. As the Fill value drops, the solid letter shapes fade away while the Stroke effect, since it’s a separate layer style rather than part of the fill, stays completely visible.
Fill vs. Opacity: What’s the Difference
Lowering a layer’s regular Opacity fades everything on that layer at once, including any applied layer styles like the stroke, whereas lowering Fill specifically only fades the layer’s own original content (the letter shapes themselves) while leaving layer styles like Stroke fully intact. Switching the stroke’s color to white at this stage, once the letters are hidden, is what the video does next: double-click Stroke again and pick white.
Applying the Same Technique to Any Shape
This entire technique isn’t limited to text: any shape or object layer, such as an icon or logo mark, can be outlined and have its fill hidden the exact same way, by adding a Stroke layer style through FX, then Blending Options, choosing its position (Inside, Outside, or Center), and lowering that layer’s Fill value to reveal just the outline.
Combining Techniques for a Custom Look
Duplicating an outlined-and-hollowed text layer and placing the copy over a cropped photo shows how flexible this effect can be as a design overlay: increasing the stroke width slightly can help keep the outlined text readable against a busier background image, and the Fill value doesn’t have to sit at exactly zero either. Anything from 0 to 100 works, so a little Fill left in lets a little of the white letter color show inside the outline.
Going Deeper with Layer Styles
Stroke is just one of several layer style effects available in the same Blending Options dialog, alongside options like Color Overlay, Drop Shadow, and Bevel & Emboss, all of which stack together non-destructively on any layer. For the fuller picture of what is possible, see How to Master Layer Styles in Photoshop.
Final Thoughts
Outlining text in Photoshop comes down to one layer style, Stroke, and one simple trick, lowering Fill instead of Opacity to hide the interior while keeping the outline intact. Since the same steps work identically on shapes and icons, not just text, this is a genuinely versatile design technique worth having on hand for logos, overlays, and any design that needs a bold outlined look.
Quick Reference: Keys, Menus and Settings
- Open Layer StyleDouble-click the type layer’s gray bar, or fx > Blending Options
- Add the outlineStroke: Size, Opacity, Color; Position Outside for this text
- Edit it laterDouble-click Stroke under the layer’s effects
- Letters touchingWindow > Character, tracking 25 to 100, or lower the stroke Size
- Outline onlyFill to 0% in the Layers panel, under Opacity; leave Opacity at 100%
- Outline a shapefx > Blending Options > Stroke, then lower Fill
No AI, no generative credits.

Free Downloads
Follow Along on the Same Design
Get the 2 sample images, the layered Red Lion logo PSD and the 3-page PDF guide to outline the same text as the video. Free with a PHLEARN account.
Outlining Text: Common Questions
How do I outline text in Photoshop?
Double-click the gray bar of the type layer in the Layers panel, or click fx at the bottom of the panel and choose Blending Options. Turn on Stroke, then set the Size, Opacity and Color.
Should the stroke be Inside, Outside or Center?
Inside keeps the stroke within the letters, Outside puts it only on the outside, and Center straddles the edge. It is different for every instance, so zoom in and compare. For this text, Outside works best.
Can the outline be a gradient instead of a color?
Yes. In the Stroke settings, switch the fill to Gradient and open the Gradient Editor to load one. You can try a Radial style and change its Scale.
How do I change the outline after I click OK?
Double-click the word Stroke listed under the layer’s effects in the Layers panel. The same dialog opens, so you can change the size or color at any time.
Why are my outlined letters touching each other?
A thick stroke closes the gaps between letters like the R and E. Go to Window > Character and raise the tracking (the sample is set to 25), or bring the stroke Size down. In the video Aaron keeps tracking at 25 and lowers the Size.
How do I make the inside of the letters transparent?
With the type layer selected, lower Fill near the top of the Layers panel, under Opacity. At Fill 0% the letters disappear and the stroke stays.
Why does lowering Opacity make the outline fade too?
Opacity fades everything on the layer, including layer effects like the stroke. Fill fades only the letters themselves, so use Fill when you want just the outline.
Does Fill have to be set to 0?
No. Anything from 0 to 100 works, so you can let a little of the white letter color show inside the outline.
Can I outline a shape or icon instead of text?
Yes, the same steps work on any layer, like the lion icon in the sample. Go to fx > Blending Options, add a Stroke, pick its color, width and position, then lower Fill.
Are the sample files free?
Yes, with a free PHLEARN account. You get 2 sample images, 1 sample PSD and 1 PDF guide: the PSD is the layered Red Lion logo design used in the video, and the guide covers every step.
Master Photoshop, Lightroom and Photography
Join PHLEARN PRO for $12.99 a month or $99.99 a year. Cancel anytime, with a 100% money-back guarantee.





