Tutorial Description
Learn to edit in a way that is not as destructive to your images, and retain the maximum amount of quality. Use these 8 steps!
Photoshop has a legendary array of editing Tools at your disposal: Curves, Levels, Color Balance, Saturation, Gradient Maps, Channel Mixer, etc. Each allows you to apply unique effects to your images, so when your photo calls for a very specific kind of edit it’s not uncommon to stack up layer after layer of adjustments to get that perfect look. Unfortunately, each additional layer adjustment you apply can degrade your image quality. Here are some of the best ways to maximize your image quality while editing.
A quick side note: I can hear a bunch of you already shouting at me: but adjustment layers are non-destructive, so what are you talking about degrading image quality for??? True, Adjustment Layers are “non-destructive,” but what that really refers to is the ability to apply and remove adjustments without altering the actual pixels of the Background layer. Since you aren’t affecting the original pixels, this editing is called “non-destructive;” this is NOT the same thing as degrading image quality. With adjustment layers it’s still entirely possible to push an image outside of its Color gamut or to Stretch its tones too far apart, resulting in posterization or banding. What we’re going to talk about here is how to maximize your image quality while also editing non-destructively.
1) Shoot Raw
The number one thing you can do to prevent image quality issues is to shoot using the raw image format. For those of you whose cameras’ quality is set to “jpeg,” go change it to “raw.” Right now; I’ll wait. Why is this so important? Simple: because a raw file contains anywhere between 16 and 64 times more data than an equivalent Jpeg does, and when it comes to image quality, more data is a good thing. When your camera creates a Jpeg image it takes all the raw information from the photo and compresses it into an 8-bit file. In this compression process tons of data is simply thrown away in order to save storage space. And as soon as you start to throw away image data you lose Shadow and Highlight detail, your Colors become less accurate and less subtle, and any smooth Transitions or gradients in your image (like Light fall-off across someone’s Face) become more and more rough. By shooting in the raw format you’ll preclude any of these jpeg issues from occurring and you’ll maximize the data you have to work with during the editing process.
2) Edit in ACR or Lightroom as Much as Possible
All RAW files need to be opened in a raw convertor before they can be brought into Photoshop. Adobe Camera Raw (which is built into Photoshop) and Lightroom are the two most common convertors and they’re both magical in their editing capabilities. Editing a photo in a RAW convertor is like working with warm taffy: you can massage it and knead it to an infinite degree and it remains pliable. Bring that same photo in Photoshop and it becomes brittle, more likely to snap than Stretch. Case in point: below are two versions of the same photo, one in which an extreme curves adjustment was applied in the raw convertor, and one in which the same extreme curves adjustment was applied in Photoshop. Even though the photos may look virtually identical check out the Histogram of the one edited in Photoshop. All those gaps in the histogram mean missing data, and missing data means crap image quality.
Hover over to see the Difference between editing in ACR and Photoshop
This idea goes for Saturation, Color Balance, Black and White conversion, or any of the other adjustment layers you might throw on an image. All adjustment layers have the ability to degrade image quality if pushed too far. Make as many as possible of these Adjustments in ACR or Lightroom and you will prevent further image quality degradation.
3) Minimize Curves and Levels Adjustment Layers to Prevent Banding
Ok, so we’ve seen that pushing heavy edits from within Photoshop can lead to data gaps in the Histogram. But what do those
gaps actually mean for our images? Look at it like this: wherever you have a gap in your histogram it means you have an entire tonal area missing from your image. Say you have a sky that Fades from royal blue to turquoise. It should be a smooth Transition, but if you’ve pushed your edits too far -thus removing some tonal areas in your sky- it means that the Fade from blue to turquoise will look like a series of discrete tones, or bands:

This banding, also known as posterization, occurs when a Curves or Levels adjustment Spreads the tones of an image too far apart. Because we’re talking about a digital file, the tones in an image don’t lie along a smooth Curve, but rather exist as a series of discrete steps. Most of the time those steps are so close together that they appear to be a smooth Curve. But once a curves, levels, or Contrast Adjustment starts to Spread the tones apart, their step-wise nature becomes apparent. The solution here is simply to minimize the number of curves, levels, or Brightness Adjustment Layers and to limit the strength of the ones you do apply. But if you listened to Step 2 then you’ll be doing most of your edits in your raw convertor and you will have avoided this issue entirely. A cookie for you.
4) Edit in 16-bit mode for Further Banding Prevention
Many times you will see banding in image edits that rely on lots of gradients, feathered masks, or soft-edged brush strokes. This kind of banding is often caused by editing in 8-bit mode. When you open a jpeg directly into Photoshop it opens as an 8-bit file. When you bring your image from the raw convertor into Photoshop you have the option of editing it as an 8-bit or 16-bit file. 16-bit images are much higher in quality for the same fundamental reason we’ve been discussing so far: more data to work with.
—Warning! Technical jargon ahead. Feel free to skip the technical description that follows; just be sure to always open your files as 16-bit for maximum quality—
8-bit and 16-bit refer to something called bit Depth. Bit Depth is an indication of the number of tones available in your image in each of the RGB Channels, as well as the number of shades of gray. Like we discussed in Step 3 above, digital images are represented by discrete tones, not continuous curves. So the more tones you have the smoother the transition between tones will seem.
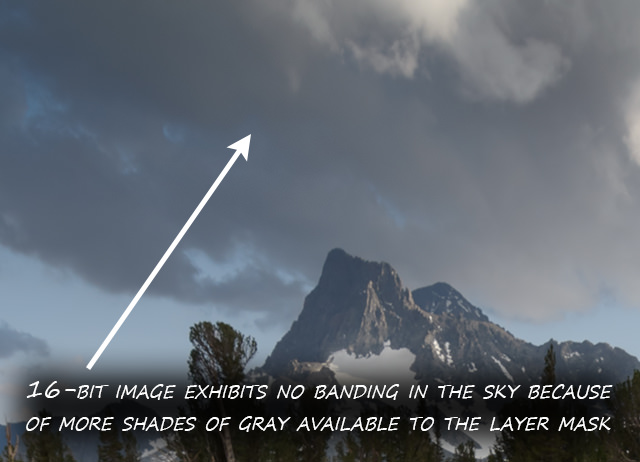
At first glance you might think a 16-bit image has twice as many tones as an 8-bit image, but that’s far from the truth. In fact, since bits are used as a binary method of counting, each bit you add doubles the number of tones in your image. So a 16-bit image contains two times two times two times two times two times two times two times two times more data than an 8-bit image. 8-bit images contain a maximum of 256 (which is 2^8) discrete tones in each of the Red, Green, and Blue Channels. They also contain a maximum of 256 shades of gray. Whereas a 16-bit image contains 65,536 tones in each Channel, and 65,536 shades of gray. That huge increase in the total number of tones in your images means much smoother Color gradients and Luminosity gradients, effectively getting rid of the banding problem caused by soft brush strokes, feathering, and Layer Mask gradients.
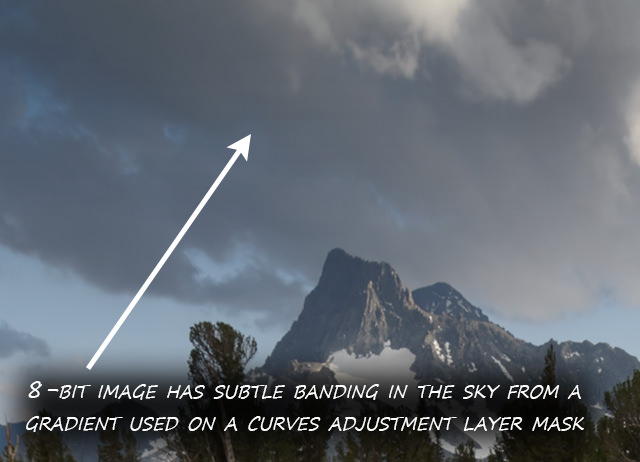
Look at the two images below. The first was edited in 8-bit mode. When I used the Gradient Tool to mask a Curves Adjustment to affect only the sky it cause banding, because there are only 256 shades of gray available to describe the Transition of the gradient. But the 16-bit image uses 65,536 shades of gray to describe the gradient, and the result is a much smoother transition with no visible banding.
5) Use Smart Objects
Another key ingredient in the image quality recipe is Smart Objects. In Lightroom or ACR, when you export your file to Photoshop as an 8- or 16-bit image you also have the option of exporting the image as a Smart Object. Do it.
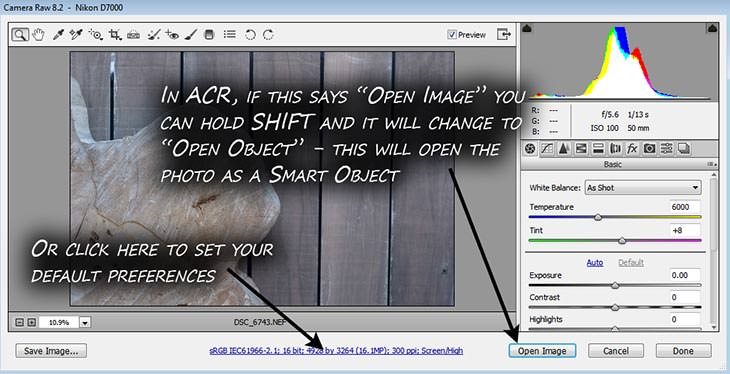
A Smart Object is simply an image that can be brought back into the raw convertor at any time and re-edited in raw (note that even if you use Lightroom as your raw convertor, Smart Objects re-open in ACR). These re-edits will then be exported back into Photoshop and will propagate through your entire Photoshop Workflow. For example, say you open an image from ACR into Photoshop and make some quick Color Adjustments to it. Then you decide there isn’t enough Contrast in the image. You could add a Curves Adjustment Layer to beef up the contrast, but we already know that Curves Adjustment Layers increase posterization in your images. Instead, if you’re working with a Smart Object, you can simply double-click the Smart Object icon in the Layers Palette to send the image back to ACR.
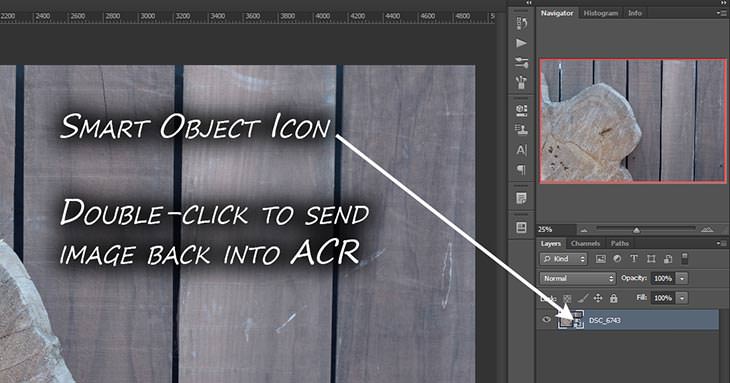
Add your contrast and click ok: the image is exported back to Photoshop with the highest possible quality. Best of all, any adjustment layers you did create will be preserved, meaning you can pick up your editing right where you left off. There’s no limit to the number of times you can send a Smart Object back to the raw convertor, so every time you want to make an adjustment to your image decide if the adjustment can be made in raw rather than via an Adjustment Layer. If so, send the Smart Object to the raw convertor and maintain your image quality. This method of editing also minimizes file Size (compared to having lots of adjustment layers), thus saving disk space and speeding up processing time.
6) Fix Banding / Posterization Issues by Adding Noise
So far we’ve been talking all about prevention; how to stop those ugly banding issues before they even start. But what if, despite your painstaking approach to maximizing image quality, you’re still getting banding? Or say you have an old photo that’s full of banding, but re-editing it from scratch is too much of a pain is the ass? How can you get rid of banding once you’ve got it? You’ve heard the phrase “fight fire with fire,” and here we’re going to do something similar: fight poor image quality by obscuring image quality. Say what?
Specifically, what we’re going to do is Add Noise. The easiest way to do this is to simply use the Filter->Noise->Add Noise Filter in Photoshop. Each image will require a certain amount of noise depending on how bad the banding is. Take a look at our sky image from before as an example. Since it contains a high amount of banding, it took a fairly high amount of noise (22%) to obscure the posterization. But that noise did indeed help the transition look smoother.
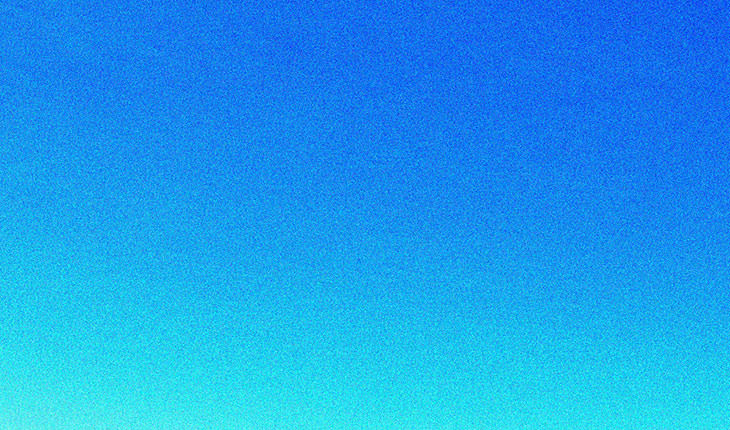
So is the noise really getting rid of the banding? Nope. It just breaks up the image so that your eye can’t tell it’s there anymore.
7) Get a Proper Exposure to Minimize Noise
And now that I’ve told you to Add Noise to obscure banding, I’m going to tell you that noise is actually an unholy scourge that should be avoided at all costs. Oh sure, some amount of noise can be used to great artistic effect, or as we’ve just seen, to help fix other image quality issues. But if you’re going to use noise or Grain in these ways, you still want the cleanest possible image to start with, because that will give you the most options with your editing. If your final image comes out full of Grain, great! Just make sure it’s because you intentionally put it there and not because you had a crappy, low-quality image to start with.
So how do we eliminate noise in our images? The number one thing you can do is get a proper Exposure in camera. The fact is Noise will always exist; it’s a by-product of the digital era. There is always some small amount of random electronic activity happening within your camera that affects the pixels on your sensor. Typically this activity is so minor compared to the rampaging tide of photons entering the camera that we don’t even notice it. But if you underexpose your photo then the Difference between the genuine photons and the electronic activity isn’t as great. The darker your exposure gets the harder time your camera will have telling the photons and the noise apart. Meaning that if you increase the exposure of your photo after the fact in your raw convertor, you are also increasing your Noise at the same time. The prevention in this case is easy: always check your histogram and ensure you are making a good Exposure in camera. This will save you a lot of pain in post.
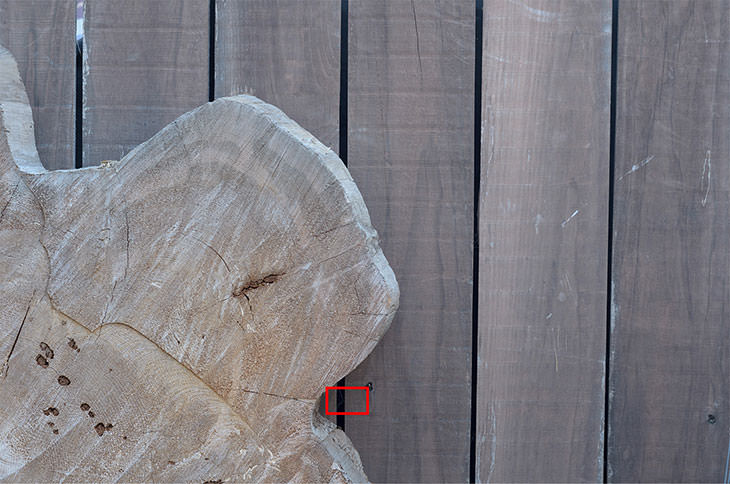
Let’s take a look at a tiny section of the above image. In the first case the image was exposed properly, with a nice, balanced histogram, leading to smooth Shadows and clean details. In the second case the image was under-exposed by 3-stops, then the exposure was pushed 3-stops in ACR. Even though the final exposure is the same in each case, the second one is much grainier and contains less Shadow detail.

Another easy way to minimize noise in your images is to shoot at a low ISO. Boosting your ISO can be a great way to maintain a fast shutter speed in low Light, but since all ISO really does is take the Light information from your sensor and Multiply it by some factor, it also Multiplies that random electrical activity by the same factor, resulting in more noise at higher ISOs. And while cameras are making huge leaps forward in their high-ISO Performance I still wouldn’t recommend shooting above ISO 400-800 for images that have to have the utmost quality.

8) Use Noise Reduction Software
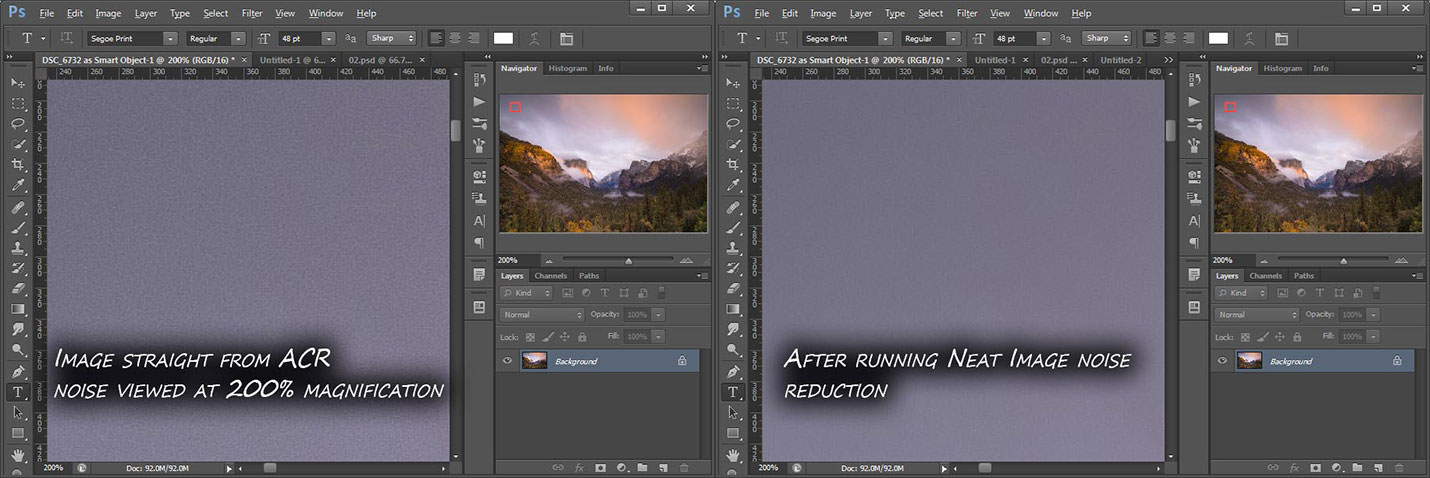
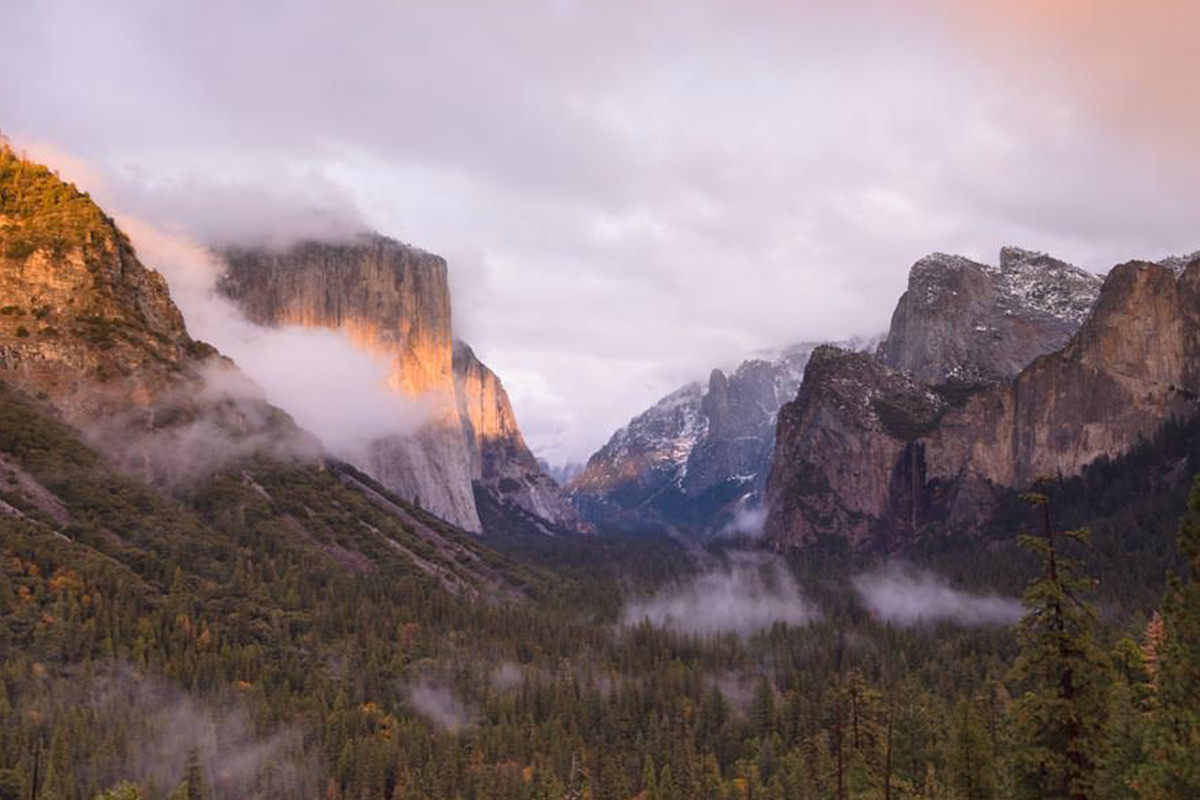
Great, so now you’ve taken your properly-exposed, low-ISO image and brought it into the raw convertor for some tweaking. You export it into Photoshop and what do you see? Noise, argh! As I mentioned, some amount of noise will always exist; it’s a fact of digital life. But no problem: we can actually reduce a fair amount of noise from within Photoshop. Let’s look at some noise reduction for the marked section of this image from Yosemite Valley:
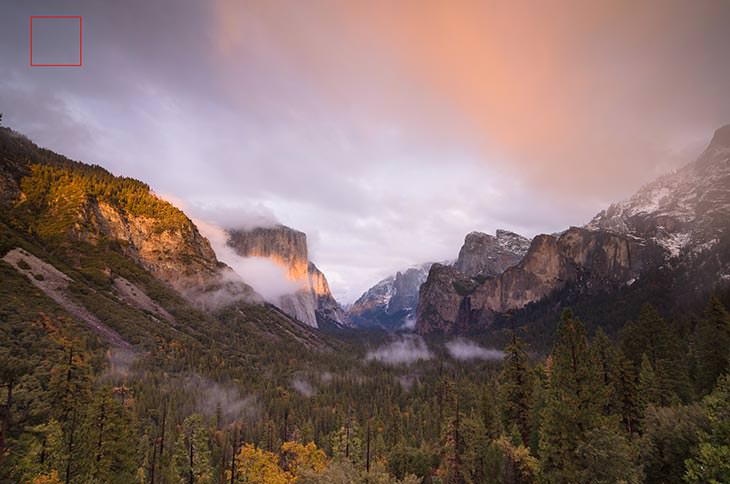
Personally I’ve found Photoshop’s built-in noise reduction to be clumsy at best: it reduces fine detail while only minimally removing noise. Boo. I’ve had much better success with 3rd-party plug-ins. I myself use three different ones: Neat Image, Nik’s Dfine, and Topaz Labs’ DeNoise. Neat Image tends to give me the cleanest results without any destruction of fine detail, but it struggles with complex images. Dfine and DeNoise are better for images full of complex Patterns and shapes, but their more aggressive nature means that sometimes they’ll smooth fine detail. Regardless, any of these packages will give you one more excellent weapon in the fight against noise.
Hover over to see how noise reduction software can help your image.
There you have it: eight easy steps to maximize image quality. Make sure these are all a part of your Workflow and your photos will exude quality, you’ll get that promotion at work, and the girl down the street will finally notice you. Ok, maybe just the first one.
Until next time, take care and happy shooting!
Josh

