Download Sample Images & Brush (145 MB)
Download the PSD
Due to the file size, we created a separate download for the PSD. You can download it here!
description
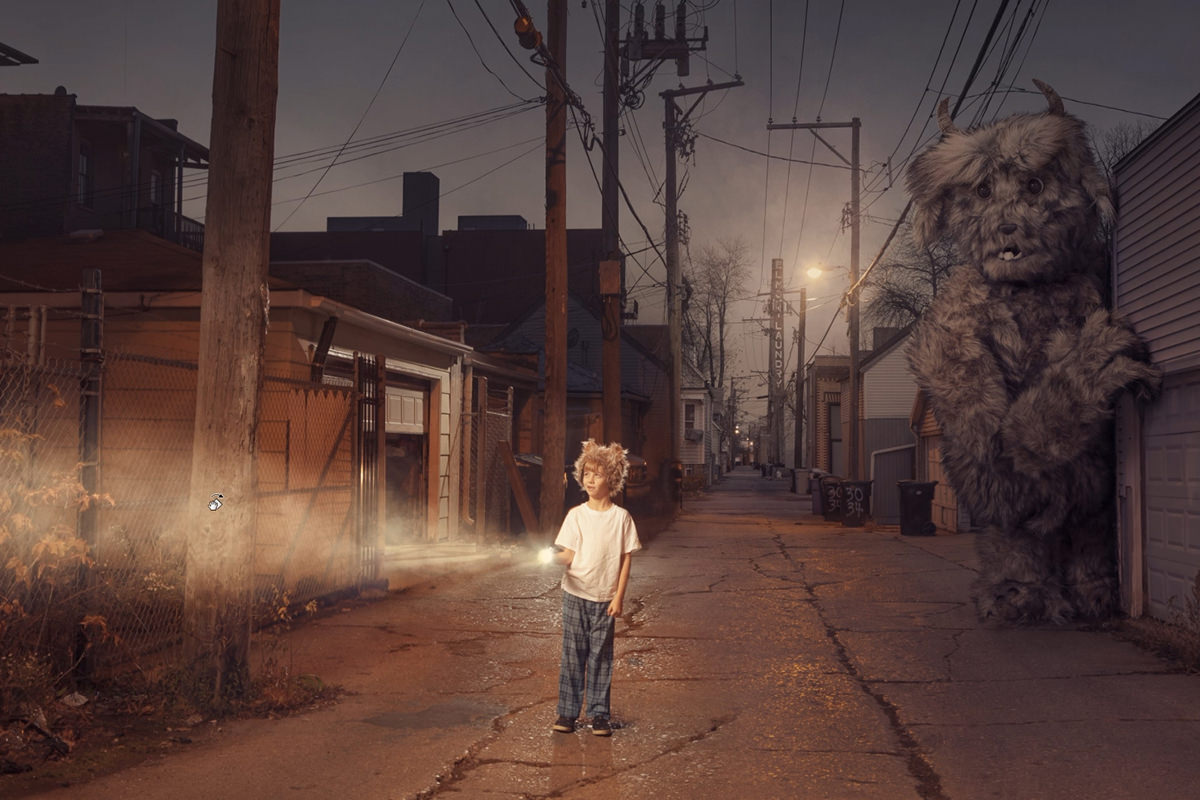
Aaron Nace is known for his extraordinary fantasy images. From impossible feats of levitation to far-off adventures on alien worlds, he’s shared his love of Photoshop compositing and has demonstrated how it can help anyone unlock their imagination. In 2012 Aaron created one of his most iconic scenes–a fantasy image that would later become one of the most popular courses on PHLEARN, while also bringing to life a lovable, furry creature named Bakster.
And now Bakster is free for everyone! Join us for this three-episode series where we show you how to build an advanced fantasy composite image from scratch. In this first episode we’ll build the background, blending multiple images together, matching light and color, removing distractions, and turning day into night.
If you’re a fan of family-friendly fantasy worlds like E.T. or Stranger Things, Bakster is right up your alley. Download the sample images and join in the fun!
Watch Next
This episode is part of our FREE Fantasy Compositing series where we show you how to create this extraordinary image from scratch!
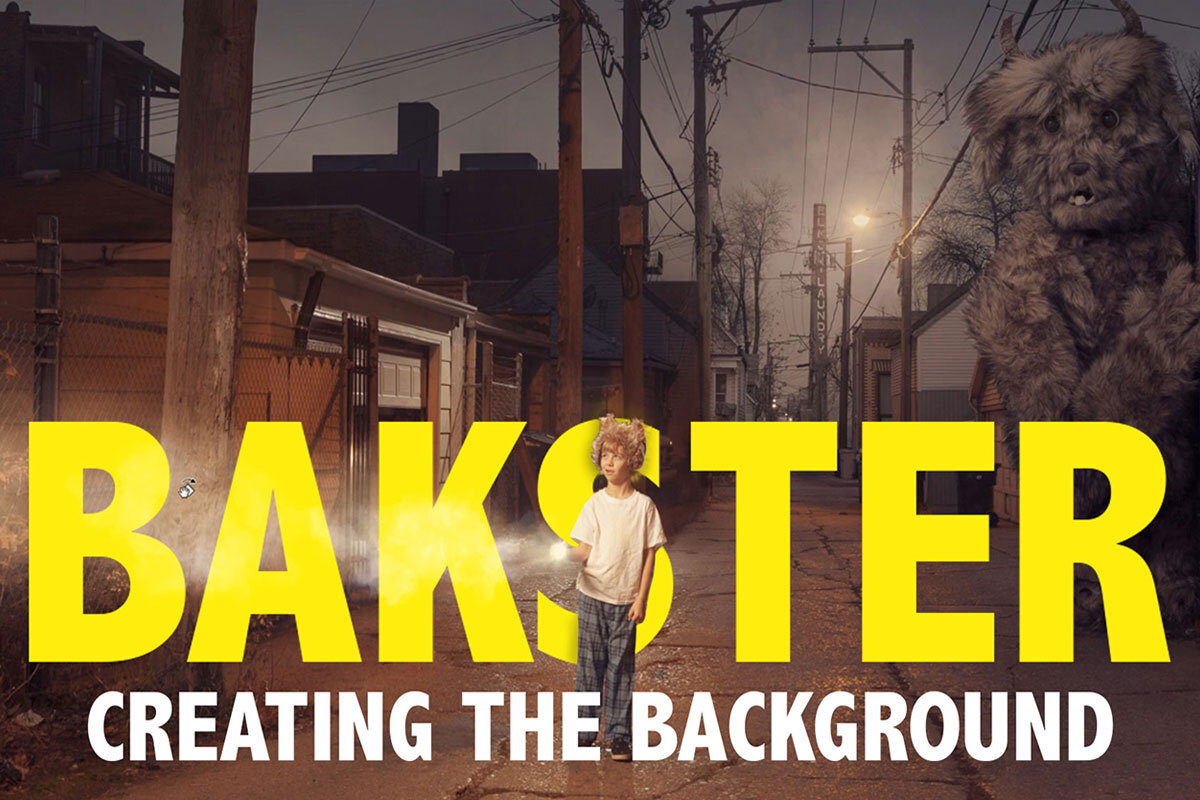
- Bakster Part 1: Creating the Background
- Bakster Part 2: Adding Bakster
- Bakster Part 3: Color Toning & Finishing
Share
Learn Fantasy Compositing
Getting Started with Compositing
Before we dive in it’s important to note that this is an advanced compositing tutorial! So if you feel lost, don’t worry–this series covers a lot of tools and techniques that even some savvy Photoshop artists might not be comfortable with. If you’re new to the world of compositing, we recommend checking out the following PHLEARN courses:
PRO Courses
- Photoshop Compositing: Essential Tools & Techniques
- Intro to Photoshop Compositing for Beginners
- Photoshop Compositing: Masking and Cutting Out Subjects
FREE Tutorials
- How to Match Colors for Compositing in Photoshop
- How to Composite Photos in Photoshop
- Create a Simple Composite in Photoshop
These courses will help you brush up on the fundamentals of compositing, but throughout the Bakster series, we do our best to break everything down for creators of all skill levels. If you want to jump right in, go for it!
RAW & JPEG Sample Images
This tutorial includes everything you need to create the Bakster image in Photoshop. In the sample image download package you’ll find six images and a custom Photoshop Brush. Not only that, we’ve provided both RAW and JPEG downloads!
If your computer can handle RAW editing, we recommend following along with the RAW images.
If you’re working with a computer that has to work hard to run Photoshop, grab the JPEGs!
All of the compositing techniques we teach will work with either RAW or JPEG images, but if you’re using JPEGs, there are some RAW-specific steps that you can ignore.
We’ve also included a free download of the final layered file (.TIF), which you can open in Photoshop to see every Layer and adjustment used to create the final image.
Building the Background
One of the principles of realistic compositing is to work back-to-front, starting a project by building the background. Then, once the background is complete, you can begin introducing other elements into the midground and foreground of the scene. This back-to-front method is built around the idea that the environmental lighting should inform most of the lighting and coloring decision you make later on. It’s always easier to match the color and lighting of a subject to a new environment than the other way around!
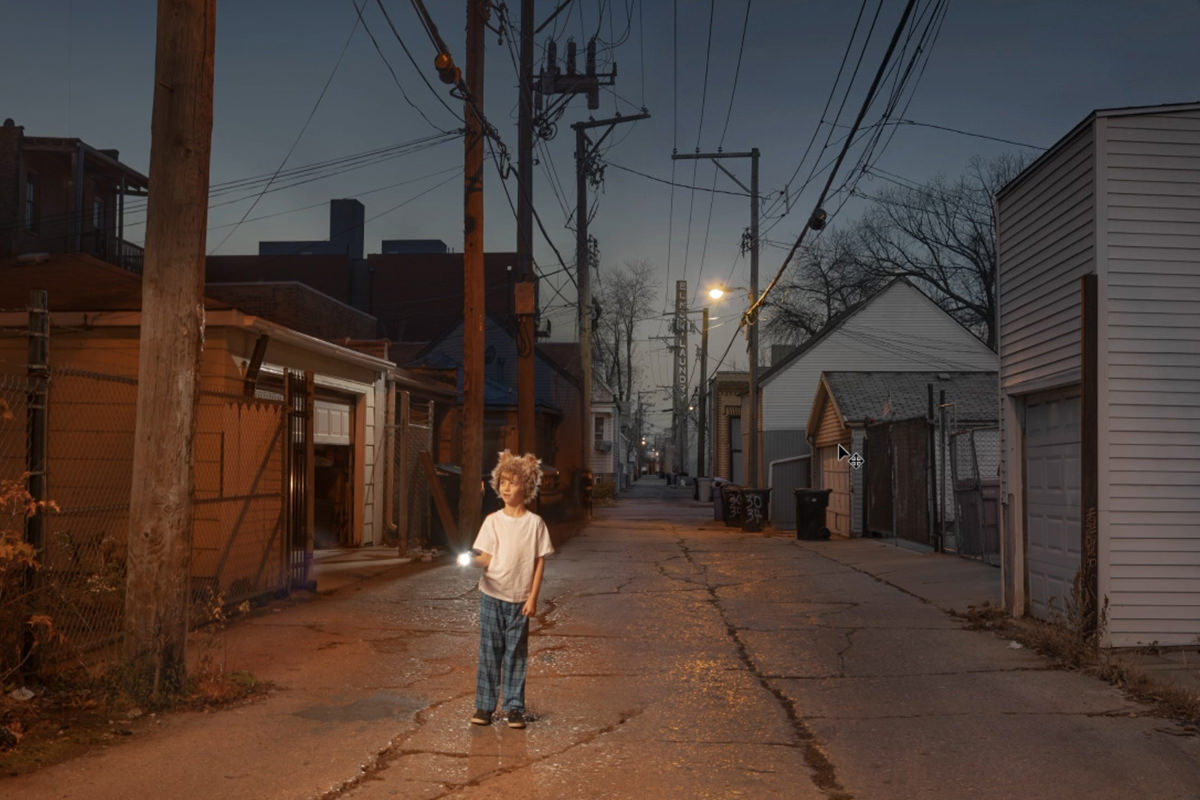
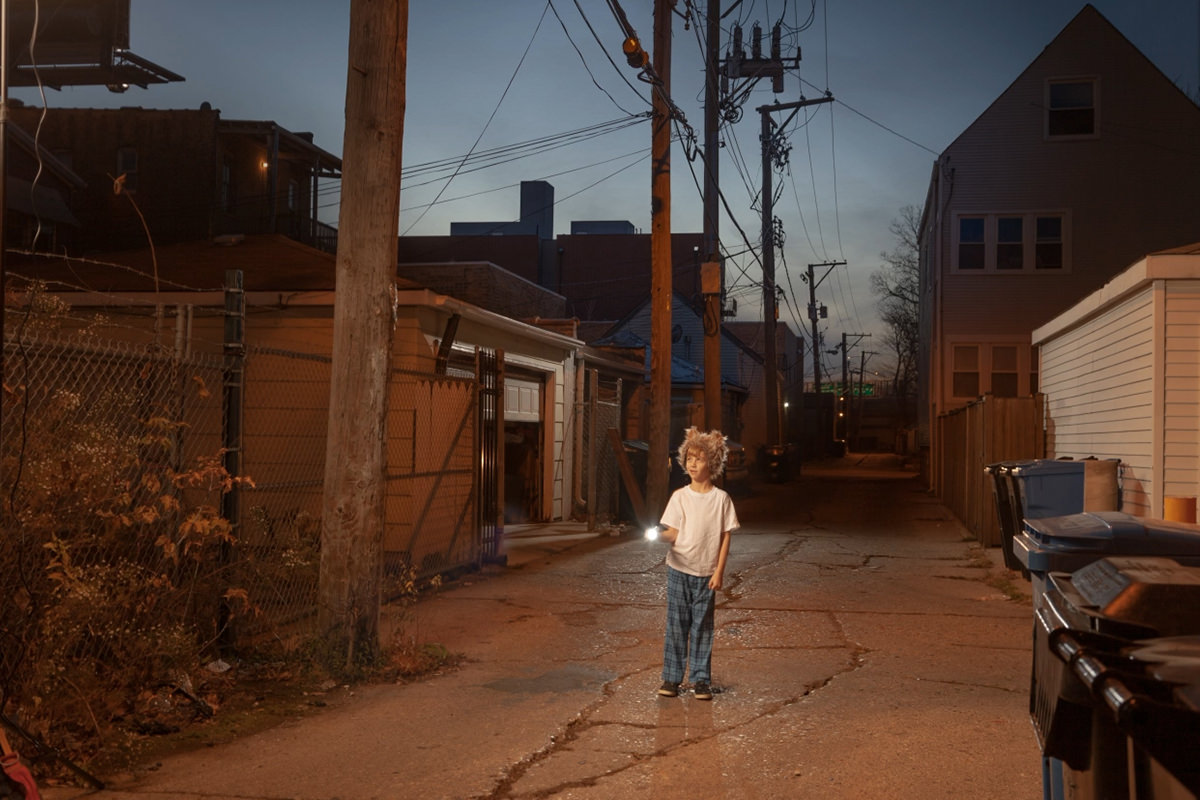
The final background scene that we’ll be building in this episode.
With Bakster we’ll be doing just that. In this first episode we’ll create the background which will involve blending several different images together. One of our subjects was photographed in the environment, so he is already perfectly matched to the environmental lighting conditions. In the second episode we’ll introduce Bakster, the fuzzy star of our fantasy show. And in the final episode we’ll add some atmospheric and lighting effects into the foreground, and tie everything together with a dramatic color grade.
But let’s not get ahead of ourselves! Let’s kick things off by constructing the background elements.
Opening the Images in Photoshop
Opening the RAW images in Photoshop will open up Adobe Camera RAW, Adobe’s integrated RAW editor. We’ll be using Camera RAW a lot since it’s tools allow us to make powerful and precise adjustments to exposure and color. But first, let’s just get all the photos into a single Photoshop document.
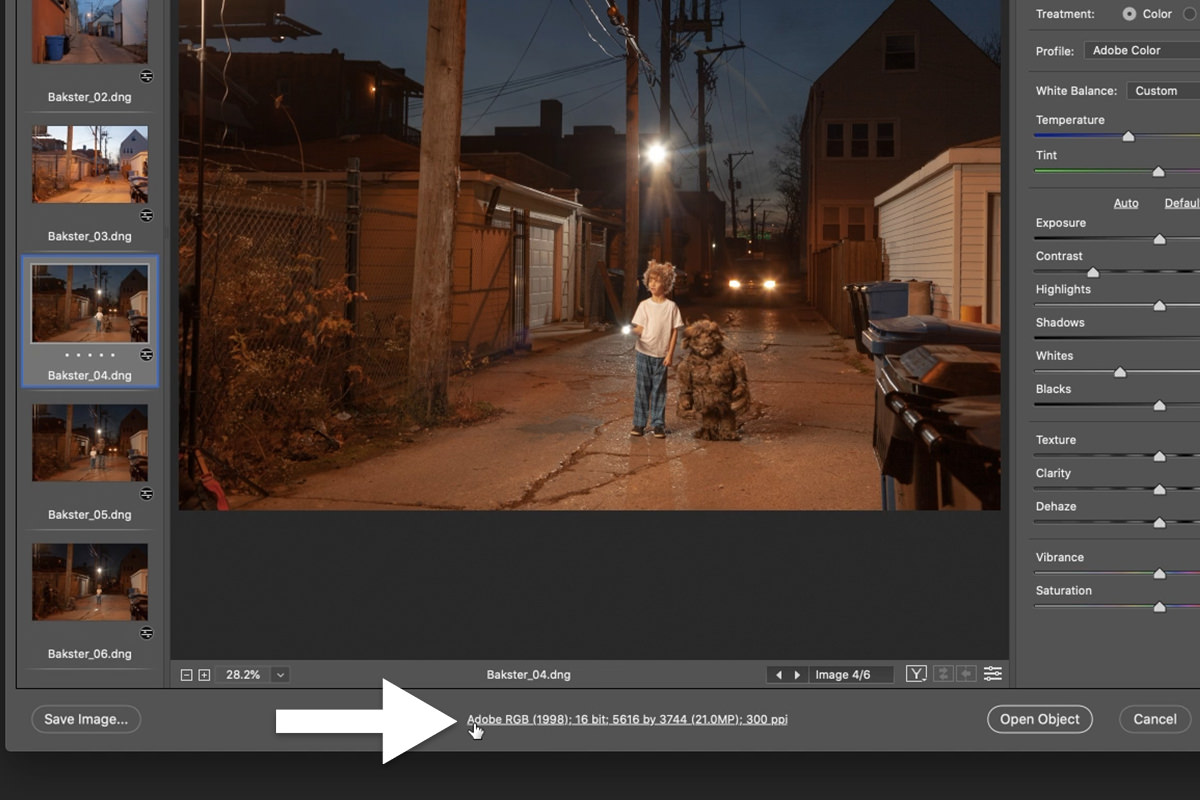
Once all of the RAW images are opened up in Adobe Camera RAW, click the text link at the bottom of the dialog. To make sure that we’re working with as much image data as possible, we need look at three settings:
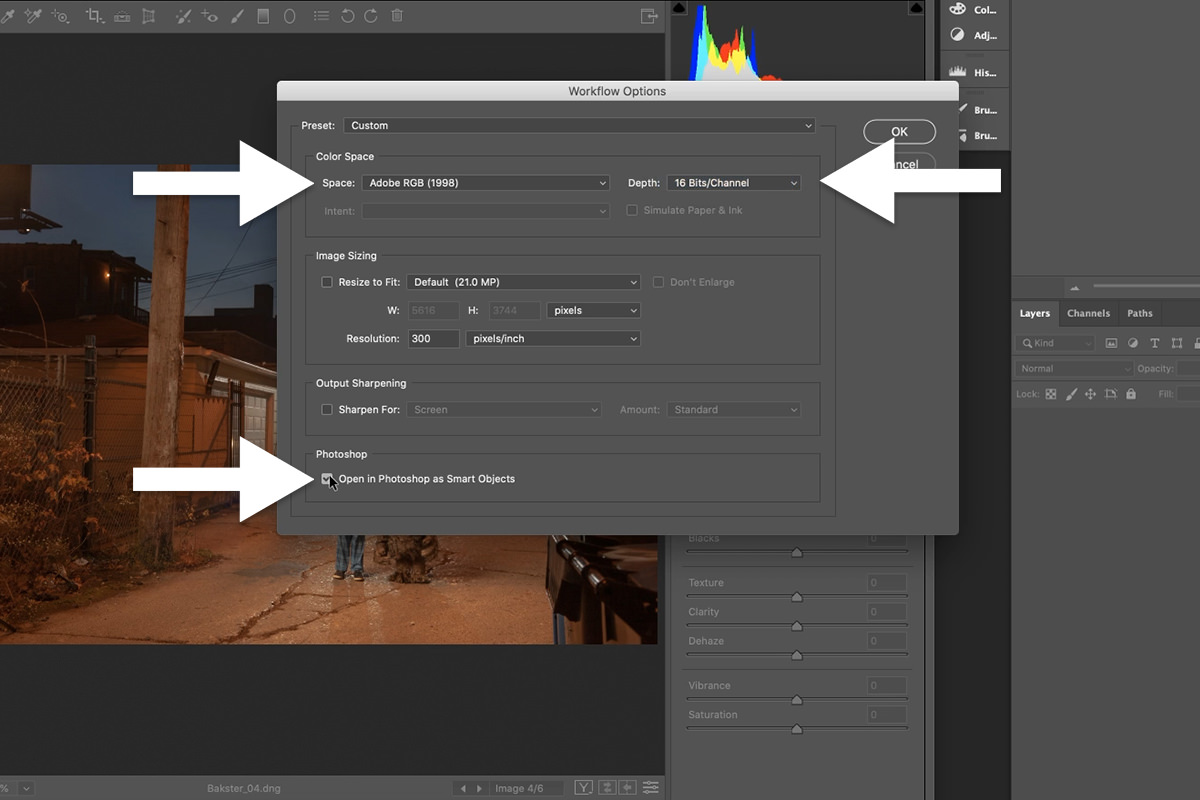
- The Color Space should be set to Adobe RGB(1998). This will allow us to work with the ideal amount of color information.
- The Depth should be set to 16-bit. This will allow us to work with all of the image information in our RAW files (RAW files are 16-bit, JPEGs are 8-bit).
- The Open in Photoshop as Smart Objects box should be checked. This allows us to get back into Adobe Camera RAW at any time to make additional adjustments.
Once those three options are set, click OK. Then, back in the main Adobe Camera RAW dialog, select all of the images and click Open Objects. Each image will open as a separate Photoshop Document. Use the Move Tool to drag-and-drop all of the images into a single Document. When finished, you should have a single Photoshop Document with six different Layers in the Layers Panel.
Let’s Get Organized!
Now that all of the images are in the same Document, let’s get them organized so we can better keep track of all of the different elements. We’re working with six different images to create the final composite, so let’s break down how we’ll be using each of them:
- Bakster_01: This is the photo of Bakster that we’ll be using in episode 2. Before we introduce him into the scene, we need to build the background.
- Bakster_02: This is an image of a different alleyway than the one in our main background image below. We’ll be replacing the right side of the main alleyway image with the right side of this image. Then we’ll introduce Bakster, hiding behind the large white garage.
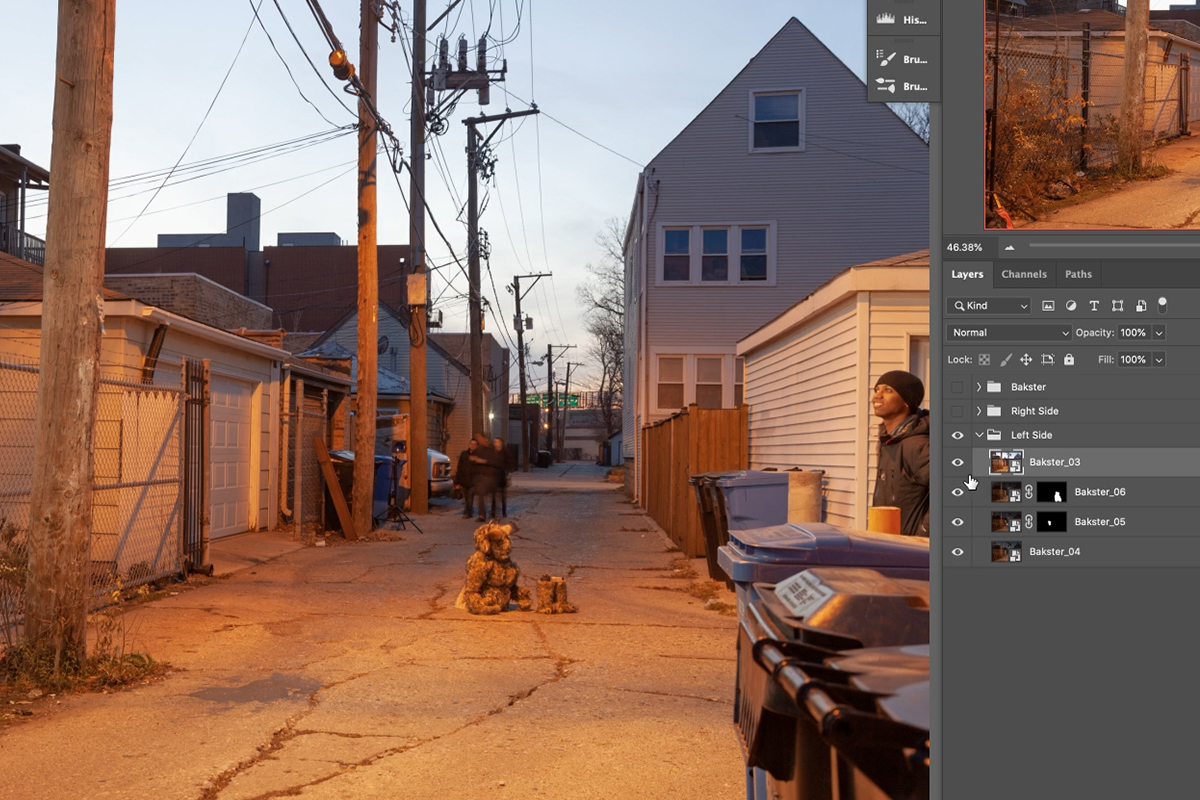
- Bakster_03: This is a photograph of the main alleyway a little before sunset. We needed an image of the scene without any artificial lighting. We’ll use this image to remove the strobe light from behind our subject in the main background image.
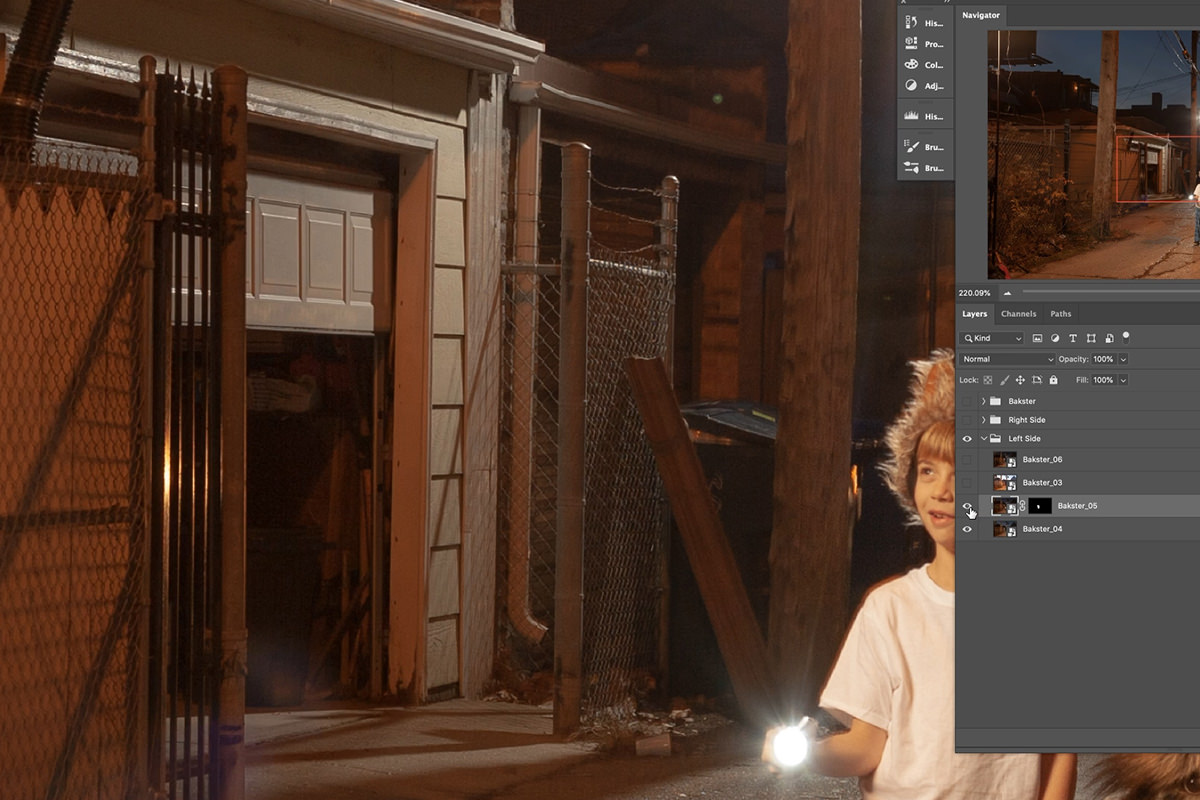
- Bakster_04: This is our main background image! It needs some work though, so we’ll be using other images to remove the little Bakster doll next to the boy, remove the car, and to open the garage door.
- Bakster_05: We’re going to use the open garage door from this image.
- Bakster_06: We’re going to use this image to remove the Bakster doll and the car from the main image.
Now that we know what each image is for, let’s organize them in the Layers Panel!
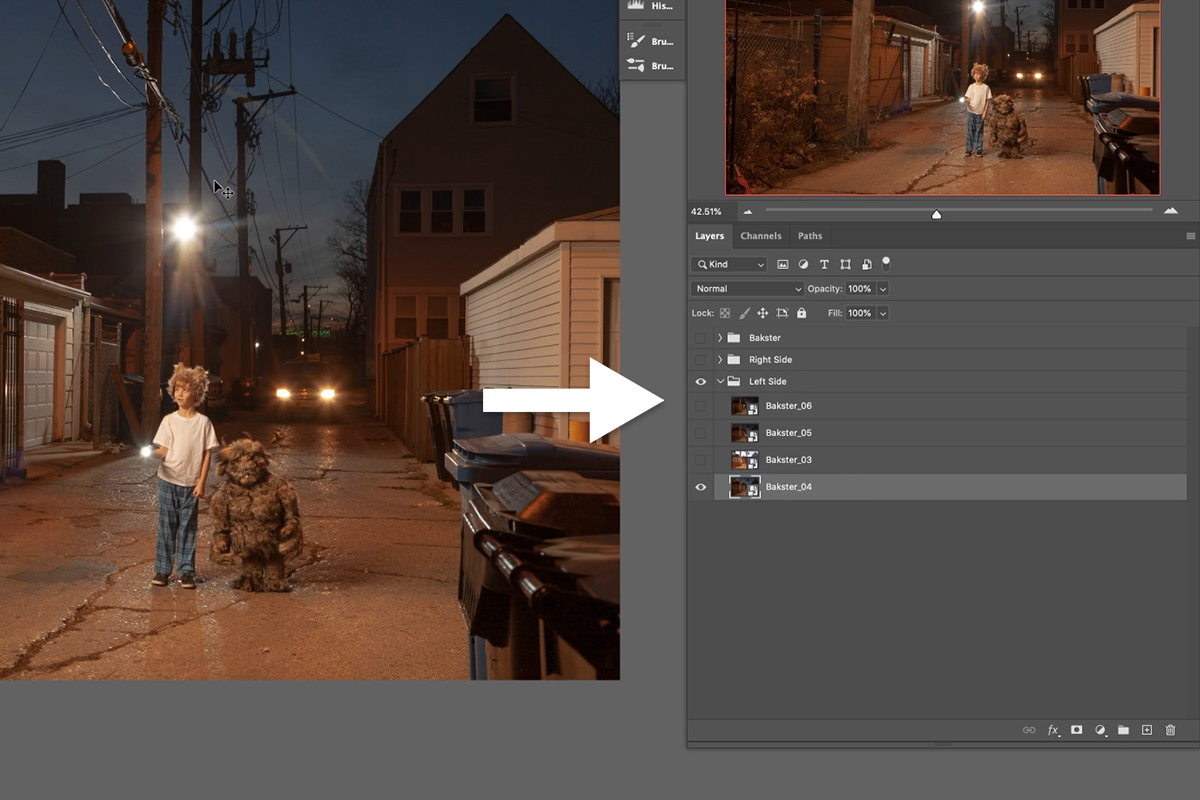
- The image of Bakster (Bakster_01) can go on top of Layers Panel. Group it with itself and name the Group Bakster.
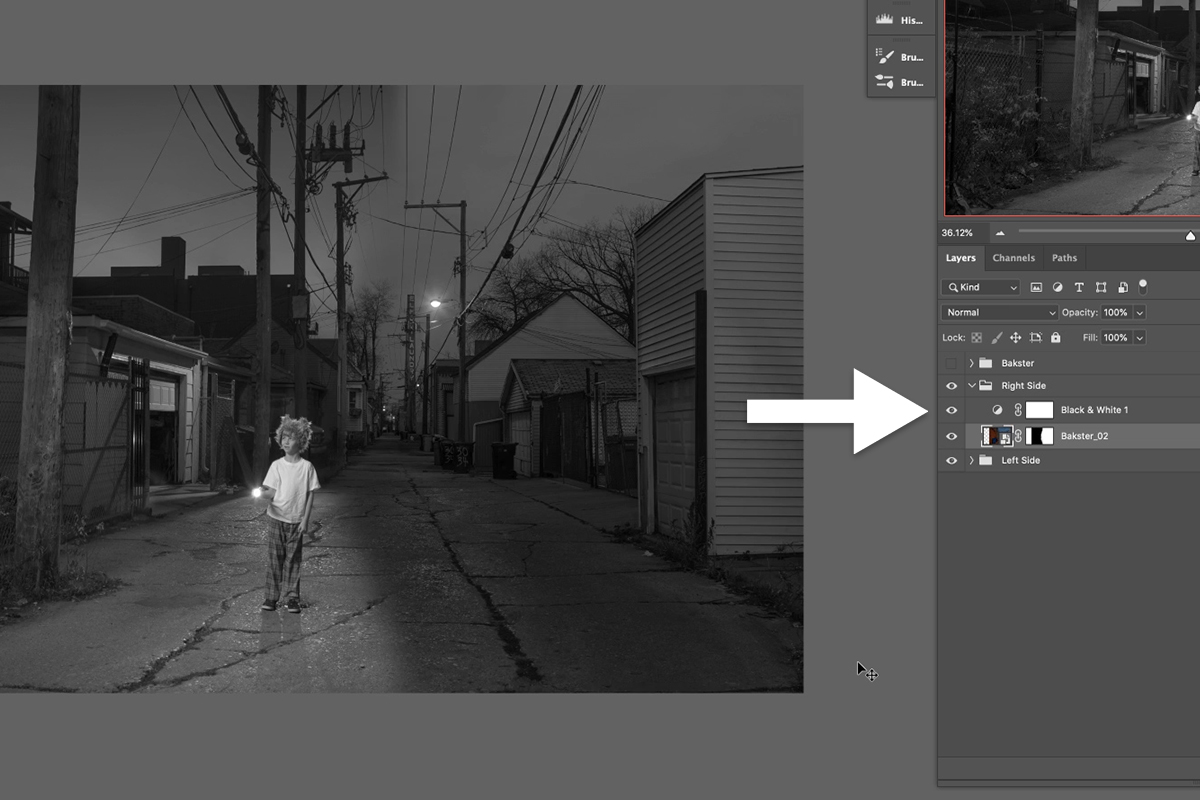
- The image of the alternate alley (Bakster_02) can go second in the list. Group it with itself and name the Group Right Side (since we’ll be using this as the right side of the background).
- The remaining four images can be Grouped together and placed at the bottom of the Layer Stack. Name this Group Left Side (since they will be used to create the left side of the image). Make sure the image Bakster_04 is the bottom Layer of the Group. This is the main photo that we’ll be using for the background!
Use the image above as a reference to properly organize all of the Layers. Once in place, make every Layer invisible except for Bakster_04. As we add new elements on top of the base image, we can make those Layers visible as we need them. It’s time to start compositing!
Starting Simple: Opening the Garage Door
Let’s get warmed up with something easy! In the image Bakster_05, a car pulled into a garage behind the subject. Aaron liked the look of having the garage door open in the background, so he decided to integrate the door from that photo into the main image.
Before we start, be sure to install the included custom Photoshop Brush. Aaron created it to help make Masking more natural and precise, so try and use it as much as possible. Need some help installing and using custom brushes? Check out our install guide!
When the brush is ready, add a Layer Mask to the Bakster_05 image, fill the Layer Mask with black to make that entire Layer invisible, and then paint with white on the Layer Mask over the garage door using the Brush Tool to make that area visible.
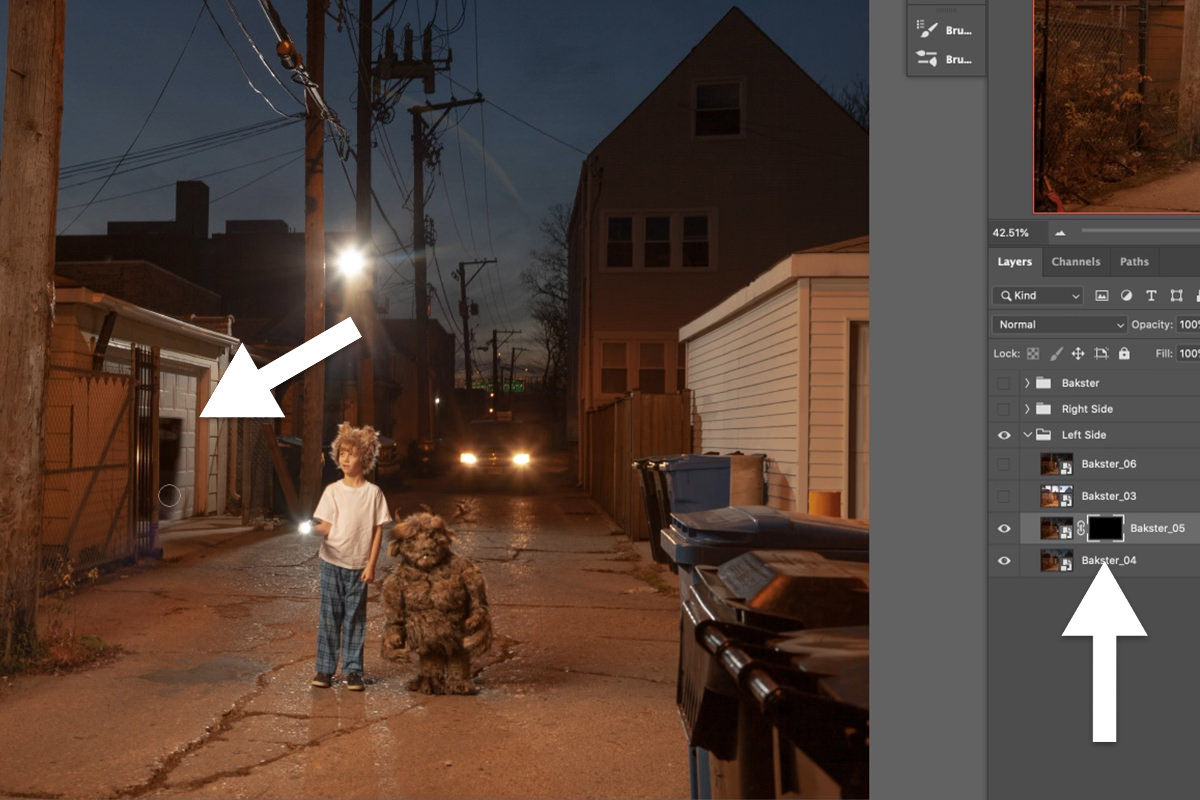
Since both images were captured in the same environment, with almost the exact same lighting and camera position, the integration is almost seamless! The camera did shift a tiny bit, so use the Move Tool and Transform Tool to gently shift and warp the new open door into place. Just be sure that all of the architectural lines match up.
Try to get the new garage door to look something like this.
Removing the Car & Bakster
You might have noticed that Bakster is already standing next to our subject in the main image (Bakster_04). Not only that, but there’s a car driving through the alley behind them. The car wasn’t a planned part of the shoot, and we’ll be using another image of Bakster later on, so both of those elements need to be removed.
The image Bakster_06 has got use covered! Since this photo just has the subject in the environment with no car and no Bakster, we can use it to remove those elements from the main image. Again, we’ll be using Layer Masks to get the job done.

Create a black Layer Mask on the Bakster_06 Layer, and paint with white using the custom Brush over the car and over Bakster. You may need to zoom in and adjust the Brush size if you need a more precision. And remember that Layer Masks are non-destructive! That means if you add or remove something you didn’t intend to, just switch to the opposite Brush color to fix it (Painting white on a Layer Mask makes things visible, black makes things invisible.)

You may need to use the Move Tool or Transform Tool again to get the Layers to line up properly. Once done, the result should look something like the image above.
Removing the Backlight
So far we’ve only used Layer Masks to integrate new elements into the scene (the garage door) or remove unwanted elements (the car and the Bakster doll). Next we’re going to get into the heart of compositing: matching light and color.
Take a look at the base Bakster_04 image with the changes that we’ve made. It looks great so far, right? Of course! But there’s a bright, distracting light in the scene directly behind the subject. This is a studio strobe that was used during the photoshoot to backlight the subject and separate them from the background. We got the effect that we wanted on the subject, but we don’t want the entire light source in the shot.
Having planned for this, an image was captured of the scene just before sunset with no artificial lighting. Not only does this provide an image that we can use to remove the strobe, but it also allows us to create a little more detail in the sky and background!
However, there is one big problem; the lighting between the base image and the image taken before sunset doesn’t match. Once we use Layer Masks to remove the light, we’ll need to jump back into Adobe Camera RAW to use its powerful exposure and color adjustments to blend the two photos together.
Turning Day Into Night
Remember back when we chose to open up all of the RAW images as Smart Objects? It’s time for that otherwise easy-to-miss setting to pay off. Double-click on the image preview of the Bakster_03 Layer to go back into Adobe Camera RAW. We still have full access to RAW processing which will allow us to make ultra-precise adjustments to any of the images at any time.
With Bakster_03 open in Camera RAW, we need to make it match the lighting and exposure of the base image that was taken after the sun set. First, lower the Exposure. Then raise the Shadows and Blacks (This helps maintain details in the darkest areas of the photo.) Adjust the sliders until you get something that closely matches the lighting from the base image. You can hit OK to see the changes and compare, and then go back into Adobe Camera RAW to make additional adjustments.
Once you get something that’s close, hit OK to exit Camera RAW and apply the adjustments. Now we need to Mask in areas of Bakster_03 to remove the strobe light from Bakster_04. Create a black Layer Mask on the Bakster_03 Layer and paint with white over the strobe in the background. Once the light is gone, continue painting white over the sky to introduce some more detail into the background and to help blend the two exposures together. Remember to always use a soft, relatively large Brush (or our included custom Brush) with a low Flow (~20% for pen tablet users, ~2-5% for mouse users).
Once the exposures are blended, it’s likely that sky is going to be a little bit too bright for the scene. Just open Bakster_03 in Adobe Camera RAW to dial it in. You can use the HSL Adjustment menu in combination with the Targeted Adjustment Tool to simply click and drag on the colors in the sky to only affect those areas. Just make sure that you’re working in the Luminance tab if you want to make exposure adjustments–we’ll be working with the Hue and Saturation Tabs a little later.
In addition to the HSL Adjustments, we also recommend lowering the Exposure and working with the other basic adjustment sliders until the sky is dark enough to match the scene.
With the backlight removed and the two exposures blended together, things are starting to look pretty good! However, the biggest challenge lies as we move on to replace the entire right side of the image with a photo of an entirely different alley. We’ll need to combine all of our compositing know-how to realistically match lighting, color, perspective, and more.
Replacing the Right Side of the Alley
It’s time to turn our attention to the Right Side Group we created when we first organized our project. Right now it only contains the image Bakster_02, which is a photo of an alternate alleyway. But by the end of this first episode, this group will be full of adjustments designed to blend this image seamlessly into the base background Layer.
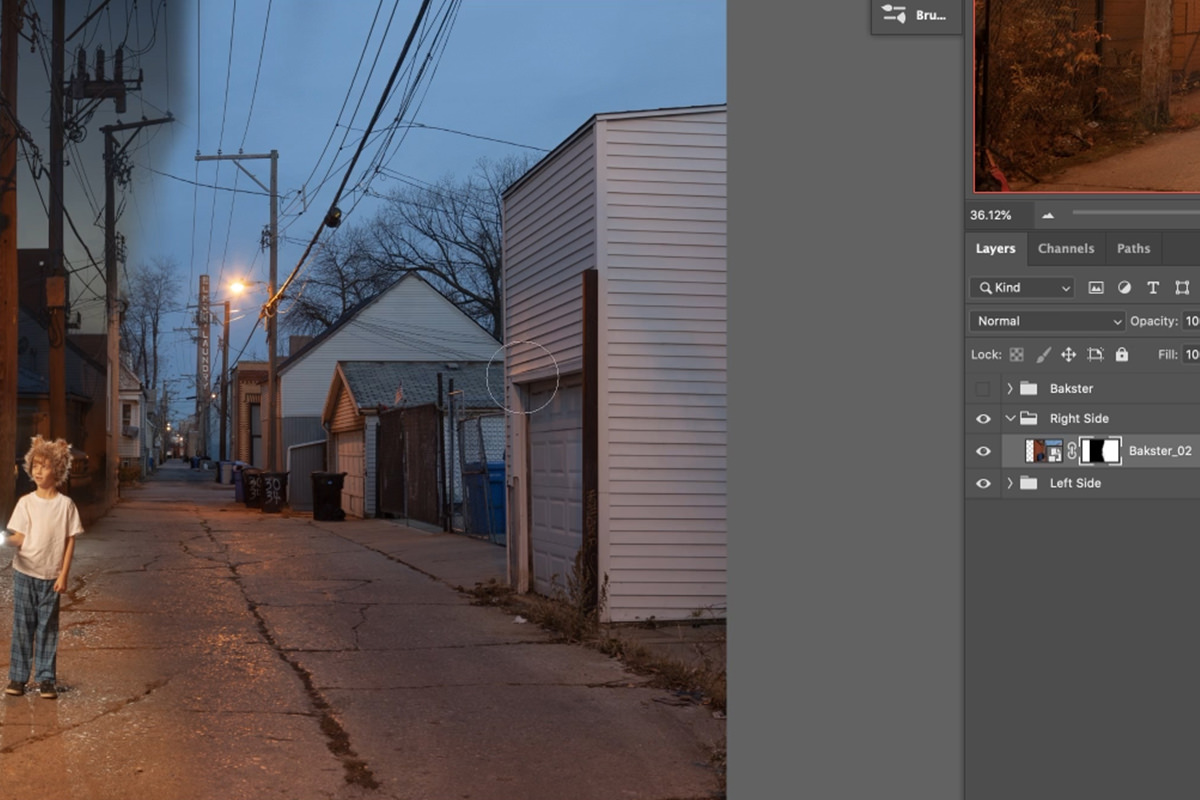
If you’ve made it this far, you can probably guess what the first step is going to be. Before we worry about light and color, we need to position the new alley in our scene so it lines up as best as possible with the base image. Given that Bakster_02 was captured in a totally different environment, we just need to get it close for now. We can clean it up later!
Use the Move Tool and Transform Tool to position the new alleyway over the existing scene (lower the transparency of the Bakster_02 Layer while doing this to see a little easier). Use the Crop Tool to extend the scene out a little more to the right (just make sure Delte Cropped Pixels is not checked). Once it’s in a good spot, use a Layer Mask to make sure that the new alley image is only visible on the right side of the frame, just to the right of the subject.
With the new alleyway in place, it’s time to blend it into the scene by matching the light, saturation, and color to the base image.
Matching Light
Matching two different images together usually will involve a 3-step process of matching the light levels between the two, then the saturation, and then the color. Let’s start by matching the light levels between the new Bakster_02 images and our base Bakster_04 image.
Open up Bakster_02 in Adobe Camera RAW by double-clicking on the image preview within the Layer. Similar to how we started our last adjustments, lower the Exposure and then raise the Shadows and Blacks. Once you get it close, hit OK. You’re likely going to notice that even though the new image is darker and closer in exposure to the base image, it still looks way off from where we want it to be. That’s because even though we’re getting closer with the exposure, the saturation and color are nowhere close to matching. Since we want to be able to focus only on light and exposure, we’ll want a tool that can help us more easily see the changes we want without other distractions. Let’s talk about Check Layers.
Using Check Layers
When matching things like light and color, it can be tough to see everything all at once. With so many variables involved, it helps our eyes immensely to focus in on one area at a time. So how do we only see an image in terms of just light values? Or just saturation? Or just color?
With helpful tools that we call Check Layers.
Check Layers are simple Adjustment Layers that you can add to a composition that break it down into specific elements. For example, by creating a Black & White Adjustment Layer over an image, all color and saturation is removed–you’re left with only light values. So if you’re trying to match the light levels between two images, converting it to black and white makes it much, much easier to compare the light levels between the two.
The image above shows our new alleyway image alongside our base image, but now everything is displayed in black and white thanks to a Black & White Adjustment Layer. With the color information removed, it’s much easier to see that the ground of the new image is too dark and the sky is too bright. Armed with this information, we can jump back into Adobe Camera RAW to make those changes.
Since we need to make different adjustments to the light levels in both the ground and sky, we’ll need to use a Camera RAW tool that offers a bit more precision. The Graduated and Radial Filers allow you to define specific parts of an image to apply adjustments to. Best of all, they’re applies using built-in gradient and feathering effects so blending is extremely easy.
We created a Graduated Filter over the ground and raised the exposure of that area, and then created another Graduated Filter for the sky, lower the exposure of that area. You can create as many different filters and types of filters that you want and apply as many different adjustments that you want to them. Just remember that the only goal right now is to get the light levels of the Bakster_02 image to match the lighting of our main composition.
For general compositing advice, if you can get a composite to closely match in black and white, chances are good that the final image will look great. So take your time, work in black and white, and get the lighting to match as close as possible!
Matching Saturation
With the lighting done, we can disable the Black & White Adjustment Layer. What looked great seconds ago, now looks like mess of mismatched colors. Next we’ll move on to matching the relative saturation between the two images, which will make it much easier to match the color later on. Images at different exposures will naturally have different levels of saturation. More brightly exposed images will have higher saturation, underexposed images will be less saturated. But even knowing that, we have another Check Layer we can use to make comparing saturations a breeze.
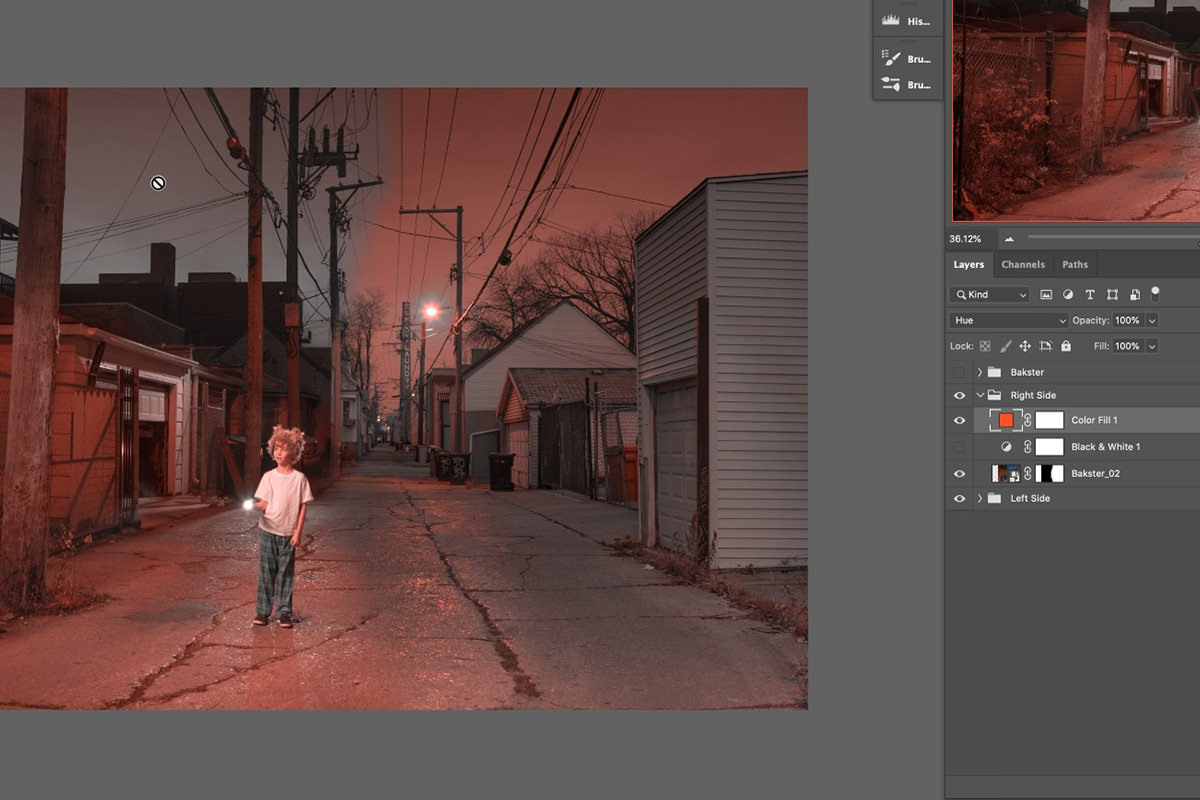
Create a Solid Color Fill Layer over top of the composition and set it to a bright and saturated color. We chose red for our example, but any color will do as long as it stands out. Then set the Blending Mode of the Solid Color Fill Layer to Hue. This will make seeing the relative saturation in an image much easier as the Fill Layer will shift every hue in the image to red. Once everything is the same color, it’s much easier to see what areas are more or less saturated. In the example above, we can see that the sky on the right side of the image is much more saturated than the sky on the left, and the ground on the right side of the image is much less saturated than the ground on the left.
Now we can use this information to once again make the necessary adjustments within Adobe Camera RAW.
You can use the Saturation slider, the Saturation tab in HSL Adjustments, and any Radial or Graduated Filters you need to adjust these areas. You can even use existing Graduated or Radial Filters that were used for exposure adjustments! Adobe Camera RAW also has an Adjustment Brush Tool which allows you to paint over an area that you want to adjust. This adds an extra level of precision when the Graduated and Radial Filters aren’t cutting it.
Matching Color
Light? Check. Saturation? Check. Now we’re on to color! With photos taken in different environments, colors and color temperature can vary quite a bit. The goal of this step is to make subtle shift to the hues in the Bakster_02 Layer to match the hues in the base image. And since we know that the lighting and color are both perfectly matches, this step is even easier.
You can use Adobe Camera RAW for color adjustments, but we find Hue/Saturation Adjustment Layers make it a little easier to see when the colors are matched up. Create a Hue/Saturation Adjustment Layer over Bakster_02 and make sure it’s Clipped to only affect that Layer. Moving the Hue slider, you can see how easy it is to shift the colors. Again, it’s best to adjust the sky and ground separately here as well, so try to focus on one area first before moving to the next.
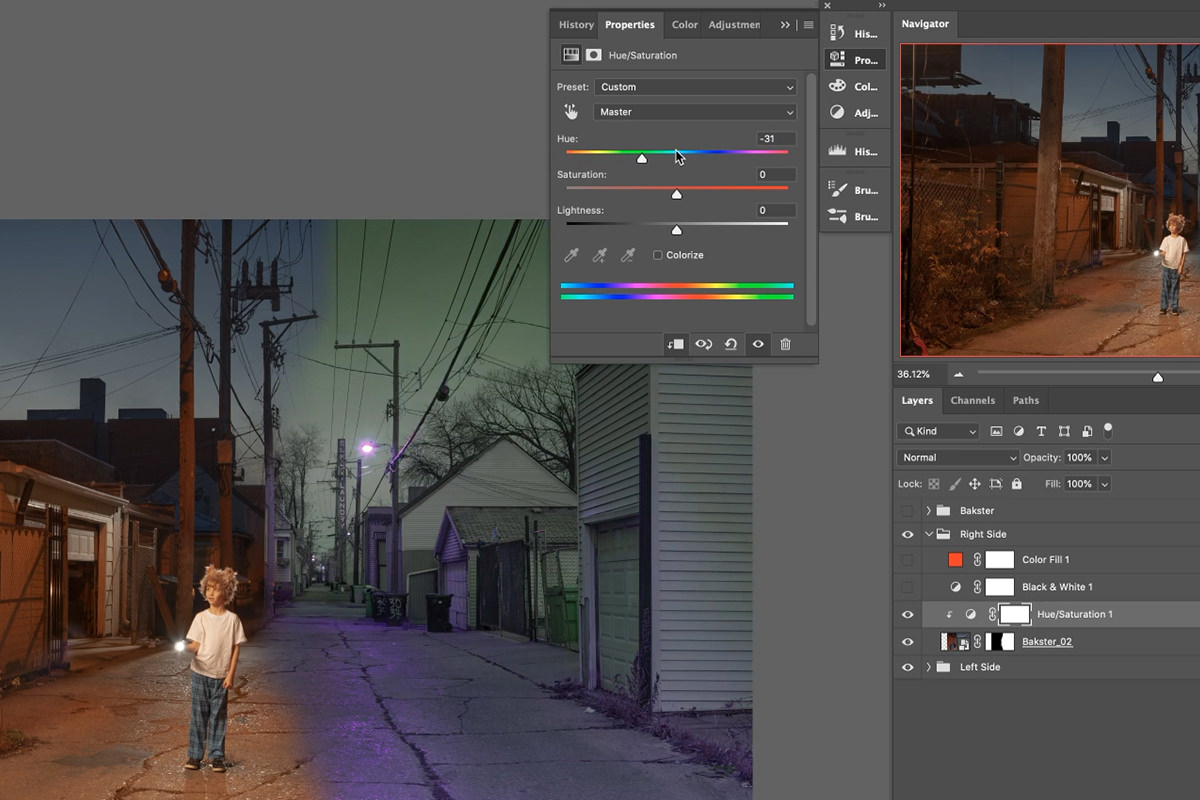
Clipping Masks allow you to apply effects to specific Layers
Adjust the Hue until the colors more closely match in an area, then Invert the Layer Mask of the Hue/Saturation Adjustment Layer. Then use the Brush Tool to paint white on the Layer Mask to make it visible only where you want those changes to appear. You can repeat this process with as many Hue/Saturation Adjustment Layers as you want, using Layer Masks to control where the adjustments are visible for each.
Fine-tuning
This is a great time to look at the overall composition and determine if there’s anything else we want to change. For example, if you want the image to be a little bit darker, you can use a Curves Adjustment Layer to
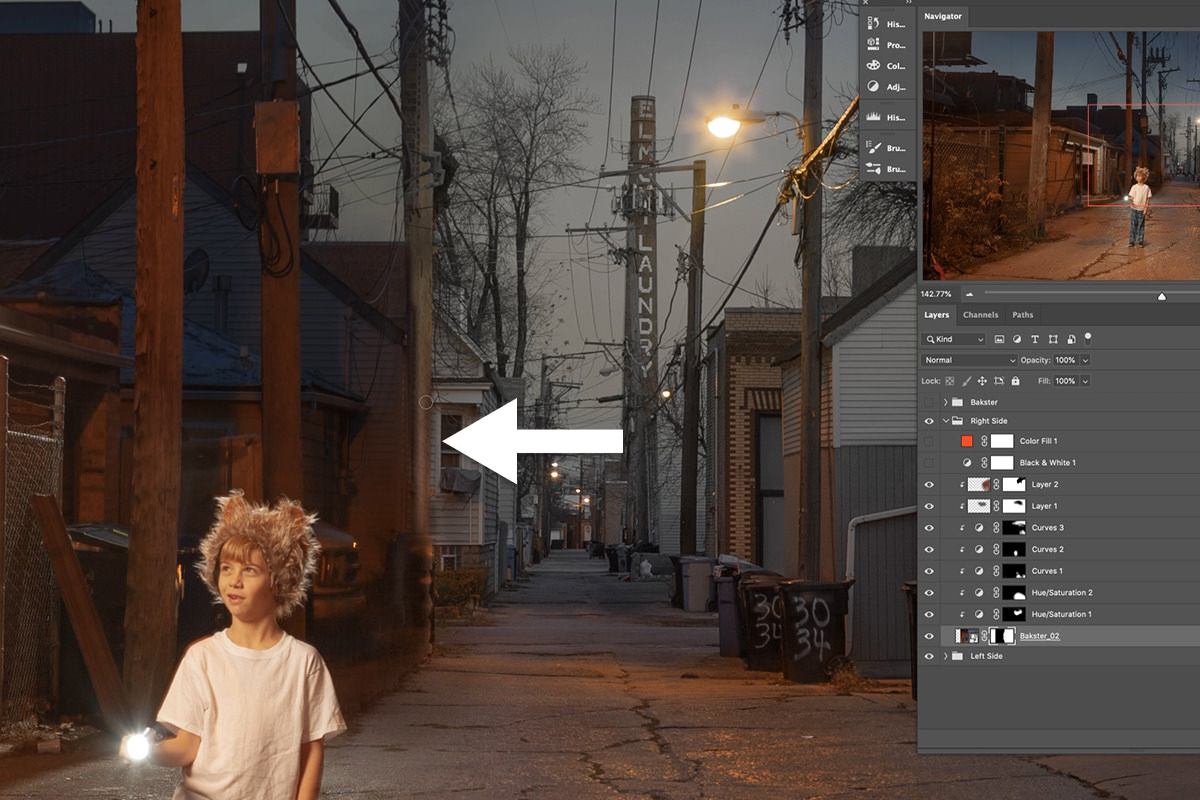
Cleaning Up the Background
We’ve come a long way! Now it’s time to wrap up a few odds and ends. The first thing on the list is to clean up some of the original Layer Masks from when we first blended all the different background elements together.
This process is fairly straightforward, just zoom in to the edges of each Layer Mask and use the Brush Tool to paint black or white to smooth out the transitions between the different images.
Cleaning Up Electrical Wires
With all the heavy lifting we’ve done to get light and color to match, tiny details and inconsistencies can still threaten the realism of a composite. Our background is look great, but the electrical wires from the two different alleys need to be cleaned up and integrated into one another.
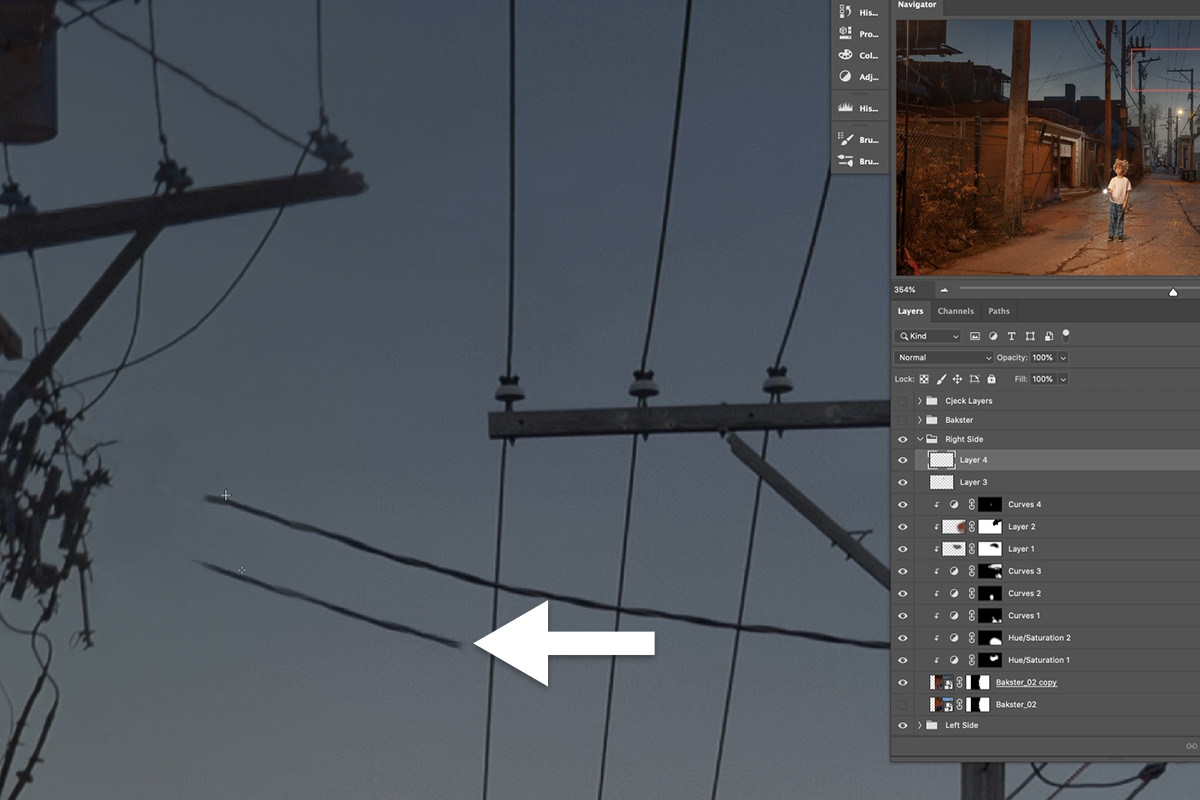
Painting in new wires with the Clone Stamp Tool
Fortunately, this is a quick fix for the Spot Healing Brush and Clone Stamp Tool (Before using either, make sure to always create and work on new Layers so you don’t damage any of the original images.) The Spot Healing Brush is great at removing small distractions or wires that don’t need to be in the image. If you need to create a new wire, or extend an existing one, simply sample part of another wire, paint it in, and then use the Move Tool and Transform Tool to get it in place (you can also use Layer Masks for additional refinements). Creating the illusion of a physical connection between the two different exposures is the great way to sell the overall effect.
The Background is Done!
When we said advanced, we weren’t kidding! If you made it this far, congratulations–you’re well on your way to compositing mastery.
The background and environment for our fantasy scene is complete. Now we’re ready for the next major step.
Where’s Bakster?
All this work so far and no Bakster? Well, you won’t have to wait much longer! In the next episode we introduce our giant, furry friend. You’ll learn how to cut out a subject from a background, and integrate them into a new environment by, you guessed it, matching light and color!