Download Sample Images & Brush (145 MB)
Download the PSD
Due to the file size, we created a separate download for the PSD. You can download it here!
description
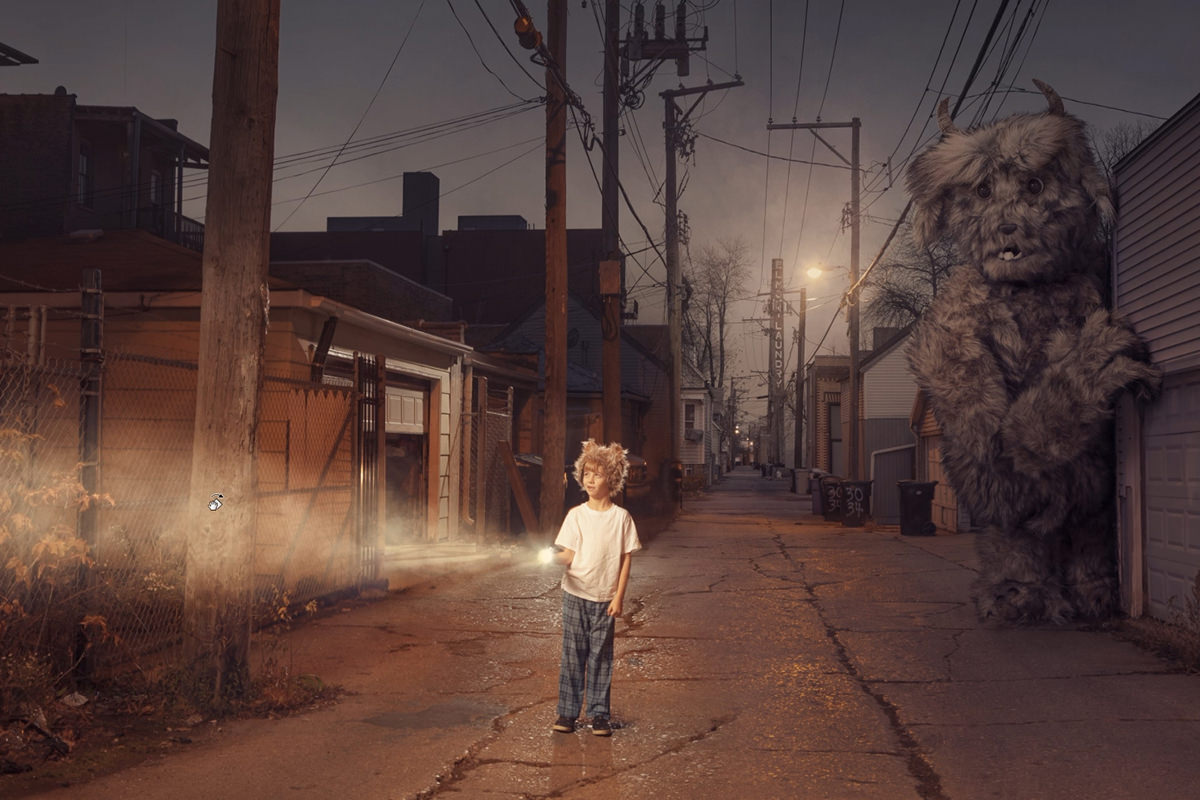
In Part 3 of our Fantasy Composite Series, we bring everything together and apply some finishing touches to complete our extraordinary scene. Learn how to create realistic lighting and atmospheric effects, remove objects and distractions, and add dramatic color toning to a composite image.
And don’t forget to watch Part 1 and Part 2 to get catch up on everything we’ve done so far!
Watch Next
This episode is part of our FREE Fantasy Compositing series where we show you how to create this extraordinary image from scratch!
- Bakster Part 1: Creating the Background
- Bakster Part 2: Adding Bakster
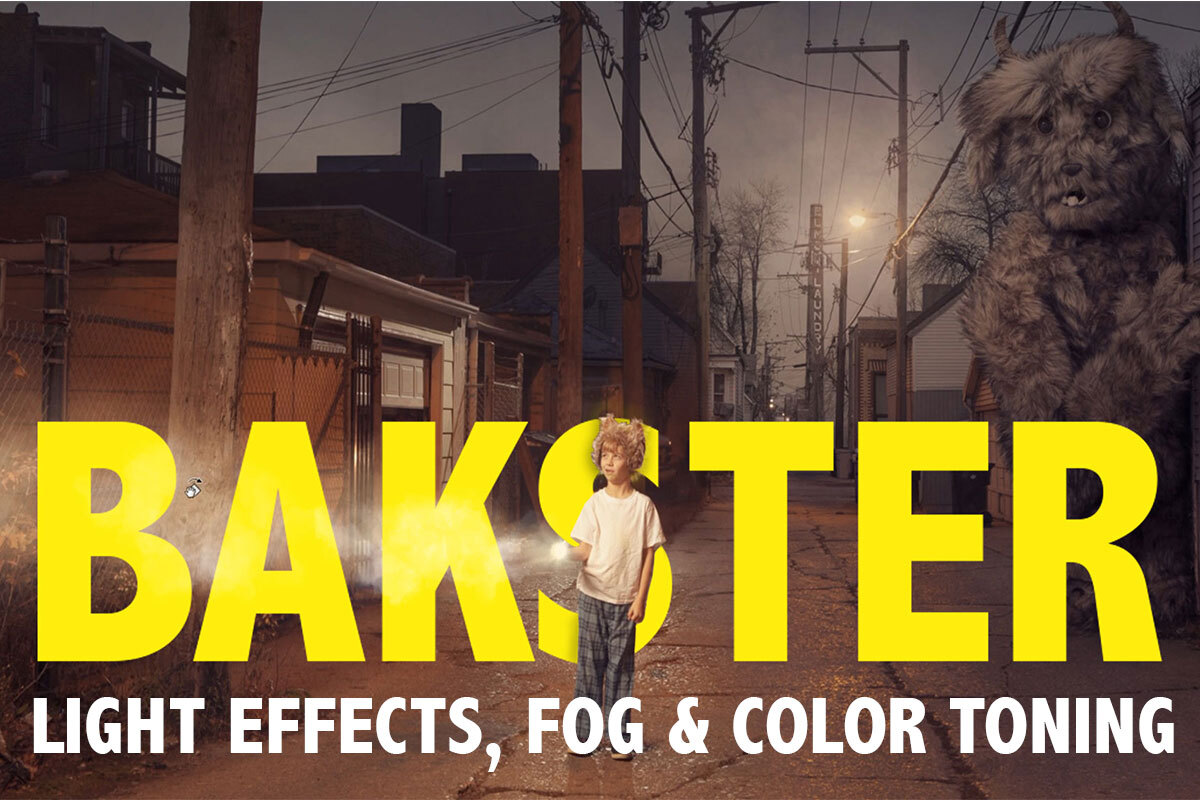
- Bakster Part 3: Color Toning & Finishing
Share
Dramatic Lighting & Atmosphere
Getting Started with Compositing
Before we dive in it’s important to note that this is an advanced compositing tutorial! So if you feel lost, don’t worry–this series covers a lot of tools and techniques that even some savvy Photoshop artists might not be comfortable with. If you’re new to the world of compositing, we recommend checking out the following PHLEARN courses:
PRO Courses
- Photoshop Compositing: Essential Tools & Techniques
- Intro to Photoshop Compositing for Beginners
- Photoshop Compositing: Masking and Cutting Out Subjects
FREE Tutorials
- How to Match Colors for Compositing in Photoshop
- How to Composite Photos in Photoshop
- Create a Simple Composite in Photoshop
These courses will help you brush up on the fundamentals of compositing, but throughout the Bakster series, we do our best to break everything down for creators of all skill levels. If you want to jump right in, go for it!
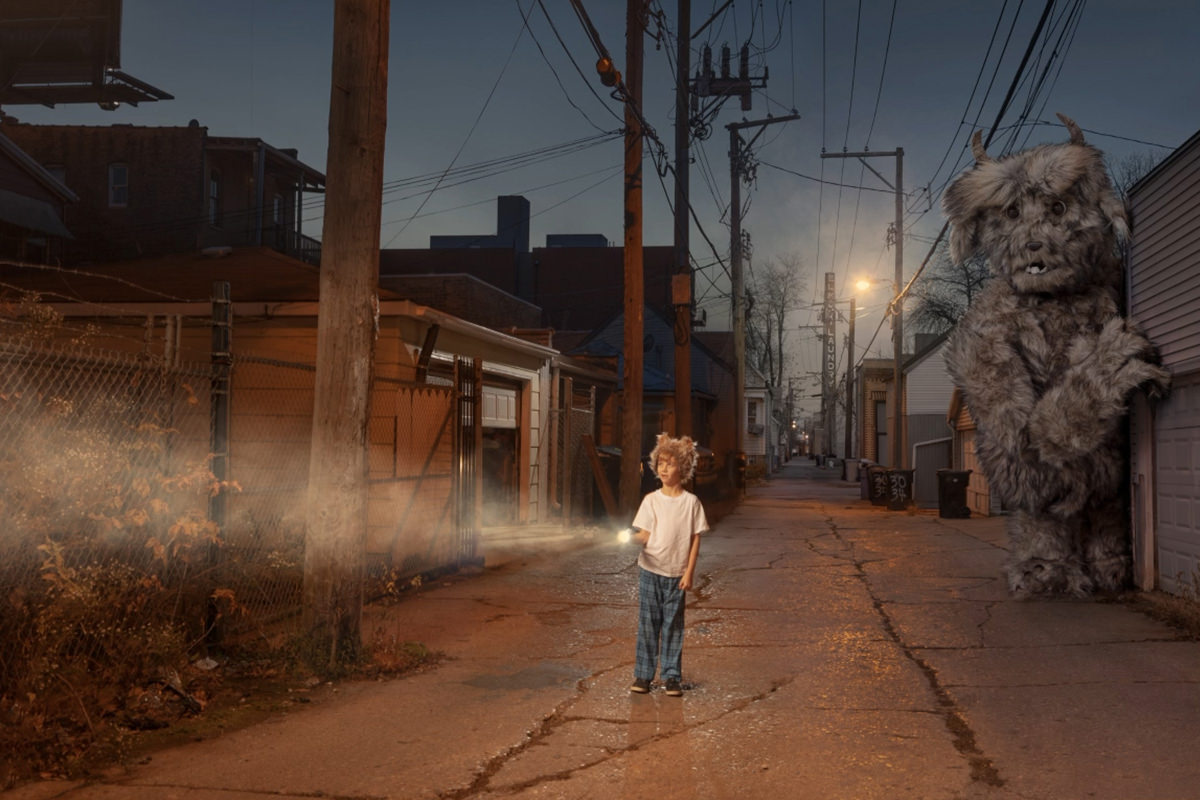
Look How Far We’ve Come!
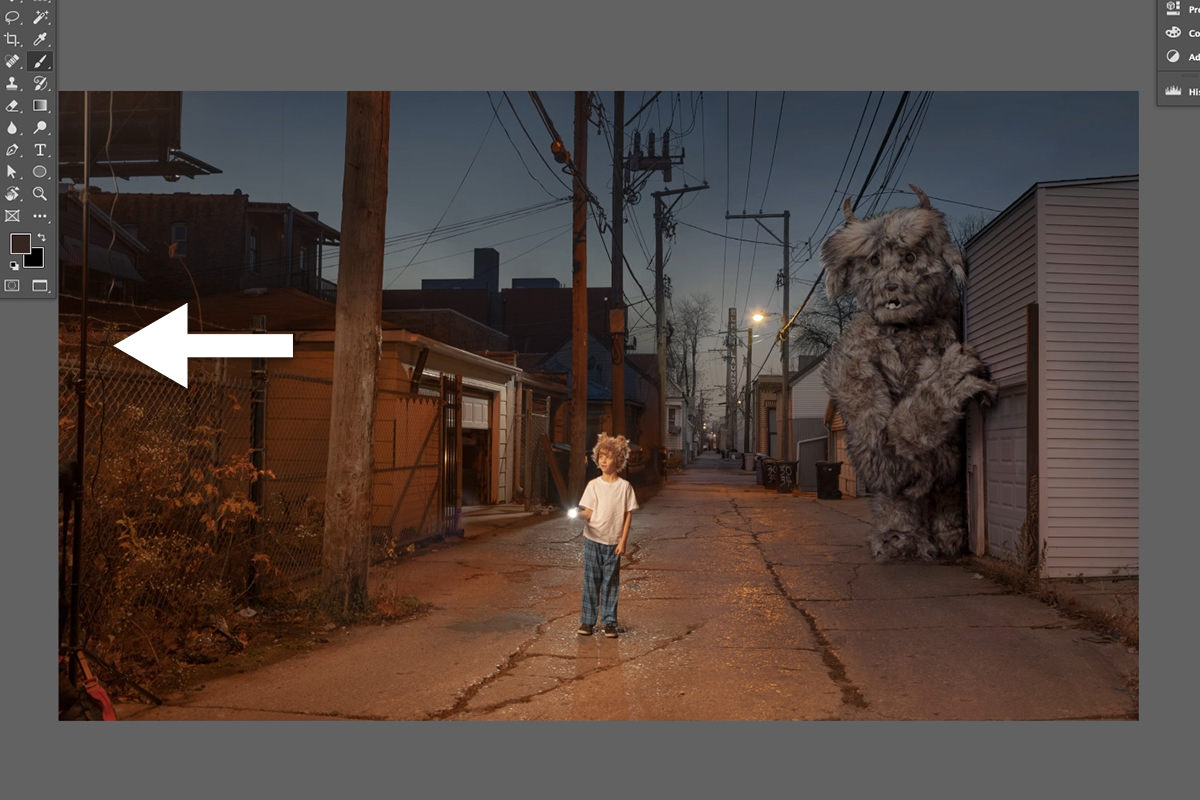
In Part 1, we combined multiple images together to create the background and environment for the scene. In Part 2, we cut out Bakster from his original background, placed him in the environment, and then carefully matched the lighting and color. Here in Part 3, we’re going to put on the finishing touches, adding dramatic lighting effects, fog, and beautiful color toning! But first, we need to remove some objects and distractions from the scene. Most importantly of all, the large light stand on the left side of the frame.
Let’s get started!
Removing Objects & Distractions
We need to get rid of the the light stand which is relatively easy work thanks to the Spot Healing Brush Tool. Create a New Layer (this is important as it allows us to work non-destructively when removing objects), select the Spot Healing Brush, make sure Sample All Layers is checked in the Tool Options, and begin painting over the light stand and cables. It’s more reliable to work with smaller strokes than trying to paint over everything all at once, so paint over a small section until it looks good before moving on to the next.
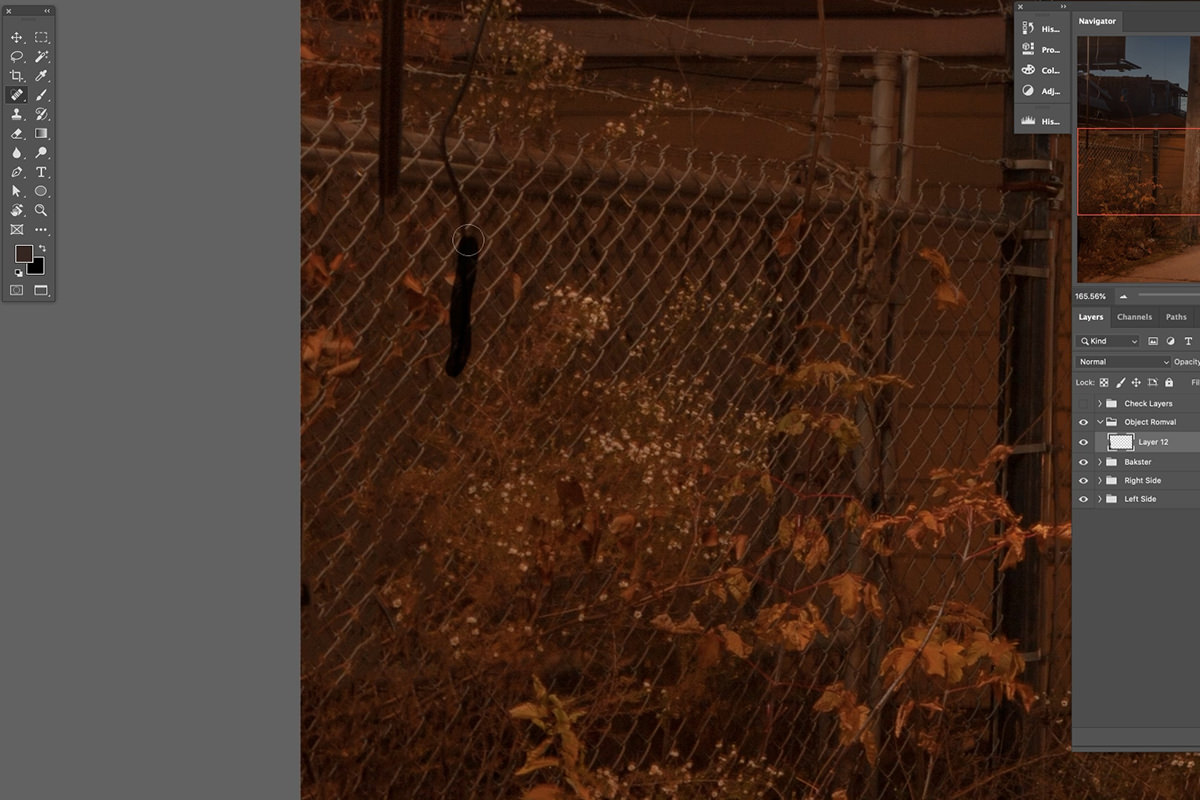
The Spot Healing Brush is an automated tool, and while it works well most of the time, it’s not always perfect. If you paint over an area and it looks a little strange after, just paint over it again (and again, if necessary!) until it looks seamless.
Once the light stand is covered up, check the image for other small distractions–anything that might draw the viewer’s eye away from the boy or from Bakster. Look for pieces of trash on the ground or unwanted lights or reflections in the background.
Now that the frame is cleaned up, we can also adjust the crop to remove unwanted sections of the background and to improve the overall composition. Just select the Crop Tool, make sure Delete Cropped Pixels is not checked (we don’t want to delete any information from the image), and adjust the crop to your liking.
Creating Lighting Effects
Pretty much everything we do from here on out will be for dramatic effect. Since this is a fantasy scene, dramatic lighting, atmospheric effects, and stylized color toning are all great aesthetic choices to help further establish the tone.
The image is telling the story of a young boy playing hide-and-go-seek with his gigantic furry friend Bakster. He’s searching for Bakster in an alleyway with his trusty flashlight in hand. Let’s add some lighting effects focused around the flashlight, which will help tell the story we want and help guide the viewer’s eye around the scene.
Lighting with Levels
Create a Levels Adjustment Layer above the background and Bakster Groups. Group the Levels Adjustment Layer with itself and give it the name ‘Light’. In the Levels Dialog, make the darks a little brighter. This will create the overall light effect that we want. Next, select the Blue Channel and lower the blues in the highlights, then do the same for the greens in the Green Channel.
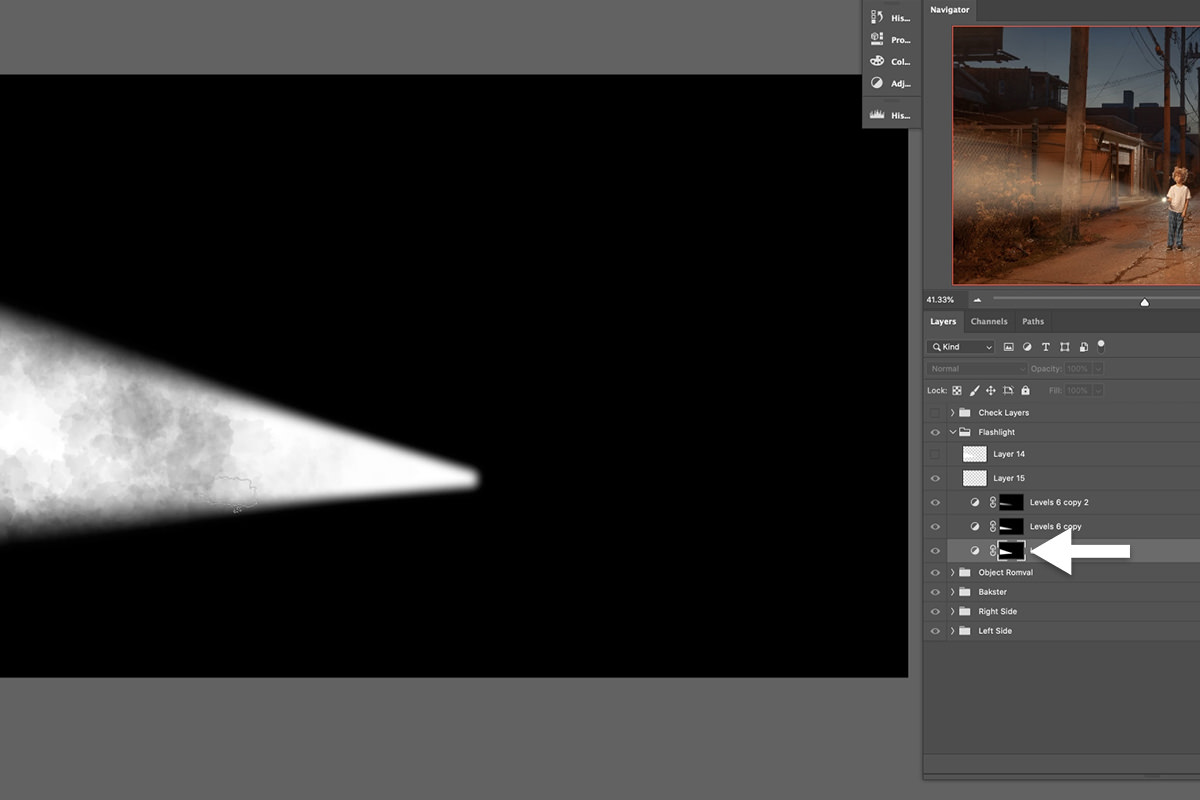
Creating a Beam of Light
Now we’ll give the light some direction, focusing it into a beam coming from the flashlight. Select the Polygonal Lasso Tool and draw a triangular shape starting from the opening of the flashlight and expanding out towards the left edge of the frame.
With the Layer Mask of the Levels Adjustment still active, hit CTRL or CMD + I to Invert the Layer Mask. Now the Levels Adjustment is only visible where we defined the beam of light. If you want to reposition or change the angle of the light beam, hit CTRL or CMD + T to activate the Transform Tool, allowing to scale or rotate the Layer Mask to fit where you want it. When positioning the beam, pay close attention to where the boy is looking as this will help make the effect look much more realistic.
Using Blurs
We have a beam of light in place but it doesn’t look at all realistic. We need to give the beam a much softer look, and it should get softer and softer as it extends further from the light source. We can adjust this by making changes directly to the Layer Mask of the Levels Adjustment Layer. Hold ALT or OPTN and click on the Layer Mask of the Levels Adjustment. This will reveal the Layer Mask and allows us to more easily see the changes we make to it.
Next, navigate to the Blur Gallery menu and select the Tilt-Shift Blur option. Tilt-Shift Blur allows us to define a center area which will stay in focus, and then create a blur which will become more pronounced the further it gets from that center area. Place the center control point over top of the flashlight bulb. Then adjust the rest of the blur so that it extends from that point to the left edge of the frame. Change the settings as necessary until you get a nice soft graduated effect. It doesn’t need to be perfect, as we’ll be adding an additional blur on top of this to make everything even softer. Once you’ve set the Tilt-Shift Blur, hit Okay to apply it to the Layer Mask.
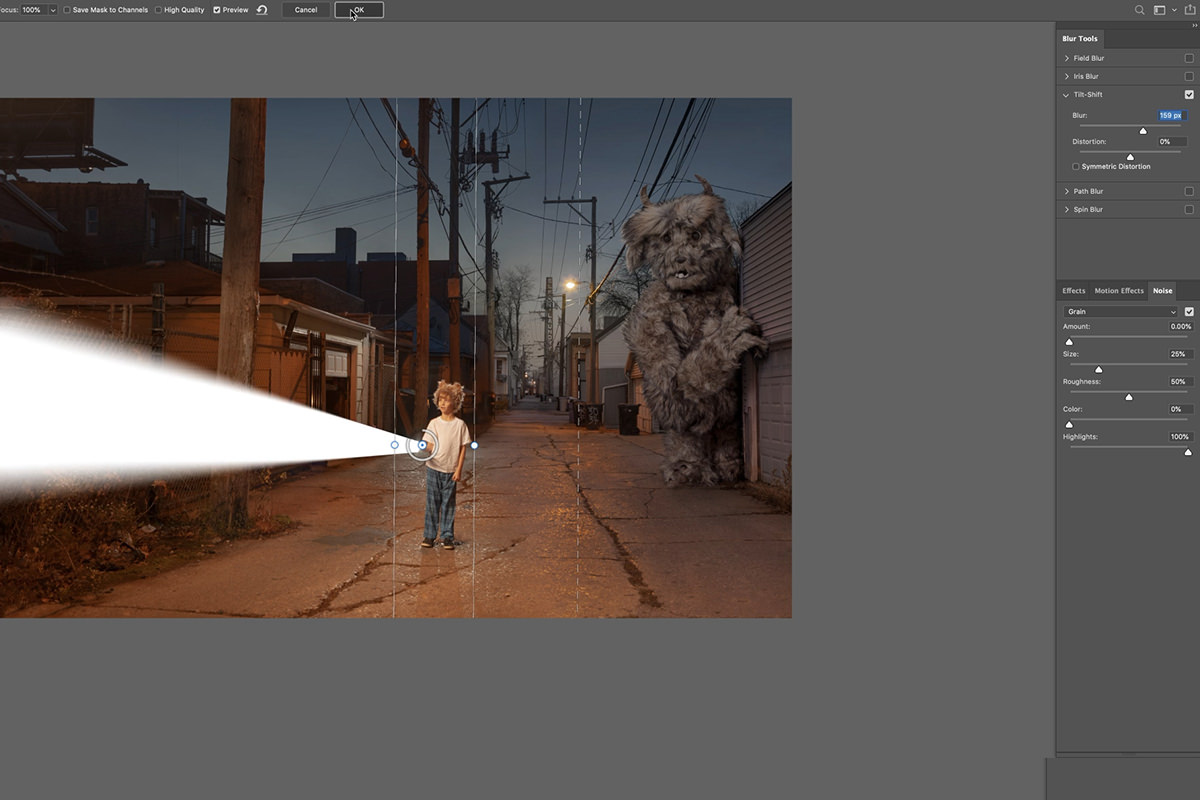
It looks a lot better, but it’s still not very realistic. Let’s apply a Gaussian Blur to the entire Layer Mask, giving the beam a much softer and much more true-to-life look.
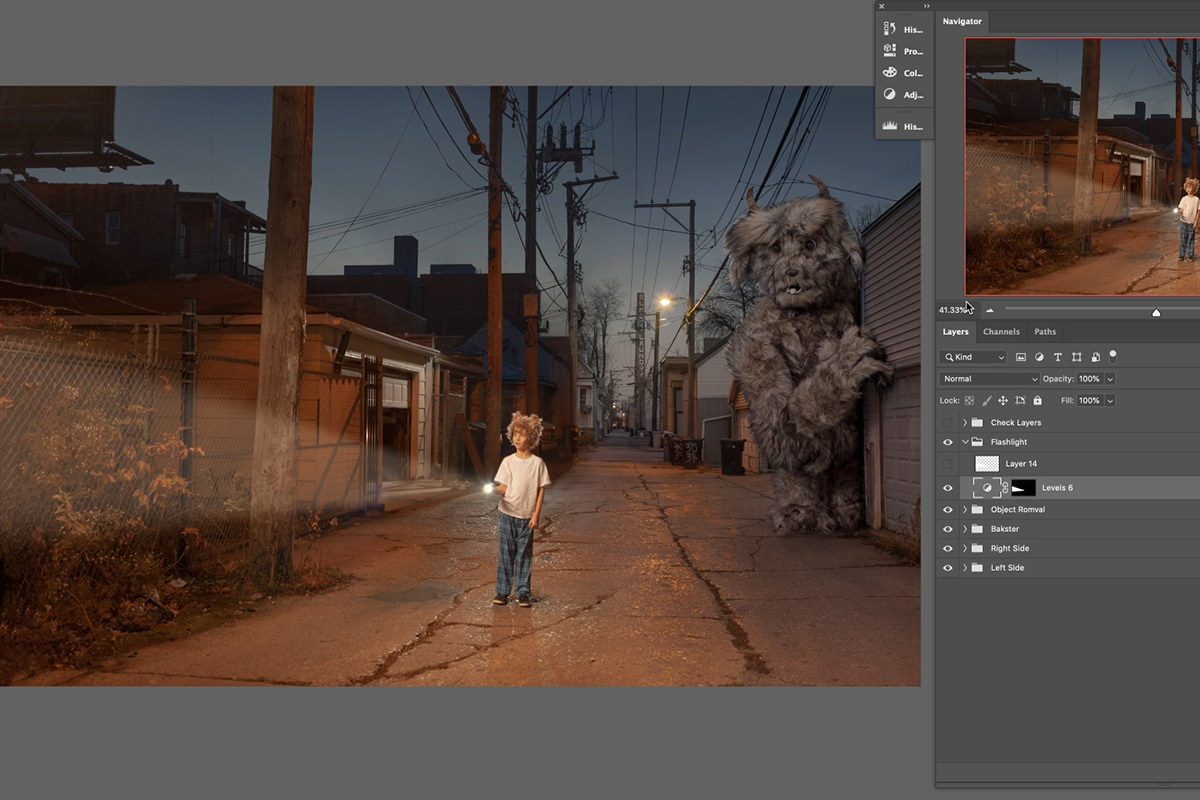
Layering the Light
Light, much like the shadows we created, looks most realistic when you create it using multiple Layers and using different levels of light. Next we want to add a core to the light, giving it a slightly more focused beam through the center. Just Duplicate the Levels Adjustment, and then use the Transform Tool to shrink it down to fit along the center of the original beam. Apply a Gaussian Blur to soften it until it looks natural.
Repeat that process again, adding another smaller core along the centers of the first two beams. Remember to Blur it until it’s nice and soft.
Creating Fog & Atmosphere
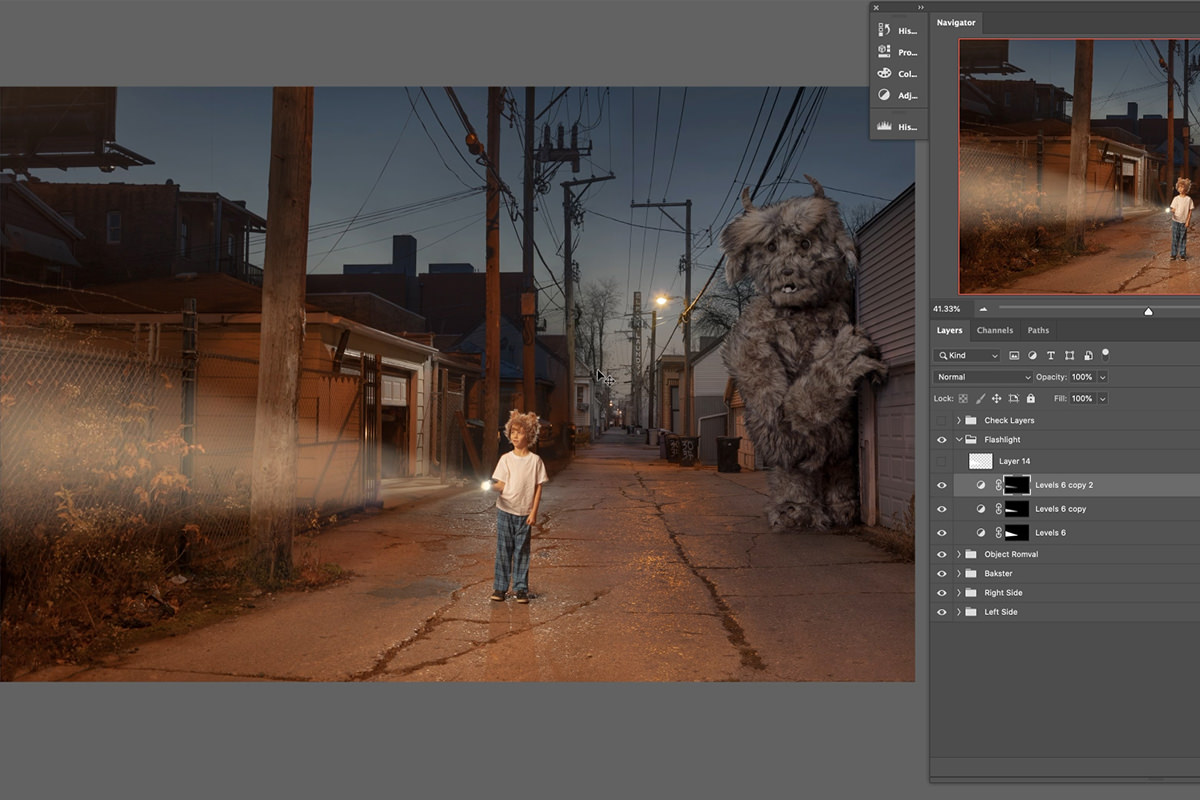
With the beam of light in place, we can some mystery to the scene by adding fog and atmosphere. In the included custom Brushes you’ll find the PHLEARN Cloud Brush, which will help you paint realistic fog and clouds into any image. The coolest part of this is that we can use it directly on the Layer Masks of each light beam! Select the Brush, set the color to black and, using a low Flow, paint along each beam to add a subtle fog effect to each. To further enhance the effect, duplicate on the Levels Adjustment Layers, fill the Layer Mask with black, and then paint with white with the Cloud Brush to add additional depth.
For added realism, Duplicate the Levels Adjustment and repeat that same process around the street light in the background.
Light Adjustments & Color Grading in Photoshop
Coloring an image is a highly subjective process, so while you’re welcome to follow along and color Bakster the same way we do, we encourage you to get creative and use colors that look great to you. It’s also important that any major color toning work happens at the end of an edit, since we want every Layer to be colored the exact same way so that they each fit in the scene.
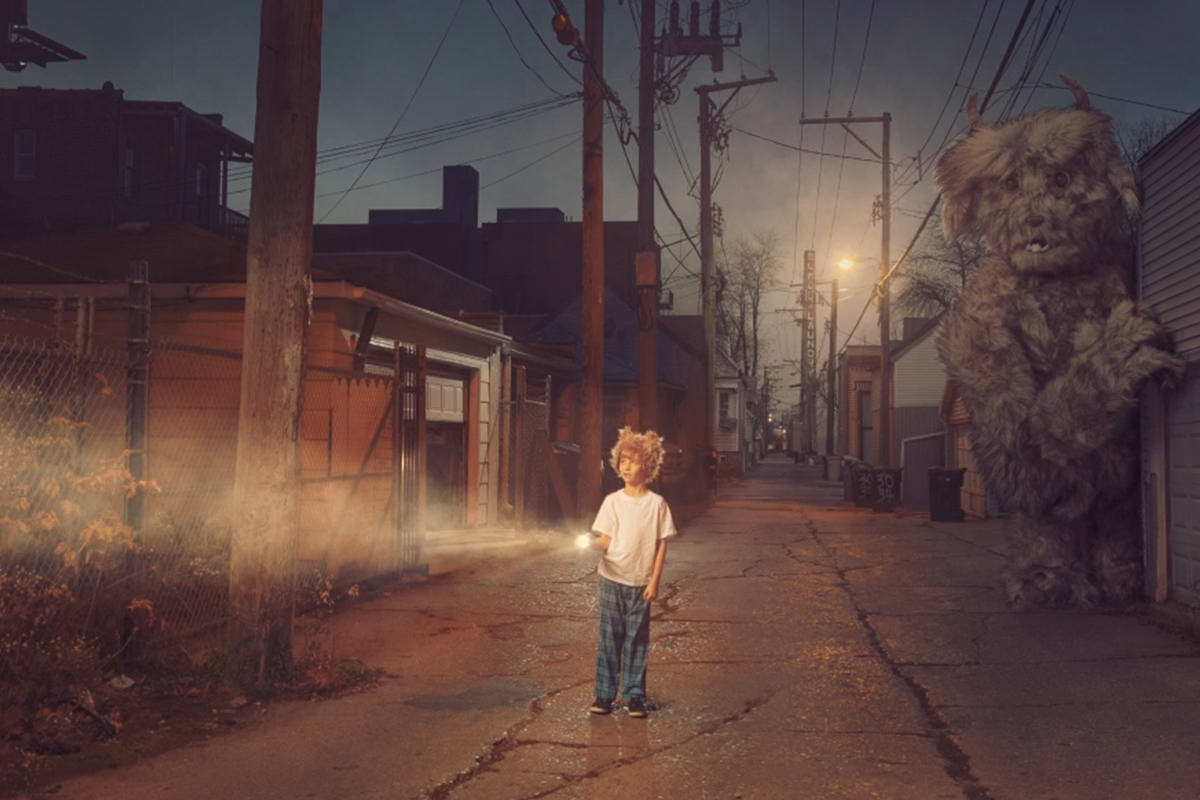
Before we get into coloring, let’s make some last-minute changes to the overall lightness of the scene. We want Bakster to be a little bit more hidden in shadow, adding a nice visual payoff as the viewer sees the boy, follows the beam of light, and then discovers Bakster hiding on the opposite side of the image behind a building.
Hiding Bakster with Levels
Create a new Levels Adjustment Layer, Group it with itself, and name the Group ‘Color Tone’. Use the Levels to darken the image. Focus on Bakster, making him a little darker, but still visible. Invert the Layer Mask and then use the fog brush to paint with white over Bakster on the Layer Mask. This will make him a little darker while applying a little atmospheric texture.
Try using multiple Levels Adjustments with this same technique to add multiple levels of darkening. Remember, we don’t want Bakster to be too dark or invisible, we just don’t want him to be the first thing the viewer sees when they look at the image.
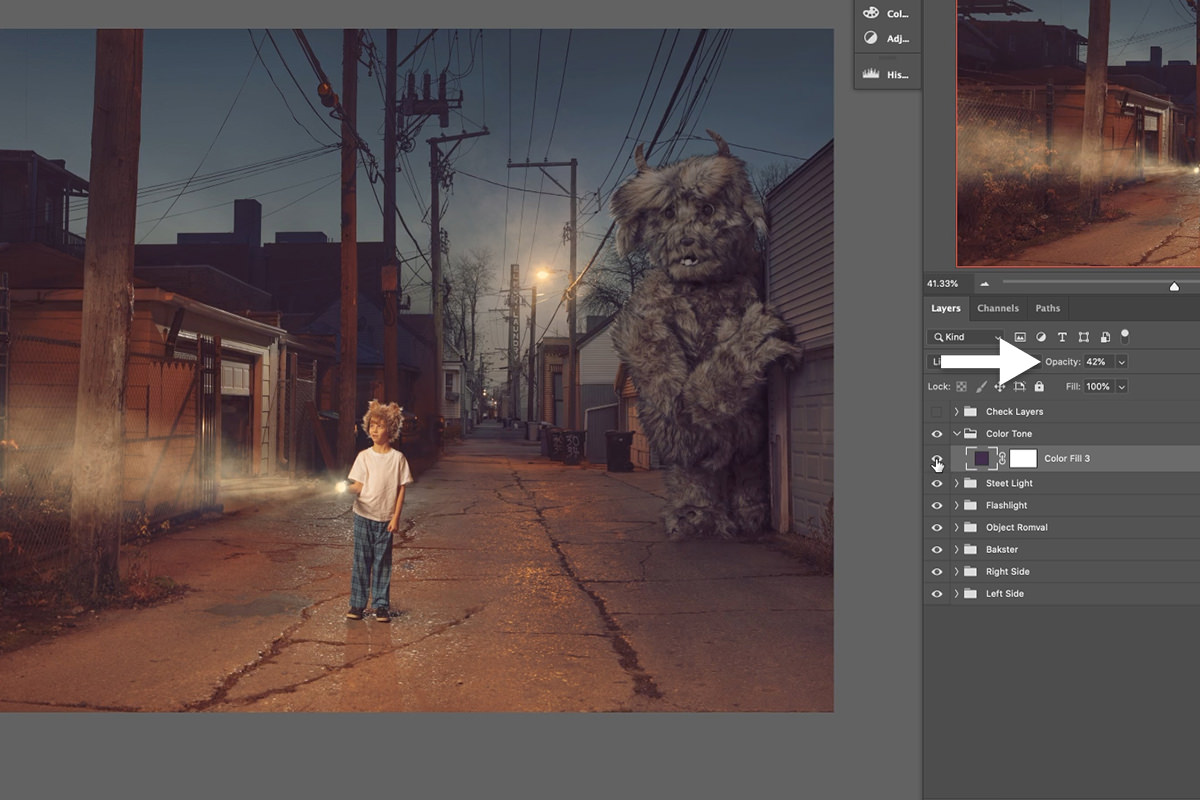
Color Toning
There are countless tools and techniques that you can use to color tone an image. One of the easiest, and one of the less obvious, is using Solid Color Fills to apply a nice general coloring to an entire photo. Create a Solid Color Fill Layer in the Color Tone Group (and above the Levels Adjustment Layers). We chose to use purple, but you can experiment with colors of your own choosing. Set the Blending Mode of the Solid Color Fill Layer to Lighten, and then make the color darker within the Solid Color Fill dialog until it’s just barely visible. As you adjust the color of the Fill Layer, you’ll be able to see the changes in real time on the image. This makes it very easy to dial-in the exact color and level of color toning you want.
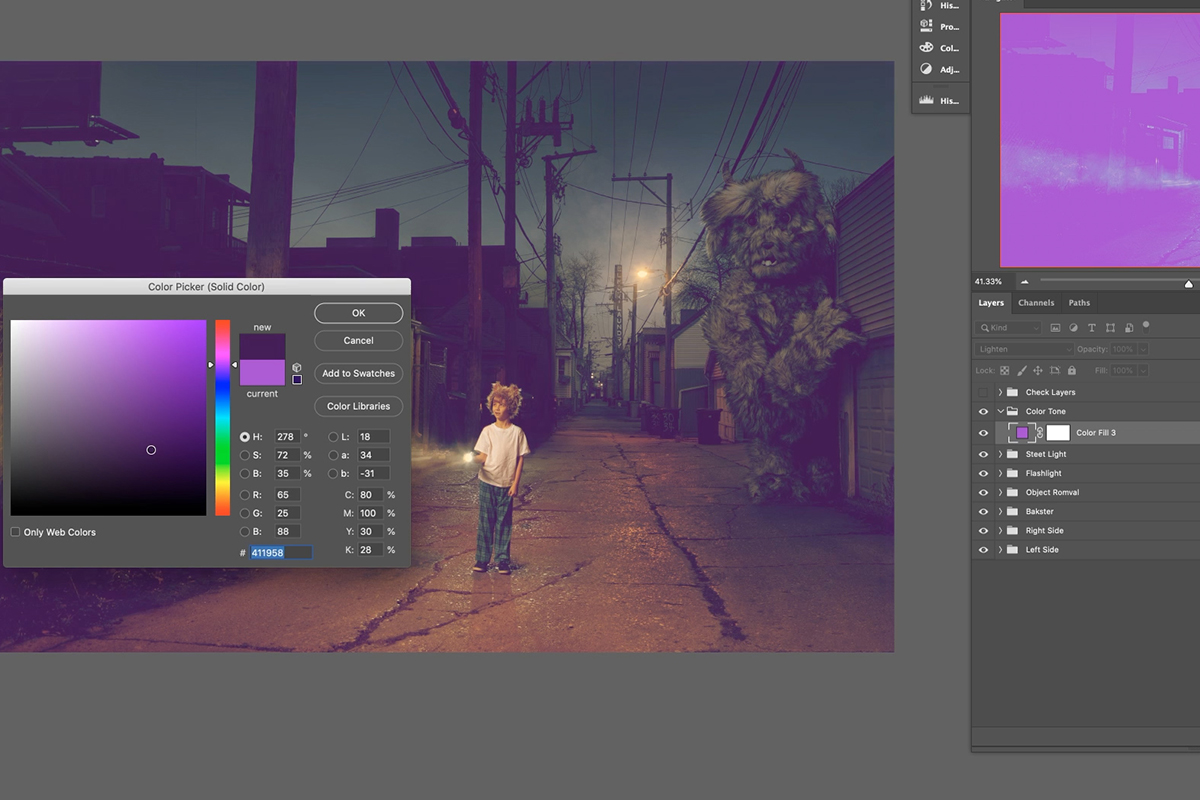
Once you’re done the image should have a nice, general coloring in the shadows that helps to tie everything together. It will likely be a little too strong, so lower the Opacity to your taste.
Coloring the Sky
We can also target our color grading to specific areas of the image. Let’s try adjusting the color of the sky. For our overall look, we want purples in the shadows and yellows/golds in the highlights. The sky is looking a little too blue overall, so we can fix that by creating a Hue/Saturation Adjustment Layer above the Background Group and below the Bakster Group. Use the Hue/Saturation Adjustment eyedropper to select the blues in the sky, and then move the Hue Slider until the color shifts slightly towards purple. You can also adjust the Lightness and Saturation as you see fit.
We also recommend making the background a little bit darker, which will help Bakster and the boy stand out a little bit more from the environment. Create a Levels Adjustment Layer over the Hue/Saturation Adjustment, make the image a little darker, Invert the Layer Mask, and paint with white over the sky using the Fog Brush, again to add more atmospheric texture to the scene.
Coloring with Curves
As we said earlier, there are a ton of tools that help us color tone our images. So far we’ve used Hue/Saturation Adjustment Layers and Levels Adjustment Layers. Now let’s try Curves! Curves and Levels are very, very similar, but Curves offers a little more precision when you need it.
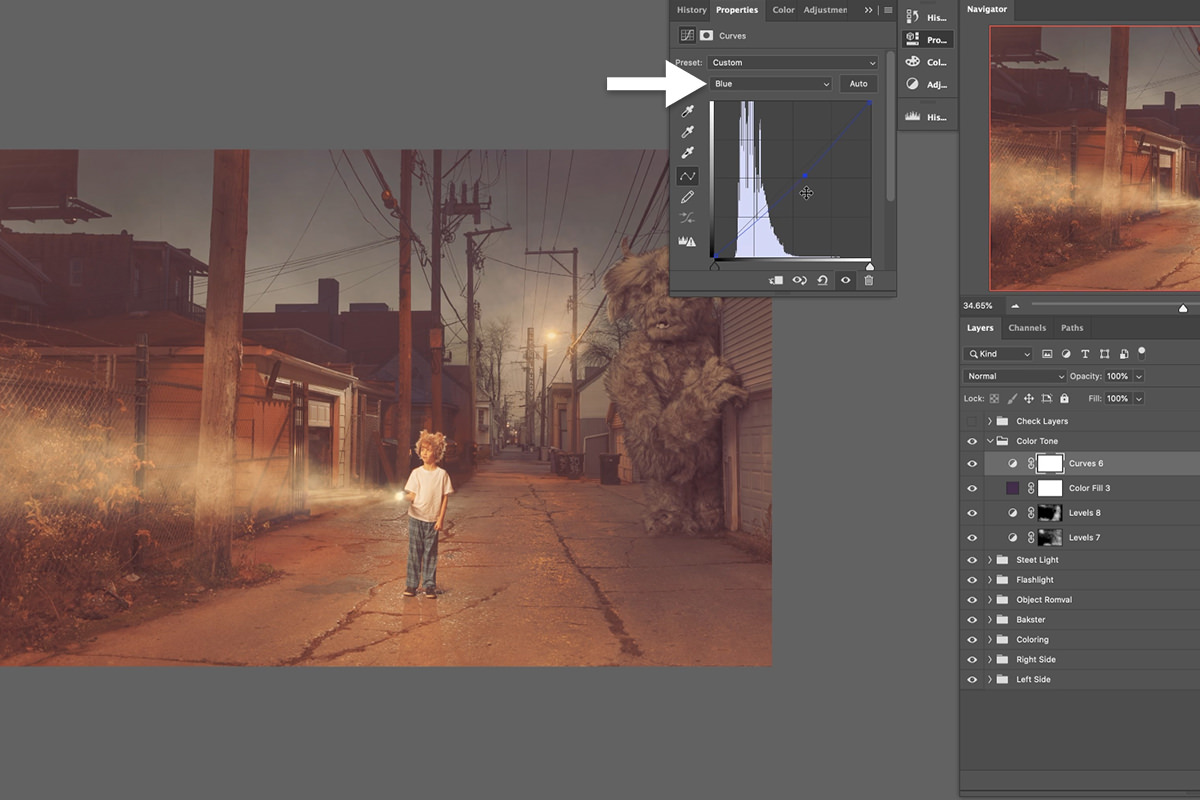
Let’s add some yellows and gold colors into the highlights. Create a Curves Adjustment Layer within the Color Tone Group. Select the RGB Channel and lift the shadows and midtones up slightly. Select the Red Channel and lift the center of the curve up to add some reds into the image. Then select the Blue Channel and lower the center of the curve to remove some blues from the image. You should have a slightly brighter and yellow coloring effect. Invert the Layer Mask and, using the Fog Brush, paint in the Curves Adjustment over top and around the highlights and light sources in the photo.
Creative Coloring with Gradient Maps
Gradient Maps are a fun and easy way to add color to the highlights, midtones, and shadows of an image. Not only do they look great, they really help to blend of the different elements of composite image together, making it appear like everything was photographed in the same scene.
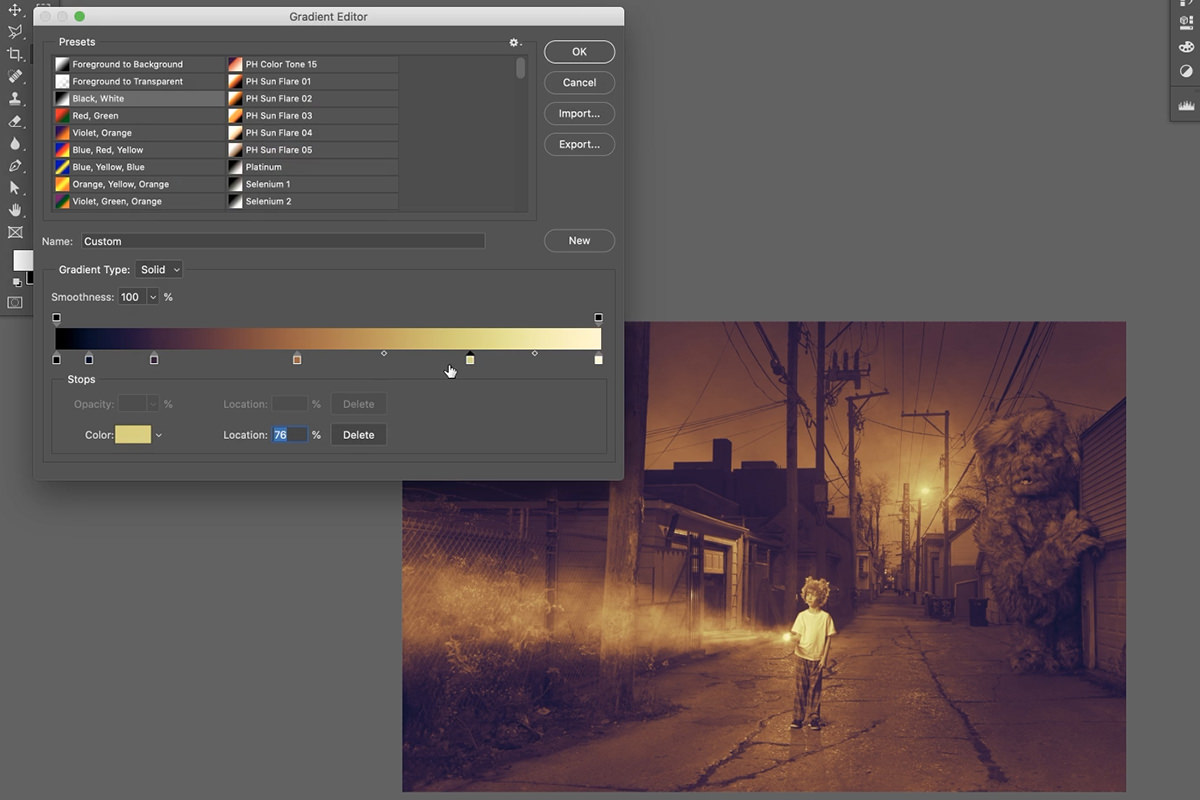
They’re also easy to use! Simply create a Gradient Map Adjustment Layer on top of everything in the Color Tone Group, and assign colors to the shadows, midtones, and highlights. It’s important to make sure the shadow colors are still dark and the highlight colors are still bright, but there’s a lot of flexibility to where and how many colors you can integrate into a scene.
Have fun and experiment with Gradient Maps as they’re an easy-to-use and powerful tool for any compositor or image maker!
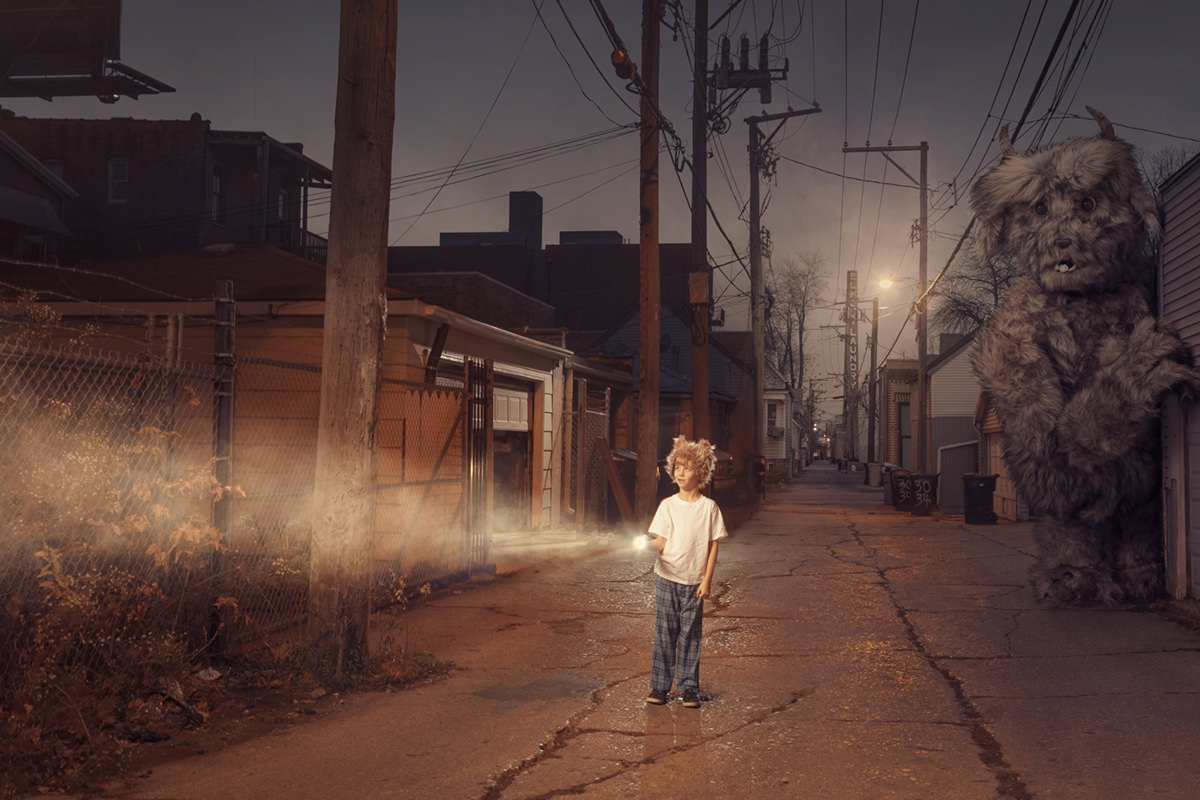
Finishing Touches
You have all the tools, now it’s up to you to discover a look that you love! Adjust the existing Layers we’ve used to color the image and even add more. Even though it can be a difficult and time-consuming process, coloring is often the most fun and satisfying part of editing an image. Remember to use different Adjustment Layers, Layer Masks, and Brushes to blend everything together for a powerful and dramatic final image.
Now What?
It’s been a wild and fantastic ride and now our extraordinary composite image is complete! If you enjoyed this series, you’ll love our other fantasy composite courses. From levitation, to alien worlds, to surreal scenes, we’ve got you covered if you want to continue on your Photoshop compositing journey.