


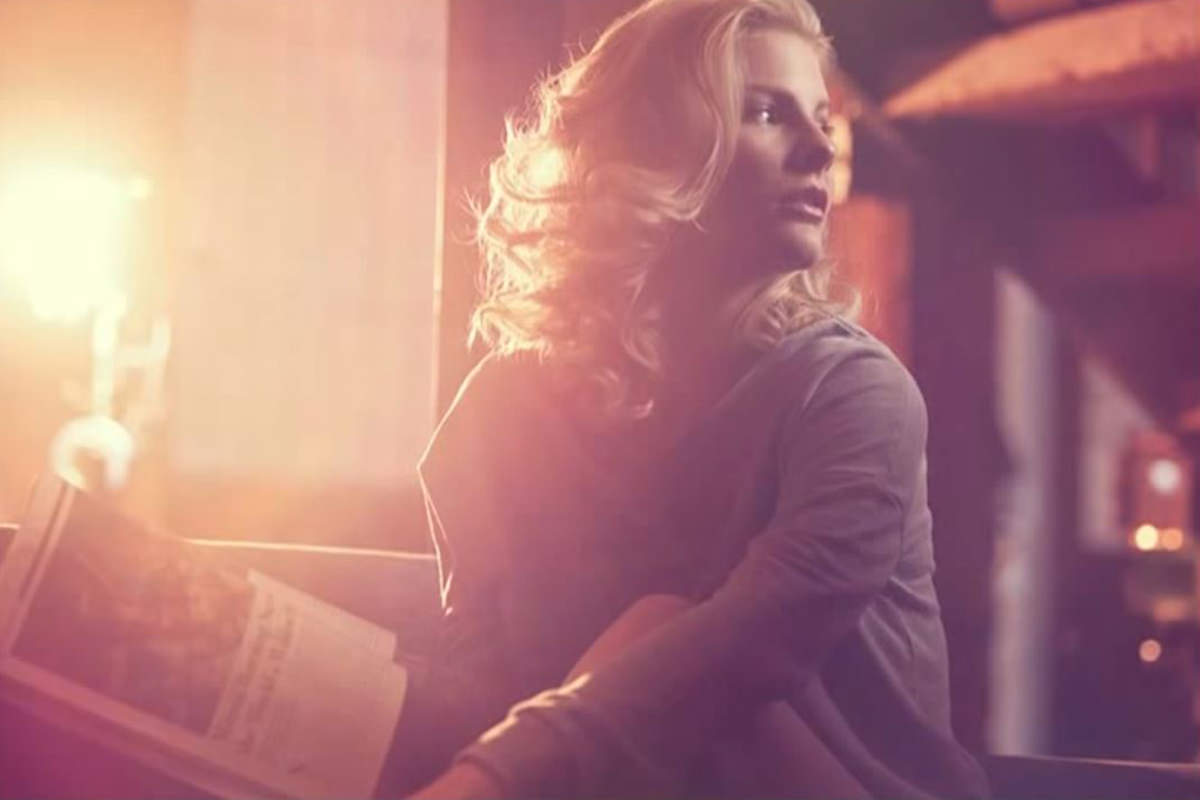
Two lights, one gel, and a grid, shot on a couch with the subject never moving from where she was already sitting. This behind-the-scenes breakdown covers a bare bulb strobe behind the subject with a 3/4 CTO gel standing in for a low sun, a gridded beauty dish left ungelled so the face stays readable, and lens flare deliberately encouraged rather than flagged off the lens.
We publish a new free tutorial every week, each one with sample images and PSDs you can download and follow along with. Sign up and they land straight in your inbox, along with early word on sales, events and subscriber-only offers.
Behind the Scenes: Creating a Backlit, Lounge-Style Portrait With Two Lights
Shot directly on a couch with the subject never even moving from where she was sitting beforehand, this behind-the-scenes breakdown covers a simple two-light setup built entirely around one concept: a warm, relaxed, lounge-around feel that reads like a low sun coming through a window at sunrise or sunset. Just a gelled bare bulb strobe and a gridded beauty dish, paired with deliberately encouraged lens flare, do all the work.
The Concept: A Warm, Low-Key Lounge Portrait
The goal for this shot wasn’t high fashion or beauty-lit polish — it was a relaxed, lounge-about feel, still pretty and a little bit sexy, but clearly casual rather than styled. Every lighting decision that follows was made specifically to support that one concept.
Creating a Warm Backlight With a Bare Bulb Strobe
The light doing most of the work sits behind the subject with nothing on it at all.
-
Set Up a Bare Bulb Strobe Behind the Subject
Position a strobe directly behind the subject with nothing on it — no softbox, no reflector, just the bare bulb itself.

Why Bare Bulb Instead of a Softbox
A bare bulb strobe produces a harder, more point-like light source than a softbox would, which is exactly what makes it convincingly imitate sunlight streaming in from a window rather than reading as an obvious studio light. That harder quality is part of what sells the illusion of a low morning or evening sun.
Gelling the Backlight to Mimic Sunlight
A gel turns that hard light the color of a low sun.
-
Add a 3/4 CTO Gel
Fit the bare bulb strobe with a 3/4 CTO (Color Temperature Orange) gel, shifting its output toward a warm, orange tone.
Combined with the bare bulb’s harder quality of light, the warm gel makes this backlight double as both the light on the subject and the ambient light filling the rest of the scene, similar to how a low sun would wash warm light across an entire room.
Adding a Gridded Beauty Dish as the Main Light
The second light exists only to keep the face readable without diluting that warm wash.
-
Position an Ungelled, Gridded Beauty Dish as the Main Light
Set up a beauty dish fitted with a grid as the main light on the subject’s face, left ungelled so it stays neutral to cooler rather than matching the warm backlight.
Why Grid the Beauty Dish This Close
Positioned relatively close to the subject, an ungridded beauty dish would spill light broadly across the couch and surrounding area. A grid narrows the beam so the light lands specifically on the subject’s face rather than lighting everything nearby, keeping the warm backlight as the dominant light filling the rest of the frame.
Encouraging Lens Flare Instead of Avoiding It
With a bright backlight sitting directly behind the subject and within the camera’s frame, lens flare becomes almost unavoidable — and in this case, that’s exactly the point.
-
Let the Backlight Sit Directly in Frame
Keep the backlight visible to the camera lens rather than blocking it, which produces a soft lens flare that washes warm color and light across the image.
Why the Light Needed to Be Visible to the Lens for Flare
Lens flare only happens when the light source itself is visible within, or very close to, the camera’s field of view. Normally this is something to avoid entirely, often by blocking the light from the lens with a flag, but here the flare was worth keeping deliberately, since it reinforces the same warm, soft, sun-drenched feeling the whole shot was built around.
Camera Settings for a Shallow, Warm Exposure
The camera settings keep the subject isolated and let a little of the real daylight outside into the frame.
-
Shoot Wide Open at a Long Focal Length
Use a 70-200mm lens at f/2.8 for an extremely shallow depth of field, at a shutter speed of 1/160th of a second and ISO 100.
Keeping ISO low minimizes noise, the shallow aperture isolates the subject against a soft background, and the shutter speed lets in a small amount of the bright ambient daylight outside without overwhelming the strobe-lit exposure.
Filling Shadows With a Reflector
A reflector stands in for a third light without adding another color temperature to balance.
-
Bounce Light Back In With a Silver Reflector
Position a standard silver-surfaced reflector to catch some of the light spilling from the gridded beauty dish and bounce it back onto the shadowed side of the subject’s face.
This small addition fills in what would otherwise be a completely shadowed side of the face, without needing a third dedicated light source.
Matching Pose and Wardrobe to the Lighting Concept
The lighting only reads as casual if everything else in the frame agrees with it.
-
Direct a Relaxed, Everyday Pose
Have the subject do genuinely casual things — playing with her hair, flipping through a magazine — rather than more deliberate, angled fashion posing, matching the relaxed mood of the lighting.
-
Choose Wardrobe That Matches the Mood
Dress the subject in something loose and casual, like a sweatshirt and shorts, rather than anything sleek or high-fashion, so wardrobe reinforces the same lounge-about concept as the lighting and posing.
Why This Approach Works
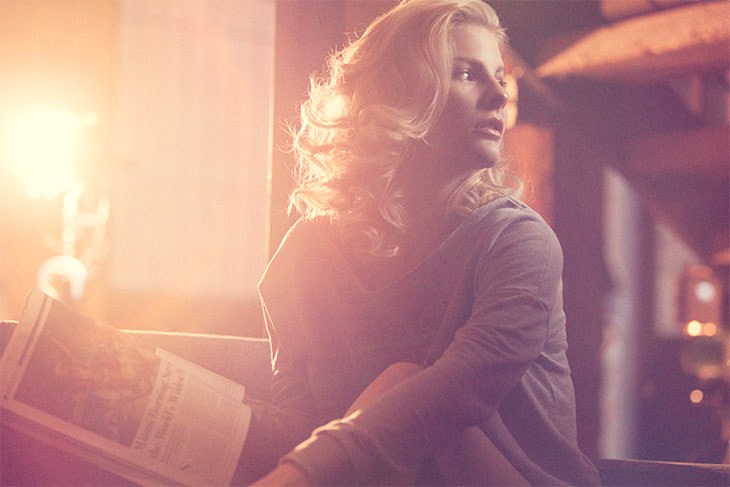
Every choice in this setup reinforces the same single concept rather than working against it. A bare bulb strobe, warmed with a CTO gel, produces a harder, sun-like quality of light that a softbox could never quite replicate, and letting that light spill into lens flare instead of blocking it turns what’s normally considered a mistake into the exact soft, warm feeling the shot needed. The gridded, neutral beauty dish then adds just enough controlled light on the face to keep the subject readable without competing with or diluting that warm backlight, and a simple reflector fills remaining shadow without adding a third light or a different color temperature to balance. None of this works in isolation, though — a relaxed pose and casual wardrobe are just as much a part of selling the lounge-about concept as any lighting decision, which is really the core lesson: lighting, posing, and wardrobe all need to agree with each other, or the shot reads as mismatched no matter how well any single element is executed.
Final Thoughts
Two lights, one gel, and a grid are all it takes to produce a shot that feels considerably more complex than it actually is. The real skill demonstrated here isn’t technical complexity — it’s making sure every decision, from the bare bulb’s harder light quality down to the choice of a sweatshirt over a sleek dress, points toward the exact same mood. That kind of consistency, more than any individual piece of gear, is what makes a lighting setup like this repeatable on a completely different subject and still feel cohesive.
Quick Reference: Settings and Tips
- BacklightBare bulb strobe behind the model with a 3/4 CTO gel
- Main lightGridded beauty dish, no gel, close to the face
- FillStandard reflector, silver side up, bouncing the beauty dish
- Lens flareKeep the backlight in the frame; a black flag blocks it when you don’t want flare
- Camera settings70-200mm at f/2.8, 1/160 s, ISO 100
- Pose and wardrobeCasual moments, sweatshirt and jean shorts, matched to the lazy low-sun light
Indoor Sunset Lighting: Common Questions
How many lights does this indoor sunset look need?
Two: a bare bulb strobe behind the model as a warm backlight and a gridded beauty dish as the main light on her face. A silver reflector adds a little fill.
Why use a bare bulb strobe for the backlight?
With nothing on it but a gel, it looks like sunlight coming in at sunrise or sunset. It lights the model and everything around her.
What gel makes the backlight look like a low sun?
A 3/4 CTO (Color Temperature Orange) gel on the bare bulb strobe, which turns its light a warm orange.
Why leave the beauty dish without a gel?
It keeps the light on the face neutral and a little cooler than the warm background. That play between warm behind and neutral in front is part of the look.
Why put a grid on the beauty dish?
The dish is close to the model, and the grid keeps its light on her face instead of the couch and her feet. The warm backlight stays the main light in the rest of the frame.
How do I get lens flare on purpose?
Keep the backlight visible to the lens, in the frame. If you ever want to avoid flare, put a black flag between the light and the lens.
What camera settings were used for this shoot?
A 70-200mm lens at f/2.8 for a very shallow depth of field, 1/160 of a second and ISO 100. The shutter lets in only a little of the bright daylight outside.
How do you keep one side of the face from going dark?
A standard reflector, silver side up, catches some light from the beauty dish and bounces it back onto the shadow side of her face.
What posing and wardrobe suit a lounge-style portrait?
Casual moments like playing with her hair or reading a magazine, and loose clothes like a sweatshirt and jean shorts. A sleek dress with the same lighting would read as a totally different shot.
From the Magazine View all
Stories, interviews and guides for photographers, new every week.
 BusinessHow to Compete With AI: Give Your Clients MoreEveryone has the same tools now, and your clients know it. The way to compete is to give them more.
 EditingLightCraft vs Lightroom: Is the Free Clone Any Good?The free clone on the same RAW files: what matches, what breaks and who should switch.
 EditingHow to Tell If a Photo Is AI, and Prove Yours Is RealThe tells that still work in 2026, why detectors disagree, and how to prove your own photos.
Master Photoshop, Lightroom and Photography
Join PHLEARN PRO for $12.99 a month, or $99.99 a year (save 36%). Cancel anytime, with a 100% money-back guarantee.





