
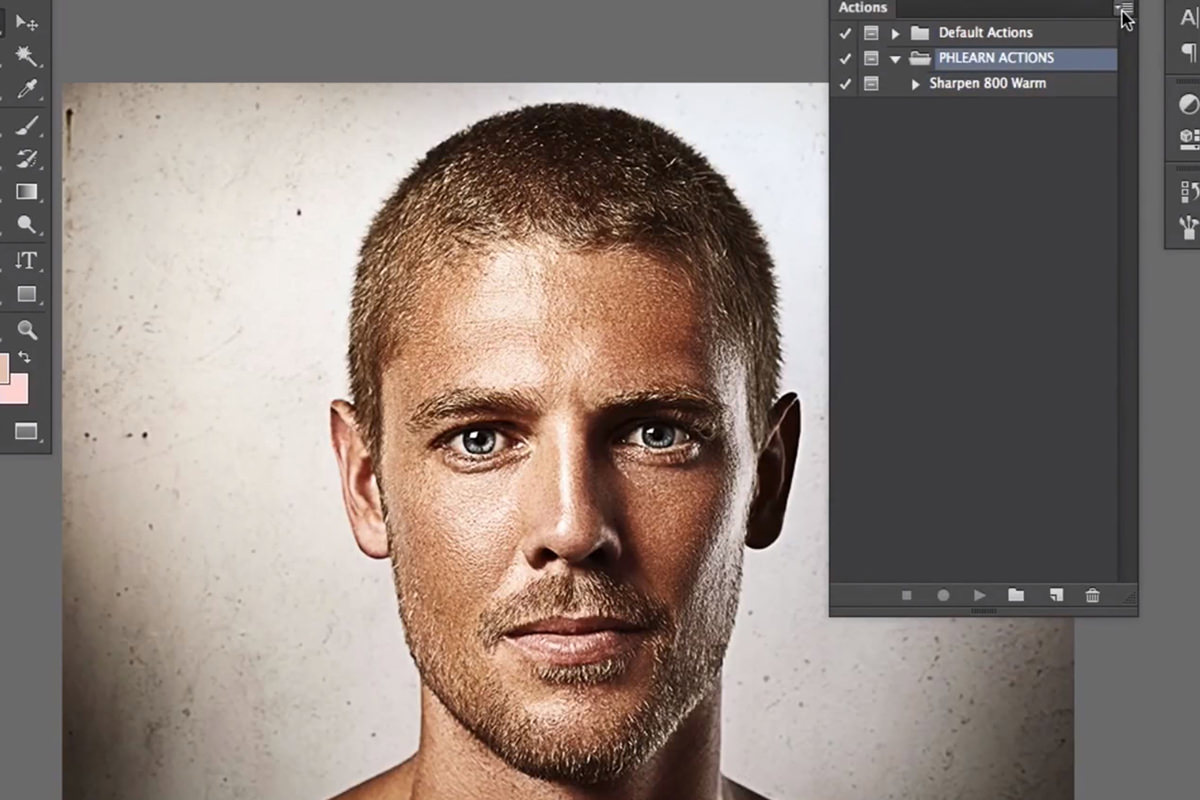

description
An action that works perfectly on one document but throws an error like “layer background is not currently available” on another is almost always built too specifically for that one file. This tutorial records a simple test action first to show exactly how that error happens, then builds a genuinely reusable sharpening and warming action using non-specific keyboard shortcuts, smart dialog choices, and a custom pause for adjustable settings.
Enjoying This Free Tutorial?
We publish a new free tutorial every week, each one with sample images and PSDs you can download and follow along with. Sign up and they land straight in your inbox, along with early word on sales, events and subscriber-only offers.

How to Create Professional Photoshop Actions
An action that works perfectly on one document but throws an error like “layer background is not currently available” on another is almost always built too specifically for that one file. This tutorial records a simple test action first to show how that error happens, then builds a genuinely reusable sharpening and warming action using non-specific keyboard shortcuts, smart dialog choices, and a custom pause for adjustable settings.
Opening the Actions Panel and Recording a Basic Action
The Actions panel records a sequence of steps that can be replayed identically later, starting with something as simple as duplicating and rotating a layer.
-
Open the Actions Panel
Go to Window > Actions.
-
Create a New Folder and Action
Create a new folder to organize actions, then create a new action inside it and click Record.
-
Record a Simple Step
Press Cmd/Ctrl+J to duplicate a layer, then Cmd/Ctrl+T to rotate it, confirming the transform to record both steps.
-
Stop Recording and Play It Back
Click Stop, then select the action and click Play to watch it repeat the exact same duplicate-and-rotate sequence.
Understanding Why Actions Fail on Different Documents
An action recorded around a specific layer, like the background layer, breaks the moment it’s played on a document where that exact layer doesn’t exist.
-
Record a Step That References a Specific Layer
Click directly on the background layer, then press Shift+Delete and fill it with black. The action records this as “select layer background” followed by the fill.
-
Delete That Layer and Replay the Action
Delete the background layer, then play the action again to see it fail with an error saying that layer isn’t currently available.
Why Actions Break When They Reference Specific Layer Names
An action that records “select layer background” or “select layer 1” only works on a document that happens to have a layer with that exact name in that exact position. The moment the action runs on a different file, with different layer names or a different layer order, that specific reference has nothing to point to, which is exactly what produces the “layer doesn’t exist” errors that make actions frustrating to build.
Building a Non-Specific, Reusable Sharpening Action
Using commands that are always available, regardless of a document’s specific layer setup, is what makes an action work reliably across completely different images.
-
Resize the Image
Go to Image > Image Size and set a target width, such as 800 pixels, that works well for the sharpening technique that follows.
-
Create a New Layer and Stamp Visible
Press Shift+Option/Alt+Cmd/Ctrl+N to make a new layer, then Shift+Option/Alt+Cmd/Ctrl+E to stamp a merged copy of everything visible, both of which are always available regardless of the document’s layer setup.
-
Desaturate the Stamped Layer
Press Shift+Cmd/Ctrl+U to desaturate the stamp visible layer so the upcoming sharpening only affects lightness and darkness, not color.
Setting Layer Blend Mode and Opacity Without Extra Recorded Steps
Double-clicking a layer to open its Layer Style dialog previews blend mode and opacity changes live without recording every single tweak as a separate action step.
-
Double-Click the Layer
Double-click the stamped layer to open its Layer Style dialog.
-
Set Blend Mode and Opacity in the Dialog
Choose the final blend mode, such as Overlay, and opacity directly in the dialog, then click OK to apply everything at once.
-
Apply High Pass for Sharpening
Go to Filter > Other > High Pass and choose a radius that produces the desired amount of sharpening (3.4 pixels in the video).
To warm the photo too, make another new layer with Shift+Option/Alt+Cmd/Ctrl+N, press Shift+Delete and fill it with a warm color picked in the Fill dialog, then double-click the layer and set it to Soft Light at 10% opacity. Using the dialogs this way keeps each change to one recorded step.
Why Double-Click a Layer Instead of Toggling Blend Mode Live
Clicking directly on the blend mode dropdown and cycling through options one at a time records every single change as its own step in the action, cluttering it with dozens of unnecessary entries. Opening the Layer Style dialog with a double-click allows blend mode and opacity to be previewed and adjusted freely, since only the final click of OK actually gets recorded as a single, clean step.
Selecting Layers Non-Specifically With Keyboard Shortcuts
Keyboard shortcuts for selecting the layer above or below the current one work regardless of what those layers happen to be named, which is essential for an action meant to run on any document.
-
Select the Layer Below
Hold Option/Alt and press the opening bracket key ([) to select the layer directly beneath the current one (Select Backward Layer).
-
Select the Layer Above
Hold Option/Alt and press the closing bracket key (]) to select the layer directly above the current one (Select Forward Layer).
-
Select Multiple Adjacent Layers
Hold Option/Alt and Shift together while pressing the bracket keys to add adjacent layers to the current selection.
Grouping Layers Within an Action
Once multiple layers are selected non-specifically, grouping and naming them keeps the action’s output organized every time it runs.
-
Group the Selected Layers
Press Cmd/Ctrl+G to group the currently selected layers together.
-
Name the Group
Double-click the new group’s name and give it a descriptive label, such as Sharpen and Color.
Adding a Pause for a Custom Dialog Box
Enabling a dialog box for one specific step, along with an optional written note, lets an action pause for manual input instead of always using the exact same fixed value.
-
Enable the Dialog Box for a Step
Click the small dialog box icon next to a recorded step, such as the High Pass filter, so it pauses and shows its settings dialog each time the action runs.
-
Insert a Stop With Instructions
Select the step just before the High Pass and choose Insert Stop from the Actions panel menu, then type a short message like “Choose High Pass Radius” to guide whoever runs the action, and check Allow Continue so they can carry on to the High Pass dialog.
Testing an Action on a Completely Different Image
Running the finished action on an entirely different photo, ideally one with a different size, orientation, and existing layer setup, is the real test of whether it was built correctly.
-
Open a Different Image
Open a completely different photo, ideally one that already has its own layers and adjustments from previous editing.
-
Play the Action
Select the action and click Play, confirming any dialog prompts, and check that every step, resizing, sharpening, and grouping, completes correctly.
To keep the finished action, rename it, select its folder (the action set) and choose Save Actions from the Actions panel menu to save an .atn file. Load Actions in the same menu brings an .atn file back into Photoshop.
Why Test an Action on a Totally Different Image
An action that only gets tested on the same document it was recorded on can hide layer-specific mistakes that won’t surface until it’s actually needed on new work. Testing it on an unrelated photo, especially one already partway through its own edit with different layers, is what confirms the action was truly built in a non-specific, reusable way.
Why This Approach Works
Using commands that are always available, like Make Layer and Stamp Visible, instead of ones tied to a specific named layer, is what determines whether an action will actually run on a document it wasn’t originally built on. Selecting layers with the non-specific “backward” and “forward” keyboard shortcuts rather than clicking a named layer directly is the single detail that separates a reusable action from one that breaks the first time it’s used on different layer structure. Testing the finished action on a completely different photo is what actually proves it was built correctly, rather than assuming it works because it played back fine on the original file.
Final Thoughts
Building actions this carefully takes more effort upfront, but it’s what turns a one-off recording into something that can genuinely be applied to any future photo with a single click. Any repetitive editing step, resizing, sharpening, watermarking, or color toning, is worth turning into an action built with these same non-specific habits in mind.
Quick Reference: Keys, Menus and Settings
- Record an actionWindow > Actions; new folder, new action, Record, then Stop
- ResizeImage > Image Size, Width 800 pixels
- New layer and stampShift + Alt/Option + Cmd/Ctrl + N, then Shift + Alt/Option + Cmd/Ctrl + E
- Desaturate and sharpenShift + Cmd/Ctrl + U; double-click the layer, Overlay at 100%; Filter > Other > High Pass, 3.4 pixels
- Warm itNew layer, Shift + Delete to fill with a warm color, Soft Light at 10%
- Select and groupAlt/Option + [ or ]; add Shift to add a layer; Cmd/Ctrl + G
- Pause and saveDialog toggle on the High Pass; Insert Stop with Allow Continue; Save Actions on the folder
No AI, no generative credits.
Photoshop Actions: Common Questions
Why does my action say a layer is not currently available?
The action recorded a step that selects a layer by name, like “select layer background”. On a document without that layer, the step has nothing to point to. Re-record it with commands that don’t name a layer.
Where is the Actions panel?
Go to Window > Actions. Make a new folder to hold your actions, make a new action inside it and click Record. Everything you do is recorded until you click Stop.
How do I make an action that works on any photo?
Use only commands that are always available, like Image Size, a new layer with Shift + Alt/Option + Cmd/Ctrl + N and a stamp visible layer with Shift + Alt/Option + Cmd/Ctrl + E. Never click a layer by name while recording.
How do I select a different layer inside an action?
Use Alt/Option + [ to select the layer below and Alt/Option + ] for the layer above. They record as Select Backward Layer and Select Forward Layer, so they work whatever the layers are named.
How do I group layers in an action?
Hold Alt/Option and Shift and press a bracket key to add the next layer to the selection, then press Cmd/Ctrl + G. Double-click the group name to label it; the video calls it Sharpen and Color.
Why is my action full of blend mode steps?
Every pick in the blend mode menu or opacity slider is recorded. Double-click the layer instead and try settings in the Layer Style dialog; only the final OK is recorded, as one step.
How do I fix a mistake while recording?
Click Stop, Shift-click the unwanted steps and delete them, then press Record again. Recording picks up in the same action.
Can an action let me choose a setting each time?
Yes. Click the dialog box toggle next to the step, like the High Pass, and its dialog opens on every run. The video’s radius was 3.4 pixels, then 4.1 on a second photo.
How do I add a message to an action?
Select the step before it and choose Insert Stop, type the message, such as “Choose High Pass Radius”, and check Allow Continue. It pops up like a Photoshop dialog with a Continue button.
From the Magazine View all
Stories, interviews and guides for photographers, new every week.
 BusinessHow to Compete With AI: Give Your Clients MoreEveryone has the same tools now, and your clients know it. The way to compete is to give them more.
 EditingLightCraft vs Lightroom: Is the Free Clone Any Good?The free clone on the same RAW files: what matches, what breaks and who should switch.
 EditingHow to Tell If a Photo Is AI, and Prove Yours Is RealThe tells that still work in 2026, why detectors disagree, and how to prove your own photos.
Master Photoshop, Lightroom and Photography
Join PHLEARN PRO for $12.99 a month, or $99.99 a year (save 36%). Cancel anytime, with a 100% money-back guarantee.





