
How to Change the Size of People in Photoshop – A Giant Ego
-

-
Add to
favorites
-
DifficultyAdvanced
-
Length2.75 hours
-
Videos6
-
Software
DESCRIPTION
Master compositing and perspective as we place a person into a new environment while making them appear larger-than-life! Learn how to make accurate selections of people and hair, blend images together, and tie everything together with light and color.
THIS COURSE INCLUDES
- 6 Sample Images
- 1 Sample PSD
- 3 Photoshop Brushes
- 1 Photoshop Action
Share
Table of Contents
-
01 - Place Subject into a New Background19:30m
-
02 - Cut Out a Subject with the Pen Tool23:23m
-
03 - Color Matching29:55m
-
04 - Blending Backgrounds & Cutting Out Hair31:55m
-
05 - Color Fringe & Reflections19:40m
-
06 - Retouching, Color Toning & Light Effects36:15m
Course Downloads
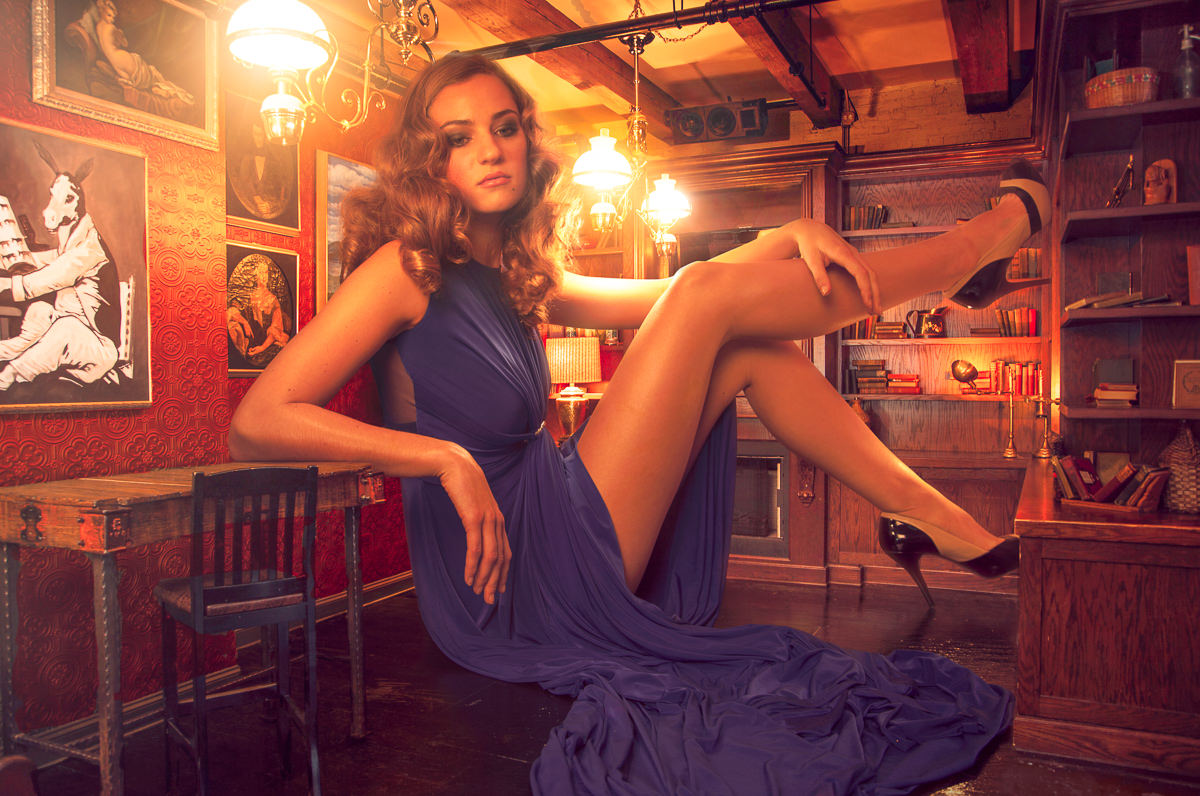
A Composite of Epic Proportions.
From Start to Finish
Grow your subjects to fill an entire room. Learn each step required to make your composites as natural as possible. Make amazing cutouts, match the most difficult lighting and adjust color in every spectrum to create a visually flawless composite.
Make Perfect Cutouts
Follow along as we explain the correct tools and techniques to cut out the subject for this image. Learn how to use the Pen Tool to create paths and turn the paths into selections. Create incredible selections and speed up your background cleanup.
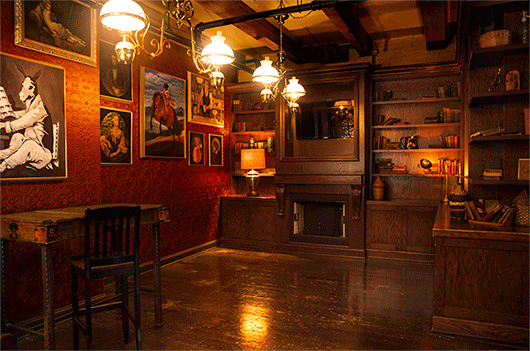
Match the Lighting
See how we set the lighting during our photo shoot to match the room and learn a great technique for taking care of your edges to make sure they match the rest of the scene.
Create Reflections
Creating reflections in Photoshop varies depending on the surface that reflects your subject. Reflections might need to be smooth and clear, or other times blurry and distorted. Learn how to make reflections that apply to different types of images.
Match Light Sources
Learn the best methods for seamlessly matching the room light to your subject. Adding light with Photoshop is a great way to bring atmosphere and attention to your images. Use the included bonus textures to add flare to this and any other image!
Build Interaction
Unite the subject with their environment by adding interaction between them. Plan ahead to pose the model in a way that will compliment the room. Learn how to evaluate what’s important to make this interaction more seamless.
A Giant Ego
Learn how to use composition, perspective, and compositing tricks to make a subject look larger-than-life!
Create the Ultimate Composite
When creating a multiple image composite, you may encounter areas of your photo that require some special attention. Learn how to complete a complicated task by breaking it into smaller tasks that are more familiar.
Custom Photoshop Brushes
Create your own Photoshop brushes so you’ll always have the right brush for the job. Custom brushes are excellent for advanced retouching and adding special effects to your images.
Analyze Color
Create the most believable composite image by matching the colors perfectly. With this tutorial you will receive a Phlearn Custom Photoshop Action that will help you to analyze the color of your images.


Reviews
New & Popular Tutorials


Training Site in
the World
Tutorials!
Ratings
and Counting
Subscribers
I love everything about this tutorial. This is one of my favorite tutorials and also the style of tutorials for which i always come back to Phlearn as my source of Photoshop education – advanced level, a bit complicated at first, but very rewarding! My favorite subject, just to name one: the technique which helps you match the elements of a composite, to make them all look like they were shot together. I can never get enough of this subject, because, even after years of using Photoshop, i still find this tricky at times. Even if i am now using a newer version of Photoshop, i can easily follow along. Very good quality!
Once again, I am blown away! This is the second tutorial I’ve worked with (first was Bakster – I’M SPEECHLESS!) and Holy smokes Batman, you are quite the craftsman. Looking forward to the next. Thanks, Alldaron SwissPL
Yay! So happy you are enjoying the tutorials 🙂 If you want a real challenge, A Dark Force is one of our most advanced composites, but it does takes several hours of work.
Long journey, but a very great job! I really learn a lot with that. Congratulations!
Glad you enjoyed it!
Absolutely fantastic will definiately watch again, and follow along to see what I come up with
PHantastic ! Well on top of my 4-5 weeks of Photoshop experience this is my second pro tutorial. I decided to take a step further and dive into this advanced tutorial. The technics Aaron uses are advanced for sure but with a pinch of patience I finally reached the end and I learnt a ton of things !
I did some mistakes and had to struggle alone to fix them in order to go further but it’s an amazing opportunity to challenge yourself and dig into photoshop.
The Photoshop action provided in this tutorial is more than an action … it’s amazing and impressive, very useful to match light properties between 2 different shots ! The technical aspect behind the scene of this action is quiet complicated for someone who doesn’t have his eyes and brain trained with colors/hue/saturation/value etc. but one more time it’s the perfect opportunity to search and understand a little bit more.
You’ll find in attachement the final result of my work. :/
I know there’s a huge room for improvement but it comes with experience. I’m a little bit better than yesterday. 😉 (I hope)
Thanks Phlearn Team !
Played around with the color a little bit more. Couldn’t sleep i had to go over it a second round.
Great tutorial pretty easy to follow along. Each one is getting easier to do as Aaron makes it fun and each Pro you will learn more techniques and you can use on the older Pros such as this one. If Aaron didn’t take the time to shoot the Background then do the math and shoot the subject to match the Background this one would of been a task. The lighting and the color is pretty much spot on already, just a few adjustments. All in all a great tutorial again.