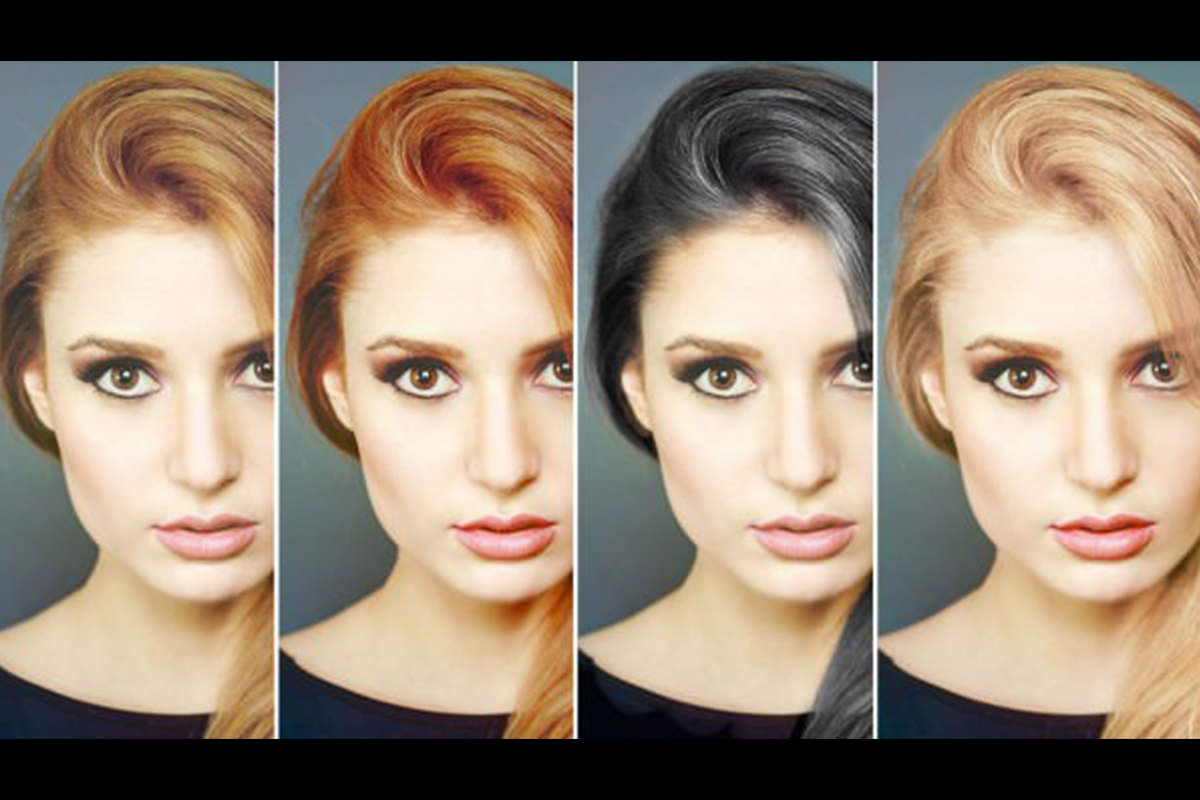

description
Learn how to change hair color in Photoshop by taking one redhead through brown, black, and blonde. A Selective Color layer nudges red toward a natural brown, a targeted Hue/Saturation layer plus Curves takes it to black, and painted skin tone between the strands keeps the hairline believable. Blonde is the hard one, since lightening means adding brightness that is not in the original pixels, so it needs Screen-mode color, Blend If highlights, and warmed shadows.
Enjoying This Free Tutorial?
We publish a new free tutorial every week, each one with sample images and PSDs you can download and follow along with. Sign up and they land straight in your inbox, along with early word on sales, events and subscriber-only offers.
How to Change Hair Color in Photoshop
Changing hair color in Photoshop sounds simple, but hair has to stay within a fairly narrow color range to look natural, and it usually shows different tones in its highlights than in its shadows. This tutorial takes a redhead’s hair through three different color changes, brown, black, and blonde, using selective color, Hue/Saturation, and layer masks, and shows why going lighter is always the hardest direction to work in.
Creating Brown Hair With a Selective Color Layer
A Selective Color adjustment layer works especially well for nudging an existing hair color like red toward brown, since its individual Black, Yellow, Magenta, and Cyan sliders target the color range more precisely than Hue/Saturation alone.
-
Add a Selective Color Adjustment Layer
Add a Selective Color adjustment layer above the subject.
-
Adjust the Black Slider
Pull the Black slider down for less black or up for more, adjusting the overall depth of the hair color.
-
Adjust Yellow, Magenta, and Cyan
Push Yellow up for a warmer tone, adjust Magenta to add or remove red and green, and adjust Cyan to shift between cyan and red until the hair reads as a natural brown.
-
Group the Layer
Group the finished Selective Color layer and label it Brown so it’s easy to identify later.
Removing Color for Black Hair With Hue/Saturation and a Layer Mask
Turning hair black starts by stripping out its existing color entirely, targeting just the hair’s specific red range rather than the whole image.
-
Create a New Group for the Black Hair Layers
Create a new group and label it Black Hair.
-
Target the Hair Color With the Hue/Saturation Eyedropper
Add a Hue/Saturation adjustment layer, click Master, switch to Reds, and use the eyedropper to click on the hair color, using the plus eyedropper to add any additional shades of hair color.
-
Bring Saturation Down to Zero
Lower the Saturation slider to zero to remove the targeted color entirely.
-
Mask Out the Skin
Paint black on the layer mask over the face and skin, since skin tones can fall close enough to the hair color to get desaturated by mistake.
Why Fade the Layer Mask Into the Hairline Instead of a Hard Edge
A layer mask painted with a hard, fully opaque edge right at the hairline leaves a visible line where the desaturated hair meets the still-colored skin. Lowering the brush’s Flow and using a soft-edged brush right along that boundary fades the transition gradually instead, so the change in color reads as a natural hairline rather than an obvious cutout.
Darkening the Hair With a Curves Adjustment Layer
With the color removed, a separate Curves adjustment layer controls exactly how dark or light the now-neutral hair actually becomes.
-
Add a Curves Adjustment Layer
Add a Curves adjustment layer above the desaturated Hue/Saturation layer.
-
Darken the Curve for Black Hair
Click the middle of the curve and pull it down to darken the hair toward black.
-
Copy the Layer Mask From the Previous Layer
Hold Option/Alt and drag the layer mask from the Hue/Saturation layer onto the Curves layer to copy it instantly, then refine it further with the brush if needed.
Restoring Skin Tone Between Strands
Areas of visible skin peeking through between strands of hair need actual skin color painted back in, not just a fully transparent mask, since the hair color layers beneath would otherwise still show through.
-
Sample a Skin Color
Sample a natural skin color from the subject’s face.
-
Paint on a Color Blend Mode Layer
Create a new layer, change its blend mode to Color, and paint the sampled skin tone into the gaps between strands of hair.
-
Lower Opacity for a Natural Blend
Lower the layer’s opacity so the restored skin tone fades in naturally rather than sitting as a flat patch of color.
Why Restore Skin Color Instead of Making the Mask Fully Transparent
Simply masking away the desaturated hair color where skin peeks through would reveal whatever color was underneath, which is still the original red rather than natural skin. Painting the actual sampled skin tone back in on a Color blend mode layer replaces that gap with the correct color instead, keeping the transition between hair and skin looking believable.
Adding Shine to Black Hair With Blend If
Black hair needs visible highlights to read as realistic, and Blend If restricts those highlights to only the areas that were already catching light.
-
Paint White Highlights
Create a new layer and paint white over the areas of the hair that show natural shine.
-
Open Blending Options
Double-click the layer to open Blending Options.
-
Split the Underlying Layer Slider
Hold Option/Alt and drag the underlying layer slider to split it, restricting the white highlight to only show where the layer beneath is already lighter.
Why Use Blend If Instead of Just Lowering Opacity for Highlights
Lowering opacity on a painted highlight layer dims it evenly everywhere it was painted, including areas that were never catching light in the first place. Blend If instead restricts the highlight specifically to the lighter areas underneath, so shine only shows up exactly where the hair’s own form would naturally reflect light.
Adding a Hint of Brown Back Into Black Hair
A small amount of color painted over otherwise black hair keeps it from looking completely flat.
-
Sample a Brown Color
Sample a brown tone, such as one found in the skin.
-
Paint With an Overlay Blend Mode
Create a new layer, change the blend mode to Overlay, and paint the brown color over the hair.
-
Lower Opacity to Taste
Lower the layer’s opacity until the brown reads as a subtle tint rather than an obvious color change.
Starting Blonde Hair With Selective Color and Screen-Mode Highlights
Blonde is the hardest color to achieve because it means both changing the hue and lightening the hair at the same time, starting with the same Selective Color approach used for brown.
-
Add a Selective Color Layer for Blonde
Group a new Selective Color adjustment layer labeled Blonde and adjust the Black, Yellow, Magenta, and Cyan sliders as a starting point.
-
Mask Out the Lips and Face
Paint black on the layer mask over areas like the lips that shouldn’t be affected by the color shift.
-
Paint Blonde Highlights With a Screen Blend Mode Layer
Create a new layer, set its blend mode to Screen, and paint an orange-range blonde color over the hair, since Screen only lightens what it touches.
-
Target the Highlights With Blend If
Open Blending Options and split the underlying layer slider so the painted blonde color only shows up in the areas that are already lighter, rather than lowering opacity evenly.
Warming Dark Areas and Adding Final Highlights for Blonde Hair
The darker remaining areas of blonde hair need their own color and brightness pass, along with a final layer of highlights, to finish the effect.
-
Add a Levels Layer to Warm the Darks
Add a Levels adjustment layer, switch to the Red channel, and raise the output black point slightly, then do the same on the Green channel to avoid an overly red or green tint.
-
Reveal the Warming Over the Hair
Invert the layer mask to black and paint white over the hair to bring the warming effect into just the darker areas.
-
Add White Highlights With Blend If
Paint white highlights on a new layer, then use Blend If to restrict them to the lightest areas, adjusting blend mode and opacity until they look natural.
-
Brighten With a Curves Layer
Add a Curves adjustment layer, raise the curve for extra brightness, and paint that brightness in only where the hair needs to look lighter.
Why Going Darker Is Easier Than Going Lighter
Turning hair darker mostly involves desaturating and dimming color that’s already there, which Hue/Saturation and Curves handle well. Turning hair lighter, especially all the way to blonde, requires adding brightness and color that doesn’t exist in the original pixels at all, which is why going from very dark hair to blonde is close to impossible and why the blonde result here still needed several extra layers of highlights and warming to look convincing.
Why This Approach Works
Separating color removal, from Hue/Saturation, and brightness, from Curves, into two different layers is what makes it possible to fine-tune each independently instead of fighting one slider trying to do both jobs at once. Using Blend If instead of opacity for every highlight layer in this tutorial is what keeps painted-on shine restricted to the areas that would actually catch light, rather than dimming evenly across the whole hair. Restoring sampled skin color between strands, instead of leaving the mask fully transparent, is the detail that keeps the gaps in the hair from revealing the original, unwanted color underneath.
Final Thoughts
Brown and black hair color changes come together quickly with just a couple of adjustment layers, while blonde takes real patience since it fights against how much easier it is to darken hair than to lighten it. The same selective color, Hue/Saturation, and Blend If combination used here is also a great way to preview a hair color change in Photoshop before committing to it for real, and Change Any Color in Photoshop works through the same ideas across sixteen different examples.
Quick Reference: Keys, Menus and Settings
- Brown hairSelective Color layer: less Black, then Yellow, Magenta and Cyan to taste
- Take color outHue/Saturation: Master to Reds, eyedropper on the hair, Saturation 0
- DarkenCurves layer, pull the middle of the curve down
- Copy a maskAlt/Option-drag the mask onto the next layer
- Skin between strandsNew layer in Color blend mode, paint sampled skin tone, lower opacity
- Shine only in the lightsDouble-click the layer, Alt/Option-drag to split the Underlying Layer slider
- Warm blonde darksLevels: raise the Red and Green output blacks; Cmd/Ctrl + I inverts the mask, paint white on the hair
Changing Hair Color: Common Questions
Why use Selective Color for hair instead of Hue/Saturation?
Selective Color lets you push and pull a color range like red hair with separate Black, Yellow, Magenta and Cyan sliders, which tends to look more natural on hair. Hue/Saturation still comes in later, to take the color out for black hair.
How do I turn red hair brown?
Add a Selective Color adjustment layer, take a little Black out, then balance Yellow, Magenta and Cyan until you get the light or dark brown you want. Those sliders adjust highlights, midtones and shadows a little differently.
How do I make hair black in Photoshop?
Add a Hue/Saturation layer, switch from Master to Reds, click the hair with the eyedropper (the plus eyedropper adds more shades) and drop Saturation to zero. Then add a Curves layer and pull the middle of the curve down.
Why is the skin losing color too?
Skin tones can sit close to the hair color, so the Hue/Saturation change catches them. Paint black on the layer mask over the face, and fade the hairline with a soft brush at low Flow.
Can I reuse the same mask on the Curves layer?
Yes. Hold Alt/Option and drag the mask from the Hue/Saturation layer onto the Curves layer to copy it, then touch it up with the Brush tool.
Can I make the hair gray instead of black?
Yes. Raise the Curves layer instead of lowering it. One layer takes the color out and a separate layer decides how light or dark the hair is.
How do I fix skin showing between strands of hair?
Sample a skin color, paint it on a new layer set to the Color blend mode, and lower its opacity. Masking the change away would bring back the original red instead.
How do I add shine without it looking painted on?
Paint white on a new layer, double-click the layer for Blending Options, and hold Alt/Option to split the Underlying Layer slider. The white then shows only where the hair below is already light.
Why is blonde the hardest color to make?
Going darker only removes color and brightness. Going blonde means changing the color and lightening the hair, so it takes extra layers: Selective Color, a Screen layer of blonde color, a Levels layer to warm the darks, white highlights and a Curves layer.
Master Photoshop, Lightroom and Photography
Join PHLEARN PRO for $12.99 a month or $99.99 a year. Cancel anytime, with a 100% money-back guarantee.





