
Download Assets
This tutorial includes 1 sample image and 1 PDF guide. Downloads are free with a PHLEARN account.
- Download the sample images and PSDs from every free tutorial on PHLEARN
- New free tutorials published every week
- One free account — sign up once, then download anything
Free PDF Guide · 4 Pages
This Tutorial as a Step-by-Step PDF
Every step from the video in order: Window > Workspace > Reset Essentials, pinning the contextual taskbar, dragging tabs out and back, collapsing groups to reorganize, New Workspace, Reset and Lock Workspace, and switching between saved layouts. Keep it next to your keyboard.
description
Customize your workspace once and Photoshop stops fighting you. This tutorial guides you through using default settings, adding/removing tabs, grouping panels, and resizing sections. Discover how to create and save personalized workspaces for different tasks like photo editing, ensuring your tools are always exactly where you need them. We’ll even show you how to reset and lock your workspace for consistent, efficient workflow.
Enjoying This Free Tutorial?
We publish a new free tutorial every week, each one with sample images and PSDs you can download and follow along with. Sign up and they land straight in your inbox, along with early word on sales, events and subscriber-only offers.
Image Source
Image sourced from Pexels.
How to Customize Your Workspace in Photoshop
Photoshop’s default workspace is a compromise built for everybody, which means it is optimized for nobody. It shows panels you never open and hides ones you reach for constantly, and every panel you do not use is screen space taken from the ones you do.
Rearranging it is completely safe. Panels can be moved, grouped, closed, and reopened endlessly, nothing is deleted, and any arrangement can be restored in one click. This tutorial covers reorganizing panels, saving named workspaces, locking one in place, and switching between setups for different kinds of work.
Where Everything Lives
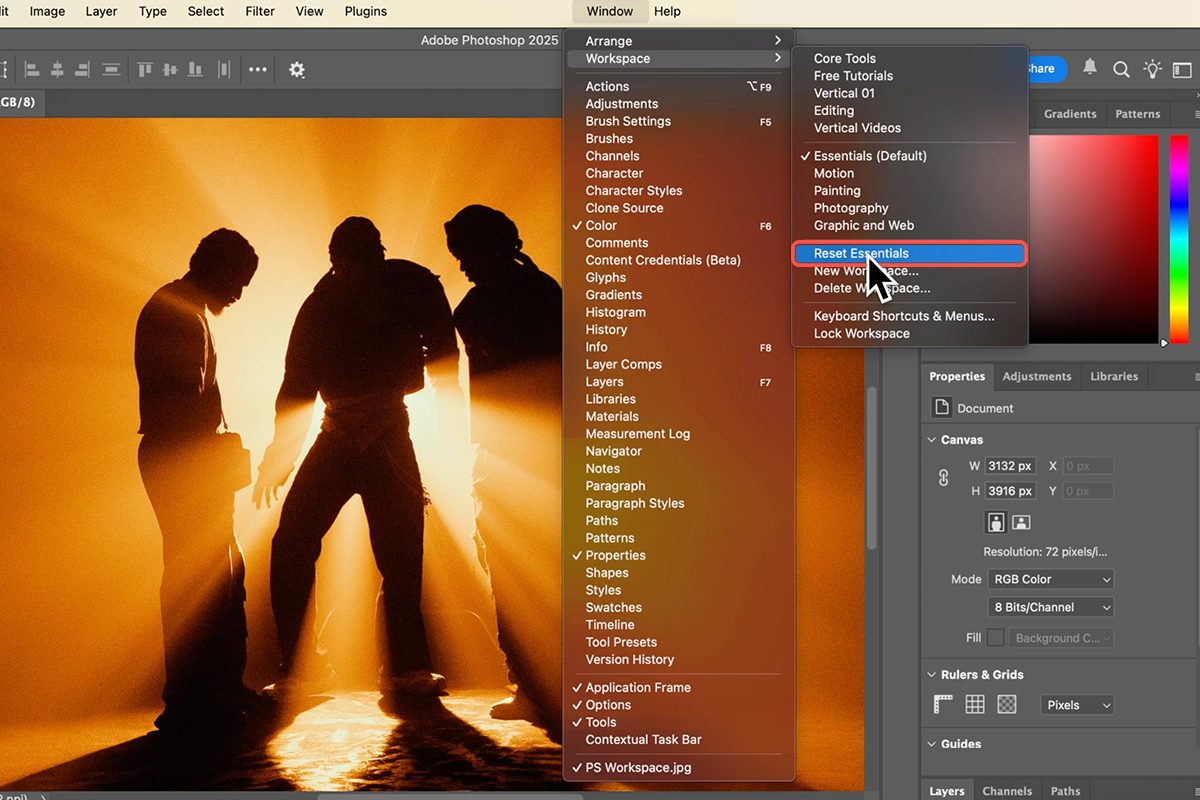
Photoshop opens in the Essentials workspace. You can confirm this and get back to it under Window ? Workspace, where Reset Essentials restores the factory arrangement at any time.
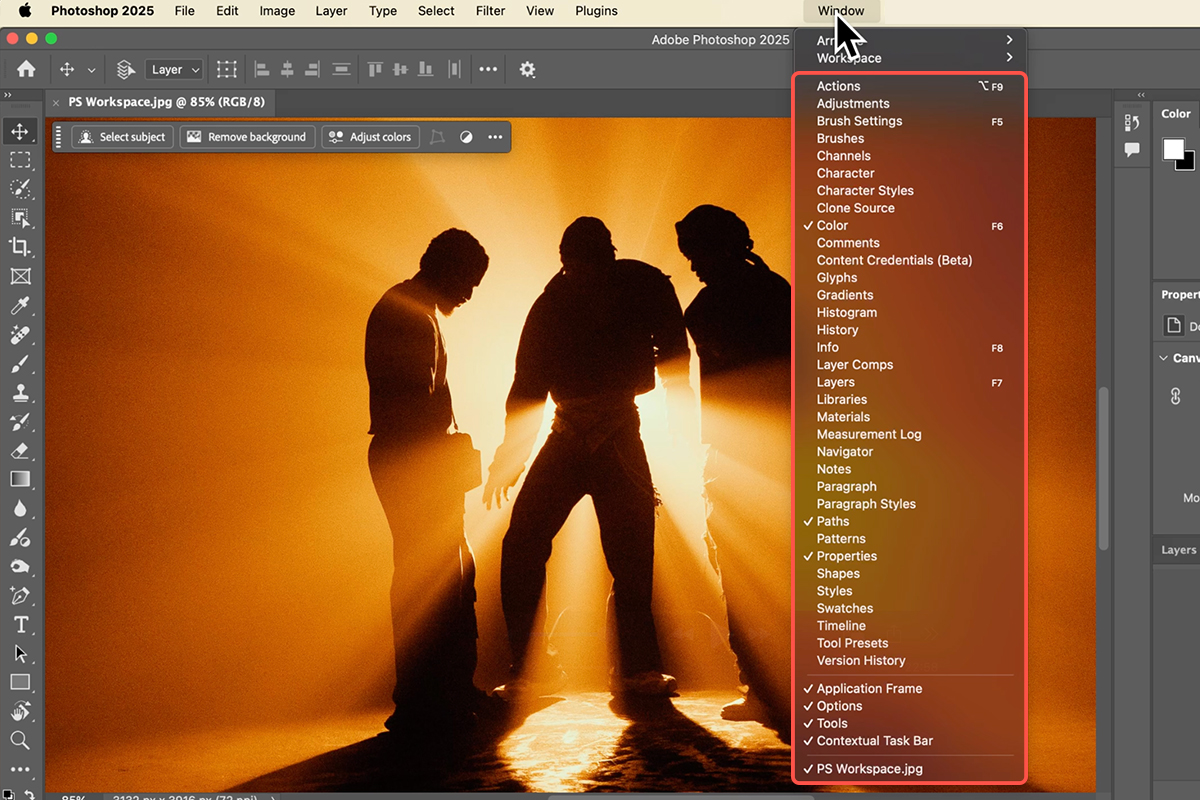
The rule that makes all of this stress-free: every panel in Photoshop is listed under the Window menu. Close something by accident and it is not gone — open the Window menu and it comes back, in the last place you had it. That menu also holds the Application Frame, the Options bar, the Tools panel, and the Contextual Task Bar.
Pin the Contextual Task Bar
The Contextual Task Bar floats over your image and shows actions relevant to what you are doing. By default it sits low and moves around, which is distracting.
Drag it where you want it — near the top works well — then click the small edit icon on it and choose Pin Bar Position. It stays put from then on.
Moving Panels Around
Three operations cover everything.
Remove a panel: drag its tab out of the group to float it, then close it.
Add a panel to a group: drag its tab onto an existing group and drop it. A blue highlight shows where it will land.
Reorder tabs: drag a tab left or right within its group.
Panels can also be dragged between the upper and lower sections of the dock, so Properties can live with Layers, or on its own, or anywhere else you prefer.
Collapse Groups While You Work
Each group has an icon that collapses it to a strip of icons and expands it again. Clicking a collapsed icon pops that panel out temporarily and clicking away tucks it back.
This is genuinely the most useful trick here: when rearranging gets confusing, collapse everything first. Dragging panels around while they are all expanded is fiddly and things land in the wrong place. Collapsed, the structure is obvious and drops go where you intend. Expand again when you are done.
Strip It Back
The productive move is subtraction. Go through the defaults and close anything you do not genuinely use — for photo editing that is often most of them.
Channels is powerful but specialized, and rarely needed day to day. Paths matters only if you work with the Pen Tool. Libraries is valuable for shared team assets and dead weight otherwise. Color, Swatches, Gradients and Patterns are design panels more than photo panels. History is less necessary than it used to be given Smart Objects and adjustment layers. Comments is for collaborative review.
None of this is a recommendation to close those specific panels — it is the question to ask of each one. If you use it weekly, keep it. If you cannot remember the last time you opened it, close it and get the space back. Everything remains one Window-menu click away.
For photo work that usually leaves Layers, Properties and Adjustments.
Group by How You Work
Panels in the same group are tabs, so only one is visible at a time. Panels in separate groups are visible simultaneously. That distinction should follow your actual workflow.
Layers is the panel most people want visible always. Putting it in a group with Properties means every time you check a layer’s properties, your layer stack disappears.
Give Layers its own group. Put Properties and Adjustments together in another. Now the stack is permanently on screen and the other two share space, because you rarely need both at once.
Drag the divider between groups to set heights — a tall Layers panel is worth the space on a complex file.
Save It as a Named Workspace
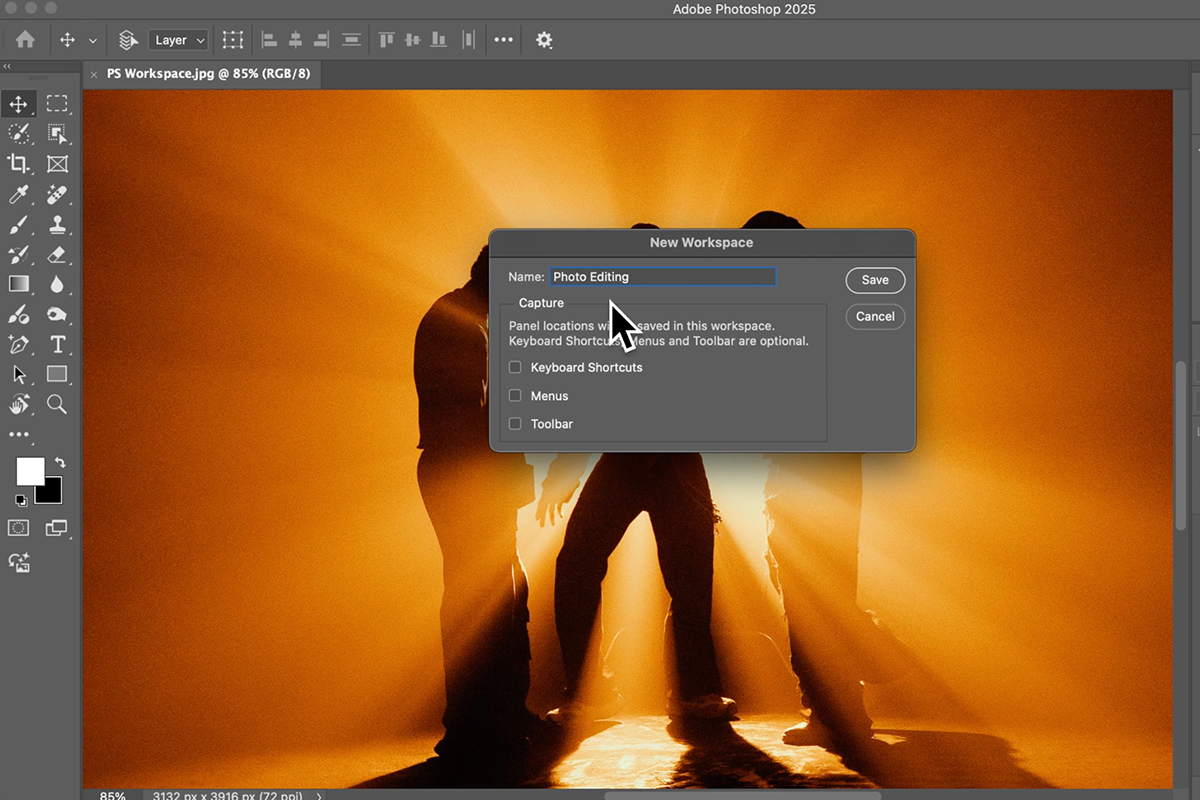
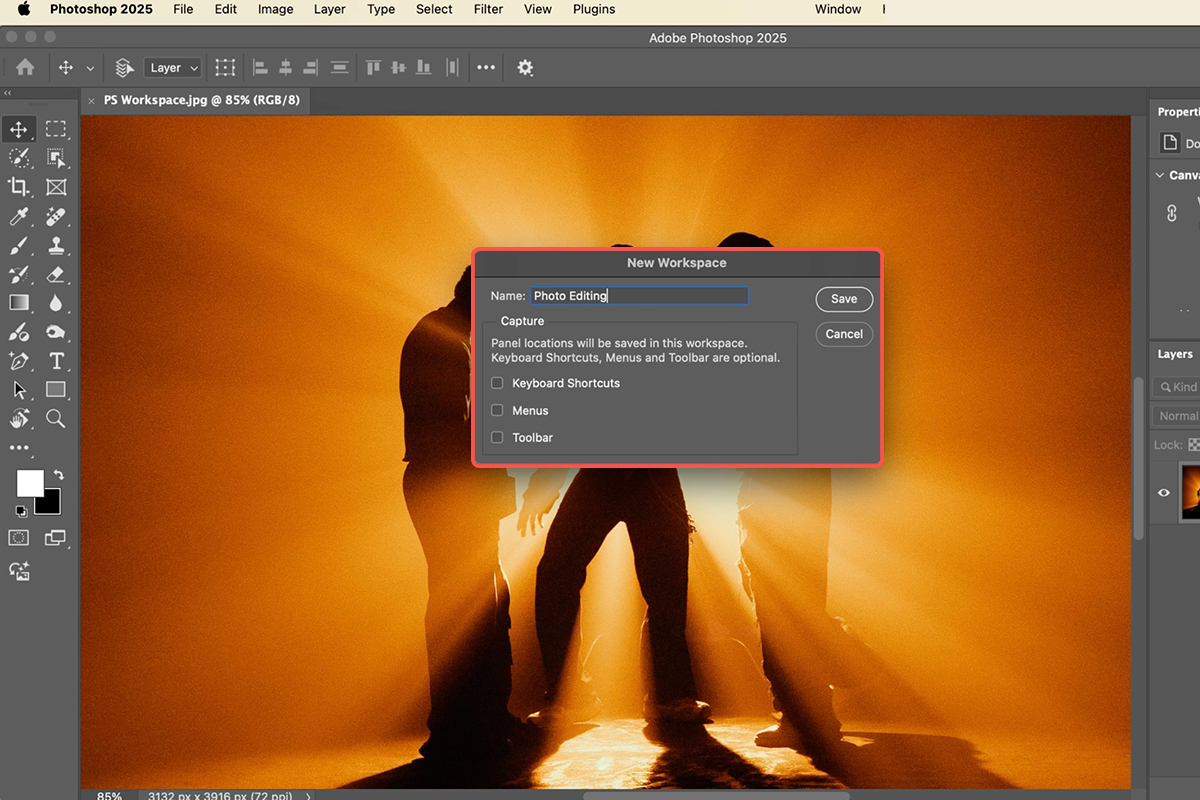
Once the arrangement is right, save it: Window ? Workspace ? New Workspace. Name it for the job — Photo Editing, Retouching, Type.
The save dialog offers to include keyboard shortcuts, menus, and the toolbar alongside panel positions. Consider leaving shortcuts out. Panel layouts benefit from changing per task; keyboard shortcuts benefit from being identical everywhere, since muscle memory that shifts between workspaces is worse than no shortcut at all.
Reset Is the Real Payoff
Saving a workspace gives you an undo for your entire interface. Panels get dragged out of place, someone else uses your machine, you close something and cannot find it — Window ? Workspace ? Reset [name] puts everything back instantly.
That safety net is what makes experimenting free. There is no arrangement you can get into that one menu command will not fix.
Lock It
Window ? Workspace ? Lock Workspace prevents panels from being dragged out of position. Useful if you keep knocking panels loose by accident, or on a shared machine.
Locking is partial rather than absolute: you can still resize panels and still add new ones to existing groups, but you cannot pull them out again until you unlock. Worth knowing so the behavior does not surprise you.
Build Several and Switch
Different work wants different panels. A workspace icon in the top right switches between everything you have saved.
Photo editing — Layers, Properties, Adjustments, expanded toolbar, pinned task bar.
Type and design — add Character and Paragraph, which are far more useful together than either alone.
Recording or teaching — Navigator at the top with Layers and Properties beneath, so a viewer can follow what is happening.
Vertical video — an arrangement that suits a tall canvas rather than a wide one.
Photoshop’s own presets — Painting, Graphic and Web, Motion, 3D — are reasonable starting points. Modify one and save it under your own name rather than working from a default that nearly fits.
Worth Doing
An hour spent on this pays back constantly. Panels you never use stop taking space, panels you need stop hiding behind tabs, and one menu command restores everything if it goes wrong.
The short version: pin the Contextual Task Bar, close what you do not use, give Layers its own group, save it as a named workspace, and reset it whenever it drifts.
Quick Reference: Keys, Menus and Settings
- Start cleanWindow > Workspace > Reset Essentials
- Find any panelWindow menu; a tick means it’s open, and it reopens where you left it
- Pin the taskbarDrag the contextual taskbar where you want it > its menu > Pin Position
- Remove a panelDrag its tab out of the dock, then close it
- RearrangeDrag a tab into another group or between groups; the double arrow collapses a dock to icons (easier to drag)
- SaveWindow > Workspace > New Workspace, name it (optionally include shortcuts, menus and toolbar)
- Undo someone’s messWindow > Workspace > Reset [your workspace]
- Stop panels movingWindow > Workspace > Lock Workspace (heights still adjust; unlock to remove tabs)
- SwitchThe workspace dropdown at the top right
Nothing here can break Photoshop; reset brings it all back.

Free Downloads
Follow Along on the Same Photo
Get the sample image from the video and the PDF guide, and set up your own photo editing workspace. Free with a PHLEARN account.
Workspaces: Common Questions
I closed a panel and can’t find it. Where did it go?
The Window menu lists every panel in Photoshop. Click the one you need and it reopens in the last place you had it.
How do I get the default layout back?
Window > Workspace > Reset Essentials. The same Reset option exists for any workspace you save, so a layout someone else scrambled is one click from normal.
How do I move panels around?
Drag the tab. Drop it on another group to join it, between groups to make a new row, or outside the dock to float it. Collapsing the dock to icons first makes dragging easier.
Which panels does Aaron remove?
For photo editing: Channels, Paths, Libraries, Color, Swatches, Gradients, Patterns, History and Comments. What stays is Layers, Properties and Adjustments, with Layers given the most room.
How do I save my layout?
Window > Workspace > New Workspace and name it. You can include keyboard shortcuts, menus and the toolbar, though Aaron keeps his shortcuts the same across workspaces.
What does Lock Workspace do?
It stops panels being dragged out by accident. You can still resize them and add a tab into a group, but you can’t pull one out until you unlock.
Should I have more than one workspace?
If your work varies, yes. Aaron keeps one for photo editing, one for recording tutorials with the Navigator on top, and one for vertical videos. Switch from the dropdown at the top right.
How do I keep the contextual taskbar in one place?
Drag it where you want it, open its small menu and choose Pin Position. If it’s missing, turn it on under Window.
Is the sample file free?
Yes, with a free PHLEARN account. You get the sample image and the PDF guide.
Master Photoshop, Lightroom and Photography
Join PHLEARN PRO for $12.99 a month or $99.99 a year. Cancel anytime, with a 100% money-back guarantee.





