How to Use Photo Restoration to Rescue Your Analog Memories In a Digital World
In 2019, our memories feel almost bulletproof. They’re right there when we need them; in our camera rolls, social media albums and backed up neatly in the almighty cloud. It’s easy to forget that only a few short years ago, photos that weren’t printed didn’t get seen, and prints that weren’t stored properly suffered irreparable damage or disappeared altogether.
Due to weather, age and the normal wear and tear of being handled over and over again, there are dogeared prints from the 1880s all the way up to the 1990s that desperately need a little – or a lot – of TLC. (Have you ever tried to remove a family photo from an adhesive photo album? It’s not pretty.)
But there’s good news: torn and faded photos don’t have to stay that way. The decline in printing coincides with some truly remarkable advances in photographic technology, including tools that can digitally bring new life and longevity to older photos. Adobe Photoshop is particularly well-equipped to deal with the challenges of a photo restoration project, although you could also do some great repair work with Lightroom, GIMP or Corel Paintshop Pro. Let’s take a look at what you can do to get damaged prints back in top shape.
Scanning Images
Prior to scanning photos, a few steps are important to ensure less work in the restoration process in Photoshop. Check that the scanner glass doesn’t have lint, fingerprints, or smudges. If it does, purchase a lint-free cloth to clean the scanner glass and computer monitor. This helps in removing dust that can be picked up and transferred to your digital image when scanning prints, negatives and slides.
It’s good practice to wear nylon gloves to handle photos, negatives, or slides. Nylon gloves are better than cotton ones, which accumulate dust and lint. They also protect photos, negatives and slides from skin oils. Always wash the gloves after handling photos.
Another good practice is to purchase a can of compressed air to spray slides before scanning to further minimize dust on the scanner. Never spray the glass of the scanner; compressed air can scratch the glass or damage the scanner.
Always scan your photos in RGB mode. Typically for most scanners, 24-bit color is the default. Set it to 24-bit color if the scanner isn’t already set to that. Disable all auto-correction controls like color correction, sharpening, etc. By doing this, you have the liberty of changing settings to desired taste.
Once scanning the original image is completed (if it’s for restoration purposes) it should be saved in TIFF or JPEG format. Other formats can be accommodated as well but in TIFF format, information is not lost from the original image. TIFF format does require a good deal of computer memory if you’re working with several images. If saving your photo in JPEG format, be sure to save it with no compression and at 100 percent quality.
Using the Right Printer Resolution (dpi)
Choose 300 dpi (dots per inch) for a commercial printer or 720 dpi for the highest quality restoration and retouching work (4″ x 6″ photos). For 5″ x 7″ and 8″ x 10″ photos, use at least 600 dpi.
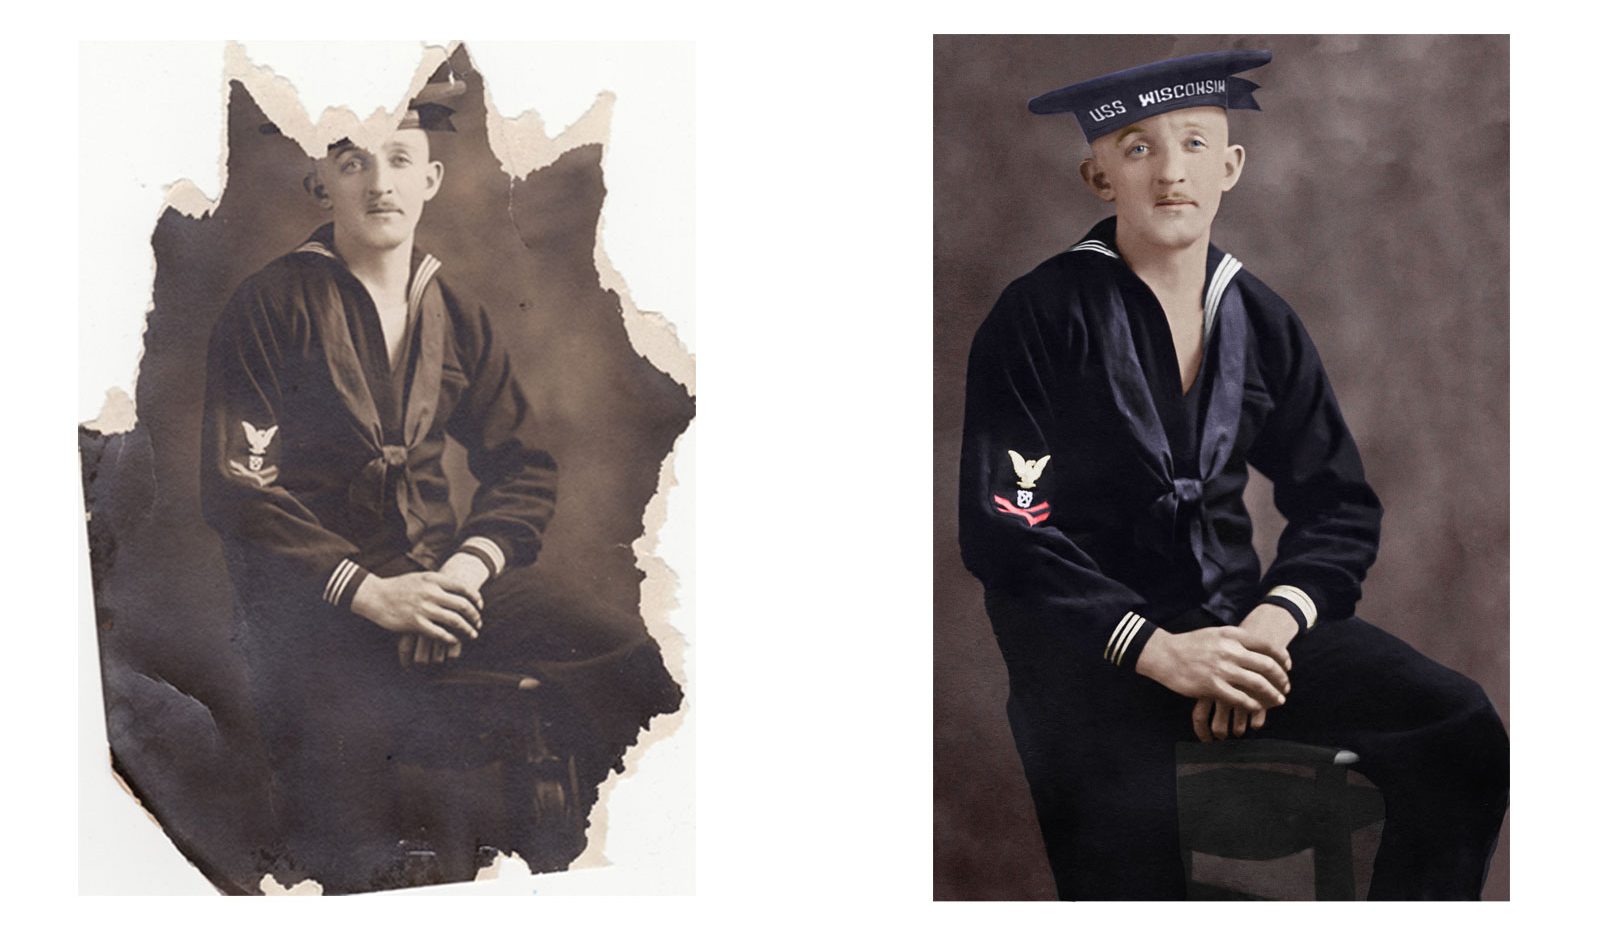
Digitizing photos, whether old or modern, is very important. This ensures photos are safe and can be restored digitally. The process of restoration can take a considerable amount of time and patience. Research is also important for old photos that have damage, especially to historically and accurately restore a photo. For example, the photo shown below was missing the name of the ship on the man’s cap.
If a photo is dated, it makes research easier, since knowing the year gives one a starting point for research. In this case, we needed to research any ship sailing circa 1920, eventually finding it was the USS Wisconsin. This part of the process is critical for historical accuracy. Knowing the ship made it easier to replicate the font to match the last couple of letters showing on the cap, as well as the cap itself. Where you are doing your research for a restoration is crucial as well. Google (only use reputable search results!) and Ancestry.com both provide easy access to this type of research. On a more personal level, relatives – older family members in particular – often enjoy sharing about their parents, growing up, etc.
Another way to gather information is to contact museums’ archivists or visit in person to look at antiques, equipment, military uniforms, etc. Old advertisements can add insight if you can find them. You might even be surprised at the wealth of information your local library has to offer!
Getting Started with a Restoration
For especially old images, you’ll likely face a variety of challenges in your restoration. This can make the beginning the most difficult part of the entire process, since you need to determine where to actually start your work.
Use a Grid
A good way to test the waters is to lay out a grid system. Using guides in Photoshop, divide the image into nine rectangles. If Rulers aren’t visible, go to View > Rulers, or press Command-R (PC: Ctrl-R). Click on the horizontal ruler and drag out a guide about a quarter of the way down from the top of your image. Do the same from the bottom. Repeat this process with the vertical ruler, placing lines a quarter of the way in from the edges of the image. This makes the photo restoration process easier if beginning in upper left corner, for example, then work from left to right and row to row.
Assess the Damage
Now it’s time to assess the areas of damage in your photo. Beyond tears or missing parts, there are other things likely needing repair such as color tones, dust and scratches, discoloration from old adhesive tape and creases from being folded. Mold damage is another issue often needing to be removed. This is usually a result of photos, slides and negatives having been stored in humid environments. Removing mold can be a tedious process, but the Clone Stamp will simplify things a bit.
Choose Destination Color and Match Texture
Many older images are not black and white. There are two reasons for this: how the images were printed and how the images have faded over time. One such feature is sepia tone, a brownish cast that appears throughout the image. Another one commonly seen is cyanotype, meaning the tones in the image are cyan, or bluish.
For these types of restorations, convert the image to Black and White in Camera Raw, prior to beginning. If the image is faded, slide the Dehaze slider to the right until it brings the image more into focus. This will also bring forth dust and scratches that weren’t seen prior. Multiple tools available within Photoshop can help you remove dust and scratches, water damage and/or stains on the image, such as the Clone Stamp or the Spot Healing Brush. These two tools take the texture from one area of your photo and blend it to another area.
Always Make a Base Scan Copy
Which brings us to a word of caution: always edit non-destructively! This is never more important than when you are rebuilding a damaged image. Your original is only going to get older, so it’s paramount that you keep a copy of your base scan, not only to preserve as much information as possible in case you need to go back to the drawing board, but to refer back to as you work. That base scan is the most visual information you will ever have about the original look of a photo!
Copy Good Elements and Save Them
Another option for restoring photos, whether old or modern, is to copy a portion of a photo that’s near the damaged portion and copy/paste it over the damaged portion. For instance, if one eye is missing, copy the good eye and paste it over the damaged eye. Press Command-T (PC: Ctrl-T) for Free Transform, then flip, scale and rotate the copied section so it covers the missing section of the photo.
Don’t worry if it covers other elements; those bits can be painted away on a layer mask. Press Enter to commit the transformation. It’s important to keep each piece on separate layers to work on individual parts. If you merge layers while working on the image, then make a mistake or want to alter something, it’s more difficult to go into the history to fix it. This is the next step of that non-destructive editing we talked about earlier.
You may wish to create folders on your computer named “eyes,” “backgrounds,” etc. As you’re retouching images, copying “good” selected areas into a new file and saving them in the appropriate folder is very advantageous in the restoration process. This library of copied parts will make your workflow easier when restoring other images with missing areas. Keep these folders easily accessible!
Know What to Remove and What to Leave
After placing missing parts, a more delicate retouching process begins: removing dust and scratches, blemishes in the photo, wrinkles in the photo paper and so on. Some of the damage may have occurred the day the image was created. Photography during the mid-1800s through the early 20th century wasn’t as sophisticated as what we have today, meaning there were many flaws that appeared in photos.
Be careful not to retouch old images to the quality of modern photos, which would look unrealistic for the time period. Reducing digital noise and enhancing resolution is important, but film grain and original texture might be better left as is. Blurred images aren’t aesthetically pleasing, so fixing blurs with a Sharpening tool or process is a good idea. Cropping images is also recommended if there’s a great deal of “unimportant” background in the image, causing the main subject to appear quite small. (It’s also a pro hack to eliminate damaged sections on the edge of your image, which would require extra work without really adding to the overall impact.)
Many times, someone may want a person or object removed from an image. For example, if someone is vacationing and wants to photograph a monument, but other people are by the monument doing the same thing, leaving those people in the image can not only distract from the monument, but from the important people in the photo.
The same holds true for objects. There could be a fire hydrant within the frame of the photo. Since it’s not able to be moved so it’s not in the photo when taking the picture, the best way to accomplish this is in post-production.
Finishing Up
Once completed, make sure the original scan and edited photo are safely stored either on an external hard drive, the cloud, or a third-party service such as Apple iCloud, Amazon Photos or Dropbox. You can certainly save on your computer’s hard drive, but space can quickly become an issue and without backups, you run the risk of data loss should your computer’s data become inaccessible.
It’s best to send finished photos out in JPEG format, but saving a version in a layer-friendly format like TIFF will keep you from having to start over if you ever need to revisit your project. Although this will take up more space, it’s well worth it in terms of peace of mind.
Photo restoration is very time-consuming and requires a great deal of patience. In the end though, family and friends will appreciate the love and time put into restoring photos. They make for incredibly meaningful (and relatively inexpensive) gifts, regardless of whether it’s an old photo taken one hundred years ago or a modern photo that has been damaged. The process can help in researching your ancestry or perhaps help family members with Alzheimer’s remember times past. It’s also rewarding to hand clients, family and friends a pristine bit of their past that they thought was lost forever.
Before taking on a project that is packed with emotion and sentiment, try practicing with stock images found online or photographic items from flea markets and thrift stores. You’ll find that with less at stake, it’s easier to learn and experiment! When you master restoration and finish that first “real” project, you’ll be amazed at the pride that comes from bringing old memories back to life.