

Install Guide
How to Install Your LUTs
A short PDF that walks you through loading this pack in Photoshop, Premiere Pro, DaVinci Resolve and Final Cut Pro, plus two tips for better results.
DESCRIPTION
Photos and videos that feel like breath of fresh air! Our Bright & Airy LUTs will brighten your scenes while giving them a soft finish, creamy colors, and positive vibes.
All five lift the blacks into a soft matte, brighten the midtones a lot and mute the colors, with a faint pink tint in the shadows: Peachy Cream is the warmest and mutes blues the most, and Light Aurora fades yellows the most. After you apply one, lower the layer opacity in Photoshop or the LUT intensity in your video app if the look is too strong.
One zip holds the 5 LUTs as .CUBE files for Photoshop’s Color Lookup, the same 5 in .3DL, .CSP, .CUBE and .ICC for video and other apps, plus 4 sample images to practice on and the PDF install guide.
TRY THEM FOR FREE
Want to try our LUTs before you buy? Check out our FREE Premium LUTs Sample Pack that includes some our favorite Warm Tone, Cool Tone, Film Tone, and Moody Vibe looks.


PHLEARN PRO · LUTs
Bright and Airy LUTs
5 LUTs4 sample imagesPhoto & video apps
Bright and Airy LUTs · 5 Looks
Soft Pastel Light With Open Shadows
Five LUTs that brighten the frame, lift the shadows and add soft pink and lilac tints. They work on photos and video in Premiere, Final Cut, DaVinci Resolve and Photoshop.


Peachy Cream
Peachy Cream brightens the whole frame and lays a soft peach-pink blush over the white brick and bedding. Her skin goes lighter and rosier, and the gray shadows in the sheets turn creamy. It has the brightest blacks in the pack.
Black Point Lifted High
Pure black comes out at about 29% brightness and middle gray rises from 50% to 65%, so no deep shadows are left. Midtone contrast drops by about 30 percent, and a faint warm tint runs through every tone.
Blues Fade to Pastel
Blues lose more than half their color and get much lighter. Reds, oranges, yellows and greens lose roughly a quarter to a third of their saturation, and magentas hold the most. Deep skin lightens much more than light skin. Cool corners of a white room warm up into cream.
Best on: boudoir and bedroom portraits, white walls and sheets, and soft window-lit scenes.

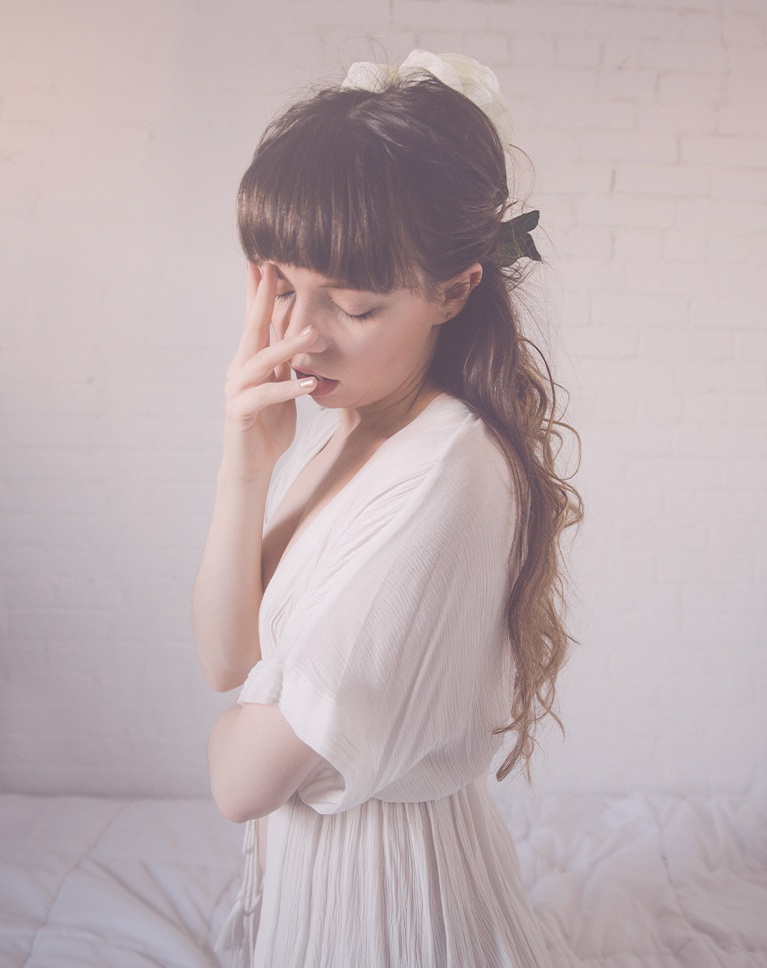
Mystic Pinks
Mystic Pinks lays a pink-mauve tint over the brick wall, the white dress and the bedding, and fades the shadows. Her dark hair softens to a warm brown and the image takes on a dreamy, hazy look. It is the lowest-contrast look in the pack, with midtone contrast down by about a third.
Faded Shadows, Mauve Highlights
Black lifts to about 26% brightness and middle gray rises to 63%, which gives a soft matte finish. A light magenta cast runs from the shadows to the highlights, so white walls and fabric turn pale pink.
Softer, Lighter Colors
Every color gets lighter and loses roughly a quarter to a third of its saturation, with greens, oranges and yellows muted most and magentas least. Aquas lean slightly toward blue. Skin stays warm, shifts a little toward pink and comes out a shade lighter.
Best on: moody indoor portraits, light clothing against pale walls, and slow, quiet moments.


Light Aurora
Light Aurora brightens the frame and opens the dark gaps between the flowers, so the pink robe and blooms turn lighter and more pastel. Her skin gets a clean, luminous glow and keeps its warmth. It keeps the deepest blacks in the pack.
Bright Mids, Clean Whites
Middle gray rises from 50% to 64% and the black point lifts to about 13%, with a faint magenta tint in the deepest shadows. Whites stay close to where they were at 97%. Midtone contrast drops by about a quarter.
Pinks Hold, Yellows Soften
Magentas, purples, reds and blues keep the most color, while yellows lose about 60% and greens and oranges lose almost half. Reds lean slightly toward pink as they lighten. A pink outfit keeps more of its color than golden areas, which go soft. Skin comes out lighter and less saturated.
Best on: floral and flat-lay portraits, pastel wardrobes, and beauty close-ups.


Soft Purples
Soft Purples, the pack’s featured look, lightens the warm beige wall and lace and gives them a faint pink-lilac tint. Shadows open up and contrast drops, so skin and white fabric look gentle and muted. It brightens the midtones more than any other look in the pack.
Lifted Mids and Shadows
Middle gray rises from 50% to 67% and the black point lifts to about 19% with a hint of warmth. Whites are held down to 95%, the lowest in the pack, and midtone contrast drops by nearly 30 percent. The result is a light, low-contrast image with soft whites.
Softer Color, Purples Lean Magenta
Colors lose about a quarter of their saturation as they brighten, blues a little more, and purples shift slightly toward magenta. Skin goes lighter and creamier without turning gray, and deep skin turns a softer caramel as it lightens strongly.
Best on: boho and lace portraits, warm interiors, and cozy lifestyle shots.


Sweet Sachet
Sweet Sachet fades the blue sky to a pale, misty gray-lilac and makes the whole frame light and low in contrast. The pink of the sheer dress stays, so it becomes the main color in a soft, washed-out scene. It changes contrast and color the least of the five.
Low Contrast With a Mauve Tint
The black point lifts to about 17% while 25% gray rises just to 39%, so shadows stay gentle rather than milky. Middle gray rises from 50% to 61%. The shadows and midtones carry a light warm magenta cast, while highlights stay neutral.
Warm Tones Keep Most of Their Color
Magentas, purples and reds lose the least saturation, greens and yellows lose about a fifth, and every color gets lighter. Backlit skin and hair keep a warm glow against the pale sky.
Best on: backlit portraits at the beach or at sunset, sheer fabrics, and calm outdoor shots.
What’s in the Download
5 LUTs, every format
One zip with the 5 LUTs as .CUBE files for Photoshop, plus each one in .3DL, .CSP, .CUBE and .ICC for video and other apps, and 4 sample images to practice on. In Photoshop they load through a Color Lookup adjustment layer.
- ZIPPHLEARN Bright and Airy LUTs 2026.zipEvery LUT in every format, one download, 9.4 MB
- CUBEPhotoshop Quick Install (.CUBE)The 5 LUTs ready for a Color Lookup layer
- 3DLAll Formats (.3DL, .CSP, .CUBE, .ICC)The same 5 for Premiere Pro, After Effects, Resolve, Final Cut and Capture One
- JPG4 Sample ImagesFree-to-use practice photos
- PDFPHLEARN LUTs - Install Guide (2026).pdfInstall steps for Photoshop and video apps, plus two tips
- PHLEARN-Bright & Airy-Light Aurora.CUBE
- PHLEARN-Bright & Airy-Mystic Pinks.CUBE
- PHLEARN-Bright & Airy-Peachy Cream.CUBE
- PHLEARN-Bright & Airy-Soft Purples.CUBE
- PHLEARN-Bright & Airy-Sweet Sachet.CUBE
The 4 sample images


Photos by Anthony Tran, Freddie Addery, arman grigoryan and Oleksii Rozanov on Unsplash
LUT Questions, Answered
What’s included in the Bright & Airy LUTs?
The pack has 5 LUTs: Soft Purples, Peachy Cream, Mystic Pinks, Light Aurora and Sweet Sachet. Each LUT comes as .CUBE, .3DL, .CSP and .ICC files, so it works in Photoshop, Premiere Pro, DaVinci Resolve, Final Cut Pro and most other editors.
What kind of photos and videos are the Bright & Airy LUTs made for?
They are made for scenes you want to feel like a breath of fresh air. The LUTs brighten your photos and videos and give them a soft finish, creamy colors and a positive, cozy feel. Soft Purples is the featured look on this page.
How do the Bright & Airy LUTs handle shadows and contrast?
They lift the shadows and remove harsh contrast, then add subtle, muted colors to the scene. The result is a softer, lighter image rather than a punchy, high-contrast one, which is what gives these looks their soft and cozy feel.
Are LUTs included in my PHLEARN PRO subscription?
Yes. A PHLEARN PRO membership includes every LUT pack, plus PRO Tutorials, Lightroom Presets, Photoshop Actions and Photoshop Brushes.
Which programs do the LUTs work in?
Photoshop, Premiere Pro, DaVinci Resolve, Final Cut Pro, After Effects, Lightroom Classic and most other photo and video editors. Use the .CUBE file unless your software asks for .3DL, .CSP or .ICC.
How do I use a LUT in Photoshop?
Choose Layer > New Adjustment Layer > Color Lookup, open the 3DLUT File menu in the Properties panel, choose Load 3D LUT and pick a .CUBE file from the Photoshop Quick Install folder. Set the strength with the layer’s Opacity.
How do I install LUTs in Premiere Pro, DaVinci Resolve or Final Cut Pro?
The PDF install guide in your download has a page for each one, and every step for every program is on our How to Install LUTs page.
The LUT looks too strong. What do I do?
Turn it down: lower the layer Opacity in Photoshop, the Intensity slider in Premiere Pro or the Mix slider in Final Cut Pro. In DaVinci Resolve, reduce Key Output Gain for that node.
Should I correct my photo before adding a LUT?
Yes. Set exposure and white balance first, then add the LUT on top. A LUT grades color; it does not correct it.
My LUTs don’t show up in DaVinci Resolve.
Skipping Update Lists is the usual reason. Open Project Settings > Color Management, click Update Lists, then Save.
Do you offer refunds?
Because these are downloadable products, all sales are final and we are not able to offer refunds.
Terms of Use
These LUTs are licensed for personal and professional use by the individual who purchased or downloaded them. The license does not extend to companies or partnerships, and the files may not be resold, loaned, gifted, shared, copied or redistributed. All PHLEARN LUTs are copyright protected.
Master Photoshop, Lightroom and Photography
Join PHLEARN PRO for $12.99 a month, or $99.99 a year (save 36%). Cancel anytime, with a 100% money-back guarantee.





