
Download Sample Images
Click the link below to download the sample images and follow along with this tutorial.
DownloadThe winners have been announced! View the Winners
This tutorial is a part of the Horror Movie Poster Collection
For Creative Help, Use References
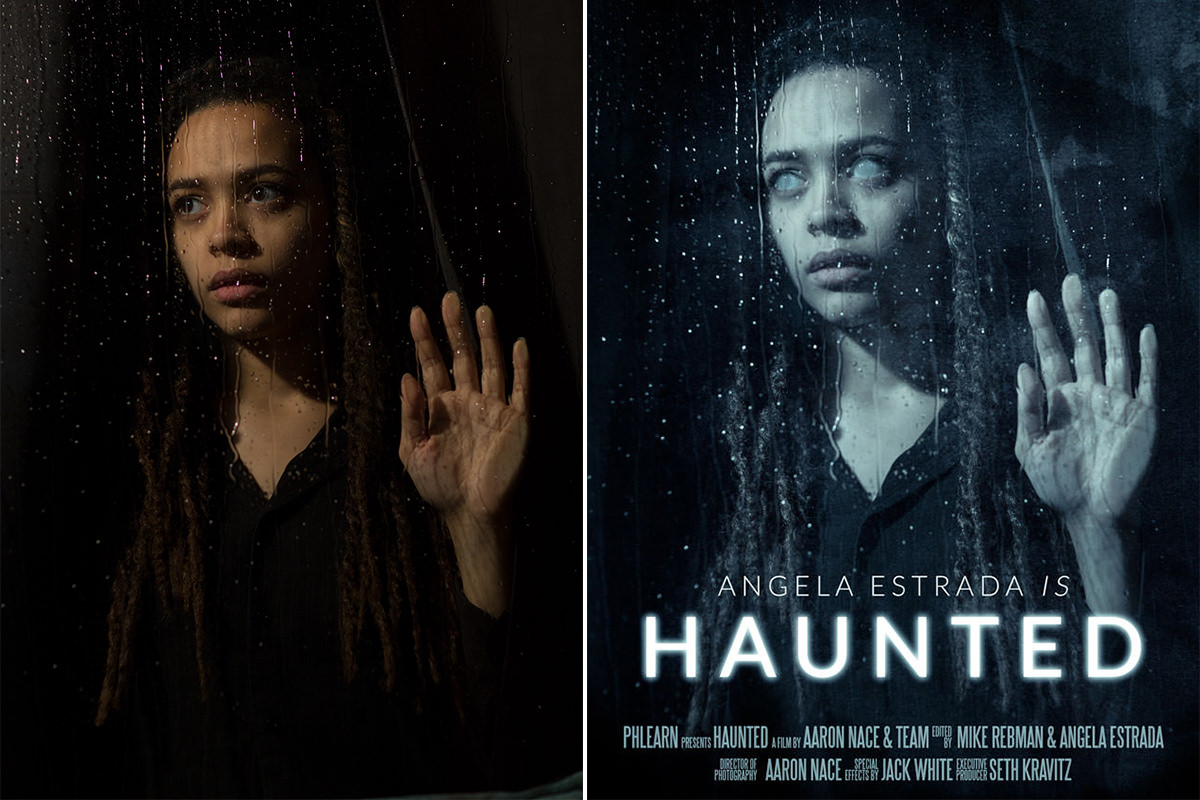
We based this week’s poster off of an image we discovered for the film The Eye (2008, starring Jessica Alba). We know that it can sometimes be difficult to come up with a completely original idea and this can be a pretty huge obstacle to the creative process. If you find yourself in that situation, we recommend finding an image that inspires you and try to recreate the elements of the image that make it stand out. To recreate the poster for The Eye, we would need a subject, a window or pane of glass for our subject to look through, and a method to create a rain effect on the surface of the glass.
Our setup for the photoshoot was very similar to what we did in our first horror episode. Again, we used only a bare light bulb and some Cinefoil (to prevent glare) to light our subject. We shot this in our studio using a window built into one of the offices. We asked Angela, a member of our PHLEARN team and our champion video editor, to channel her inner evil for the picture. Lastly, we would need a brave soul with strong forearms to man the spray bottle, to create the rain effect on the outside of the window. Jack, another member of our team, was up to the task.
We had Angela stand inside the office and look out window. Outside of the office, we had our light bulb lighting her face and Jack spraying water onto the glass to create the rain effect. Since our environment was dark, the camera aperture was set to f/ 2.0 and we bumped the ISO up to 800 so that we could shoot with a shutter speed of 1/100 to avoid any motion blur.
After a few snaps of the shutter, it was time to turn it over to the mad genius, Aaron Nace. He performed his ritual sacrifice to the Photoshop gods that left us all shocked and confused and then calmly sat down at his editing computer.
Photoshop
We begin by opening up the image of our subject in Adobe Camera Raw. We’ll be doing most of our adjustments in Photoshop, but the tools in Adobe Camera Raw are extremely helpful and will allow us to start with a strong foundation. After some minor adjustments to the color temperature, exposure, shadows, clarity, and vibrance, we’re ready to start the work in Photoshop.
There are some lighter areas along the edges and corners of the image that are a bit distracting. To remove them, create a Solid Color Adjustment Layer and fill it with black. Select the layer mask of your adjustment layer and invert it by hitting CTRL or CMD + I. Then, on the same layer mask, select the Brush Tool B and paint with white over the areas that you want to remove. We recommend using a low flow of about 20%.

Quick Tip: To crop the image and adjust composition, use the Crop Tool C.
Since the raindrops are an important element of the image, we want to make sure that they don’t get lost. To brighten them up, create a new layer and use your brush tool to paint white on the image wherever you want to add highlights. Be sure to avoid painting over the subject’s face, as you don’t want to adjust any of the highlights in that area. You should end up with a large white blob surrounding your subject. Perfect, we’re all done here.
LOL. JUST KIDDING.
Seriously though, you need to change the blending options of that layer before anyone else sees this and judges you. Blend If is an extremely powerful tool, giving you the ability to make a layer only appear in highlights or shadows. Under the Blending Options for your white paint layer, you’ll see Blend If sliders at the bottom of the menu. In this case, we want to adjust the Underlying Layer slider. Click the slider under the shadows and, while holding ALT or OPTN, drag it from the left to the right. Adjust this slider until only the water drops are affected by the paint layer. If you’ve accidentally painted over your subject a bit, simply put a layer mask on your white paint layer and paint black over areas that you don’t want to be highlighted.
To make this image particularly bone chilling, we whited out Angela’s normally normal-looking eyes. Zoom In by hitting CTRL or CMD + +. Create a new layer and select the Brush Tool. Again, you’ll want to use a low flow. You can adjust flow percentage by hitting SHIFT + 0-9. We recommend a flow of about 20% (SHIFT + 2). Sample the color from the white of your subject’s eyes by holding ALT or OPTN. Carefully paint over each to remove the iris and pupil. Then switch the Layer Blending Mode to Lighten, which will allow some of the underlying detail to appear. You can also lower the Opacity as well.
When using the brush tool, it’s a good idea to add noise to those layers that matches the noise present in the original image. This will help blend painted areas and make them appear more realistic. Select the layer that you want to add noise to. Go to the Filter menu at the top of the screen, click on Noise, and then Add Noise. Be sure to be zoomed in as you’re doing this so you can see the noise in the original image to compare. Adjust the slider until you find a setting that matches.
Next, we’ll use a Gradient Map to add some color. Create a new Gradient Map Adjustment Layer and place it on top of your Layer Stack. The Gradient Map slider will allow you to choose colors for your shadows, midtones, and highlights. For this image, we kept our shadows black, added a couple shades of blue for our midtones, and left our highlights white. Again, you can adjust the opacity as you see fit.
You generally want your subject’s face to be the brightest part of the image. To brighten just that area of the image, create a curves adjustment layer and place it over the layer with your subject. Select the layer mask of that adjustment layer and, using a large, soft brush, paint white on the layer mask over the face of your subject.
We finished the poster off by adding a title, tagline, and some credits.
That’s it! Use this as inspiration or do something strange and original. There’s only one week left to submit your poster – the end is near!
We’ll see you next week with the winners!