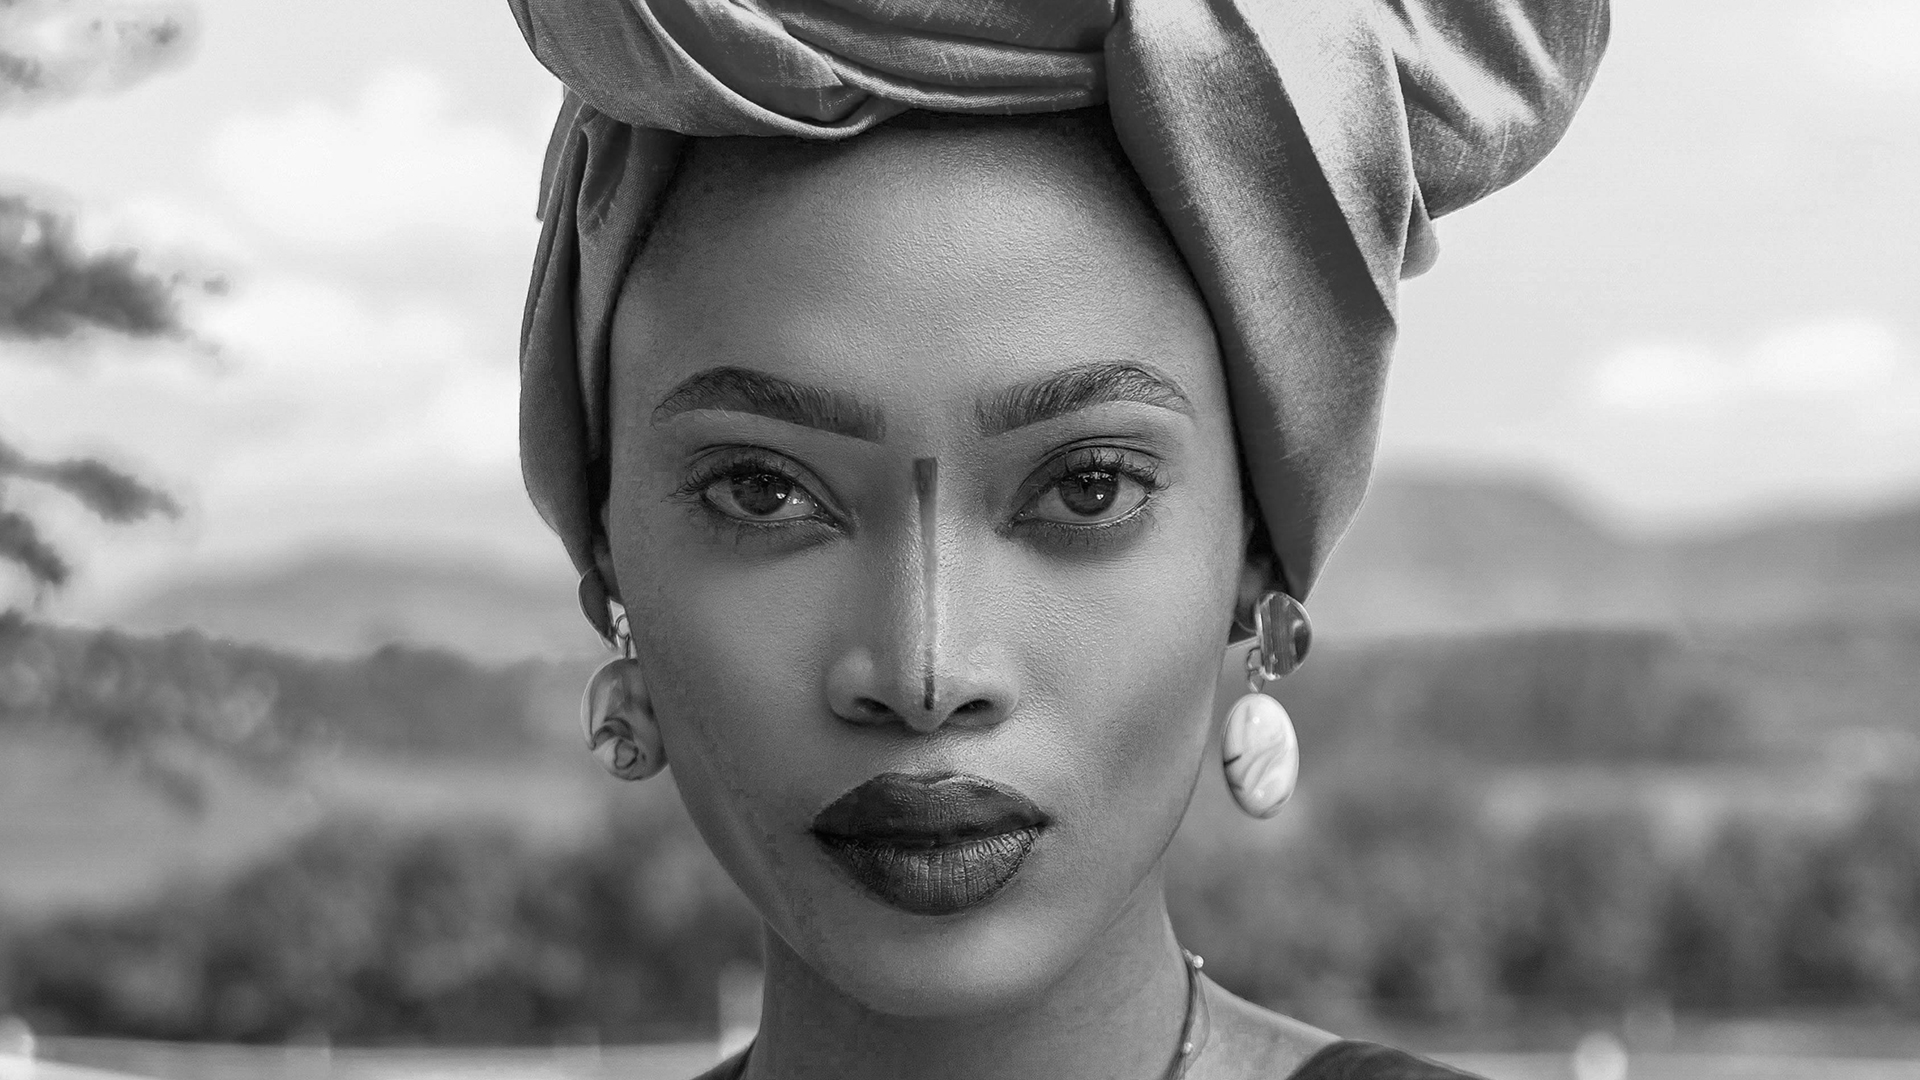

Download Assets
This tutorial includes 1 sample image, 1 sample PSD and 1 PDF guide. Downloads are free with a PHLEARN account.
- Download the sample images and PSDs from every free tutorial on PHLEARN
- New free tutorials published every week
- One free account — sign up once, then download anything
Free PDF Guide · 4 Pages
This Tutorial as a Step-by-Step PDF
Every step from the video in order: Convert for Smart Filters, Camera Raw Filter, the Black & White button, the Mixer and its Auto button, the on-image tool that drags tones lighter or darker, Color Grading for a sepia tone, and the Alt/Option reset. Keep it next to your keyboard.
description
Camera Raw converts to black and white properly; desaturating a photograph just turns it grey, and that’s the whole problem with the obvious approach. Two colours that were vividly different — a red jumper against green foliage — convert to almost identical shades, and the picture goes flat exactly where it used to have separation.
The Black & White Mixer in Adobe Camera Raw exists to fix that. It lets you decide how bright each original colour becomes in the conversion, so you can darken a sky by pulling on the blues or lift skin by lifting the oranges — and you can do it by dragging directly on the photograph itself.
Enjoying This Free Tutorial?
We publish a new free tutorial every week, each one with sample images and PSDs you can download and follow along with. Sign up and they land straight in your inbox, along with early word on sales, events and subscriber-only offers.
Image Source
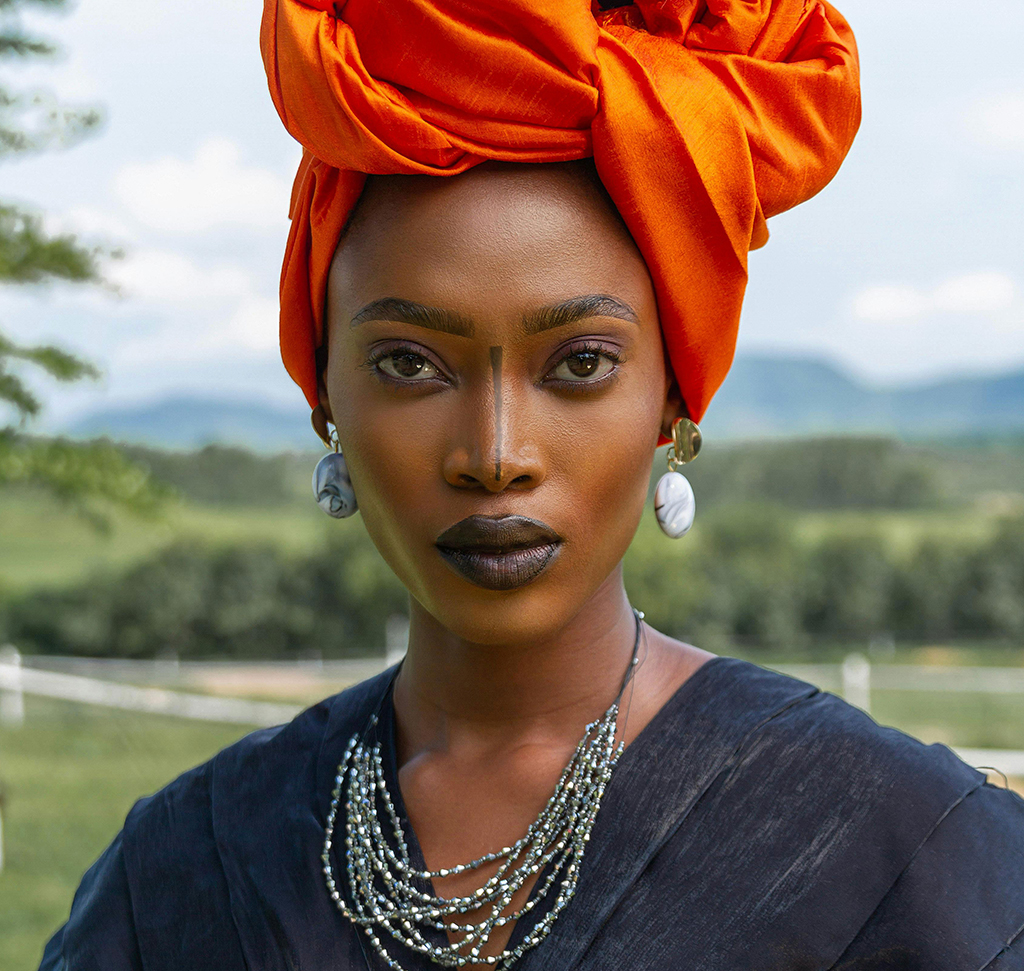
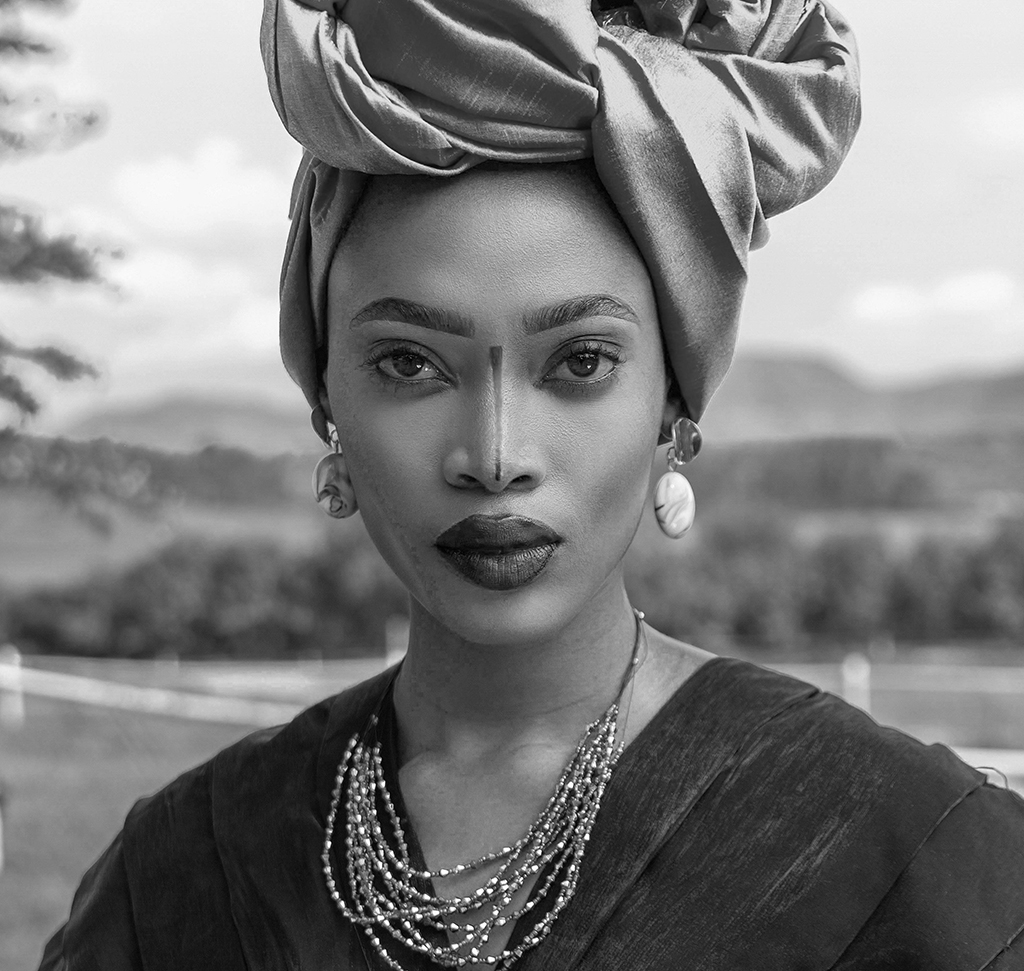
Good Black and White Images Come From the Colours You Started With
Camera Raw gives you a better black and white conversion than desaturating ever will. Desaturating a photograph turns it grey. That’s the whole problem with the obvious approach: two colours that were vividly different — a red jumper against green foliage — can convert to almost identical shades of grey, and the picture goes flat exactly where it used to have separation.
The Black & White Mixer in Adobe Camera Raw exists to fix that. Camera Raw lets you decide how bright each original colour becomes in the conversion, so you can darken a sky by pulling on the blues, or lift skin by lifting the oranges, long after the colour has visibly gone. Once you understand that, monochrome stops being a filter and becomes a set of decisions.
Why the Mixer Is the Whole Thing
Contrast Comes From Colour Separation
Two tones that look different in colour can convert to the same grey. The mixer is how you pull them apart again.
Nothing Is Actually Discarded
The colour information stays in the file while the mixer works from it. That’s why you can keep adjusting the conversion indefinitely rather than committing at the moment you desaturate.
You Can Drag on the Photograph Itself
The targeted adjustment tool means you never have to work out which slider corresponds to which part of the image. Click the thing you want darker and pull down.
Set Up Before You Convert
-
Open the Image and Go to Filter > Convert for Smart Filters
Black and white is a treatment you will revise more than most — possibly back to colour entirely. A Smart Object keeps that door open.
-
Open Filter > Camera Raw Filter
Works on JPEGs and any other format, not just raw files.
Convert, Then Mix
-
Click the Black & White Tab
Top of the right-hand panel. The image converts instantly — and this default conversion is a starting point, not a result.
-
Open the Black & White Mixer
Eight sliders, one per colour range from the original photograph.
-
Grab the Targeted Adjustment Tool
The small circular icon. This is the part worth learning — it turns an abstract panel into direct manipulation of the picture in front of you.
-
Click and Drag Directly on the Image
Drag up on an area to brighten whatever colours were there, down to darken them. Pull down on a sky and it deepens because the blues drop; pull up on a face and the oranges lift. You’re working by eye on the actual subject rather than guessing at slider names.
-
Try Auto as a Reference Point
Worth clicking once to see where Photoshop would put things, then adjusting from there or starting again.
Add a Tone If It Wants One
-
Close the Mixer and Open Color Grading
Get the greys right first. Toning a conversion you haven’t finished means judging two things at once.
-
Use the Main Colour Wheel for a Uniform Tint
This is where a sepia or a cool blue-grey comes from — a single hue laid across the whole image.
-
Or Use the Three-Way Wheels for Split Toning
Separate hues into shadows, midtones and highlights. Warm highlights against cool shadows is the classic film look, and it’s more interesting than a flat sepia.
-
Alt/Option-Click Reset Color Grading to Go Back to Neutral
Instantly returns to pure black and white without undoing your mixer work.
Keep It Editable
-
Click OK to Apply as a Smart Filter
It appears beneath the layer in the Layers panel.
-
Toggle the Eye Icon to Compare Against the Colour Version
The fastest before-and-after you’ll get, and worth doing repeatedly — some photographs are simply better in colour and it’s useful to find that out.
-
Double-Click Camera Raw Filter to Return
Every mixer position and every toning wheel exactly as you left them.
Common Mistakes
Just Desaturating
It throws away every decision the mixer would have let you make. There’s no reason to do it.
Accepting the Default Conversion
Clicking the Black & White tab is step one of about six, not the finished job.
Toning Before the Greys Are Right
A tint over a muddy conversion is still muddy. Fix the mix first.
Pushing the Mixer Sliders Too Far
Extreme values produce banding and blotchy skin. Large moves in the mixer show up faster than they do in colour.
Converting Everything
Black and white suits photographs with strong form, texture or light. On an image whose whole point was the colour, it removes the subject.
You Have to Keep Thinking in Colour
The counter-intuitive part of monochrome work is that you never stop dealing with colour. Every grey in the finished picture came from a hue, and the mixer is simply the place where you decide the exchange rate between them.
Which is why it’s worth learning to look at a colour scene and ask which parts would collapse into the same tone. Red and green at similar brightness are the classic trap. Once you can spot that before you convert, you’ll know both which photographs will work in black and white and, when one doesn’t, exactly which slider to reach for.
Convert One Photograph Properly Today
Convert to a Smart Object, open the Camera Raw Filter, click the Black & White tab, and then — instead of touching the sliders — grab the targeted adjustment tool and drag directly on the sky and on your subject. Download the free sample image and PSD and take it all the way: get the greys separated first, then add a tone in Color Grading, and toggle the Smart Filter’s eye icon to compare against the colour original. For Photoshop taught in order rather than feature by feature, our PRO Photoshop Learning Path is where to go next.
Quick Reference: Keys, Menus and Settings
- Keep it editableFilter > Convert for Smart Filters, then Filter > Camera Raw Filter
- ConvertClick B&W at the top of the Edit panel
- Starting pointB&W Mixer > Auto
- Mix on the photoClick the targeted adjustment icon in the Mixer, then drag up on the image to brighten that color, down to darken it
- CompareThe before/after icon at the bottom shows both side by side
- Sepia or a tintColor Grading > the global icon: set Hue and Saturation; the three-way view tints shadows, midtones and highlights separately
- Back to pure black and whiteAlt/Option-click Reset Color Grading
- Change it laterDouble-click Camera Raw Filter under Smart Filters
No AI, no generative credits.

Free Downloads
Follow Along on the Same Photo
Get the portrait from the video, the PSD with the Camera Raw smart filter, and the PDF guide. Free with a PHLEARN account.
Black and White in Camera Raw: Common Questions
Why convert to black and white in Camera Raw instead of a Black & White adjustment layer?
The Mixer lets you click and drag on the photo itself to brighten or darken each color, there’s an Auto starting point, and Color Grading adds a sepia tone or a split tone in the same panel. As a smart filter it stays editable.
Why convert to a Smart Object first?
So the Camera Raw Filter becomes a smart filter. Double-click it later and the black and white is still switched on with every Mixer setting ready to adjust.
What does the B&W Mixer do?
It sets how light or dark each color becomes in the conversion. Auto picks a mix that Aaron says usually works well; from there you can tune skin, clothing and background separately.
How does dragging on the photo work?
Click the targeted adjustment icon in the Mixer, hover over an area and drag up to brighten it or down to darken it. Camera Raw moves the right color sliders for you; in the video dragging on skin moved orange and a bit of yellow.
How do I get more contrast between the subject and background?
Darken one and lighten the other with the drag tool. Aaron darkened the shirt and lightened the background, checking the before/after view to see which tones to push.
How do I add a sepia tone?
Open Color Grading, click the global icon and set a hue and saturation. The three-way view goes further: a touch of blue in the shadows, warmth in the highlights.
How do I get back to pure black and white?
Hold Alt/Option and click Reset Color Grading.
Does this need a RAW file?
No. The sample is a JPEG opened through Filter > Camera Raw Filter. No AI or credits involved.
Are the sample files free?
Yes, with a free PHLEARN account. You get the portrait, the PSD with the smart filter and the PDF guide.
Master Photoshop, Lightroom and Photography
Join PHLEARN PRO for $12.99 a month or $99.99 a year. Cancel anytime, with a 100% money-back guarantee.





