

Download Assets
This tutorial includes 1 sample image, 1 sample PSD, a before-and-after pair and 1 PDF guide. Downloads are free with a PHLEARN account.
- Download the sample images and PSDs from every free tutorial on PHLEARN
- New free tutorials published every week
- One free account — sign up once, then download anything
Free PDF Guide · 4 Pages
This Tutorial as a Step-by-Step PDF
Every step from the video in order: Convert for Smart Filters, Camera Raw Filter, the Landscape mask for sky and mountains, the exposure, clarity and temperature moves, the radial gradient on the subjects with warmth and a touch of magenta, the two linear gradients and the final radial brighten. Keep it next to your keyboard.
description
Correct color and exposure in Photoshop somewhere better than the Adjustments panel. Most people meet Adobe Camera Raw once, when they open a raw file, and assume that’s what it’s for. It isn’t. Camera Raw is available to any image in Photoshop — JPEG, TIFF, PNG, a flattened composite — through Filter > Camera Raw Filter.
And it is a considerably better place to correct color and exposure than the adjustment layers most of us reach for by habit, because of masking. Camera Raw finds your sky, your subject and your background on its own, so each region can have its own exposure and its own white balance rather than one setting fighting across the whole frame.
Enjoying This Free Tutorial?
We publish a new free tutorial every week, each one with sample images and PSDs you can download and follow along with. Sign up and they land straight in your inbox, along with early word on sales, events and subscriber-only offers.
The Best Place to Correct Color and Exposure Isn’t the Adjustments Panel
Most people meet Adobe Camera Raw once, when they open a raw file, and assume that’s what it’s for. It isn’t. Camera Raw is available to any image in Photoshop — JPEG, TIFF, PNG, a flattened composite — through Filter > Camera Raw Filter, and it is a considerably better place to correct color and exposure than the adjustment layers most of us reach for by habit.
The reason is masking. Camera Raw will find your sky, your subject and your background on its own, and let you set exposure and white balance differently in each. Doing the same thing with adjustment layers means building three masks by hand before you can touch a single slider.
Why Do This in Camera Raw at All
It Works on Every File Type
Not just raw. The Filter menu opens it on anything, which surprises a lot of people who’ve had Photoshop for years.
The Masks Come Free
Select Sky, Select Subject and the rest are built in. Every adjustment you make lands inside a region the software worked out for you.
It’s One Reopenable Dialogue
Applied to a Smart Object, all of it — every mask, every slider — reopens as a single Smart Filter. Compare that to hunting through a stack of twelve adjustment layers a week later.
Set It Up So You Can Come Back
-
Convert the Layer to a Smart Object
Filter > Convert for Smart Filters, before you open anything else. Skip this and every adjustment you’re about to make is permanent.
-
Open Filter > Camera Raw Filter
Then actually look at the image before touching a slider. Where is it too cool? Which areas have lost detail? Two minutes of looking saves ten of fiddling.
Fix Each Region on Its Own Terms
-
Mask the Sky and Lift Exposure, Contrast and Clarity
Use the automatic subject detection to select the sky as its own mask. Clarity lives under Effects, and it’s what pulls structure back out of a flat sky.
-
Mask the Mountains and Warm Them Slightly
A little more Exposure, and Color Temperature nudged warm. Land and sky almost never want the same white balance, which is the whole reason global correction never quite works.
-
Draw a Radial Gradient Over Your Subjects
Warm the Color Temperature and add a touch of Magenta. Skin that has gone slightly green or gray under a cool cast comes back to life with very small moves here — magenta is the correction people forget.
-
Press V to Hide the Pins While You Judge It
The pins and mask overlays sit on top of exactly the thing you’re trying to assess. Toggle them off constantly.
Direct the Eye With Gradients
-
Add Two Linear Gradient Masks, One Up and One Down
Drag one from the bottom edge upwards and one from the top downwards. Together they make a vignette that follows the frame rather than a circle stuck in the middle.
-
Lower Exposure and Saturation on Both
Slightly. A vignette that anyone notices is too strong; the point is that the edges quietly stop competing.
-
Add a Final Radial Gradient Over the Subjects
A small lift in Exposure and Shadows. Having darkened the periphery, brightening the center completes the same idea from the other direction.
-
Feather Everything
The feathering slider is the difference between a gradient that blends and one with a visible boundary. Push it further than feels necessary.
Finish, and Then Change Your Mind
-
Click OK to Apply
It lands as a Smart Filter under the layer.
-
Double-Click Camera Raw Filter to Reopen It
Every mask and slider is exactly where you left it. This is what makes the Smart Object step worth the five seconds — color and exposure judgements are the ones you most often want to revise a day later.
Common Mistakes
Correcting Globally First
A global white balance that fixes the sky wrecks the skin. Go regional from the start.
Skipping the Smart Object
The single most consequential omission here, and it takes one menu item to avoid.
Judging With the Pins Showing
Press V. Repeatedly.
Under-Feathering the Gradients
A hard-edged vignette or a visible radial boundary undoes all the subtlety you just built.
Overdoing Clarity
It’s seductive on a sky and it goes crunchy quickly. Add it, then back it off a third.
Correction Is Regional, Not Global
The habit worth taking from this is not any particular slider. It’s that a photograph almost never has one exposure problem or one color cast — it has three or four, in different places, often pulling in opposite directions.
Global adjustments force you to average them, and averaging is why so many corrected images end up looking flat rather than fixed. Once the masks are free, the question stops being “how much warmer should this photo be” and becomes “how much warmer should this part be”, which is both a harder question and a much more useful one.
Correct One Photograph This Way Today
Convert to a Smart Object, open the Camera Raw Filter, and mask the sky before you touch anything global. Download the free sample image and PSD and work all the way through — lift the sky’s exposure and clarity, warm the land, drop a feathered radial gradient over your subject with a little magenta, then build the vignette from two linear gradients and finish with one more radial lift on the center. Reopen the filter afterwards to prove it all survived. For non-destructive workflow taught properly, our PRO Ultimate Guide to Non-Destructive Editing goes considerably deeper.
Quick Reference: Keys, Menus and Settings
- Keep it editableFilter > Convert for Smart Filters, then Filter > Camera Raw Filter
- Sky and mountainsMasking > Landscape > tick Sky and Mountains > Create two separate masks
- SkyExposure up a touch, Contrast up, Highlights up, Effects > Clarity up, Temperature warmer
- MountainsExposure up a little, Temperature warmer
- SubjectsCreate New Mask > Radial Gradient, drag it out; Temperature warmer, a little Tint toward magenta; adjust Feather
- VignetteLinear Gradient from the bottom up: Exposure, Contrast and Saturation down a little; another from the top corner: Exposure down
- Brighten the subjectsRadial Gradient: Exposure and Shadows up a touch, then feather it
- HelpersV shows or hides pins and tools; Show Overlay; the eye toggles all masks
- Change your mindDouble-click Camera Raw Filter in the Layers panel; every mask is still there with an Amount slider
Works on JPEGs as well as RAW files.

Free Downloads
Follow Along on the Same Photo
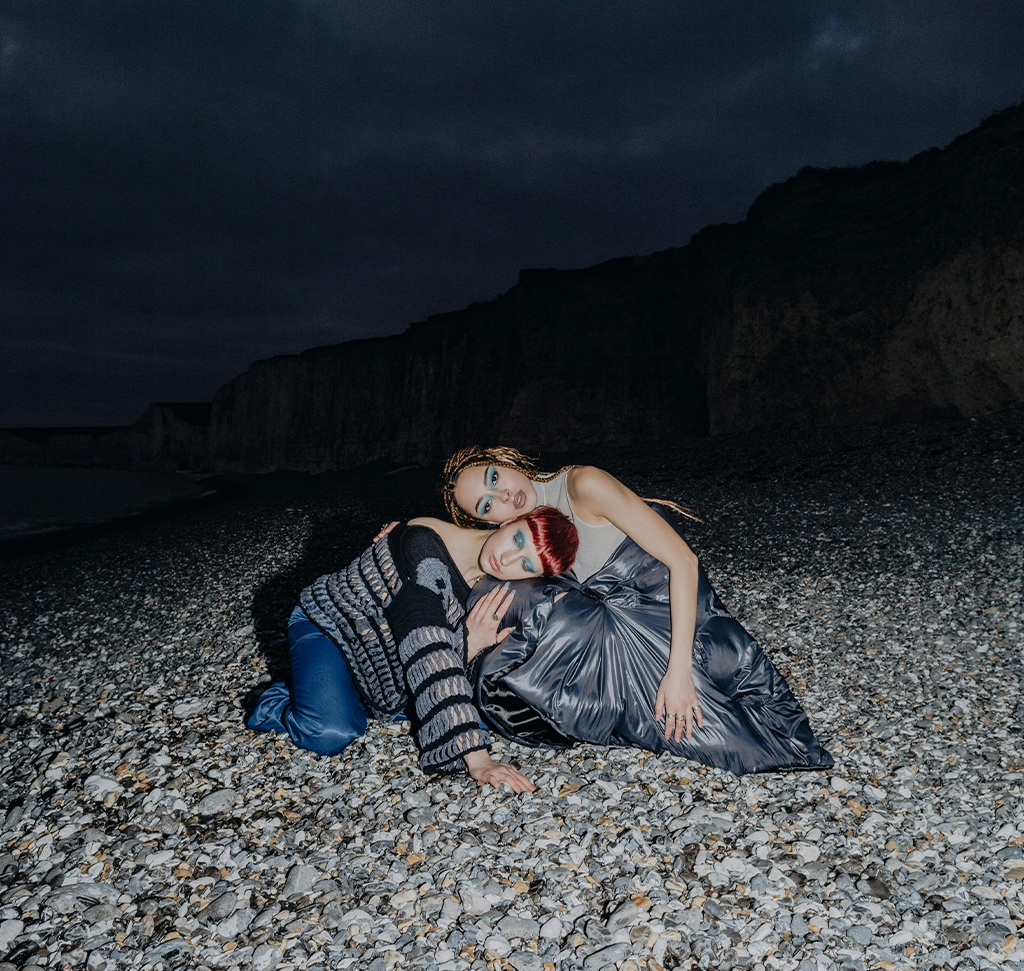
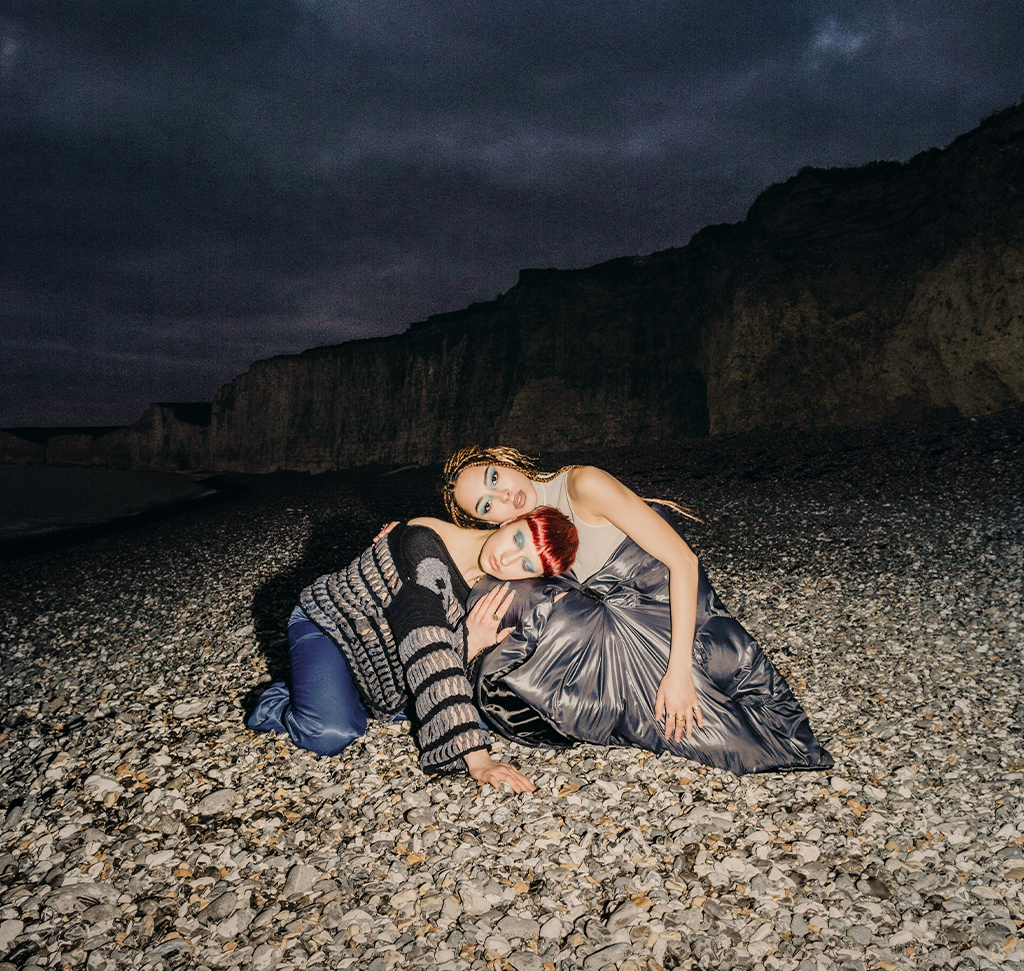
Get the beach portrait from the video, the PSD with the Camera Raw smart filter and all its masks, the before-and-after pair and the PDF guide. Free with a PHLEARN account.
Color and Exposure: Common Questions
Why fix color and exposure in Camera Raw instead of adjustment layers?
Camera Raw’s masks let you treat the sky, the mountains and the people separately, with the same sliders a RAW editor has. It works on JPEGs too, and as a smart filter it stays editable.
Why convert to a Smart Object first?
So the Camera Raw Filter becomes a smart filter. Double-click it later and every mask is still there, each with an Amount slider, so you can soften or strengthen any part without redoing it.
Why does the sample photo look so blue?
The flash was probably daylight balanced, around 5600K, on a night scene. The fix in the video is a warmer temperature on the subjects, with a touch of magenta so the warmth looks natural.
How did you bring back the sky and mountains?
Masking > Landscape found both. The sky got a little more exposure, contrast and highlights plus Clarity and warmth; the mountains got a little more exposure and warmth so detail shows against the cooler sky.
What are the gradients for?
Steering the eye. A linear gradient from the bottom darkens and desaturates the bright sand, another from the top corner darkens the sky, and a radial gradient brightens the subjects slightly. Small moves; the brightest part of the frame ends up on the people.
How much feathering?
More than you think. Aaron pushes the exposure up temporarily to see the edge, then feathers until the gradient disappears into the photo. Press V to hide the pins while you judge it.
Does this need a RAW file?
No. The sample is a JPEG and everything in the video runs through Filter > Camera Raw Filter.
Does this use AI or credits?
The Landscape mask uses AI to find the sky and mountains but creates no pixels, so no credits are spent.
Are the sample files free?
Yes, with a free PHLEARN account. You get the beach portrait, the PSD with all the masks, the before-and-after pair and the PDF guide.
Master Photoshop, Lightroom and Photography
Join PHLEARN PRO for $12.99 a month or $99.99 a year. Cancel anytime, with a 100% money-back guarantee.





