Course Downloads
How to Use Select & Mask in Photoshop
-
Add to
favorites
-
DifficultyMedium
-
Videos1
-
Software
Description
Need to cut something out of it’s background? Look no further than Select & Mask.
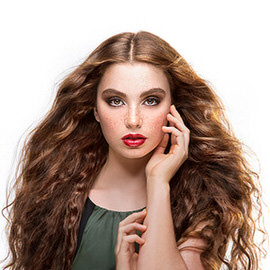
In this tutorial, learn to use Select & Mask to cut a person out of their background.
Share
What is Select & Mask
While there are many basic photo editing programs that will allow you to apply various types of filters and make changes to photos, one of the key advantages of Photoshop is the ability to selectively apply a wide range of filters and effects to a specific area of a photo, while leaving the rest untouched. One of the predominant means of doing this is by selecting the area you want to work with and applying a mask to the rest. This protects the rest of the image from being affected by the changes you are making in one area. For instance, masking allows you to boost the reds in someone’s shirt without boosting the reds in their skin tone. Selecting and masking used to be a 2-step process requiring the use of two separate tools. Adobe has recently combined them into one seamless, easy-to-use tool called Select & Mask.
What It Is
Aside from just combining two of the most commonly used tasks into one, Adobe went a step further and created a special task bar. This gives you a wide variety of options for working with your image once the area you want to work with has been selected and masked.
Select the Area You Want to Work With
This tool allows you to quickly outline the area you want to preserve, and the mask then protects that area. By default, the area you select is the area that becomes masked, but you can also select Inverse to apply the mask to everything except the area you selected.
For example, let’s say that you’re working on a photo of balloons. You want to keep their color intact but boost the blues or highlight the clouds in the sky behind them. To do this, you would select and mask the balloons. If, however, you wanted to keep the clear blue sky intact but boost the color in the balloons, you would select the balloons and mask everything except the balloons. Any changes you make to the balloons will not affect the rest of the photo.
New Control Panel Loaded with Features
The new Select & Mask feature also includes its own control panel, which offers you a wide range of options. For instance, once you have selected a certain area, you can click “on black” to place everything you have selected on a black background. This can help you see exactly where your edges are. Conversely, you can click “on white” to put it on a white background. You can then enlarge the image and use your edge-refining tools to create exactly the shape you desire. This is particularly helpful if you are planning on lifting a certain element of an image to use in another project. Edge-refining tools help ensure you are getting exactly the elements of the image you want to lift while leaving behind those you don’t.
For more helpful tips, tools and Photoshop tricks, check out our detailed video tutorials. We have a wide selection of them to help you master your Photoshop skills!
Reviews
New & Popular Tutorials
Training Site in
the World
Tutorials!
Ratings
and Counting
Subscribers


Great overview. Ive struggled with Select and Mark before but was able to follow along and get her cut out really cleanly.
This video was great! It was just the tool I was looking for
I’ve enjoying going through all the basic options that each tool can do in Photoshop. However this is the first one that I’ve come across that isn’t available to me in CS6. I really liked the tutorial about cutting out hair with the select and mask and was hoping that there was a way to do this in a previous version without me having to upgrade. Thank you, I’ve been learning so much.