Course Downloads
How to Use the Sharpen Tool in Photoshop
-
Add to
favorites
-
DifficultyEasy
-
Videos1
-
Software
Description
That photo is so sharp it will cut you!
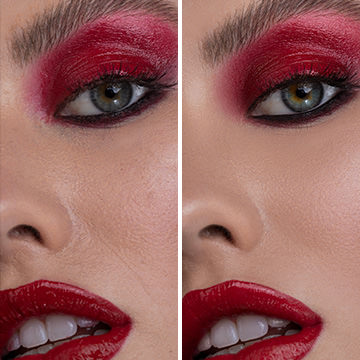
In this tutorial, learn how to sharpen an image using the Sharpen Tool. Especially useful for eyes in a portrait.
THIS COURSE INCLUDES
- 1 Sample Image
Share
What is the Sharpen Tool?
Adobe Photoshop includes a number of useful tools that allow you to accomplish a variety of effects in your images. One of those is the Sharpen tool, which enables you to tighten up a picture and make it clearer by making it sharper. However, when it is used, it’s important that you be careful because overusing it can make your images appear too grainy or noisy. The best way to use this tool is to take care and use a light hand.
Getting the Right Effect
The tool does exactly as its name implies: It sharpens up any image that is blurry or unclear. It helps to improve the contrast of your image by darkening the dark pixels and brightening up lighter ones. As a result, edges are better defined, making the object in the photo pop more and giving it more contrast. When you use this tool, it may make other objects in the image that you did not sharpen appear artistically blurred. Shadows beneath the objects you sharpen may also stand out more, giving off a cooler effect while the objects themselves stand out more.
Help Objects Stand Out
The tool is most commonly used to make a specific object or objects within a photo stand out more. Sometimes, the object you want to sharpen is a part of a person’s face in a portrait-style image. If the eyes seem a bit too soft, you would be able to use the tool to select the eyes and sharpen them. You can even play around with underlying layers of colors in the object to be sharpened.
Unlock Pressure-Sensitive Sharpening
With newer versions of Adobe Photoshop, this tool offers enhanced features. One of those is known as “Protect Detail.” This is a feature that allows the user to rely on pressure-sensitive sharpening with a brush-like touch without introducing additional negative artifacts into the photo. In other words, in previous versions of Photoshop, it was possible to have your sharpened image come out lower-quality thanks to the changes made by the effect. Thankfully, this doesn’t happen in CS5 and newer versions.
Sharpen Wisely
This tool is excellent for simply sharpening an object or feature within a photo where it is blurry or unclear. It’s also great when you want to create an added focus on a particular object. For example, if you took a picture of a flower while outdoors but it came out a bit blurred, the tool would work well to sharpen it and make it more focal to the image. However, if the focus of your image is already sharp and vibrant, it would not be a good idea to use the tool because it would just distort it. Also, if you sharpen it too much, it can take away from the quality of the picture.
If you want more helpful hints and tricks for using the Sharpen tool, check out our video.
Reviews
There are no reviews yet.
New & Popular Tutorials
Training Site in
the World
Tutorials!
Ratings
and Counting
Subscribers


