

description
A convincing tattoo removal is three jobs, not one. This tutorial roughs the tattoo out with the Spot Healing Brush in Content-Aware mode, smooths the blotchy result with a low-flow brush sampled separately from the highlight, midtone and shadow of the arm, then rebuilds real skin grain from a 50% gray Overlay layer using noise, blur and emboss.
Enjoying This Free Tutorial?
We publish a new free tutorial every week, each one with sample images and PSDs you can download and follow along with. Sign up and they land straight in your inbox, along with early word on sales, events and subscriber-only offers.
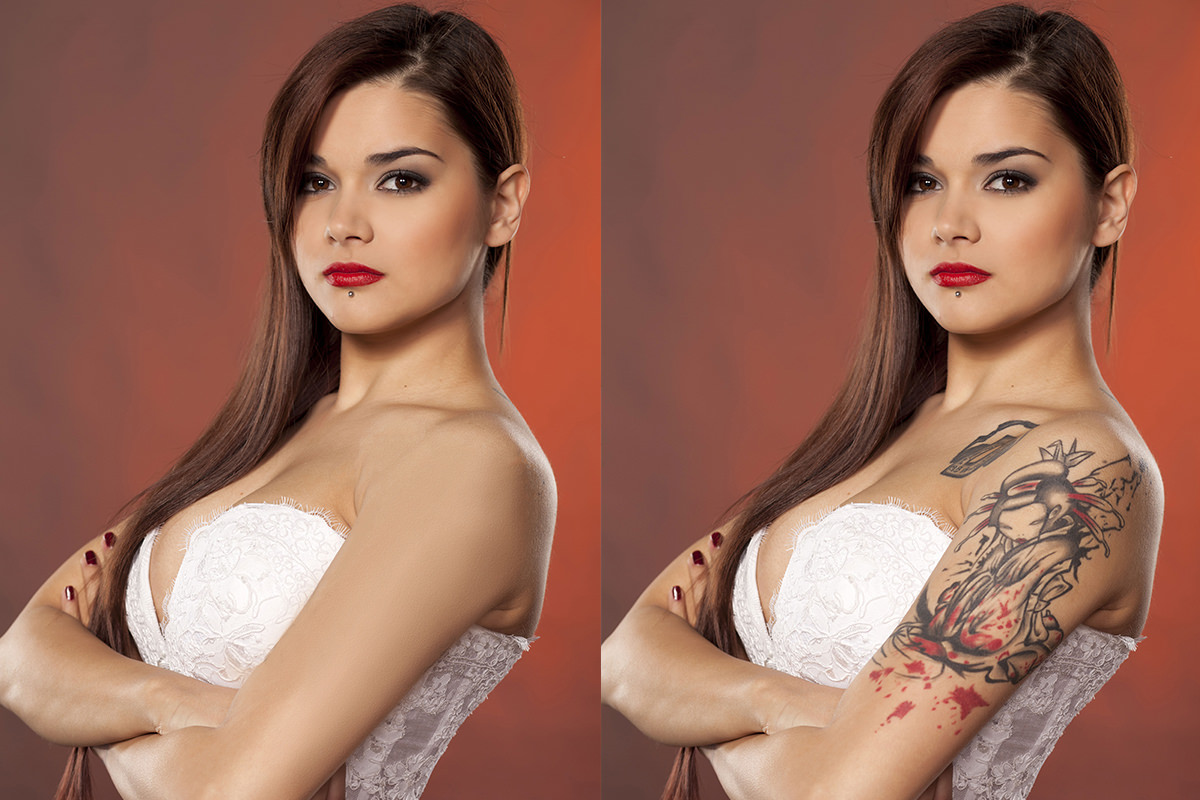
Removing a tattoo in Photoshop takes three distinct stages, a rough removal, a skin-smoothing pass, and rebuilding realistic skin texture from scratch, in order to end up with a genuinely convincing result. This tutorial covers using the Spot Healing Brush’s Content-Aware mode for the initial removal, sampling and painting with a low-flow brush to smooth the skin, and building custom skin texture with a 50% gray layer, noise, blur, and emboss to finish the repair.
Roughly Removing the Tattoo With the Spot Healing Brush Tool
The Spot Healing Brush Tool’s Content-Aware setting analyzes the surrounding skin and predicts what should replace the tattoo, without needing to manually sample a source area.
-
Create a New Layer
Add a new layer to work on, keeping the original image intact beneath it.
-
Select the Spot Healing Brush Tool
Select the Spot Healing Brush Tool, keep its Mode on Normal and set its Type to Content-Aware.
-
Enable Sample All Layers
Check Sample All Layers so the tool can pull information from the layers beneath the new empty layer.
-
Paint Directly Over the Tattoo
Paint directly over the tattoo, surrounding it with enough nearby skin so the tool understands what to remove.
Why Content-Aware Mode Matters for the Spot Healing Brush
Without Content-Aware mode, the Spot Healing Brush relies on simpler pattern matching that struggles with a large, irregular area like a big tattoo. Content-Aware mode instead analyzes the surrounding skin and other similar areas of the image to intelligently predict what should fill the space, which is what makes it capable of tackling a tattoo this large in the first place.
Working in Sections to Let the Tool Find Its Way
Painting over a large tattoo in smaller sections, rather than one continuous stroke, gives the Spot Healing Brush a better chance of finding a good match for each area.
-
Break the Tattoo Into Smaller Sections
Work through the tattoo in smaller sections rather than trying to remove all of it in a single pass.
-
Repaint Sections That Don’t Look Right
Repaint over any section that still looks blotchy or doesn’t blend well, since the tool often needs a second or third pass to find a good result.
Smoothing Skin by Sampling and Painting With a Low-Flow Brush
A large, soft brush set to a low flow, sampled directly from nearby skin, gradually smooths out the blotchy result left by the rough removal.
-
Create Another New Layer
Add a new layer to build up the skin-smoothing work separately from the rough removal.
-
Choose a Large, Soft Brush
Select the Brush tool with a low hardness, such as zero, and a size roughly matching the area to be smoothed.
-
Lower the Brush’s Flow
Reduce the brush’s flow to around 20% so color builds up gradually rather than all at once.
-
Sample and Paint Over the Blotchy Area
Hold Alt/Option to sample a nearby clean area of skin, then paint over the blotchy result to smooth it out.
Why Low Flow Beats Full-Strength Painting for Skin Smoothing
Painting at full strength lays down color all at once, which can quickly look flat, opaque, and obviously painted over rather than like real skin. A low flow setting instead builds up color gradually with repeated strokes, giving much finer control over how much coverage gets applied and keeping the result looking more like a subtle blend than a solid patch.
Following the Arm’s Natural Highlights, Midtones, and Shadows
Sampling color separately from the highlight, midtone, and shadow areas of the surrounding skin, and following the arm’s natural curve, keeps the smoothed result from looking flat.
-
Identify the Highlight, Midtone, and Shadow Areas
Look at the surrounding skin to identify where the highlight runs along the arm, where the midtone color sits, and where shadow naturally falls.
-
Sample and Paint Each Tonal Area Separately
Sample and paint the highlight, midtone, and shadow areas separately, following the natural curve of the arm rather than applying one flat color everywhere.
Creating a 50% Gray Overlay Layer as a Texture Base
A layer filled with 50% gray and set to Overlay blend mode becomes invisible on its own, providing a neutral base that only reveals whatever lighter or darker detail gets added to it.
-
Select the Area for New Skin Texture
Create a new layer and use the Marquee tool to select the area where texture needs to be rebuilt.
-
Fill the Selection With 50% Gray
Go to Edit > Fill and choose 50% Gray as the fill content.
-
Change the Blend Mode to Overlay
Change the layer’s blend mode from Normal to Overlay, which makes the 50% gray disappear while anything lighter or darker remains visible.
Why 50% Gray Is the Right Base for Overlay Texture
In Overlay blend mode, exactly 50% gray has no effect at all, neither lightening nor darkening the layers beneath it. Starting from that specific neutral value means only the noise, blur, and emboss added on top of it will show through, which is what makes 50% gray the correct base for building texture that adds detail without shifting the underlying color.
Adding and Refining Noise for a Speckled Base
Add Noise scattered across the gray Overlay layer creates the raw speckled texture that later steps will shape into something resembling skin.
-
Apply Add Noise
Go to Filter > Noise > Add Noise on the gray Overlay layer.
-
Choose Monochromatic and Uniform Noise
Check Monochromatic to remove color from the noise and choose Uniform distribution for a natural-looking speckle pattern.
-
Adjust the Noise Amount
Adjust the noise amount until the speckling looks like a reasonable starting point, then scale the layer up if the texture needs to be larger.
Blurring and Embossing the Noise Into Skin Texture
A small Gaussian Blur followed by the Emboss filter turns flat, speckled noise into something with the subtle bumps and grain of real skin.
-
Apply a Small Gaussian Blur
Go to Filter > Blur > Gaussian Blur and apply a very small amount, such as around one pixel, to soften the raw noise.
-
Apply the Emboss Filter
Go to Filter > Stylize > Emboss, adjusting the amount and height until the result looks like a natural, subtle skin texture rather than something too dramatic.
Masking the Texture to Just the Repaired Area
A black layer mask, painted white only over the previously repaired skin, restricts the newly built texture to exactly the area that needs it.
-
Add a Black Layer Mask
Hold Alt/Option and click the layer mask button to hide the texture layer entirely.
-
Paint White Over the Repaired Area
Paint white on the mask directly over the area where the tattoo was removed and the skin was smoothed.
-
Adjust Opacity if Needed
Lower the texture layer’s opacity if the added texture looks too strong compared to the surrounding skin.
Why This Approach Works
Starting with the Spot Healing Brush’s Content-Aware mode gets most of the way to removing a tattoo quickly, but treating that result as a rough draft rather than a finished product is what keeps the follow-up smoothing and texture steps from being skipped. Sampling color from the highlight, midtone, and shadow areas separately, instead of painting one flat tone, is what keeps a smoothed limb looking three-dimensional rather than flat. Building custom texture from a 50% gray Overlay layer, rather than leaving the smoothed skin bare, is what restores the natural grain a flat brush stroke would otherwise leave missing.
Final Thoughts
Removing something as large and detailed as a tattoo takes real layered work, rough removal, smoothing, then rebuilding texture, but none of the individual steps are especially difficult on their own. The same three-stage approach, healing, smoothing, and texture rebuilding, works for removing any large mark or blemish from skin, not just a tattoo.
Quick Reference: Keys, Menus and Settings
- Rough removalSpot Healing Brush on a new layer: Mode Normal, Type Content-Aware, Sample All Layers checked
- Smooth the skinBrush tool, Hardness 0, Flow about 20%; Alt/Option-click to sample nearby skin
- Gray baseNew layer, Marquee selection, Edit > Fill: 50% Gray, blend mode Overlay
- NoiseFilter > Noise > Add Noise: Monochromatic, Uniform; Cmd/Ctrl + T to scale the grain up
- SoftenFilter > Blur > Gaussian Blur, about 1 pixel
- Skin textureFilter > Stylize > Emboss, Amount and Height until it looks natural
- Place the textureBlack layer mask, paint white over the repair; lower the layer opacity if needed
No AI, no generative credits.
Tattoo Removal: Common Questions
Which Spot Healing Brush settings remove a tattoo?
Set Mode to Normal and Type to Content-Aware, and check Sample All Layers so the tool works on a new, empty layer. There is no source to sample with Alt/Option; you just paint over the tattoo.
Why does the skin look blotchy after the Spot Healing Brush?
That is expected. The tool gets the ink off quickly but leaves uneven skin, which the next step smooths with a low-flow brush. Painting over a rough section again often gives a better result.
Should I paint over the whole tattoo at once?
Work in smaller sections and include some surrounding skin in each stroke, so the tool knows to keep the skin and remove the ink. If it pulls from something else, like the dress, paint that spot again.
What brush settings smooth the skin?
A soft brush with Hardness at 0, about as large as the area you are painting (519 pixels in the video), and Flow around 20%. On a new layer, hold Alt/Option to sample nearby skin, then paint over the blotchy area.
Why does my smoothed arm look flat?
One color everywhere flattens it. Sample the highlight, midtone and shadow areas separately and paint each along the curve of the arm, then zoom out to check that it still looks round.
Why fill the texture layer with 50% gray?
In Overlay blend mode, 50% gray is invisible and only lighter or darker detail shows. That makes it a neutral base for the noise and emboss that become the skin texture.
Which filters build the skin texture?
Filter > Noise > Add Noise with Monochromatic and Uniform, then Filter > Blur > Gaussian Blur at about 1 pixel, then Filter > Stylize > Emboss. Set the Emboss Amount and Height until it looks like natural skin.
How do I put the texture only where the tattoo was?
Add a black layer mask so the texture layer is hidden, then paint white on the mask over the repaired skin. Lower the layer’s opacity if the texture looks too strong.
Master Photoshop, Lightroom and Photography
Join PHLEARN PRO for $12.99 a month or $99.99 a year. Cancel anytime, with a 100% money-back guarantee.





