

Download Assets
This tutorial includes 1 sample image and 1 sample PSD. Downloads are free with a PHLEARN account.
- Download the sample images and PSDs from every free tutorial on PHLEARN
- New free tutorials published every week
- One free account — sign up once, then download anything
description
Adobe’s new one-click blemish removal tool inside Camera Raw finds and removes skin blemishes in seconds, right inside Photoshop’s Camera Raw Filter. This tutorial covers setting up a Smart Object for non-destructive editing, using the Fade slider to control how much of a mark disappears, refining the automatic pass with Restore and Remove, and cleaning up wrinkled clothing with the same Remove tool. No plugins required, and the AI-powered removal doesn’t use any generative credits.
Enjoying This Free Tutorial?
We publish a new free tutorial every week, each one with sample images and PSDs you can download and follow along with. Sign up and they land straight in your inbox, along with early word on sales, events and subscriber-only offers.
Image Source
Photo by ohlamour studio via Unsplash


Adobe Just Made Blemish Retouching a One-Click Job Inside Camera Raw
Adobe just added a one-click blemish removal tool to Camera Raw’s Remove panel, and it changes how much of a portrait retouch you can finish without ever opening a separate healing or cloning tool. Click one button and it finds and removes skin blemishes across the whole frame in about three seconds.
What makes it worth learning isn’t the click itself. It’s everything built around that click: a Fade slider that lets you decide how much of a mark should actually disappear, a Refine mode that catches what the automatic pass missed, and the same underlying Remove tool doing manual work on wrinkled fabric a few seconds later. All of it lives inside Camera Raw Filter, which means it stays fully editable for as long as you keep the file as a Smart Object.
No plugins, no separate app. This tool uses AI, but it doesn’t cost generative credits — it’s included as long as you have access to Camera Raw. Everything below uses standard Photoshop and Camera Raw tools.
What the New Blemish Removal Tool Actually Does
It lives inside Camera Raw’s Remove panel
The tool isn’t a new standalone panel — it’s a new option inside Distraction Removal, the section of Camera Raw’s Remove tool that already handles things like reflections and people in the background. Blemishes is the newest addition alongside those, and it works the same way: check a box, and Camera Raw finds the relevant areas across your whole image on its own, no selection or brush work required.
It’s a natural extension of Camera Raw’s other AI clean-up tools
This is the same automatic-detection approach behind Camera Raw’s other AI distraction removal for portraits, its dedicated tool to remove reflections from faces, and the latest update to the Remove tool itself. Blemishes simply extends that same one-click logic to skin.
Set Up Your File First
-
Convert your layer to a Smart Object.
Select your background layer, then go to Filter > Convert for Smart Filters. This is the step that makes everything that follows non-destructive — if you skip it, Camera Raw Filter still works, but you lose the ability to reopen and adjust it later. If Smart Objects are new to you, the How to Use Smart Objects in Photoshop covers exactly why this matters.
-
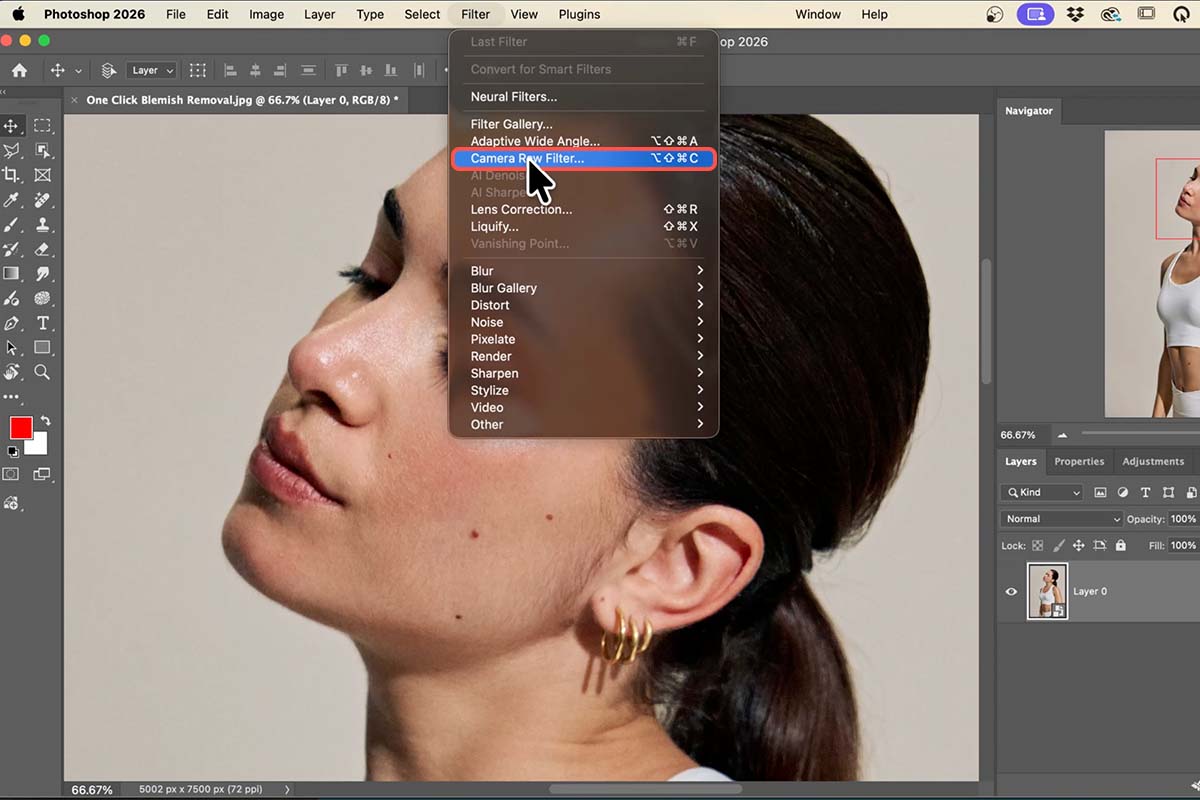
Open Camera Raw Filter.
With your Smart Object selected, go to Filter > Camera Raw Filter. Because you’re working on a Smart Object, this filter is added to your Layers panel and can be reopened and re-edited at any time.
-
Zoom in on your subject.
Blemish removal is easiest to judge up close. Zoom into the face and any exposed skin before you touch a single control.
-
Open the Remove tool and find Distraction Removal.
On the right side of the Camera Raw dialog, click the Remove tool icon, then scroll down to the Distraction Removal section. You’ll see Reflections and People above it, and Blemishes below them.
One-Click Removal, and the Fade Slider That Makes It Usable
The click itself is almost an anticlimax — the control that actually matters shows up right after.
-
Click Blemishes, then check Apply.
Camera Raw scans the frame and marks every blemish it finds. Nothing else has changed yet — checking Apply is what commits the removal.
-
Watch what happens in about three seconds.
The skin blemishes across the frame are gone. This is the whole one-click part of the process, and it’s genuinely that fast.
-
Bring some of it back with the Fade slider.
Fade runs from 0 to 100 and controls how visible the removed marks are, not whether they’re removed. This matters because retouching deals with two different kinds of marks: something like a temporary pimple that won’t be there in a month, and something permanent — a mole, a freckle pattern — that’s simply part of how the person looks. Removing a permanent mark at 100% can read as erasing an identifying feature rather than cleaning up a photo, so unless a client specifically asks for full removal, dialing Fade back to somewhere in the middle is usually the better call.

Refine, Restore, and the Manual Remove Tool
The automatic pass is good, but it isn’t the whole job. The Refine button is where you take back control over exactly what stays and what goes.
-
Click Refine, inside the Blemishes panel.
Camera Raw highlights everything it identified as a blemish across the image — often more than you’d have spotted manually, including small highlights or marks on the subject’s shoulder or chest, not just the face.
-
Use Restore to keep marks you don’t want removed.
Hold the spacebar to reposition your view, then paint with Restore over anything you want left alone — marks that are simply part of the subject’s face and aren’t going anywhere.
-
Use Remove for anything the automatic pass missed.
Switch to Remove and click directly on any spot Camera Raw didn’t catch the first time. A few clicks typically covers it.
-
Click Apply to commit, and toggle the effect off and on to check your work.
The eye icon next to Blemishes toggles the whole effect. Flipping it off and back on for a second is the fastest way to confirm you’ve actually improved the image rather than just changed it.

Cleaning Up Clothing With the Same Remove Tool
Retouching isn’t only about faces. Bunched fabric, creases and stray seams do as much to make a photo look unfinished as skin ever does, and the same Remove tool handles all of it — this time with Generative AI doing the work instead of Distraction Removal’s automatic detection.
-
Switch to the Remove tool and enable Use Generative AI.
Still in the same Camera Raw session, select the general Remove tool and check Use Generative AI in its options.
-
Adjust your brush size with the bracket keys.
Use the open and close bracket keys to size your brush up or down as you move across different areas of clothing.
-
Paint over wrinkles, creases and seams, then click Remove.
Paint over a bunched strap, a crease in fabric, or a seam you don’t want visible, then hit Remove. It reads the surrounding texture and rebuilds that area convincingly — and you can paint over several separate spots and remove them all in a single click.
-
Toggle visibility to check the difference.
The same eye-icon toggle works here. On fabric especially, the before-and-after is often more dramatic than the skin work.

What Trips People Up
You can’t find your edit afterward in the Layers panel
That’s expected. Because you converted your layer to a Smart Object before opening Camera Raw Filter, the entire retouch — blemishes, fade amount, refine choices, clothing clean-up — is stored as one editable Smart Filter, not as pixels. Double-click Camera Raw Filter under your Smart Object at any time to reopen everything exactly as you left it.
You applied it and now want a mark back
Reopen Camera Raw Filter, open the Blemishes panel, click Refine, and paint over the area with Restore. Nothing is permanent as long as you’re working on a Smart Object.
You want to adjust just your most recent clothing fix
The Remove tool carries its own opacity slider for the most recent removal, separate from the Fade slider used for blemishes. If a clothing fix looks slightly too aggressive, easing back that opacity is often faster than repainting it.
Refine is finding things you didn’t expect
It’s normal for Refine to flag areas beyond the face — a bright highlight, a mark on the shoulder or chest. Treat every highlighted area as a suggestion, not a command: Restore what should stay, and only let Remove take the rest.
When to Use It, and When Not To
Use it when you want a fast first retouching pass on a portrait without leaving Photoshop for a separate plugin or app — one click handles most of the skin, and the same tool handles clothing seconds later.
Use it when you need to stay flexible for client feedback. Because the whole retouch lives in a Smart Filter, you can turn it off, dial the Fade slider up or down, or restore specific marks after the fact without starting over.
Use it as one step in a broader pass rather than the whole job — it pairs naturally with the rest of a clean-up and polish workflow once the obvious blemishes are handled.
Don’t expect it to replace a full manual retouching pass on high-end beauty or editorial work. It’s built for speed and consistency, not for the level of texture control you get from frequency separation or dodge-and-burn skin work. And it only touches blemishes — color correction, dodging and burning, and compositing are still separate steps in your workflow.
More Free Photoshop Tutorials
- How to Use the Remove Tool in Photoshop
- How to Isolate Subjects and Clean Up Edges in Photoshop
- How to Use Frequency Separation in Photoshop
- Essential Keyboard Shortcuts for Retouching in Photoshop
Download the Practice Files
Grab the sample image and the finished PSD and follow along. Everything in this tutorial uses standard Photoshop and Camera Raw tools — no plugins, and the AI-powered removal doesn’t use any generative credits.
New Free Tutorials View All »












Enjoying This Free Tutorial? Go Further with PRO.
Unlock Full Sample Files, PSDs, and Hundreds of Masterclasses!

Download full project assets, original PSDs, and RAW images for every lesson
Unlimited access to our complete library of PRO Photoshop & Lightroom courses
Instant 4K Ultra HD streaming on all devices, anytime, anywhere
Full access to our entire library of Photoshop Actions, Presets, and LUTs
Flexible monthly and annual membership plans
Cancel anytime with zero hassle or commitments