
Download Assets
This tutorial includes sample images. Downloads are free with a PHLEARN account.
- Download the sample images and PSDs from every free tutorial on PHLEARN
- New free tutorials published every week
- One free account — sign up once, then download anything
description
A raw photo opened in Photoshop always passes through Adobe Camera Raw first, and how that handoff is configured decides whether you keep an editable, non-destructive raw file or end up with a flattened conversion you can never take back. This tutorial covers the settings that actually matter: the Workflow Options link hiding at the bottom of the dialog, choosing ProPhoto RGB and 16-bit, opening as a Smart Object, and getting back into Camera Raw whenever you want.
Enjoying This Free Tutorial?
We publish a new free tutorial every week, each one with sample images and PSDs you can download and follow along with. Sign up and they land straight in your inbox, along with early word on sales, events and subscriber-only offers.
How to Edit Raw Images in Photoshop
A raw photo brought into Photoshop always passes through Adobe Camera Raw first, Adobe’s built-in raw-processing software, and setting that workflow up correctly is the difference between an editable, non-destructive raw file and a flattened, converted image that can never go back to its original raw data. This tutorial covers the exact settings that matter, and shows how to jump back into the original raw file at any point, even after retouching has already started in Photoshop.
Open a Raw File Through Adobe Camera Raw
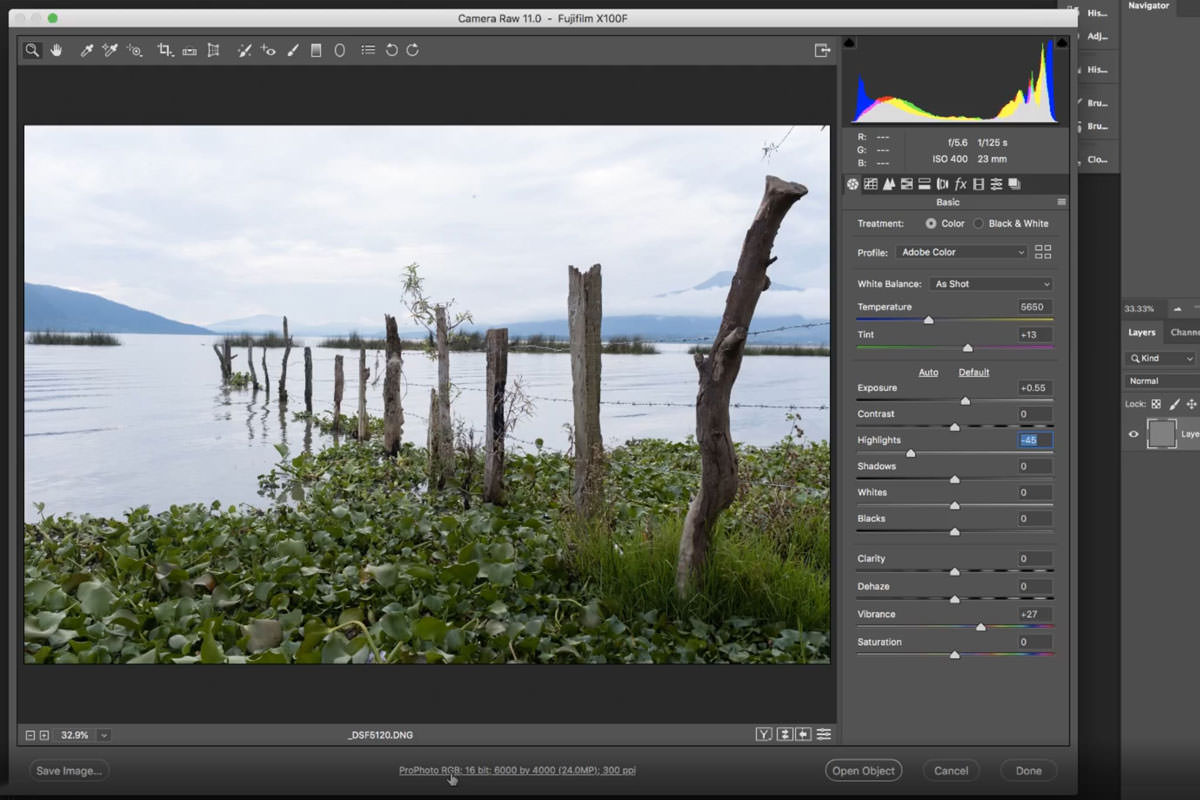
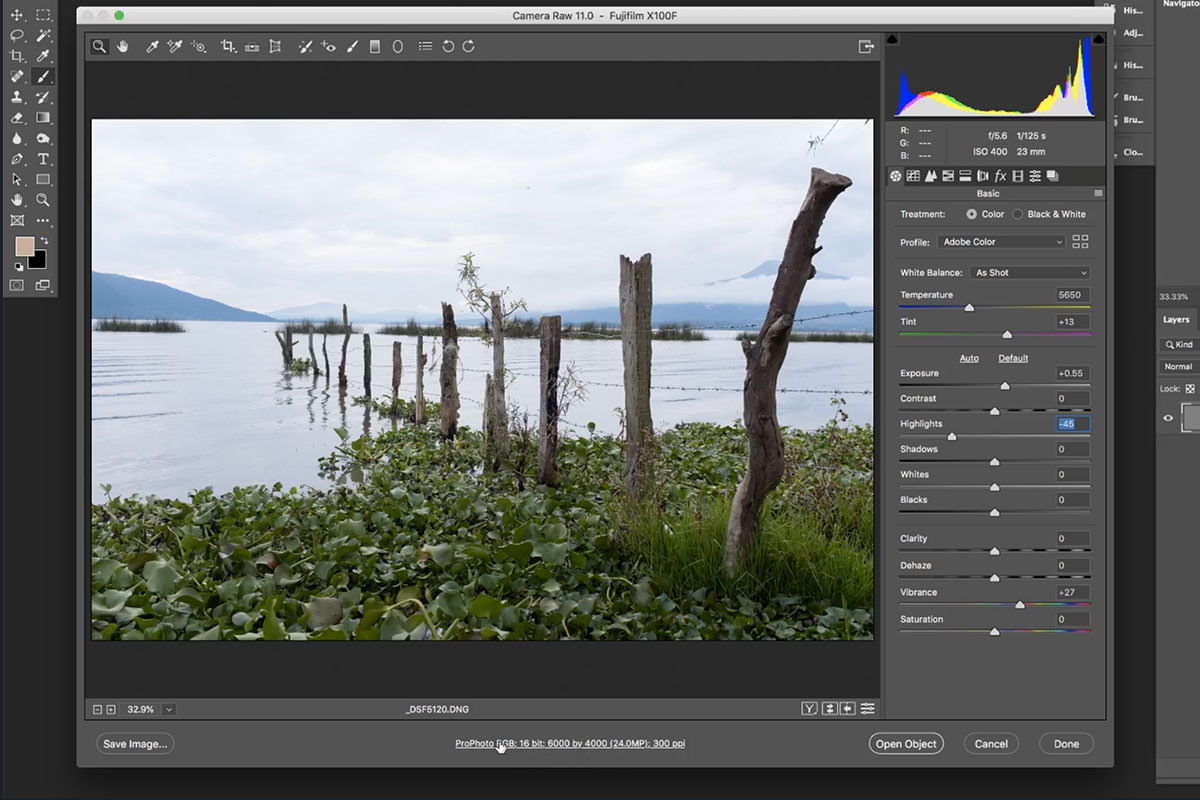
File > Open, choosing a raw image file, brings up the Adobe Camera Raw dialog automatically, showing the specific version of Camera Raw in use along with the camera model the shot was taken with. Bringing a raw file directly into Photoshop this way, rather than routing it through Lightroom first, keeps the workflow a little less destructive, since both programs use the same underlying Camera Raw engine but Photoshop’s direct route offers more control over exactly how the file gets converted.
Make Basic Adjustments Before Opening in Photoshop
Right inside the Camera Raw dialog, before the image ever reaches Photoshop, Lens Corrections can enable Profile Corrections to remove distortion and vignetting, Exposure can be raised to brighten the shot, Vibrance can be bumped up for more color, and Highlights can be pulled down to recover detail lost from a brighter exposure. All of this happens on the raw data itself, which is a genuinely different and more flexible starting point than making the same adjustments later inside Photoshop.
Check the Workflow Options Link at the Bottom of the Dialog
A small string of text near the bottom of the Camera Raw dialog, easy to miss and easy to assume isn’t clickable, actually opens the Workflow Options dialog, which controls exactly how the image converts once it moves into Photoshop.
Why This Small Link Is the Most Important Part of the Dialog
Everything covered in the rest of this tutorial, color space, bit depth, and smart object conversion, lives inside this one easy-to-overlook Workflow Options link, which is exactly why it deserves special attention: skipping past it means accepting Photoshop’s defaults, which aren’t set up for a properly non-destructive raw workflow.
Choose ProPhoto RGB and 16-Bit for Maximum Information
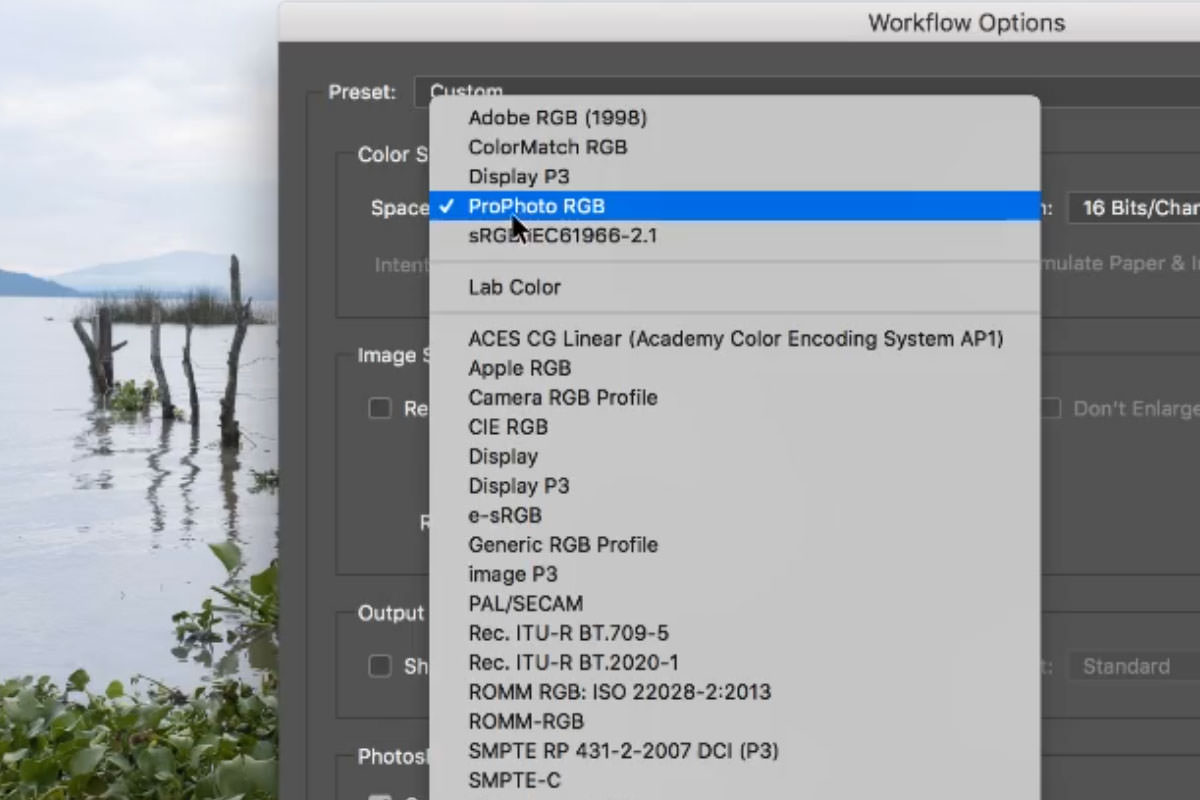
Inside Workflow Options, Color Space should be set to ProPhoto RGB, the largest available color space, giving the most color information to work with once inside Photoshop, and Depth should be set to 16 Bits/Channel, the largest available bit depth, for the same reason: more information to work with means more flexibility during editing.
Always Open as a Smart Object
At the bottom of Workflow Options, the Photoshop section has an option to open the image as a smart object, and it’s unfortunately unchecked by default. Checking this box is essential: it’s what makes it possible to return to the original raw data and its Camera Raw adjustments at any later point, rather than converting the raw file into a fixed, ordinary Photoshop layer with no way back.
Open Object vs Open Image
With Smart Object checked, the button at the bottom of the dialog reads Open Object rather than Open Image, a simple visual confirmation that the settings are correct before clicking it.
Confirm the Embedded Profile and Bit Depth in Photoshop
Photoshop may prompt that the image’s embedded color profile doesn’t match the current working space; choosing to use the embedded profile of the image, rather than converting to the working space, keeps the ProPhoto RGB assignment from Camera Raw intact. Once the image is open, Image > Mode confirms the file is in 16-Bit, and Edit > Convert to Profile (without actually converting anything) confirms the color profile really is ProPhoto RGB as expected. A useful workflow like Photoshop or Lightroom set up this way opens the door to more advanced non-destructive techniques, like luminosity masking, further down the line.
Return to Camera Raw by Double-Clicking the Smart Object Thumbnail
Double-clicking the smart object’s thumbnail in the Layers panel reopens the exact same Adobe Camera Raw dialog used originally, with every prior adjustment still intact and available to change. This is the entire payoff of checking Smart Object earlier: a decision made in Camera Raw, like white balance, isn’t locked in permanently the moment the image opens in Photoshop.
Fix White Balance and Exposure Issues Non-Destructively
If a photo’s white balance turns out to be off, set to something like Tungsten by accident, the right fix isn’t trying to color-correct it after the fact inside Photoshop, since that approach fights against an incorrect starting point rather than fixing it. Double-clicking back into Camera Raw and choosing the correct white balance setting there, then clicking OK, converts the image back into Photoshop with the color temperature genuinely corrected at the source.
Recovering Sky Detail with Highlights and Vibrance
The same double-click-to-reopen workflow works for any other raw adjustment: pulling Highlights down further can darken and recover more detail in a blown-out sky, and raising Vibrance a touch afterward can bring back some of the color that got lost in the process, all without ever leaving the non-destructive smart object round trip between Photoshop and Camera Raw.
Finish Retouching in Photoshop and Save as PSD
Once the raw adjustments are dialed in, ordinary Photoshop retouching continues on top as normal.
Cleaning Up Small Distractions with the Spot Healing Brush
Creating a new layer and using the Spot Healing Brush to remove a small distraction, like a bird or a speck of dust caught mid-flight in the shot, works exactly the same way it would on any other image. Saving the finished file as a PSD preserves the smart object and its underlying raw data permanently, meaning the Camera Raw adjustments stay reachable and editable even after the file is closed and reopened later.
More Free Photoshop Tutorials
- Select Subject and Refine Edges in Photoshop
- Three Ways to Use Blend If
- Curves vs Levels: Learn the Difference
Why the Smart Object Checkbox Changes Everything
Every technique in this tutorial, recovering highlights, fixing white balance, adjusting vibrance, hinges entirely on one small, easy-to-miss checkbox: opening a raw file as a smart object rather than a flattened image. Without it, every one of those Camera Raw adjustments becomes permanent the instant the file opens in Photoshop, and any later change means fighting against already-baked-in decisions rather than simply reopening the original raw data and adjusting it directly.
Final Thoughts
A proper raw workflow in Photoshop comes down to three settings buried inside one easy-to-overlook Workflow Options dialog: the largest available color space, the highest available bit depth, and, most importantly, opening the file as a smart object. Getting those three things right up front means never being locked into an early raw decision, since Camera Raw stays just a double-click away for as long as the file exists.
New Free Tutorials View All »











Enjoying This Free Tutorial? Go Further with PRO.
Unlock Full Sample Files, PSDs, and Hundreds of Masterclasses!

Download full project assets, original PSDs, and RAW images for every lesson
Unlimited access to our complete library of PRO Photoshop & Lightroom courses
Instant 4K Ultra HD streaming on all devices, anytime, anywhere
Full access to our entire library of Photoshop Actions, Presets, and LUTs
Flexible monthly and annual membership plans
Cancel anytime with zero hassle or commitments