


description
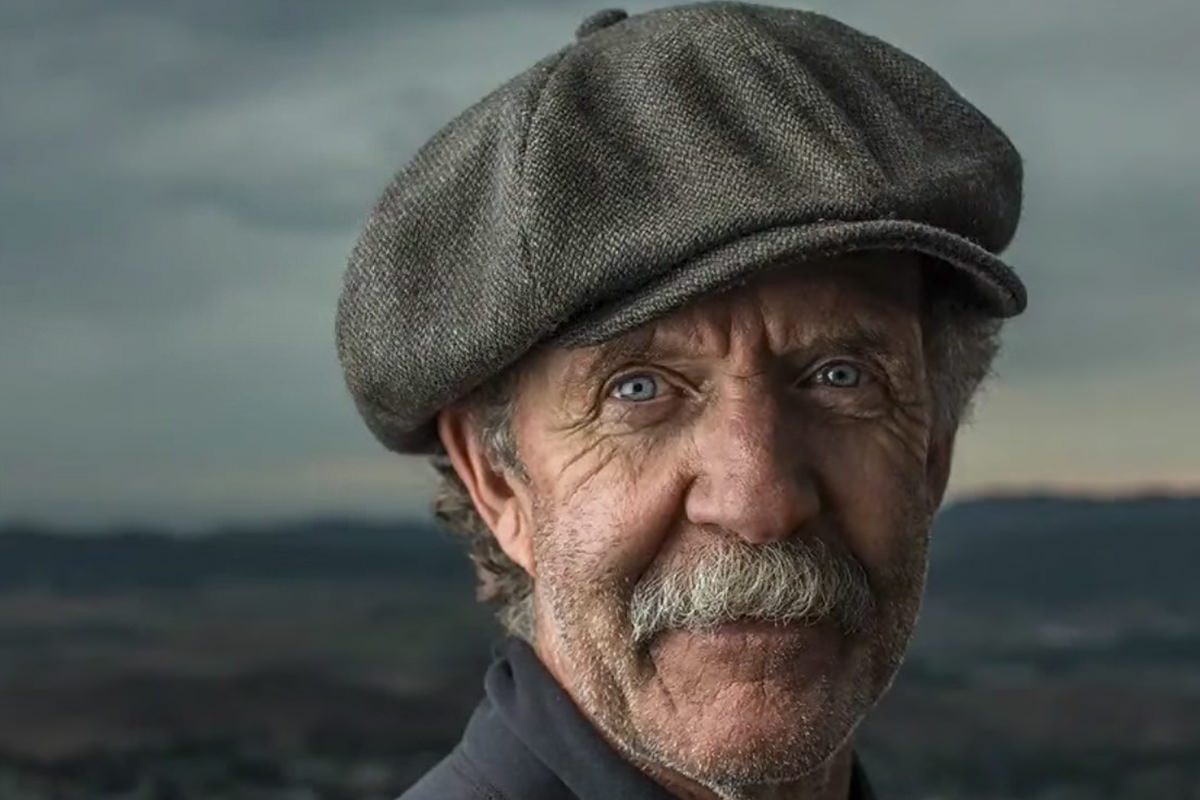
Learn how to correct red skin color in Photoshop quickly, using one Hue/Saturation layer and no masking at all. The trick is getting the color range right: switch to Reds, crank saturation temporarily so the affected pixels are impossible to miss, then narrow and slide the range until only the nose, cheeks, and under-eye areas light up. Reset saturation, push Hue to the right, and the redness becomes a natural skin tone.
Enjoying This Free Tutorial?
We publish a new free tutorial every week, each one with sample images and PSDs you can download and follow along with. Sign up and they land straight in your inbox, along with early word on sales, events and subscriber-only offers.
How to Correct Red Skin Color in Photoshop Quickly
Redness in a portrait’s cheeks, nose, or under the eyes is one of the most common small distractions in an otherwise great photo. This tutorial uses a single Hue/Saturation adjustment layer to isolate that exact red tone and shift it toward a natural skin tone in seconds, without any masking or painting required.
Identifying Where Redness Shows Up
Redness tends to concentrate in specific, predictable areas of a portrait, which makes it worth checking before assuming a fix is even needed.
-
Check the Common Trouble Spots
Look closely at the cheeks, the front and sides of the nose, and the skin around and under the eyes, since these are the areas redness shows up in most portraits.
-
Confirm the Redness Is Worth Correcting
Judge whether the redness is subtle enough to just need a quick correction, rather than a larger retouching pass, before starting.
Adding a Hue/Saturation Adjustment Layer
A Hue/Saturation adjustment layer is the starting point for the fix, but adjusting it globally would affect the whole image rather than just the problem areas.
-
Add a Hue/Saturation Adjustment Layer
Add a Hue/Saturation adjustment layer above the image.
-
Avoid Adjusting the Master Channel
Notice that dragging the Hue slider while the channel is set to Master shifts color across the entire picture, which is not what’s needed here, then undo that change.
Starting From the Reds Channel
Switching the adjustment layer’s channel to Reds narrows things down, but it still isn’t precise enough on its own to isolate just the problem tone.
-
Switch the Channel Dropdown to Reds
Change the channel dropdown from Master to Reds to start narrowing the adjustment to red tones specifically.
-
Recognize the Limits of the Reds Preset
Understand that the Reds preset affects all reds broadly, while the actual problem is one specific red tone rather than every red in the image.
Making the Affected Range Visible With Saturation
Temporarily pushing saturation to an extreme makes it obvious exactly which parts of the image the current range is affecting.
-
Raise Saturation to an Extreme Temporarily
Push the Saturation slider very high so every area currently included in the Reds range becomes obviously, exaggeratedly visible.
Why Cranking Saturation Temporarily Helps Find the Range
At a normal saturation level, it’s hard to tell exactly which pixels a given hue range is including. Pushing saturation to an extreme turns that invisible range into an obvious, exaggerated preview, making it much easier to judge and adjust before dialing the saturation back down.
Narrowing the Range to the Exact Red Tone
The range sliders beneath the color bar can be dragged inward and feathered to shrink the affected area down to just the specific tone in the nose and cheeks.
-
Shrink the Range Sliders
Drag the range sliders inward to narrow the width of the color range being affected, rather than leaving it as wide as the full Reds preset.
-
Adjust the Feathering at Each End
Drag the small triangular handles at each end of the range to control how gradually the effect fades in and out at the edges of the range.
Why Narrowing the Range Beats Using the Full Reds Preset
The full Reds preset includes tones found throughout the face, not just the specific problem area in the nose and cheeks. Narrowing the range down to just that one tone means the correction only touches the actual redness, leaving every other red-adjacent tone in the portrait untouched.
Fine-Tuning the Range’s Position
Clicking and dragging the middle of the narrowed range left or right slides the whole selection across different red tones until it lands exactly on the problem area.
-
Drag the Middle of the Range
Click directly in the middle of the narrowed range and drag it left or right to slide which specific tones are included.
-
Watch Which Areas Light Up
Notice how dragging the range toward one side lights up areas like the mustache, while dragging it toward the other side lights up nothing, helping locate the exact tone that matches the nose.
-
Settle the Range on the Nose Tone
Stop once the range lands on the position where only the actual problem areas, like the nose, eyes, and ears, become highlighted.
Resetting Saturation Back to Zero
Once the range is dialed in correctly, the exaggerated saturation used for previewing needs to come back down before making the actual color correction.
-
Return Saturation to Zero
Select the Saturation value and set it back to zero now that the range has been confirmed.
Shifting Hue Toward a Natural Skin Tone
Nudging the Hue slider within this narrowed, correctly positioned range converts the redness into a more natural yellow-toned skin color instead.
-
Push the Hue Slider to the Right
Drag the Hue slider to the right, watching the highlighted red areas shift toward yellow rather than green or magenta.
-
Settle on a Value Around Plus 24
Stop at around plus 24 (the video tries about plus 26 first), adjusting further depending on how strong the original redness was.
-
Toggle the Layer to Compare Before and After
Turn the adjustment layer off and on to compare the corrected skin tone against the original redness.
Why Shifting Hue Works Better Than Just Reducing Saturation
Simply lowering saturation on the red range would just make the redness grayer rather than turning it into a believable skin tone. Shifting the hue instead converts that same red into a warmer yellow tone, which is much closer to how healthy skin actually looks, so the fix reads as corrected skin rather than desaturated redness.
Why This Approach Works
Starting from the Reds channel and then narrowing the range down further is what makes it possible to target one specific problem tone instead of affecting every red area in the portrait. Temporarily pushing saturation to an extreme turns an otherwise invisible range into something clearly visible, which is what makes it possible to position that range accurately in the first place. Shifting hue rather than desaturating is what turns the correction into a believable skin tone instead of a grayed-out patch.
Final Thoughts
This entire fix comes down to one adjustment layer and a handful of slider drags, with no layer masks or manual painting required. Because it works by isolating a color range rather than a specific area of the image, the same targeted Hue/Saturation approach applies just as well to any other portrait with the same kind of localized redness.
Quick Reference: Menus and Settings
- Add the layerAdjustment layer > Hue/Saturation
- Pick a rangeMaster to Reds
- See the rangeSaturation way up, for now only
- Narrow itDrag the range bars in, the triangles set the feathering; drag the middle onto the nose
- ResetSaturation back to 0
- Fix the redHue about +24
- CompareToggle the adjustment layer off and on
No masks, no painting and no generative AI.
Fixing Red Skin: Common Questions
Where does red skin usually show up?
On the cheeks, around and under the eyes, and on the front and sides of the nose. In this portrait it is mostly the nose, with some in the eyes and ears.
Why not just move the Hue slider on Master?
On Master, Hue shifts the color of the whole picture. You only want to change one red, so undo that and narrow the color range first.
Isn’t choosing Reds enough?
It is a starting point, but it affects every red in the image. The red in the nose is one specific tone, so the range needs to be narrowed.
How can I see what the range is affecting?
Push Saturation very high for a moment. Everything that turns garish is in the range. Set Saturation back to 0 once the range is right.
How do the sliders under the color bars work?
The middle bar is the range that is fully affected, and the small triangles at the ends set the feathering. Drag them in to narrow the range, then drag the middle to slide it until only the problem areas light up.
How far should I move the Hue slider?
A little to the right. Aaron lands around +24 after trying about +26. Too far right turns green and left turns magenta, and how far you go depends on how red the photo is.
Why shift the hue instead of lowering saturation?
Shifting the hue turns the red toward the yellow of normal skin. Lowering saturation would only make the red grayer.
Do I need a layer mask?
No. Because the range only covers that one red, it fixes the nose, eyes and ears without masking or painting. Toggle the layer off and on to compare.
From the Magazine View all
Stories, interviews and guides for photographers, new every week.
 BusinessHow to Compete With AI: Give Your Clients MoreEveryone has the same tools now, and your clients know it. The way to compete is to give them more.
 EditingLightCraft vs Lightroom: Is the Free Clone Any Good?The free clone on the same RAW files: what matches, what breaks and who should switch.
 EditingHow to Tell If a Photo Is AI, and Prove Yours Is RealThe tells that still work in 2026, why detectors disagree, and how to prove your own photos.
Master Photoshop, Lightroom and Photography
Join PHLEARN PRO for $12.99 a month, or $99.99 a year (save 36%). Cancel anytime, with a 100% money-back guarantee.





