

Download Assets
This tutorial includes 3 sample images, 3 sample psds and 1 PDF guide. Downloads are free with a PHLEARN account.
- Download the sample images and PSDs from every free tutorial on PHLEARN
- New free tutorials published every week
- One free account — sign up once, then download anything
description
Camera Raw’s new Vectorscope gives you an objective read on skin tone, with a built-in reference line for exactly one hue. This tutorial covers turning on the Vectorscope and skin tone indicator, isolating skin with a mask so the scope reads only what matters, and correcting Temperature, Tint, and Saturation in the right order to bring skin back on target without guessing. It also covers where the tool misleads you and when to ignore it.
Enjoying This Free Tutorial?
We publish a new free tutorial every week, each one with sample images and PSDs you can download and follow along with. Sign up and they land straight in your inbox, along with early word on sales, events and subscriber-only offers.
Image Source
Photos by Kirsten Frank, Christian Agbede, and Michael McKay via Unsplash


Adobe Just Put an Instrument Inside Camera Raw for Reading Skin Tone
Camera Raw has a new panel called the Vectorscope tool, and it shows you something your eyes can’t: the color that is actually in your file, independent of your monitor, your room light, or the twenty minutes you’ve spent staring at the same face. A histogram tells you about brightness. The Vectorscope tells you about color, and it ships with a built-in reference line for exactly one thing — skin.
That line is why this tool matters. Every human skin tone sits at roughly the same hue angle regardless of how deep or light the skin is, so it works as a check for any subject in any photo — instead of eyeballing whether a face looks “too warm” under lighting you can’t fully trust, you watch a cluster of pixels align to a line that doesn’t drift.
This is a standard Camera Raw panel, not a plugin or a generative feature, and everything below uses ordinary Photoshop and Camera Raw tools. It currently lives in Camera Raw only, not yet in Lightroom or Lightroom Classic.
What the Vectorscope Actually Shows You
Angle is hue, distance is saturation
The Vectorscope plots every pixel in your image on a color wheel. A cluster’s angle around that wheel tells you the hue — the value you’re correcting. How far it sits from the center tells you saturation: near the middle is muted, toward the edge is vivid. Saturation varies legitimately from photo to photo and isn’t something you’re chasing a target on.
One line works for every subject
Right-click the histogram and turn on Show Skin Tone Indicator, and a dashed line appears across the scope. What changes person to person is how deep and saturated their skin reads, not which direction the cluster points, so this one line works as a reference for any face. Skin is also a spread, not a dot — shadowed and lit areas of a face rotate slightly differently, so you’re looking for the bulk of the mass running roughly parallel to the line, not a tidy point sitting on it. It’s one of several precision color tools Adobe has added to Camera Raw recently, alongside the Point Color tool for isolating a single hue anywhere in a photo.
Set Up the Vectorscope in Camera Raw
-
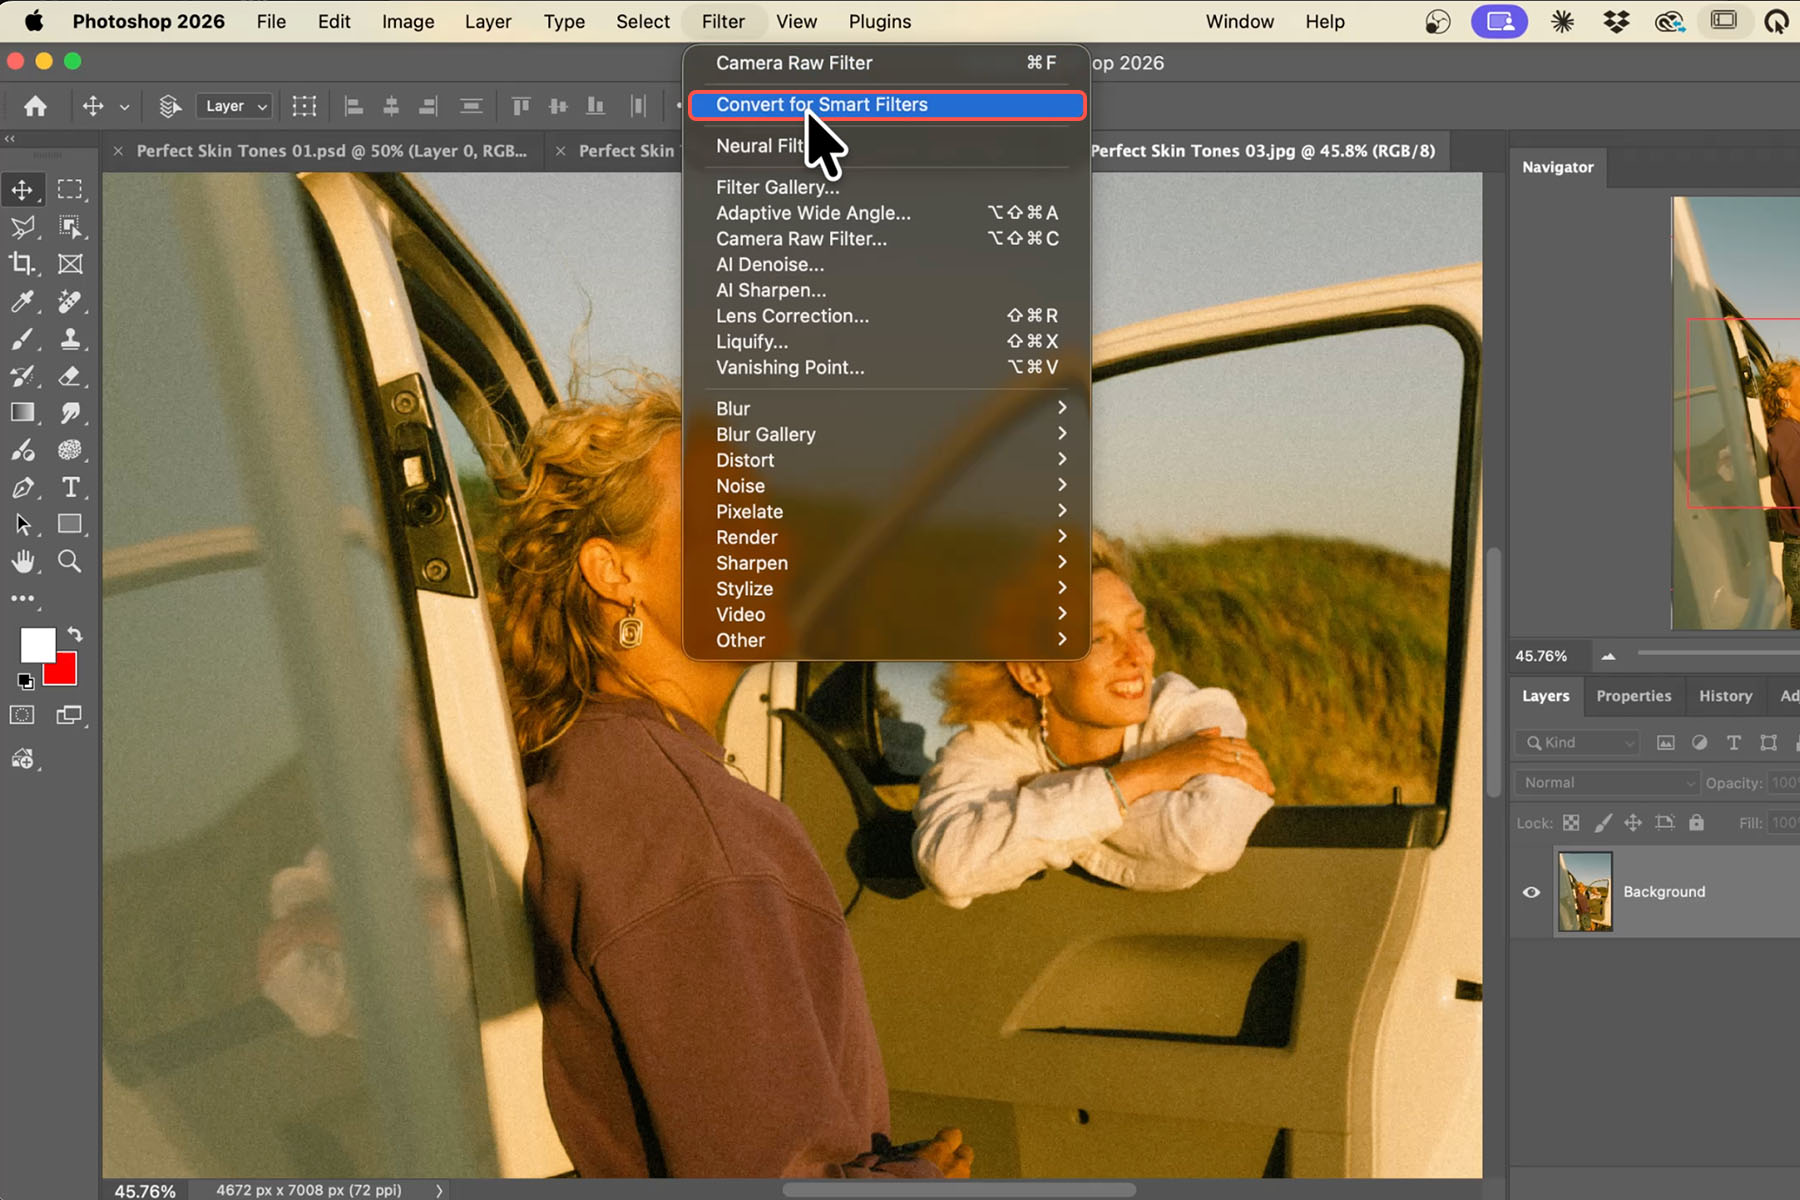
Convert your layer to a Smart Object.
Select your background layer, then go to Filter > Convert for Smart Filters, so everything below stays non-destructive and editable later.
-
Open Camera Raw Filter.
With the Smart Object selected, go to Filter > Camera Raw Filter. Requires Camera Raw 18.4 or later.

-
Turn on the Vectorscope.
Right-click directly on the histogram itself, not near it, and choose Show Vectorscope — it’s easy to miss, sitting at the very bottom of that menu.
-
Turn on the skin tone indicator.
Right-click the scope again and choose Show Skin Tone Indicator to draw the reference line every later step is measured against.
-
Add Lab color readouts and drop a few samplers.
Right-click once more for Show Lab Color Readouts, then press S and click two or three points on the skin. Samplers stay put and update live as you drag sliders.
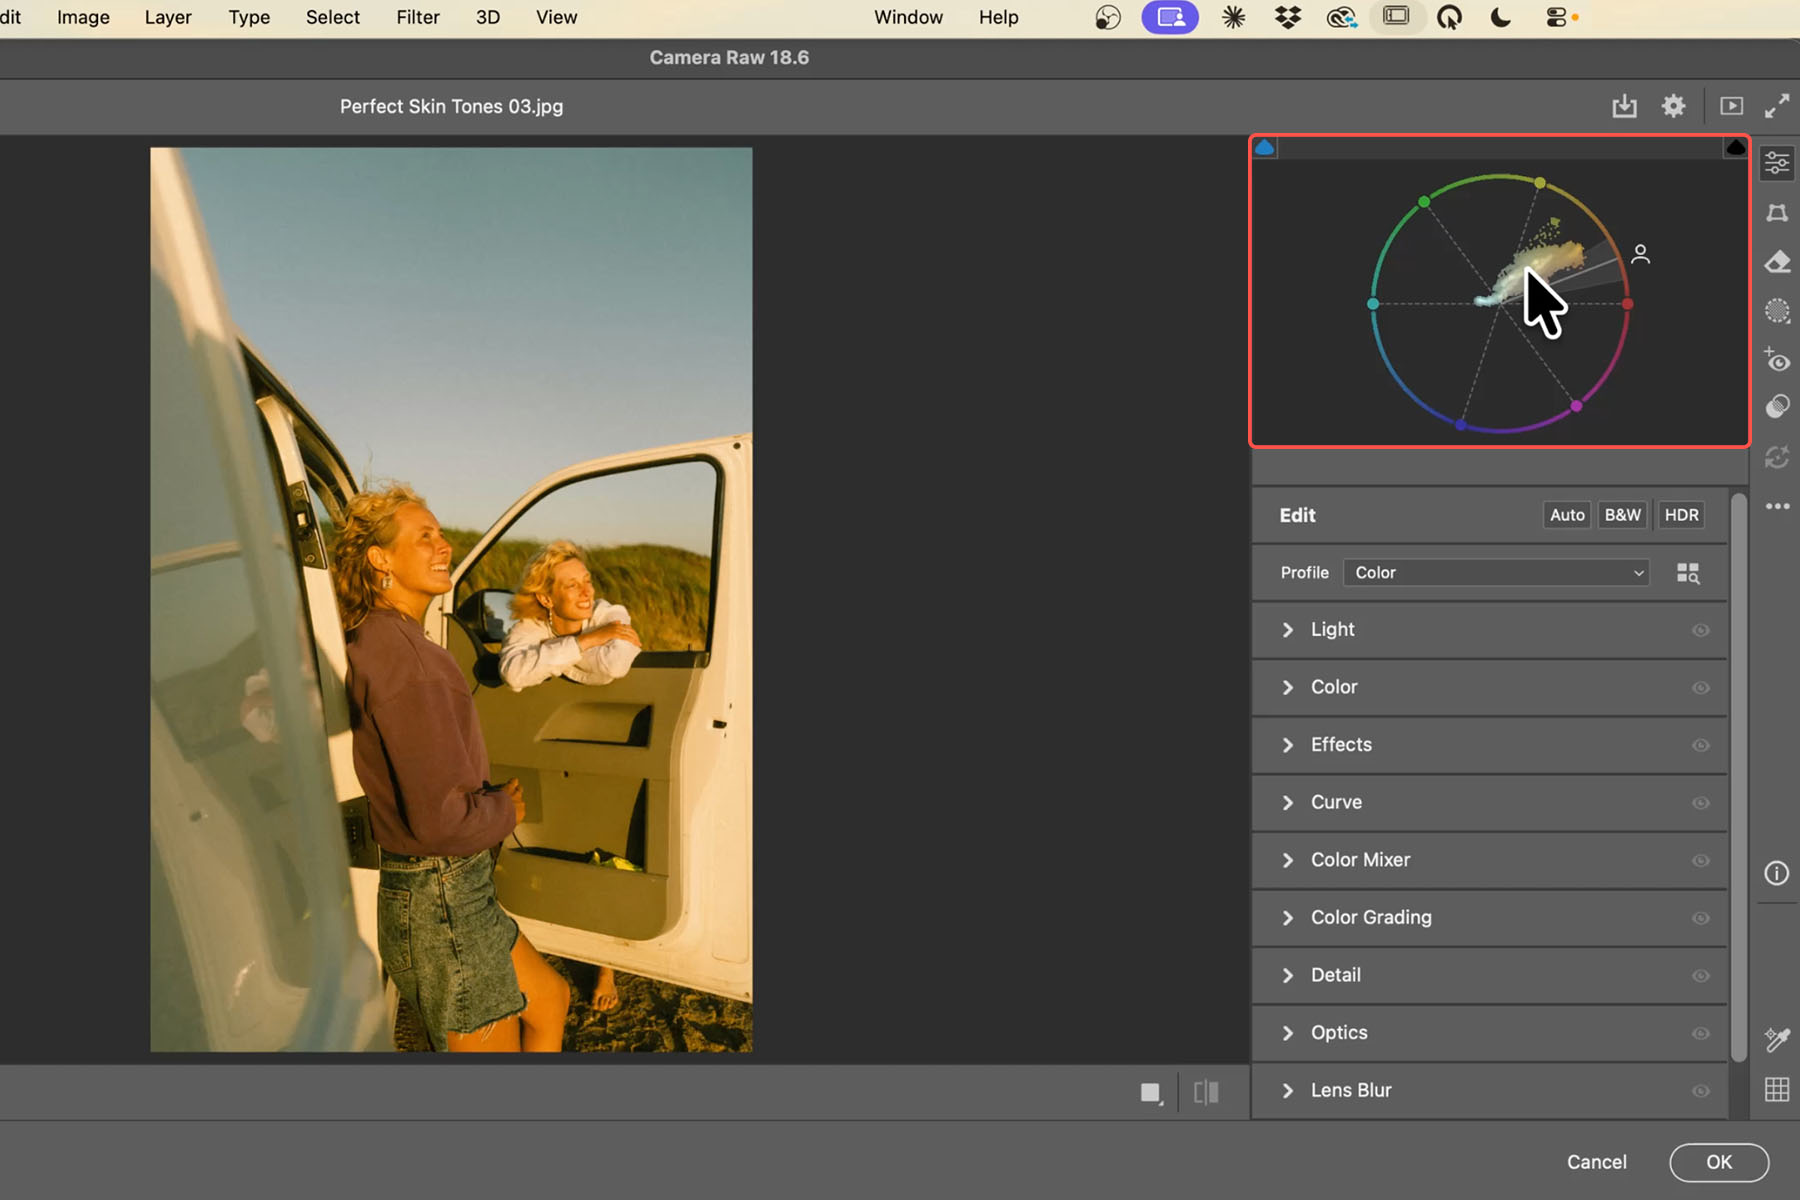
One optional setting in that same menu, Show Red at 3:00, just rotates the wheel to match video scopes like Premiere and Resolve — it changes nothing about accuracy, so pick one and stay consistent.
Isolate Skin and Read the Cluster
A full-frame reading tells you almost nothing useful about skin — sky, foliage and clothing are mixed into the same cluster, and the face you care about is buried inside it. The Vectorscope respects an active mask: build one around the skin, and the scope redraws to show only that selection.
-
Open the masking panel and try a People mask first.
If Camera Raw finds the person, check only Face Skin and Body Skin for each one and click Create. Leave hair, eyes, lips and clothing unchecked — those pixels aren’t skin.
-
If the AI can’t find your subject, mask it manually.
Select the Brush, set Flow and Density to 100 with no feathering, and paint over the face and any other exposed skin. Turn on Show Overlay so you can see exactly what’s selected, and watch for stray edges — a foot or hand at the frame’s edge is easy to miss.
-
Tighten a brush mask with Color Range.
Click the three dots on your mask, choose Intersect Mask With > Color Range, then click-drag over the skin. This narrows a rough brush selection to just the skin tones inside it.

-
Read which way the masked cluster leans.
A cluster rotated toward yellow or orange reads too warm; rotated the other way reads too cool. Confirm with Lab readouts: a and b should both be positive, with b sitting slightly higher than a, within roughly 15 units. b well above a means skin is reading yellow; b below a means it’s gone pink or magenta.
Correct Temperature, Tint, and Saturation, in Order
Before touching color at all, get your exposure and contrast dialed in — the scope doesn’t show brightness, but saturation shifts as exposure changes, so correcting color first just means redoing it. Once tone is set, the order below is what actually moves the cluster onto the line efficiently.
-
Move Temperature first.
Temperature is the bigger lever and controls your Lab b value — pull left to cool the cluster toward blue, right to warm it toward yellow. This alone typically does most of the work.
-
Move Tint second.
Tint controls your a value: pull left toward green, right toward magenta, to clean up whatever Temperature left behind. Double-click either slider to reset it.
-
Adjust Saturation last, and pull Vibrance first if skin looks over-saturated.
Saturation moves the cluster toward or away from the center of the scope. A mass pressing against the outer ring is over-saturated skin, not a hue problem — pull Vibrance back before Saturation, since it protects skin tones by design.
-
Use the mask’s Amount slider to blend the correction, then look with the mask off.
The Amount slider at the top of the mask panel scales the whole correction at once. A golden hour photo should probably keep some warmth — the indicator shows where neutral sits, not what the photo should look like, so backing Amount off is a creative choice. Toggle the mask off and on to confirm you’ve improved the photo, not just changed it.
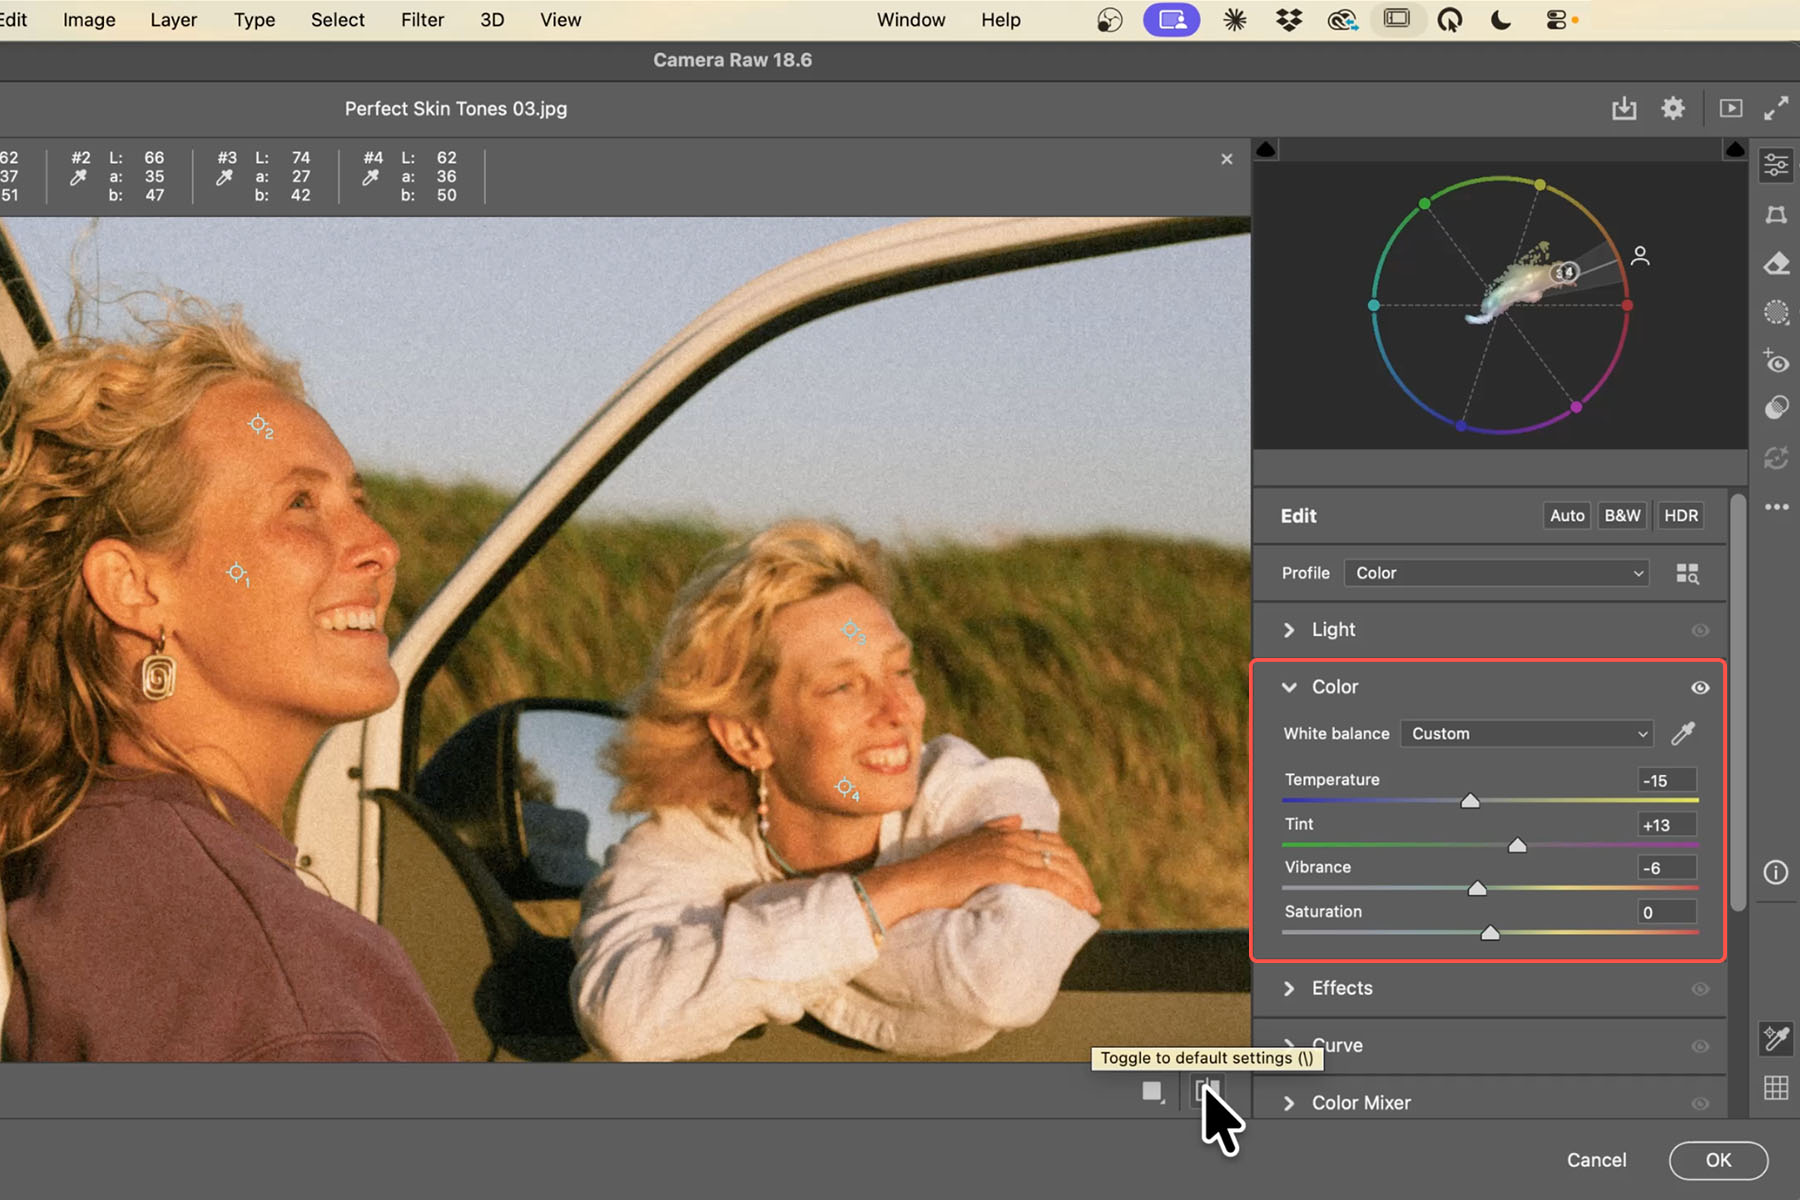
Only take a masked correction global when the whole frame shares the same cast — a real white balance problem affects everything, but warmth coming only from the skin will wreck the rest of the image if applied broadly. Local Temperature and Tint run on a relative scale, while the global sliders are measured in Kelvin, so carry across the direction and rough distance, then re-check against the scope. Once skin reads correctly, Camera Raw’s broader color grading tools and its color grading presets carry that work into the rest of the frame.
What Trips People Up
You’re chasing a perfect point on the line
Faces never produce a tight dot — shadowed and lit skin rotate slightly differently, so aim for the bulk of that spread running parallel to the line, not a single pixel landing on it.
You pushed saturation trying to reach the line
The indicator is entirely about hue, not saturation. A cluster pressed against the outer edge of the scope is over-saturated skin — pull Vibrance or Saturation back, don’t push Temperature further to compensate.
Your mask includes hair, lips, or clothing
Any non-skin pixel in the mask means the cluster you’re reading isn’t skin, and everything after that is built on bad information. Double-check People mask selections show only Face Skin and Body Skin.
Skin still looks off after the numbers check out
An objectively correct Lab reading won’t automatically look right on every subject — a naturally warmer or cooler complexion can read as off if you chase the same target every time. If color still looks wrong after aligning to the indicator, the redness may need its own targeted correction instead of a global shift.
When to Use It, and When Not To
Use it any time you need an objective check on skin color instead of trusting eyes that have already adapted to your room and monitor — mixed lighting, golden hour warmth you’re not sure you’ve overcorrected, or any photo you’ll compare against others edited on a different day.
Use it alongside masking tools you already know. The scope doesn’t care how a mask was built — a depth-based AI mask or a selection from Camera Raw’s object masking reads the same as one you painted by hand, as long as it isolates skin cleanly.
Don’t expect it to make the final call. It’s an instrument, not a verdict — it gets you objectively close and stops the slow drift of warming a photo further every session without noticing. The last five percent is still your eyes: warm skin from a golden hour shoot can be a decision, not a mistake the tool caught.
More Free Photoshop Tutorials
- How to Use the New Light Adjustment Layer in Photoshop
- How to Remove Reflections From Faces in Photoshop
- Discover the Latest Update for the Remove Tool in Photoshop
- How to Use AI Landscape Masking in Lightroom and Camera Raw
Download the Practice Files
Grab the sample images, the finished PSDs and the included PDF guide and follow along. Everything in this tutorial uses standard Photoshop and Camera Raw tools — no plugins, no generative credits.
New Free Tutorials View All »











Enjoying This Free Tutorial? Go Further with PRO.
Unlock Full Sample Files, PSDs, and Hundreds of Masterclasses!

Download full project assets, original PSDs, and RAW images for every lesson
Unlimited access to our complete library of PRO Photoshop & Lightroom courses
Instant 4K Ultra HD streaming on all devices, anytime, anywhere
Full access to our entire library of Photoshop Actions, Presets, and LUTs
Flexible monthly and annual membership plans
Cancel anytime with zero hassle or commitments