


description
Three tools can remove power lines from a photo, and which one wins depends entirely on the background. This free tutorial tries all of them side by side: the Clone Stamp, which copies pixels exactly and so goes splotchy across a gradient sky; the Healing Brush, which blends beautifully on smooth areas but smears any hard edge it crosses; and the plain Brush tool at 20% flow, sampling and building up color — usually the cleanest option of the three.
Enjoying This Free Tutorial?
We publish a new free tutorial every week, each one with sample images and PSDs you can download and follow along with. Sign up and they land straight in your inbox, along with early word on sales, events and subscriber-only offers.
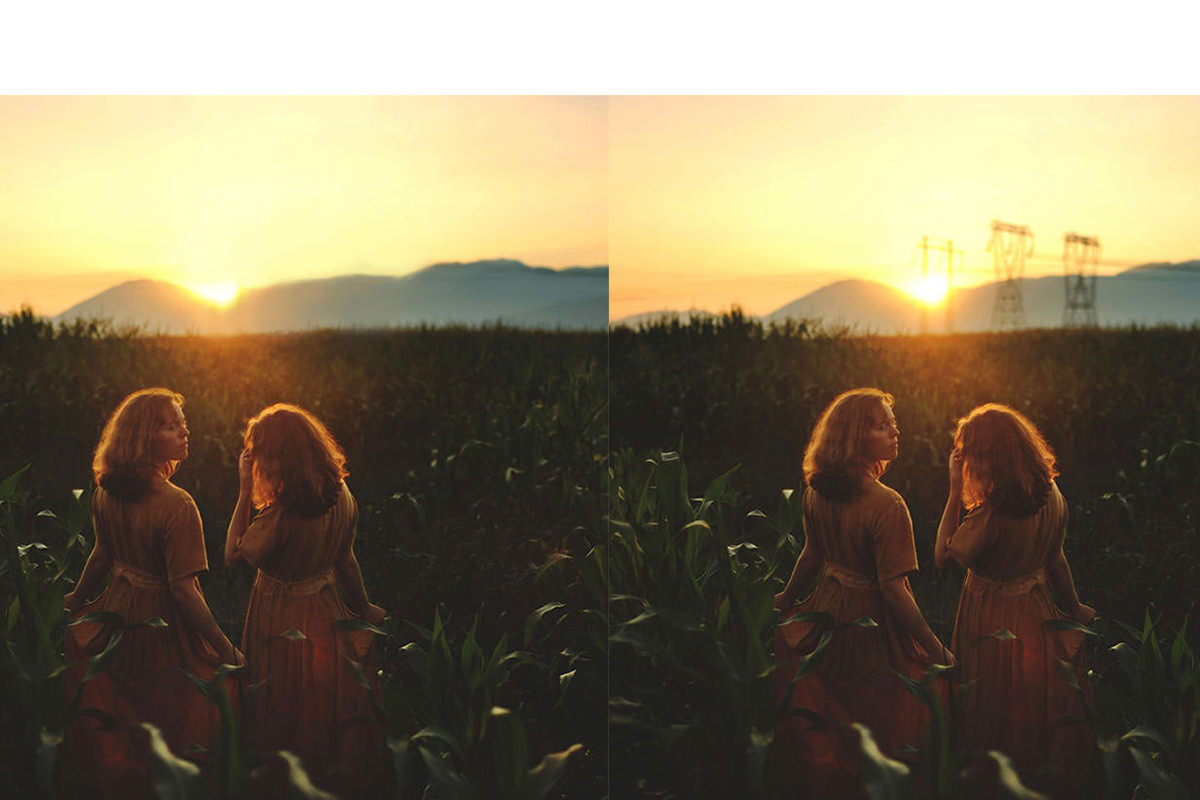
How to Remove Power Lines in Photoshop
Power lines cutting through an otherwise great background photo are a common annoyance, and Photoshop offers several tools that can handle the job: the Clone Stamp, the Healing Brush, and the Brush tool. Each one has real strengths and real weaknesses depending on the background, and comparing all three side by side makes it much easier to pick the right one for a given photo.
Trying the Clone Stamp Tool First
The Clone Stamp is often the first tool people reach for when removing something from a background.
-
Set Up a New Layer With Current and Below Sampling
Create a new layer above the background, select the Clone Stamp tool, and make sure Sample is set to Current and Below rather than Current Layer, since a blank new layer has nothing to sample from on its own.
-
Sample and Paint Over the Power Lines
Hold Alt (Option on Mac) to sample a clean area nearby, then paint directly over the power lines.
Why Clone Stamp Struggles With Color Gradients
Clone Stamp copies pixels exactly as they appear at the sample point, which becomes a problem across a large color gradient, like a sky that shifts from bright to dark. A sampled area that doesn’t closely match the color at your paint point produces a visible, splotchy patch rather than a seamless fix.
Trying the Healing Brush Tool
The Healing Brush works differently from Clone Stamp by blending texture and color together rather than copying pixels directly.
-
Sample and Paint With the Healing Brush
Select the Healing Brush, set Sample to Current and Below, hold Alt/Option to sample a clean area, and paint over the power lines.
-
Resample When You Cross a Hard Edge
If the area you’re healing crosses a hard edge, such as where a mountain silhouette meets the sky, sample from another spot that has that same kind of edge, then paint it into place to preserve the line rather than blurring it away.
Why the Healing Brush Fails at Hard Edges
The Healing Brush blends the texture of your sample point with the color surrounding where you paint, which works well on smooth, gradual backgrounds but tends to smear or soften any hard edge it crosses, since it’s actively trying to blend two different areas together rather than replace one with the other exactly.
Switching to the Brush Tool for Gradient Backgrounds
For a background with a lot of color variation, like an out-of-focus field or sky, the Brush tool alone often outperforms either of the other two options.
-
Sample a Color and Paint at Low Flow
Select the Brush tool, hold Alt/Option to sample a color directly from the area around the power line, and paint with Flow set to around 20%.
-
Build Up Coverage With Repeated Passes
Paint over the same area multiple times, resampling nearby colors as needed, letting the low flow setting build up coverage gradually rather than committing to full opacity in one stroke.
Creating Hard Edges With a Smaller Brush
A large soft brush is great for open, out-of-focus areas, but a smaller brush is what preserves crisp detail where it’s actually needed.
-
Resize Your Brush on the Fly
Hold Ctrl+Option on a Mac (Ctrl+Alt and right-click drag on a PC) and drag left or right to change your brush size, and up or down to change its hardness, without leaving the canvas to adjust settings manually.
-
Use a Smaller Brush to Preserve Hard Edges
Switch to a smaller brush and sample colors close to any hard edge you need to maintain, using the reduced size to hold that edge crisp instead of letting a larger, softer brush blur it away.
Why Brush Size Controls Edge Hardness
A large soft brush spreads its effect across a wide area, which is exactly what you want in a smooth out-of-focus field but exactly what ruins a hard edge like a mountain ridge or a building line. A smaller brush confines that same sampling-and-painting technique to a tighter area, giving you the precision needed to maintain a sharp transition.
Combining Clone Stamp and Brush for a Hybrid Approach
If working with the Brush tool alone feels unfamiliar at first, starting with Clone Stamp and finishing with the Brush tool is a comfortable middle ground.
-
Rough In the Fix With Clone Stamp, Then Blend With the Brush
Use Clone Stamp to get most of the power line removed quickly, then switch to a soft brush at a low flow to sample nearby colors and paint over any remaining rough patches until they blend in smoothly.
Why This Approach Works
None of these three tools is universally the best choice — each one handles a different kind of background differently, and understanding why is more useful than memorizing a single fixed workflow. Clone Stamp works well on flat, evenly colored areas but falls apart across a gradient, the Healing Brush blends beautifully on smooth backgrounds but smears hard edges, and the Brush tool, used with low flow and repeated sampling, gives you the most direct control over exactly how much color builds up in any one spot, which is why it tends to win out on complex, out-of-focus, or gradient-heavy backgrounds. Knowing when to reach for a smaller, harder brush to preserve an edge versus a larger, softer one to blend a smooth area is really the whole skill.
Final Thoughts
Removing something as thin as a power line isn’t difficult once you understand what each removal tool is actually doing under the hood. Start with whichever tool feels most comfortable, but don’t be afraid to fall back on the plain Brush tool, sampling and painting with a low flow, especially on a background that’s out of focus or full of gradual color shifts — it’s often faster and cleaner than either Clone Stamp or the Healing Brush for that specific kind of background.
Quick Reference: Keys, Menus and Settings
- Clone StampS, Alt/Option-click to sample; Sample: Current and Below on a new layer
- Healing BrushCurrent and Below; resample from a spot with the same hard edge
- Brush toolB, Alt/Option to sample nearby color, Flow about 20%
- Size and hardnessCtrl + Option-drag on a Mac, Ctrl + Alt and right-click drag on a PC: left/right size, up/down hardness
- Hard edgesSmaller brush, sample right next to the edge
- HybridClone Stamp first, then a soft brush at low flow to blend
No AI, no generative credits.
Removing Power Lines: Common Questions
What is the best tool for removing power lines?
It depends on the background. On an out-of-focus background like the one in this video, Aaron often skips the other tools and goes straight to the Brush tool, sampling nearby colors and painting over the lines.
Why does the Clone Stamp do nothing on my new layer?
Sample is set to Current Layer, and a new layer is empty. Set Sample to Current and Below in the options bar so the tool reads the photo underneath.
Why does the Clone Stamp leave splotchy patches in the sky?
It copies pixels exactly as they are at the sample point. Across a large color gradient, the sampled color rarely matches where you paint, so you get bright or dark patches.
Why does the Healing Brush smear the edge of the mountain?
It uses the texture of where you sample and the color of where you paint, and blends them. To keep a hard edge, Alt/Option-click a spot with the same kind of edge and paint it into place.
How do I remove power lines with the Brush tool?
Press B, hold Alt/Option to sample the color right next to the line, and paint with Flow at about 20%. Sample, paint a little, sample again and repeat; a larger soft brush blends open areas.
Should I lower Flow or Opacity?
Aaron recommends Flow over Opacity here. A low flow lets the color build up gradually each time you paint over the same area.
How do I change brush size and hardness while painting?
On a Mac, hold Ctrl + Option and drag: left and right change the size, up and down change the hardness. On a PC, hold Ctrl + Alt and drag with the right mouse button.
How do I keep edges sharp with the Brush tool?
Switch to a smaller brush and sample colors right next to the edge. The smaller brush keeps the transition crisp, where a large soft brush would blur it.
What if I’m not comfortable painting with the Brush tool yet?
Start with the Clone Stamp to remove most of the line, then use a soft brush at low flow, sampling nearby colors, to blend the rough patches in.
From the Magazine View all
Stories, interviews and guides for photographers, new every week.
 EditingLightCraft vs Lightroom: I Edited the Same RAW Files in BothThe free clone on the same RAW files: what matches, what breaks and who should switch.
 InspirationRare Historical Photos: 13 of the Rarest Pictures Ever TakenFrom the earliest surviving picture of a person to the last passenger pigeon: who took each one and why it survives.
 EditingArtCraft: Photoshop Cloned by AI in Two Weeks. Is It Legal?ArtCraft cloned Photoshop and Lightroom with AI and gave them away. Any good? Legal? Safe?
Master Photoshop, Lightroom and Photography
Join PHLEARN PRO for $12.99 a month, or $99.99 a year (save 36%). Cancel anytime, with a 100% money-back guarantee.





