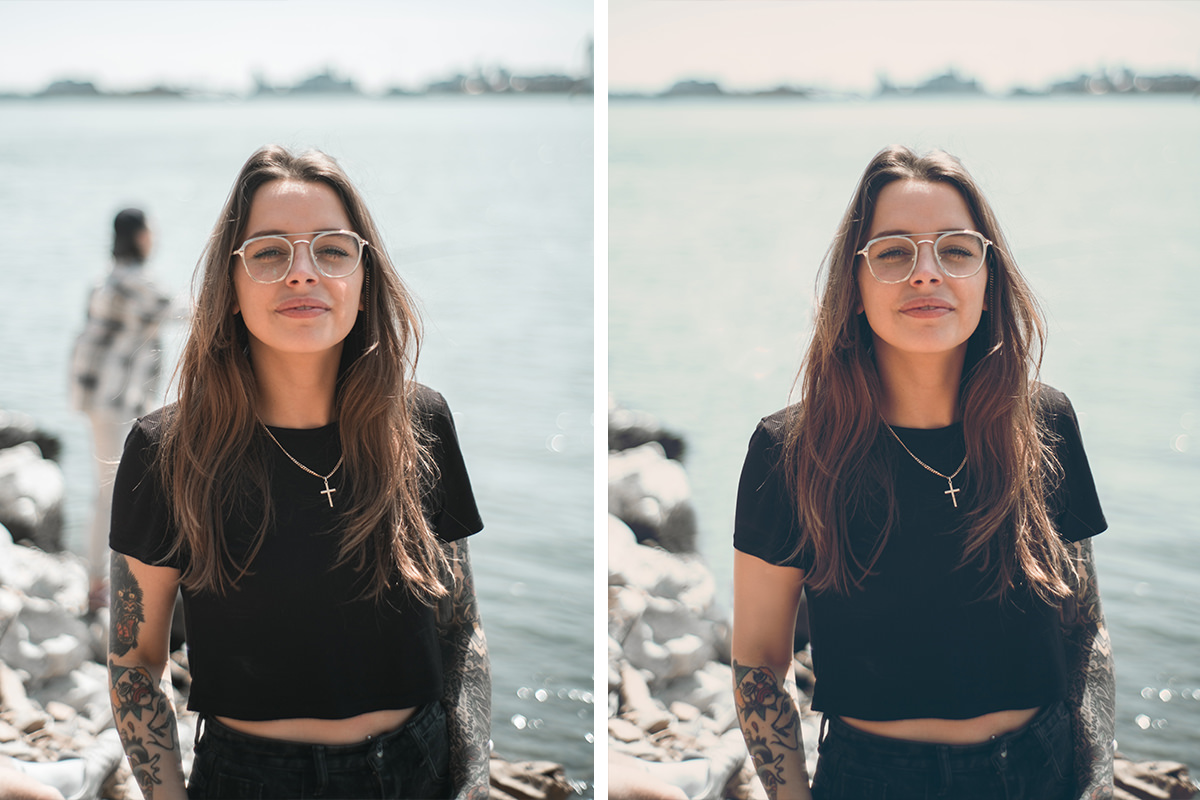

Download Sample Images
Download Assets
This tutorial includes 2 sample images, 1 layered TIF and 1 PDF guide. Downloads are free with a PHLEARN account.
- Free sample files with every tutorial on PHLEARN
- New tutorials published every week
- Unlimited downloads with your free PHLEARN account
Free PDF Guide · 4 Pages
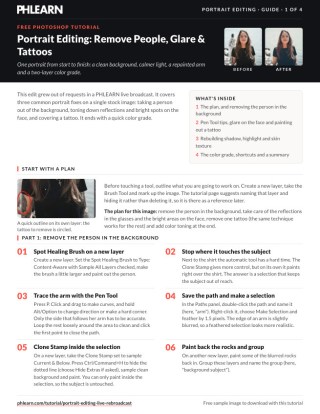
This Tutorial as a Step-by-Step PDF
The guide follows the whole edit: the Spot Healing Brush with Sample All Layers, a Pen Tool path feathered 1.5 pixels with the Clone Stamp on Current & Below, the Healing Brush for glare, the tattoo painted at 10% Flow, a blurred and clipped edge highlight, High Pass skin texture, and Solid Color layers on Lighten and Darken. Keep it next to your keyboard.
description
Follow along as Aaron walks you through a complete portrait edit from start to finish! Learn how to simplify a photo by removing common distractions like people in the background, harsh lights and glare, and even a tattoo by covering it up with natural skin tones and texture. Then we finish things off with an easy technique to apply a subtle, yet stunning, color grade to any image.
Enjoying This Free Tutorial?
We publish a new free tutorial every week, each one with sample images and PSDs you can download and follow along with. Sign up and they land straight in your inbox, along with early word on sales, events and subscriber-only offers.
Portrait Editing: Removing People, Glare and Tattoos
Three of the most-requested portrait fixes in one edit: taking a stranger out of the background without damaging the subject’s edge, killing glare in glasses and hard light on skin, and covering a tattoo convincingly — which means rebuilding highlight, shadow and skin texture, not just painting over it. The edit finishes with a two-layer color grade.
Start by Making a Plan
It’s worth starting any edit by identifying every adjustment you want to make and every distraction you want gone, and the planning doesn’t need to be complicated. Create a new layer in Photoshop, grab the Brush Tool, and mark the image up with arrows, circles and notes.
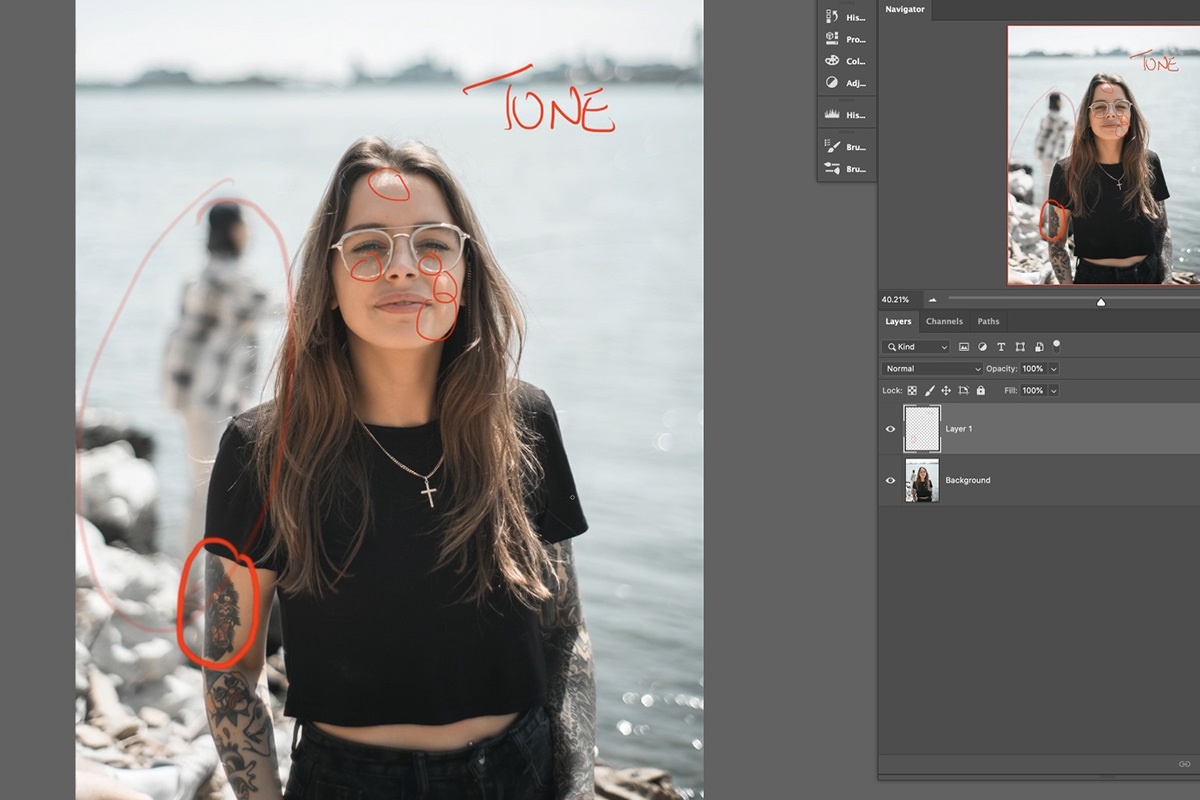
Name that layer and make it invisible, but don’t delete it. It’s a useful reference later when you’re deep in the edit.
Removing a Person from the Background
Not all object removal is the same. The shape and size of the object, the level of detail in the background and how close it sits to the subject all affect how hard the job is. There are enough situations that we made a whole tutorial on removing anything from a photo to cover them.
This example is a relatively easy one. The background is mostly out-of-focus water, so there’s no need to recreate fine detail. The challenge is that the person stands partially behind the subject, so they have to go without warping the edge around her hair and shoulder.
Start with the Spot Healing Brush
Most of the removal is Spot Healing Brush work. Create a new layer above the subject, select the Spot Healing Brush, and make sure Sample All Layers is checked in the options bar. Paint over the person in the background, keeping a safe distance from the subject for now, until they’re mostly gone.
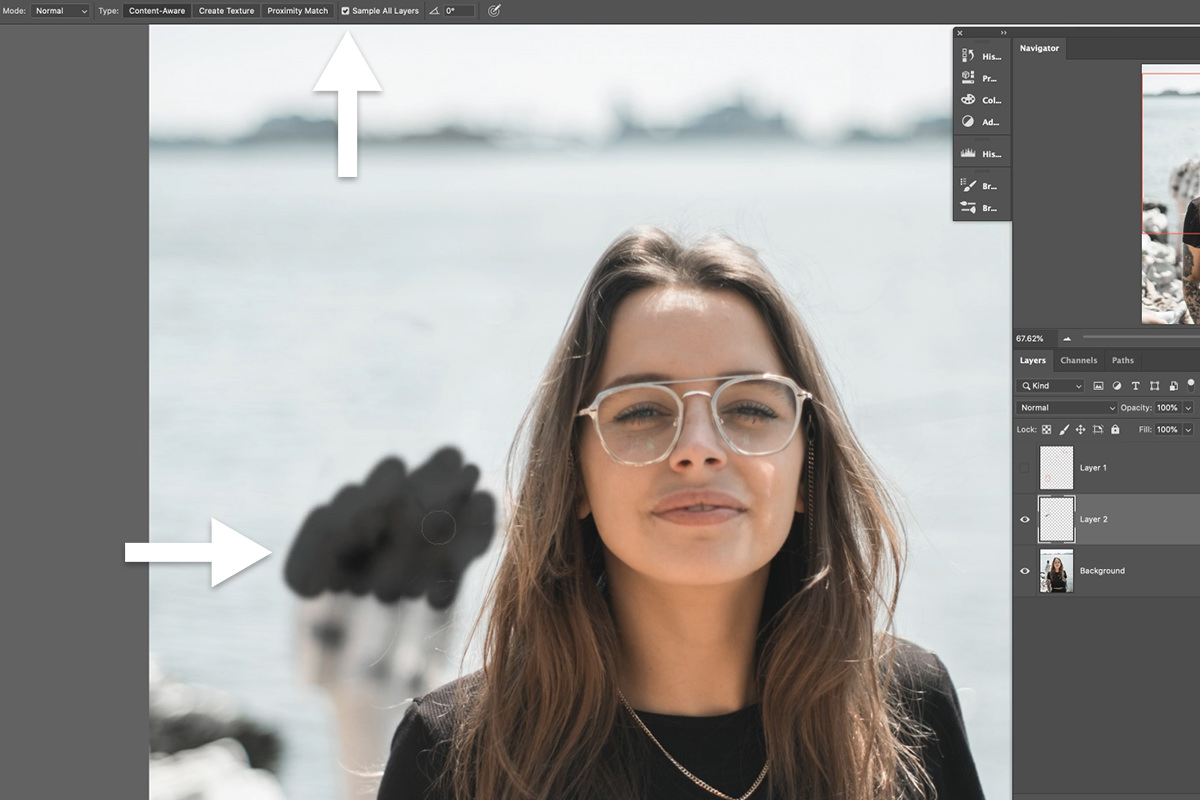
If an area looks blotchy, paint over it again and again until it reads as seamless with the rest of the background.
Protecting the Edge with the Pen Tool
That handles most of it, but not the areas right against the subject’s hair and shoulder. Whenever something has to be removed up against an edge, the right approach is to select along that edge so it’s protected from changes, and for a genuinely accurate selection nothing beats the Pen Tool.
The Pen Tool is unmatched for clean edges, lines and curves, though it takes getting used to. If you’re new to it, there’s a free episode covering the basics and a longer course that goes into everything it can do. One setting makes it much easier: click the gear icon in the options bar and turn on Rubber Band, which previews the next segment before you click.
The goal is to outline the part of the subject’s edge that sits next to any remaining pixels of the background person. Trace around her shoulder and arm with the Pen Tool, then close the path with a circle around the left side of the frame. Go to the Paths tab, select the new path and name it, because it will be useful again.
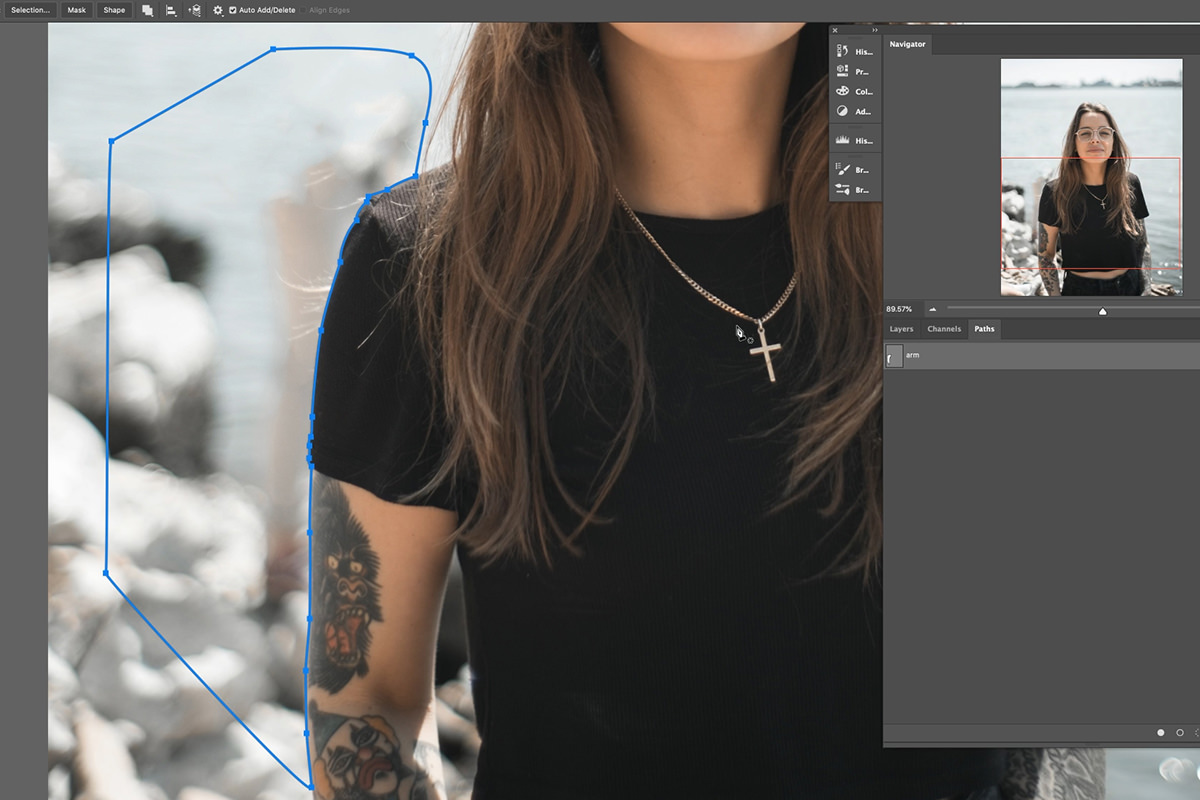
With the path saved, turn it into a selection by right-clicking anywhere on the canvas and choosing Make Selection. Feather it by 1.5 pixels. The edge of her arm is slightly blurred, and an unfeathered selection produces a hard edge that reads as unnatural.
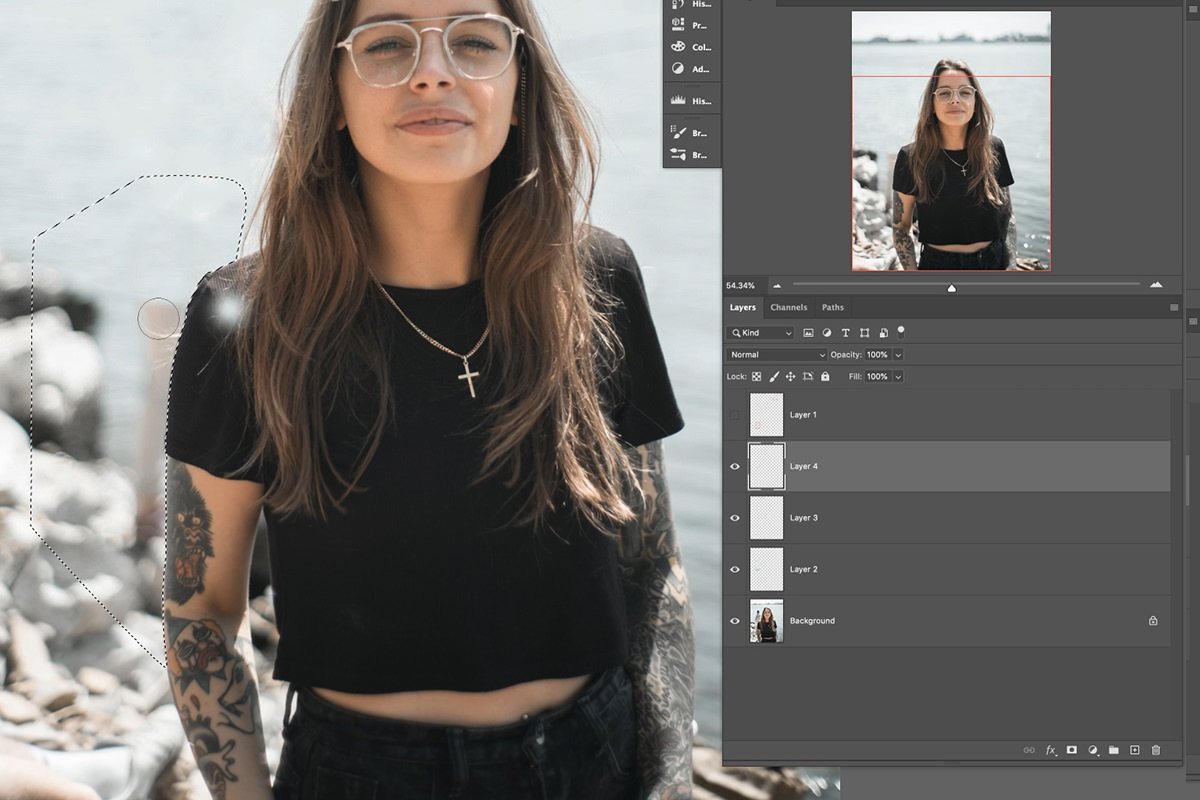
Right next to the shirt the Spot Healing Brush has a hard time, so switch to the Clone Stamp Tool. On a new layer, with Sample set to Current & Below, it can safely cover the remaining bits of the background person, because the selection defines where adjustments can and can’t land.
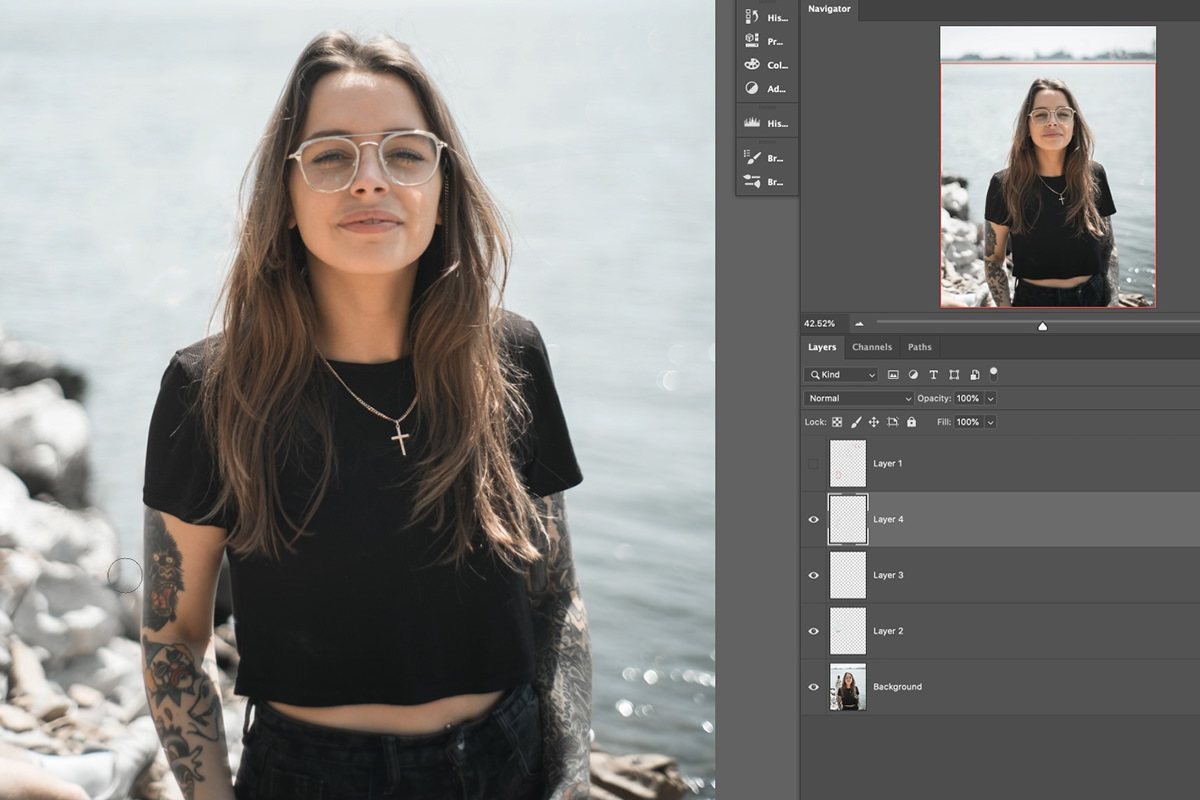
Take your time, painting over sections repeatedly until they blend in.
Removing Hard Light and Glare
Outdoor portraits are tricky because there’s far less control over the light. Since the eye is drawn to bright areas, harsh light on a face and glare in glasses become real distractions — and most of it can be handled quickly with the Spot Healing Brush.
Again, work on a new layer with Sample All Layers checked. Working non-destructively is central to a professional workflow and saves serious trouble if a step has to be redone.
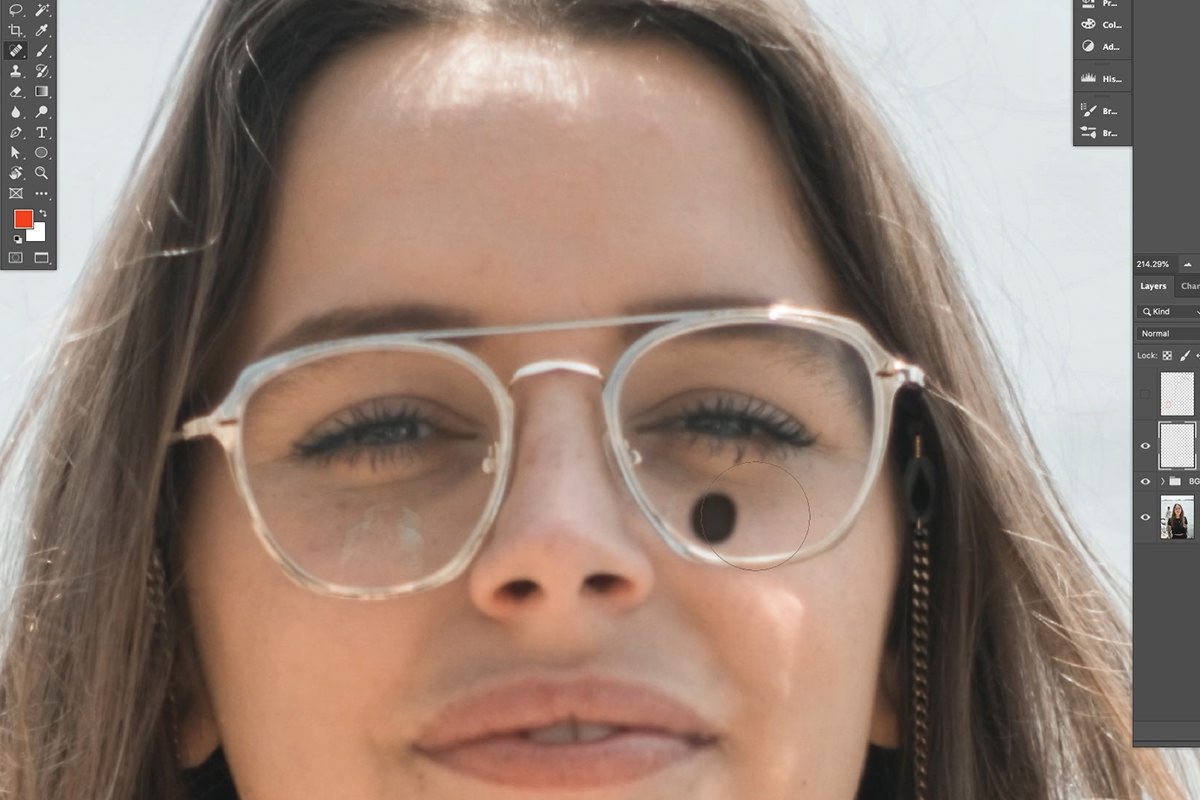
Paint over whatever you find distracting; here that was the discolored glare in the glasses and some overly bright spots on the forehead and chin. Where the Spot Healing result doesn’t look natural, switch to the regular Healing Brush: Alt/Option-click to choose the sample point, then paint. If an area still needs more blending, take the Brush Tool on a new layer, sample the surrounding skin color, and paint around the healed areas with a large soft brush at low Flow to smooth the transitions.
Removing a Tattoo
Normally there’s no reason to remove a tattoo, since it’s a permanent part of the subject, but it’s a common enough request that the process is worth demonstrating. The plan here is one tattoo on the subject’s upper right arm, which happens to sit along the same edge from earlier — so the original path can be reused.
Go back to the Paths panel, select the path, right-click the canvas and choose Make Selection, feathered by 1.5 pixels again. This time the opposite area is needed, so go to the Select menu and choose Inverse to flip the selection.
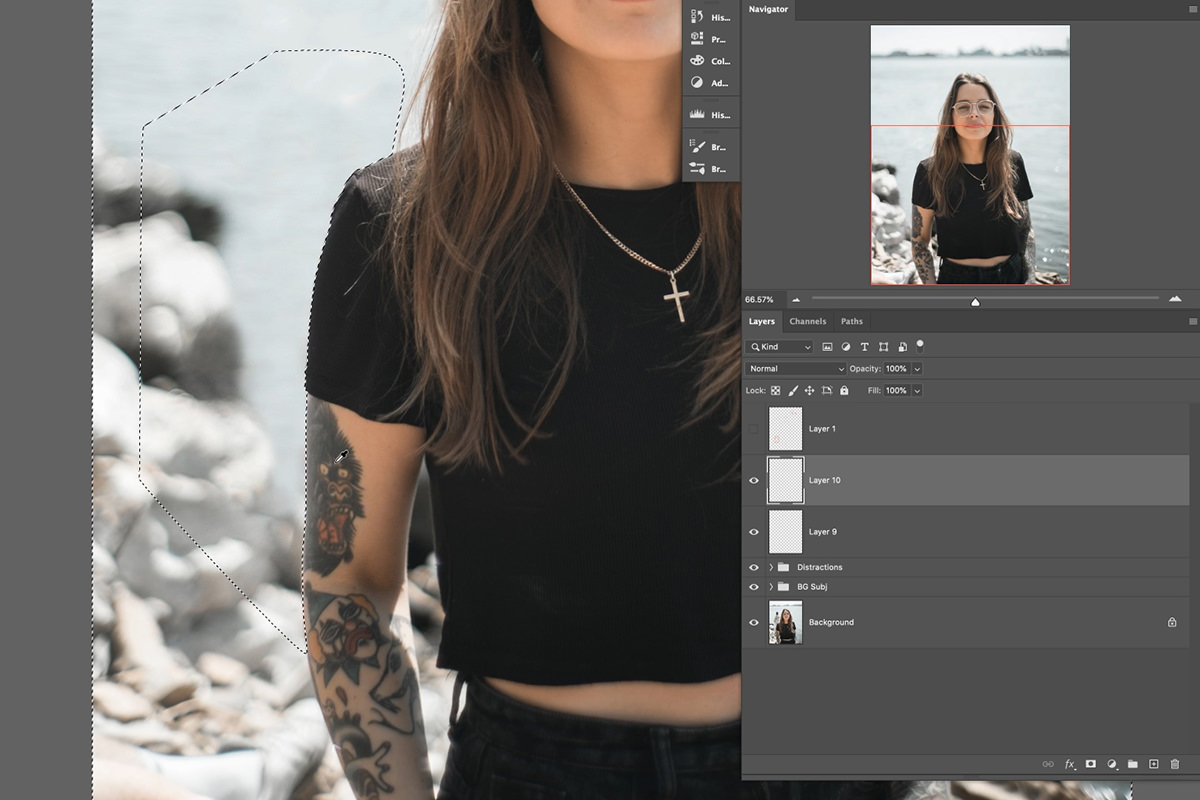
Most of the removal is Brush Tool work: sample surrounding skin colors and paint carefully over the tattoo with a large soft brush at 100% Opacity and 10% Flow, Alt/Option-clicking to sample often. Don’t worry about painting over other parts of the subject, since a layer mask cleans that up afterwards.
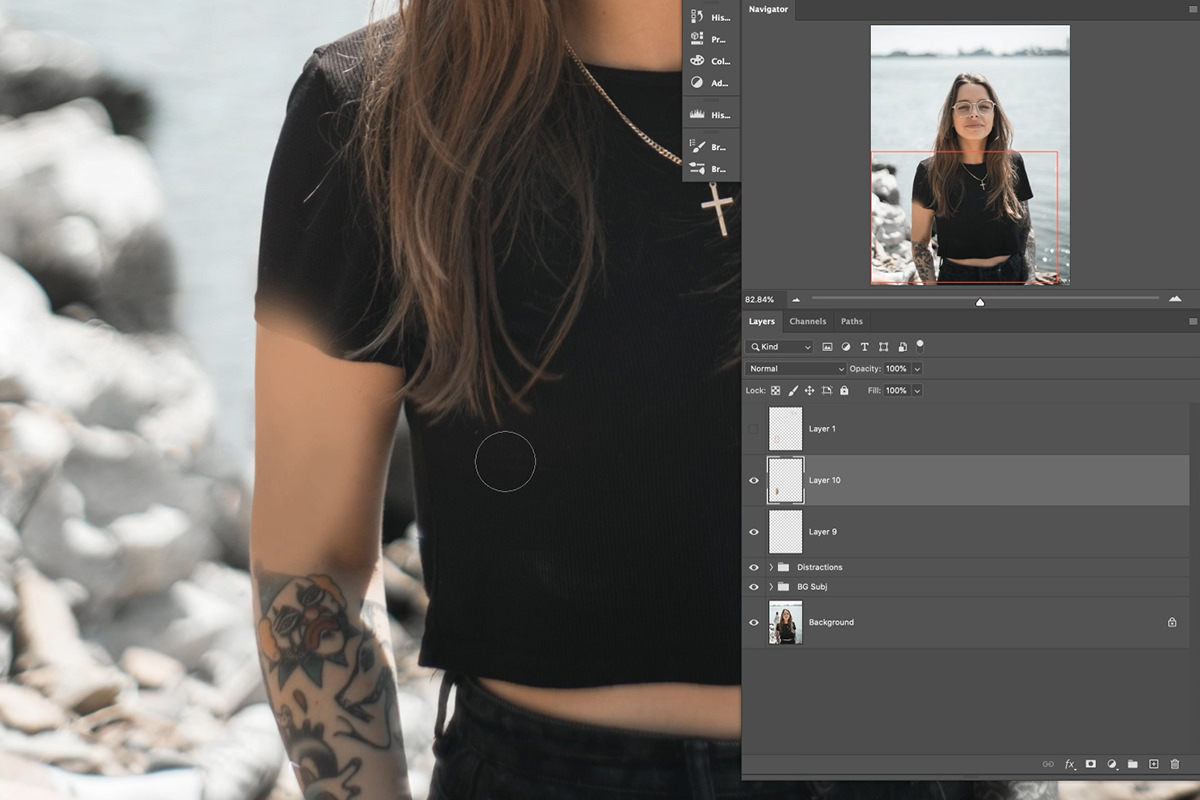
You should end up with something like the image above. If you did paint over other tattoos or the shirt, use a layer mask on the brush layer to refine it.
Recreating Highlight and Shadow
The tattoo is covered, but it doesn’t look real, because the painted area is missing two things: highlight and shadow information, and skin texture. Highlights and shadows come first.
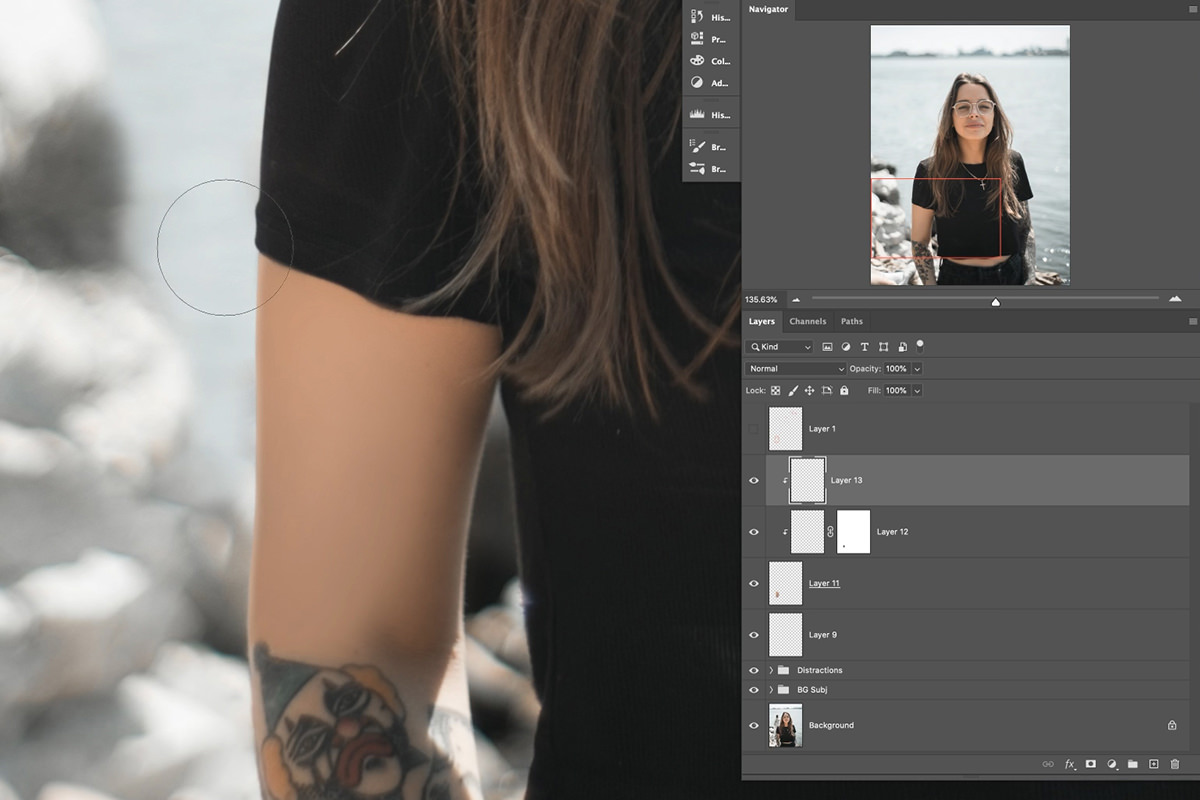
This is Brush Tool work plus some trial and error. Sample highlight and shadow information from elsewhere in the photo and paint with those shades, paying close attention to how the light in the environment falls across the subject. A large soft brush at low Flow is what makes it transition naturally.
The painted layer will look too visible and too well defined, so soften it with Filter, Blur, Gaussian Blur and lower the layer to about 70% opacity, masking it away from the shirt.
Then build an edge highlight. Turn the arm path into a selection again, and on a new layer paint a very bright skin color along the outside edge of the arm. Press M, nudge the selection left with the Left Arrow key a couple of times and press Delete, leaving a thin line of highlight. Move it into place, give it a small Gaussian Blur and clip it with Alt + Ctrl + G (Option + Command + G on a Mac) so it only shows on the arm. A second low-Flow pass, at about 20% opacity, adds a little more.
Borrowing Skin Texture with High Pass
The best way to recreate skin texture is to borrow it from skin elsewhere in the same photo. Here that’s the subject’s neck, where the area size and lighting match the arm reasonably well. The method is one normally reserved for professional sharpening.
Create a new layer, select the Clone Stamp Tool, sample a spot on the neck and paint until you have a duplicate of the whole neck area, then make it a little bigger. Desaturate it with Shift + Cmd/Ctrl + U, right-click the layer and choose Convert to Smart Object, then set its blending mode to Overlay, then go to Filter, Other, and High Pass. Adjust the slider until the texture closely matches the skin on the arm and click OK. You now have a layer holding nothing but texture information, free to move and transform anywhere.
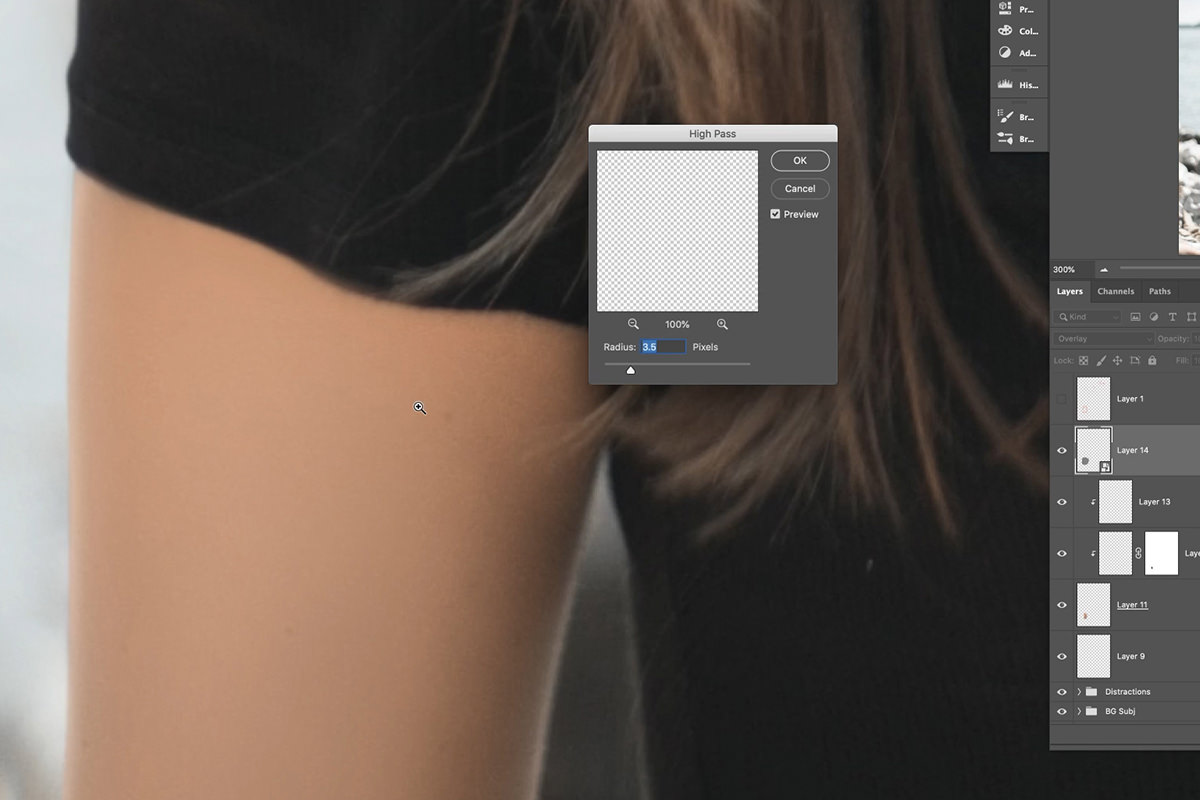
Move that texture layer over the removed tattoo, add a layer mask, invert it and paint white where the arm needs texture. Duplicate the layer to cover the top and the bottom of the area, then on a new layer use the Spot Healing Brush to remove a few marks, so the same detail isn’t seen twice.
Color Grading with Solid Color Fill Layers
The last part of a portrait edit, and the most enjoyable, is the color grade. There are countless approaches; this one is both fast and effective.
Solid Color Fill layers don’t look like candidates for subtle toning, being flat blocks of a single color by default. With blending modes, though, they inject color carefully into the highlights and shadows of any image.
Coloring the Shadows
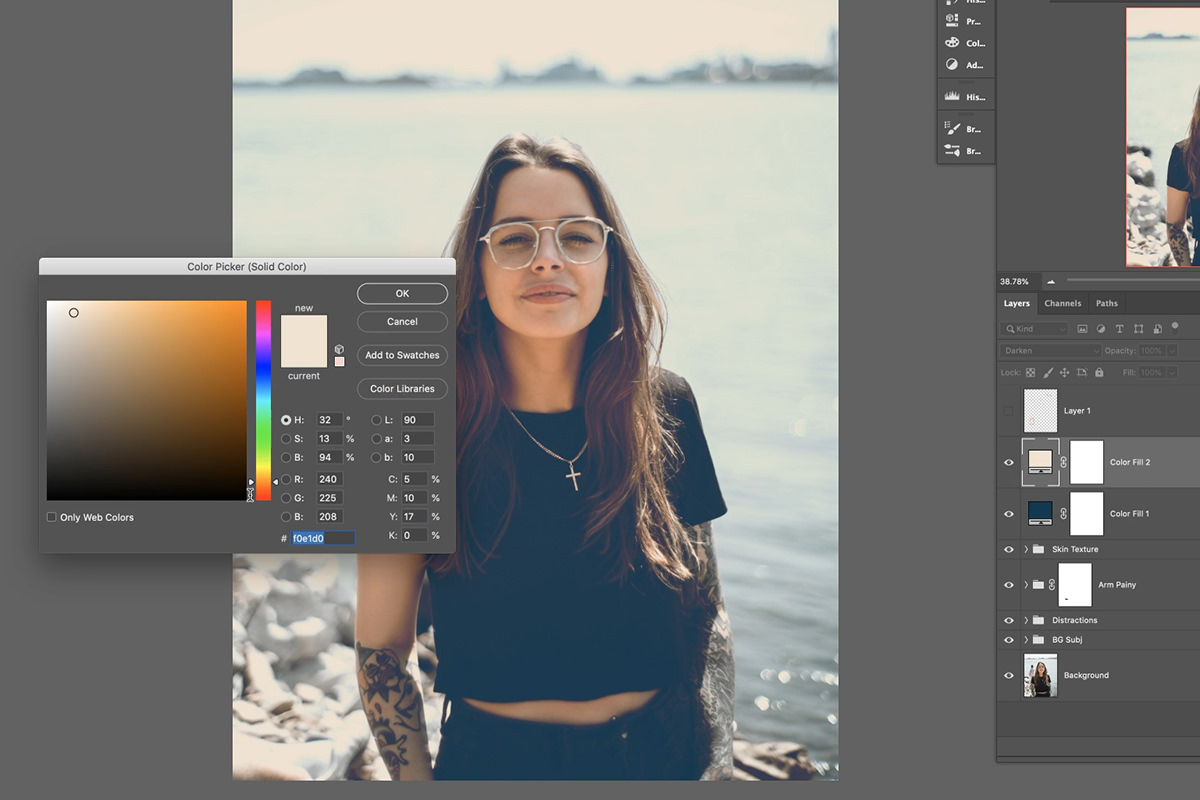
Create a Solid Color Fill layer without worrying about the exact color yet, and set its blending mode to Lighten, which confines it to the shadows. Now open the Color Picker and dial in the color while watching the result in real time. Keep it on the darker end of the spectrum, or the image ends up flat and unnatural.
Coloring the Highlights
The same technique handles the highlights. Create another Solid Color Fill layer and set its blending mode to Darken so it appears only in the brighter areas, then choose a relatively light color. That’s beautiful color in both the shadows and the highlights.
If the two layers are a little too much, group them, press V for the Move Tool and then 5 to set the whole group to 50% opacity.
Why the Path Is the Key Step
Every removal in this edit runs into the same wall: healing tools spread, and the thing you want gone is touching the thing you must not touch. A saved Pen Tool path solves it once and then keeps solving it, because a selection made from that path confines the healing to one side of the edge, and inverting the same selection confines it to the other. That’s why the tattoo removal later costs almost nothing — the hard work was already saved in the Paths panel.
Final Thoughts
Plan the edit on a marked-up layer, remove the bulk with the Spot Healing Brush on a new layer with Sample All Layers checked, then draw and save a Pen Tool path along any edge that needs protecting. Cover a tattoo with sampled skin color, rebuild its highlight and shadow by hand, borrow real texture from elsewhere in the photo with a High Pass layer on Overlay, and finish with two Solid Color Fill layers set to Lighten and Darken, grouped at 50% opacity, for the grade.
Quick Reference: Keys, Menus and Settings
- Heal on a new layerSpot Healing Brush, Type: Content-Aware, Sample All Layers; Healing Brush with Alt/Option-click where it looks unnatural
- Protect the edgeP for the Pen Tool, Alt/Option to change direction; gear icon > Rubber Band; right-click the path > Make Selection, Feather 1.5 px
- Clone inside itClone Stamp, Sample: Current & Below; Cmd/Ctrl + H hides the selection edges
- Paint out the tattooSelect > Inverse; B, large soft brush, Opacity 100%, Flow 10%
- Add depthFilter > Blur > Gaussian Blur, about 70% opacity; M and arrow keys to nudge; clip with Alt/Option + Cmd/Ctrl + G
- Borrow textureShift + Cmd/Ctrl + U, Convert to Smart Object, Overlay, Filter > Other > High Pass
- Color gradeSolid Color layers on Lighten (shadows) and Darken (highlights); group, V then 5 for 50%
No AI, no generative credits.
Free Downloads
Follow Along on the Same Portrait
Get the 2 sample images, including the portrait from the video, the layered TIF, and the 4-page PDF guide to removing the person, the glare and the tattoo. Free with a PHLEARN account.
Portrait Editing: Common Questions
How do I remove a person from the background in Photoshop?
On a new layer, paint over them with the Spot Healing Brush set to Content-Aware with Sample All Layers checked. It handles most of it; for the part touching your subject, use a selection and the Clone Stamp.
How do I remove something right next to my subject without painting over them?
Trace the subject’s edge with the Pen Tool, right-click the path and choose Make Selection, feathered by 1.5 pixels. On a new layer, the Clone Stamp set to Current & Below can only paint inside the selection.
How do I make the Pen Tool easier to control?
Click the gear icon in the options bar and turn on Rubber Band. It previews the next segment before you click. Click and drag for curves, and hold Alt/Option to change direction.
How do I hide the selection outline while I paint?
Press Cmd/Ctrl + H. The first time, Photoshop may ask whether to hide Photoshop or hide extras; choose Hide Extras. The selection stays active.
How do I remove glare in glasses and bright spots on skin?
Start with the Spot Healing Brush on a new layer. Where it doesn’t look natural, switch to the regular Healing Brush, Alt/Option-click to choose the sample point and paint. A Brush Tool layer at very low Flow smooths what’s left.
How do I remove a tattoo in Photoshop?
Reuse the arm path as a selection and go to Select > Inverse so you can’t paint past the edge. On a new layer, paint sampled skin color with a large soft brush at 100% Opacity and 10% Flow, then mask the paint off the shirt.
Why does the painted skin look flat?
It has no highlight, shadow or texture. Paint shadow and highlight on a new layer, soften it with Filter > Blur > Gaussian Blur at about 70% opacity, and add a thin edge highlight clipped with Alt/Option + Cmd/Ctrl + G.
How do I put skin texture back on a painted area?
Clone skin from elsewhere in the photo, here the neck, onto a new layer. Desaturate it with Shift + Cmd/Ctrl + U, convert it to a Smart Object, set it to Overlay and run Filter > Other > High Pass, then mask it onto the area.
How do I color grade with Solid Color fill layers?
Set one Solid Color layer to Lighten to color the shadows and another to Darken to color the highlights, then double-click each thumbnail to dial in the color. Group them and press V, then 5, to set the group to 50% opacity.
Are the sample files free?
Yes, with a free PHLEARN account. You get 2 sample images, 1 layered TIF and 1 PDF guide, including the portrait from the video and the 4-page guide to every step of the edit.
Master Photoshop, Lightroom and Photography
Join PHLEARN PRO for $12.99 a month or $99.99 a year. Cancel anytime, with a 100% money-back guarantee.





