

Download Assets
This tutorial includes 38 sample images and 1 PDF guide. Downloads are free with a PHLEARN account.
- Download the sample images and PSDs from every free tutorial on PHLEARN
- New free tutorials published every week
- One free account — sign up once, then download anything
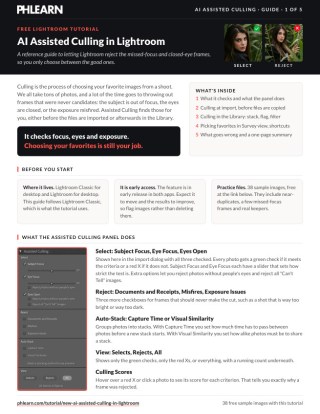
Free PDF Guide · 5 Pages
This Tutorial as a Step-by-Step PDF
Every step from the video in order: Assisted Culling in the import dialog, the three focus checkboxes and their thresholds, the Rejects view, Auto Stack by capture time, Batch Actions for pick and reject flags, the Library Filter, and Survey view with N and Shift+Tab. Keep it next to your keyboard.
description
AI Assisted Culling exists for one reason. Come back from a wedding or a sports fixture with three thousand frames and the first two hours are not editing. They’re rejection — the ones where the subject blinked, the ones where the camera focused on the wall behind, the ones where the exposure misfired between shots. Nobody enjoys it, and it requires no taste.
That is exactly the part Lightroom’s AI Assisted Culling takes on. It checks three specific technical faults — subject focus, eye focus and eyes open — and flags what fails, at import, before the files have even finished copying. What’s left for you is the artistic selection, which was always the only part worth your time.
Enjoying This Free Tutorial?
We publish a new free tutorial every week, each one with sample images and PSDs you can download and follow along with. Sign up and they land straight in your inbox, along with early word on sales, events and subscriber-only offers.
Image Source
AI Assisted Culling Does the Boring Half of the Edit, Not the Interesting One
Come back from a wedding or a sports fixture with three thousand frames and the first two hours are not editing. They’re rejection: the ones where the subject blinked, the ones where the camera focused on the wall behind, the ones where the exposure misfired between shots. Nobody enjoys it and it requires no taste.
That is precisely the part Lightroom’s AI Assisted Culling now takes on. It looks for three specific technical faults — subject focus, eye focus, and eyes open — and flags what fails. What it does not do, and is not trying to do, is tell you which of the technically fine photographs are any good.
What It Actually Checks For
Three Criteria, All Technical
Subject Focus, Eye Focus, and Eyes Open. Every one of them has a right answer that doesn’t depend on judgement, which is exactly why a machine can be trusted with them.
You Set the Strictness
Numerical sliders, not a fixed threshold. Raise Subject Focus and more frames get flagged. A studio portrait session and a hand-held gig deserve very different settings.
It’s an Early-Access Feature
AI Assisted Culling is currently in early release in both Lightroom Classic and Lightroom. Expect it to move, and expect the results to improve.
Cull Before the Files Even Land
-
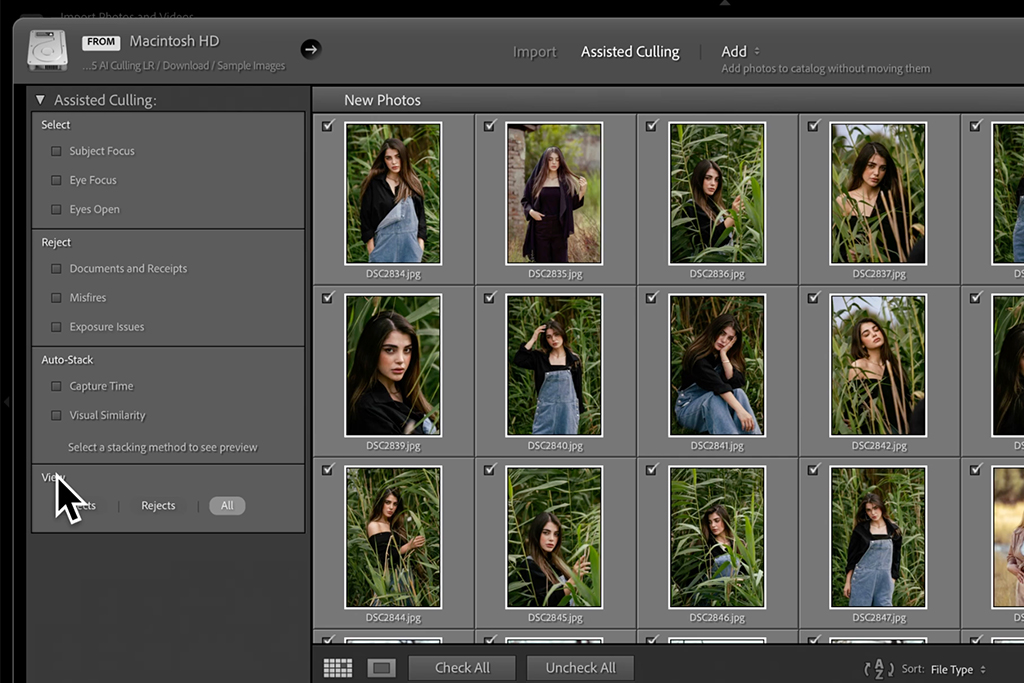
Open the AI Assisted Culling Module in the Import Dialogue
This is the part most people miss: AI Assisted Culling runs during import, before anything is copied.
-
Choose Your Criteria
Subject Focus, Eye Focus, Eyes Open — any combination. As the analysis runs, a red X appears over every frame that fails.
-
Deselect the Rejects Before Importing
Unticking a flagged frame keeps it off your drive entirely. On a large shoot that’s real disk space saved and, more usefully, a catalogue that never fills with rubbish in the first place.
-
Override Anything You Disagree With
Re-tick a rejected frame and it imports. The AI proposes; you decide. A soft-focus shot can be the best one in the take, and the machine has no way of knowing that.
Tune the Criteria Once They’re In
-
Press G for Grid View in the Library Module
Then open the Assisted Culling and Culling Score panel.
-
Adjust the Strictness Sliders
Push Subject Focus up and watch the red Xs multiply. It’s worth doing this on a shoot you already know well — you’ll quickly find the setting that matches your own tolerance rather than Adobe’s default.
-
Use Auto Stack to Group the Near-Duplicates
By capture time or by visual similarity. On burst-heavy work this collapses forty near-identical frames into one stack, which is often a bigger time saving than the rejection itself.
Flag in Bulk, Then Filter
-
Open Batch Actions Under Organize Results
This is where the analysis becomes something you can act on.
-
Apply Pick Flags to the Passes and Reject Flags to the Fails
White flag for everything meeting your criteria, black flag for everything failing. One action across the whole shoot.
-
Filter With the Attribute Section of the Library Filter Bar
Now you can look at only the picks, or only the rejects. The rejects are worth a skim before you delete anything — that’s where the AI’s mistakes live.
Finish the Selection by Eye
-
Press N for Survey View
With the technical rejects already gone, you’re comparing only frames that are all sharp and all correctly exposed.
-
Remove Images From the Comparison as You Go
Click the X on a thumbnail, or Cmd/Ctrl-click to drop several. Narrowing down from twelve good frames to two is the part of culling that was always worth your time, and it’s now the only part left.
Where It Goes Wrong
Deleting the Rejects Unseen
Look through them once. Deliberate motion blur, an intentional soft focus, a half-closed eye that reads as a laugh — all three fail the criteria and all three can be the shot.
Leaving the Sliders at Default
The right strictness for a studio headshot session is not the right strictness for a dark reception. Spend two minutes calibrating.
Expecting It to Judge Quality
It has no opinion about composition, expression or moment, and it isn’t pretending to.
Skipping the Import-Time Pass
Culling at import is where the real time and disk saving is. Doing it afterwards works, but you’ve already copied everything.
Forgetting It Is Early Access
Don’t build an irreversible workflow on it yet. Flag, don’t delete.
This Is the Right Kind of Thing to Automate
A lot of AI features in photography software try to make aesthetic decisions, and those are the ones worth being sceptical about. This one is different in kind: whether a subject’s eyes are open has a correct answer that everyone would agree on, and checking three thousand frames for it is work with no craft in it whatsoever.
The useful way to think about the whole feature, then, is as a filter rather than an editor. It removes the frames that were never candidates, so that the hour you spend choosing is spent on photographs that could all plausibly be the one. That hour was always the valuable part — it just used to be buried under two hours of clicking through blinks.
Try It on Your Next Real Shoot
Open the Assisted Culling module in the Import dialogue, tick Subject Focus and Eyes Open, and deselect what gets flagged before anything copies. Download the 38 free sample images and run the whole thing end to end — tune the strictness sliders in Grid View, Auto Stack the near-duplicates, batch-apply Pick and Reject flags, then filter to your picks and finish in Survey View with N. For Lightroom taught properly rather than feature by feature, our PRO Power of Masking and Coloring in Lightroom is the place to go next.
Quick Reference: Keys, Menus and Settings
- On importImport dialog > Assisted Culling: tick Subject Focus, Eye Focus, Eyes Open; View > Rejects shows the red X photos; uncheck to leave them on the card
- Too strict?Lower the score threshold on the left until the photo gets a green check
- ExtrasReject documents and receipts, reject misfires and exposure issues, Auto Stack by capture time or visual similarity
- In the LibraryAssisted Culling panel > Stacking > Auto Stack by capture time > Stack
- Flag everything at onceOrganize Results > Batch Actions: Pick flag for selects, Reject flag for rejects (or stars, color labels, a collection)
- See only the keepersLibrary Filter > Attribute > flag; Photo > Stacking > Collapse All Stacks
- Pick favorites by eyeShift-click a few rows, N for Survey view, Shift + Tab hides the panels, click the X (or Cmd/Ctrl-click) to drop one, 5 for five stars, G back to the grid
- Ratings1–5 stars, 0 clears, 6–9 color labels
Lightroom Classic shown; the same panel is in Lightroom desktop.
Free Downloads
Follow Along on the Same Shoots
Get all 38 sample images from the three shoots in the video plus the PDF guide, and run the same cull. Free with a PHLEARN account.
AI Assisted Culling: Common Questions
What does Assisted Culling check?
Three things, each with a score: is the subject in focus, are the eyes in focus, and are the eyes open. It can also reject documents and receipts and exposure misfires, and stack photos by capture time or similarity. It’s in Lightroom Classic and Lightroom desktop.
Why cull in the import dialog?
To decide what leaves the memory card. Tick the criteria, switch the view to Rejects, and anything unchecked never lands on your computer or in the cloud. Re-check any reject you want to keep anyway.
It rejected a photo I think is fine. Can I loosen it?
Yes. Each criterion has a threshold. In the video a frame scored 43 for subject focus and showed a red X; dropping the threshold to 40 turned it into a green check. You decide how strict it is.
What about intentional closed eyes?
Look at the Rejects view before importing. Aaron kept two eyes-closed frames because they worked as stylized shots. The tool flags; you choose.
How does stacking help?
Auto Stack by capture time sorted three separate shoots into three stacks on the default setting. Later, Photo > Stacking > Collapse All Stacks tidies the grid, and dragging each stack into its own folder organizes the files on disk too.
How do I turn the scores into flags?
Organize Results > Batch Actions. Selects get a Pick flag, rejects get a Reject flag (stars, color labels or a collection are options too). Then filter by flag in the Library Filter’s Attribute row.
How do I pick the final favorites?
By eye, in Survey view. Shift-click a couple of rows, press N, Shift+Tab to hide the panels, click the X on anything that doesn’t make it, and press 5 on the keepers. Three shoots took a few minutes.
Does it work with RAW files?
Yes. The video uses Add to keep JPEGs in place; with RAW files you’d Copy or Copy as DNG, and the culling works the same way.
Are the sample files free?
Yes, with a free PHLEARN account. You get all 38 images from the three shoots and the PDF guide.
Master Photoshop, Lightroom and Photography
Join PHLEARN PRO for $12.99 a month or $99.99 a year. Cancel anytime, with a 100% money-back guarantee.





