Learn how to Create Light Rays and Dust Particles Using a Custom Brush in Photoshop.
-

-
Add to
favorites
Download Assets
This tutorial includes 1 Photoshop brush. Downloads are free with a PHLEARN account.
- Free sample files with every tutorial on PHLEARN
- New tutorials published every week
- Unlimited downloads with your free PHLEARN account
description
Learn how to create light rays and dust particles in Photoshop with a custom brush built to beat Photoshop’s own scattering limit. Because scatter distance is tied to brush size, a 500 by 500 canvas with a second tiny dot in the far corner gives particles a huge spread while the visible dot stays small. Painted across several Soft Light layers at different sizes it reads as floating dust, and the same brush plus Motion Blur becomes the light rays.
Enjoying This Free Tutorial?
We publish a new free tutorial every week, each one with sample images and PSDs you can download and follow along with. Sign up and they land straight in your inbox, along with early word on sales, events and subscriber-only offers.
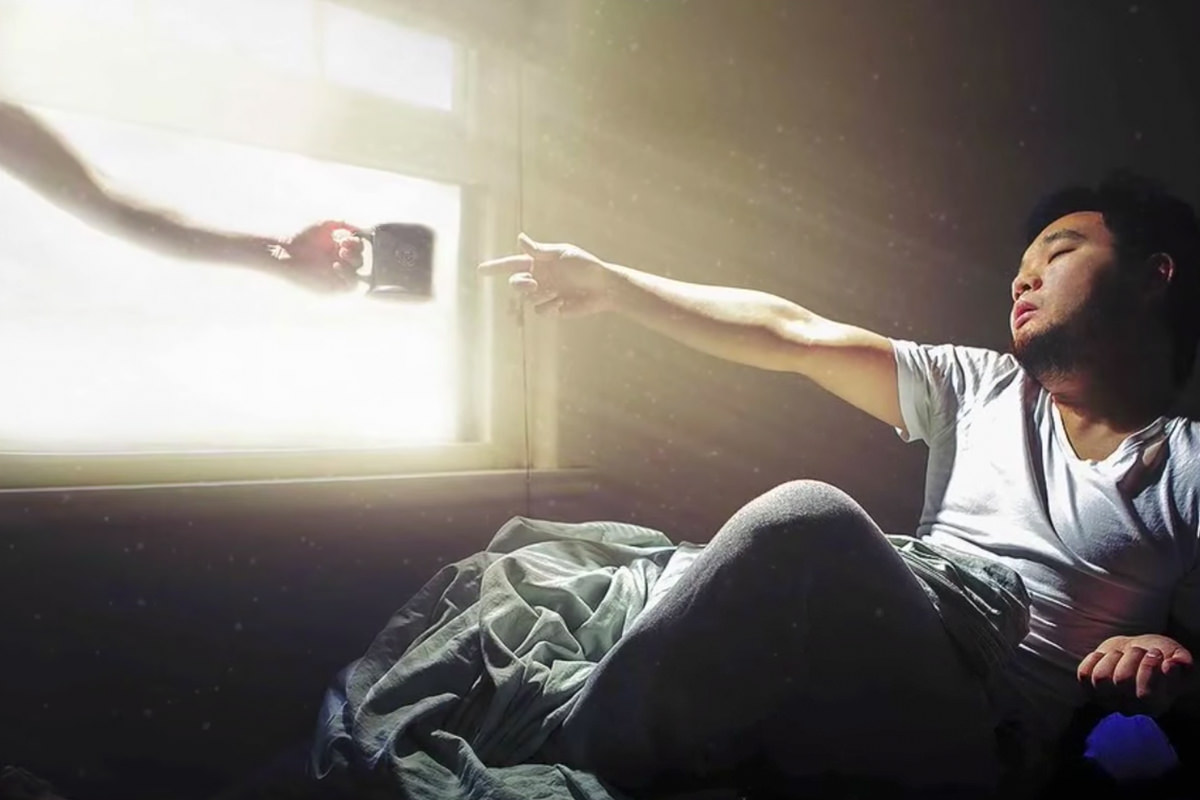
How to Create Light Rays and Dust Particles Using a Custom Brush in Photoshop
A beam of light through a window looks even better with visible dust floating in the air and streaks of light catching that dust, even when neither came through straight out of camera. This tutorial builds a custom brush specifically designed to scatter believably, then uses that same brush for both floating dust particles and motion-blurred light rays.
Why the Default Brush Scattering Falls Short
Photoshop’s built-in Scattering option ties how far particles spread to the brush’s own size, which keeps a small brush’s particles clustered too close together to look like real floating dust.
-
Try Painting Dust With a Regular Brush
Select a regular round brush and try painting a few dots to represent dust particles.
-
Turn On Shape Dynamics and Scattering
Go to Window > Brush to open the Brush panel, raise Size Jitter under Shape Dynamics, and raise the Scattering value.
-
Notice the Particles Stay Too Close Together
Notice that even with scattering turned up, particles from a small brush only spread within a small area, since scattering distance is tied to brush size.
Building and Testing a Custom Brush Canvas
A brush built from a small document with two dots, one large and visible and one tiny and far away, tricks Photoshop into treating the whole canvas as the brush size while only showing one small dot.
-
Create a New 500 by 500 Pixel Document
Press Cmd/Ctrl+N and create a new document at 500 by 500 pixels.
-
Paint a Dot in One Corner
Choose a regular round brush and paint a black dot in the bottom right corner of the canvas.
-
Paint a Tiny Dot in the Opposite Corner
Switch to a much smaller brush and paint a tiny dot in the top left corner of the canvas.
-
Define the Brush Preset
Go to Edit > Define Brush Preset and name the new brush.
-
Shrink the Brush Size to Hide the Extra Dot
Switch to the working document, select the new brush, and shrink its size down until only the corner dot remains visible.
Why a Second, Distant Tiny Dot Makes the Trick Work
Because Photoshop treats the entire 500 by 500 canvas as the brush’s true size, scattering spreads particles across that full area rather than a tiny, cramped one. Shrinking the brush down afterward keeps the visible dot small while preserving that same large underlying scatter radius, which is exactly what makes the particles spread out convincingly.
Maximizing Randomness in the Brush Settings
Pushing Shape Dynamics and Scattering to their extremes on this new brush produces particles that no longer look like an obviously repeated stamp.
-
Raise Size Jitter and Lower Minimum Diameter
Under Shape Dynamics, raise Size Jitter and lower the minimum diameter so particle sizes vary widely.
-
Raise Angle Jitter
Raise Angle Jitter as well so each particle’s rotation also varies randomly.
-
Increase and Break Up Scattering
Click on Scattering, raise the amount significantly, and turn on Both Axes so particles spread widely in every direction rather than along a single line.
Painting Multiple Dust Layers at Different Scales
Painting the same custom brush across several separate layers, at different sizes and opacities, builds up dust that reads as naturally varied rather than uniform.
-
Paint a Layer of Dust
Create a new layer and paint dust across it with the custom scatter brush.
-
Change the Layer to Soft Light
Change that layer’s blend mode from Normal to Soft Light so the dust blends into the image’s existing light and color.
-
Lower the Opacity
Reduce the layer’s opacity so the dust reads as subtle rather than overwhelming.
-
Repeat With Different Brush Sizes
Create additional new layers, adjusting the brush size larger or smaller each time, and change each new layer to Soft Light as well.
Why Multiple Layers at Different Opacities Look More Convincing
Real floating dust naturally varies in size, brightness, and density depending on distance and lighting, which a single flat layer of identical particles can’t capture. Building up several separate layers, each at a different particle size and opacity, recreates that same natural variation instead of one obviously uniform effect.
Sampling Color From the Image for the Dust
Sampling a light color directly from the photo, rather than using plain white, keeps the dust particles’ color consistent with the rest of the scene.
-
Sample a Light Color From the Photo
Press B for the Brush tool, hold Option/Alt, and sample a light color already present in the image.
-
Paint Larger Particles With That Color
Increase the brush size and paint a new layer of larger dust particles using that sampled color.
Creating Light Ray Streaks With Motion Blur
The exact same custom brush, painted near a light source and stretched with Motion Blur, can double as the streaked light rays cutting through the dust.
-
Adjust the Brush Settings for Larger Particles
Lower the Scattering amount slightly and increase the brush size to create larger particles near the light source.
-
Paint Near the Light Source
Paint a new layer of these larger particles in the area right around the light source, such as near a window.
-
Apply Motion Blur
Go to Filter > Blur > Motion Blur, choose an angle that matches the direction of the light, and set a distance for the streak length.
Building Up the Streak Effect With the Repeat Filter
Pressing the repeat filter shortcut reapplies the same Motion Blur settings instantly, making it fast to build up progressively stronger light streaks.
-
Paint Another Small Amount of Particles
Paint a bit more of the particle brush in the same area near the light source.
-
Reapply the Same Blur With a Shortcut
Press Cmd/Ctrl+F to reapply the exact same Motion Blur settings again without reopening the dialogue.
-
Repeat and Change to Soft Light
Repeat painting and reapplying the blur across a few layers as needed, then change each of those layers to Soft Light as well.
Why Repeating the Same Filter Beats Reopening the Dialogue
Reopening the Motion Blur dialogue every time risks accidentally choosing a slightly different angle or distance than before, which would make the streaks look inconsistent with each other. The repeat filter shortcut reapplies the identical settings instantly, keeping every additional pass of blur perfectly consistent with the last.
Saving the Custom Brush for Reuse
Saving the final brush settings as a new preset keeps this exact scatter brush available for future images without rebuilding it from scratch.
-
Open the Brush Preset Menu
Press B for the Brush tool, right-click, and click the gear icon in the panel that appears.
-
Choose New Brush Preset
Choose New Brush Preset, rather than Save Brushes, since Save Brushes exports the entire brush set instead of just this one.
-
Name and Save the Brush
Name the new preset something identifiable, such as Scatter Dust, and save it.
Masking the Light Flare Layers Where Unwanted
Grouping the light ray layers and adding a mask keeps the streaked light contained to where it actually makes sense in the frame.
-
Group the Light Ray Layers
Shift-click the light ray layers and press Cmd/Ctrl+G to group them together.
-
Add a Layer Mask to the Group
Add a layer mask to the group and paint black with a regular brush around any edges where the effect shouldn’t appear.
-
Group Everything Together
Group the dust and light ray effects together as a final step, once both are finished.
Why This Approach Works
Building the custom brush from an oversized canvas with a distant second dot is what solves the built-in scattering limitation, giving particles a much larger area to spread across than the brush’s visible size would normally allow. Using layered opacity and varied particle sizes across several passes, rather than one single layer, is what makes the dust read as naturally varied instead of obviously repeated. Reusing the exact same brush for both dust and motion-blurred light rays is what ties the whole atmospheric effect together as one consistent look.
Final Thoughts
A custom brush built once this way keeps paying off on every future image that could use a little floating atmosphere or a beam of light catching visible dust. Saved as a preset, the same brush and blur combination is ready to drop into any photo with a strong light source, no rebuilding required.
Quick Reference: Keys, Menus and Settings
- Brush panelWindow > Brush: Shape Dynamics and Scattering
- Make the brushCmd/Ctrl + N, 500 x 500 px; dot bottom right, tiny dot top left; Edit > Define Brush Preset
- RandomizeSize Jitter all the way up, Minimum Diameter down, Angle Jitter up, Scattering up
- Dust layersSoft Light, lower Opacity; B + Alt/Option-click to sample a light color
- Light raysFilter > Blur > Motion Blur, Angle to match the light; Cmd/Ctrl + F repeats it
- Save the brushB, right-click, gear icon > New Brush Preset
- Contain the raysCmd/Ctrl + G, mask the group, paint black
No AI, no generative credits.
Free Downloads
Paint With the Same Brush
Get the custom dust brush saved in the video, with its jitter and scattering set, ready to paint dust and light rays into any photo. Free with a PHLEARN account.
Dust and Light Ray Brush: Common Questions
Why do my scattered brush particles stay so close together?
Scattering is tied to the brush size. A small brush can only scatter its dots within a small area, which looks more like fairy dust than floating dust.
How does the custom dust brush get around that?
Make a 500 by 500 pixel document, paint a black dot in the bottom right corner and a tiny dot in the top left, then choose Edit > Define Brush Preset. Photoshop treats the brush as 500 pixels wide, so when you shrink it, the tiny dot disappears but the scatter stays wide.
Which brush settings make the dust look random?
In the Brush panel, turn Size Jitter all the way up, Minimum Diameter down and Angle Jitter up under Shape Dynamics, then raise Scattering.
How do I make the dust blend into the photo?
Paint each pass on its own layer, set it to Soft Light and lower the opacity; Aaron used about 20 to 30% for the tiniest particles. Sample a light color from the photo with Alt/Option instead of using plain white.
How do I get dust of different sizes?
Change the brush size between layers: one layer of larger particles, one at a normal size and one of very small specks. Right-click to resize the brush as you go.
How are the light rays made?
With the same brush, lower Scattering a little, make it bigger and paint near the window on a new layer. Then go to Filter > Blur > Motion Blur, match the Angle to the light and set a Distance, and switch the layer to Soft Light.
How do I repeat the same Motion Blur quickly?
In the video, Cmd/Ctrl + F reapplies the last filter with the same settings. Paint a little more, press it again, and the streaks build up without reopening the dialog.
How do I save the brush with its settings?
Press B, right-click, click the gear icon and choose New Brush Preset. Save Brushes would save the whole set instead of just this brush; Aaron named his Scatter Dust.
How do I keep the light rays where they belong?
Shift-click the ray layers and press Cmd/Ctrl + G to group them, add a layer mask to the group and paint black around the edges where the light shouldn’t reach.
Is the dust brush free?
Yes, with a free PHLEARN account. You get 1 Photoshop brush: the custom dust brush saved in the video, ready to paint dust and light rays.
Master Photoshop, Lightroom and Photography
Join PHLEARN PRO for $12.99 a month or $99.99 a year. Cancel anytime, with a 100% money-back guarantee.





