

description
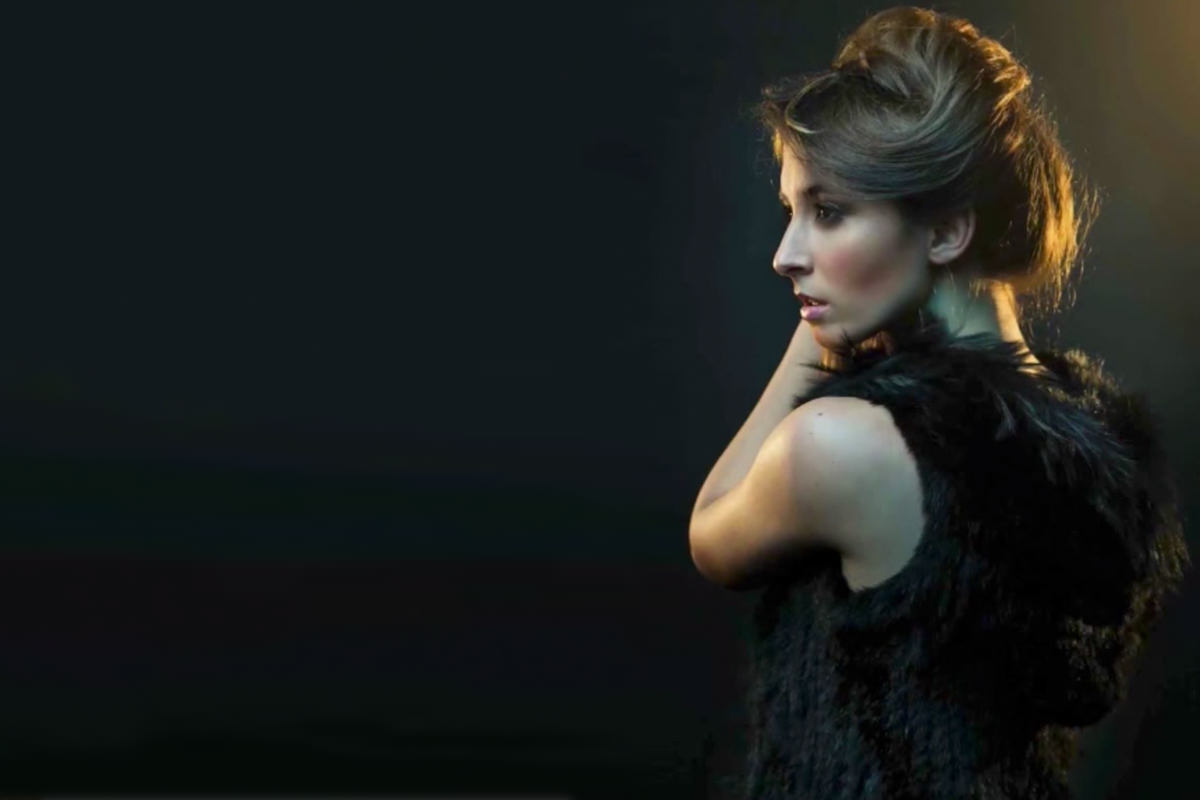
Learn how to recover shadow detail in Photoshop with the Shadows/Highlights adjustment, and why it has to be applied to a duplicated pixel layer rather than an adjustment layer. Show More Options unlocks the controls that matter, and balancing Amount against Tonal Width and Radius is what brings dark clothing and shaded areas back without the flat, HDR look. A black mask keeps it on the subject, and a sampled radial flare blended with Apply Image finishes the shot.
Enjoying This Free Tutorial?
We publish a new free tutorial every week, each one with sample images and PSDs you can download and follow along with. Sign up and they land straight in your inbox, along with early word on sales, events and subscriber-only offers.
Amazing Trick to Recover Shadow Detail in Photoshop
Dark clothing, shaded backgrounds, and other overly dark areas can hide real detail that’s still recoverable without touching the rest of the image. This tutorial uses Photoshop’s Shadows/Highlights adjustment to bring that detail back, then finishes with a bonus rim-light flare built from a color already in the photo.
Duplicating the Background Layer
Shadows/Highlights only works directly on a pixel layer rather than as a separate adjustment layer, so duplicating the background first keeps the original image intact.
-
Duplicate the Background Layer
Press Cmd/Ctrl+J to duplicate the background layer.
Why Shadows/Highlights Needs a Duplicated Layer
Unlike Curves or Levels, Shadows/Highlights doesn’t exist as an adjustment layer and has to be applied directly onto a layer’s actual pixels. Duplicating the background first means that direct, non-reversible adjustment lands on a copy, keeping the original background layer available underneath if anything needs to be undone later.
Opening Shadows/Highlights and Showing More Options
The default Shadows/Highlights dialogue only shows a basic amount slider, but switching to the expanded view unlocks the controls that actually make the adjustment precise.
-
Open Shadows/Highlights
Go to Image > Adjustments > Shadows/Highlights on the duplicated layer.
-
Click Show More Options
Click Show More Options to reveal the full set of shadow and highlight controls.
-
Reset Everything to Zero First
Bring all the values down to zero to start from a neutral baseline before adjusting anything.
Bringing Up Shadow Detail With Amount
Raising the shadow Amount slider brightens dark areas while leaving highlights largely untouched, at least up to a point.
-
Raise the Shadows Amount
Increase the shadows Amount value to bring up detail in the darkest parts of the image.
-
Watch for an Unnatural, HDR-Like Look
Notice that pushing the amount too far on its own starts to create an artificial, HDR-style look.
Fine-Tuning With Tonal Width and Radius
Adjusting Tonal Width and Radius alongside Amount is what makes it possible to push shadow detail further while keeping the result looking natural.
-
Raise the Radius
Increase the Radius value, since a very low radius limits how far the Amount slider can be pushed before looking unnatural.
-
Raise the Tonal Width
Increase Tonal Width to include a bit more of the highlight range in the adjustment as well.
-
Find the Sweet Spot Between the Three
Balance Amount, Tonal Width, and Radius together until shadow detail comes through clearly without looking artificial.
Why Amount, Tonal Width, and Radius Have to Move Together
Amount alone controls how much brightening happens, but Radius and Tonal Width control how naturally that brightening blends into the surrounding tones. Adjusting all three together is what allows a strong recovery of shadow detail that still reads as a believable part of the original photo, rather than an obvious edit.
Controlling the Highlights Side
The Highlights controls in the same dialogue work similarly but in the opposite direction, pulling back any areas that have become too bright.
-
Raise the Highlights Amount if Needed
Increase the highlights Amount slightly if parts of the image have become too bright.
-
Adjust Tonal Width and Radius for Highlights
Raise the Tonal Width and Radius for highlights slightly as well, generally keeping the radius a bit lower than on the shadows side.
Using Color Correction for Colored Shadows
The Color Correction slider matters much more when the recovered shadow detail has real color to it, rather than neutral tones like black clothing.
-
Check Whether the Shadows Have Color
Consider whether the dark area being recovered is mostly neutral, like black fabric, or has strong color, like a dark green forest.
-
Raise Color Correction for Colored Shadows
Increase Color Correction if the recovered shadows need more of their original color saturation brought back.
Masking the Recovery to Specific Areas
A black layer mask, painted with white only where needed, keeps the shadow recovery contained to areas like the subject while leaving the background as dark as before.
-
Add a Black Layer Mask
Hold Option/Alt and click the Add Layer Mask button on the adjusted layer to add a fully black mask.
-
Paint White Over the Areas That Need Detail
Paint white over areas like a dark dress, the skin, and the hair to bring the shadow recovery back in just there.
-
Leave the Background Dark
Leave the background mostly untouched by the mask so it stays generally darker, keeping the recovered detail focused on the subject.
Adding a Bonus Rim-Light Flare With a Radial Gradient
A radial gradient sampled directly from an existing warm highlight in the hair can be built into a soft flare that matches the image’s own lighting.
-
Select the Gradient Tool
Press G for the Gradient tool.
-
Choose Foreground to Transparent
Open the Gradient Editor and choose the Foreground to Transparent gradient preset.
-
Sample a Warm Highlight Color
Hold Option/Alt and click on an existing warm highlight, such as a rim light in the hair, to sample that color as the foreground.
-
Choose the Radial Gradient Option
Select the Radial Gradient option in the options bar.
-
Drag Outward to Create the Flare
Click and drag outward from the sampled highlight to create a larger, soft glow in that same color.
Blending the Flare Naturally With Apply Image
Applying a snapshot of the image directly onto the flare’s layer mask through Apply Image blends the new glow in far more naturally than a hand-painted mask would.
-
Add a Layer Mask to the Flare Layer
Add a layer mask to the new gradient flare layer.
-
Open Apply Image
Go to Image > Apply Image with the layer mask selected.
-
Keep the Default Settings
Leave the default settings, such as Merge, Multiply, and RGB, exactly as they appear and click OK.
Why Apply Image Blends Better Than a Hand-Painted Mask
Apply Image places an actual snapshot of the image’s own tonal information directly onto the mask, letting the flare naturally follow the existing light and shadow rather than a rough hand-painted shape. That’s what makes lighting effects like this rim-light flare blend into the photo convincingly with almost no manual masking work.
Why This Approach Works
Duplicating the background before applying Shadows/Highlights is what keeps this destructive adjustment from permanently altering the original image data. Balancing Amount, Tonal Width, and Radius together, rather than relying on Amount alone, is what makes it possible to recover real shadow detail without the result looking artificially flattened. Sampling the flare’s color directly from an existing highlight, then blending it in with Apply Image, is what makes an added lighting effect look like it was always part of the original shot.
Final Thoughts
What starts as a quick fix for lost shadow detail ends up opening the door to a bonus creative touch, since the same warm tones recovered from the shadows can also become the basis for a matching flare. Both techniques covered here work on any image with dark areas worth recovering or an existing highlight worth building on.
Quick Reference: Keys, Menus and Settings
- DuplicateCmd/Ctrl + J on the background
- Shadows/HighlightsImage > Adjustments > Shadows/Highlights, Show More Options, start from zero
- Recover the darksShadows: Amount, Tonal Width and Radius together; Highlights Amount up a little, lower Radius
- Colored shadowsRaise Color Correction
- Mask itAlt/Option-click Add Layer Mask, paint white over the subject
- Rim-light flareG, Foreground to Transparent, Radial; Alt/Option-click the hair highlight, drag outward
- Blend the flareLayer mask, Image > Apply Image: Merged, Multiply, RGB
No AI, no generative credits.
Recovering Shadow Detail: Common Questions
Is there a Shadows/Highlights adjustment layer?
No. It has to be applied directly to a layer, so press Cmd/Ctrl + J to duplicate the background first, then go to Image > Adjustments > Shadows/Highlights.
What does Show More Options add?
Tonal Width and Radius for both the Shadows and Highlights, plus Color Correction and Midtone Contrast. Aaron sets everything to zero first, then builds the adjustment up.
Why do my shadows start to look fake or HDR?
The Amount is pushed too far on its own. Balance Amount, Tonal Width and Radius together until you can see the detail without the image looking weird.
What do Tonal Width and Radius do?
Tonal Width sets how far into the brighter tones the adjustment reaches. A very low Radius stops you from raising Amount much before it looks wrong, so bring it up a little.
Should I touch the Highlights sliders?
Only if some highlights are too bright. Raise the Highlights Amount a little to knock them down, with Tonal Width and Radius up slightly and the Radius lower than on the shadows.
When do I need the Color Correction slider?
When the dark areas have real color, like a dark green forest; raising it saturates those darks. For neutral tones like the black top in this photo, it matters much less.
How do I recover detail only on my subject?
Hold Alt/Option and click the Add Layer Mask button for a black mask, then paint white over the dark clothing, skin and hair. The background stays dark.
How do I add a flare that matches the rim light?
Press G, choose Foreground to Transparent in the Gradient Editor and the Radial option, then Alt/Option-click the warm highlight in the hair to sample it. Click and drag outward to make a larger glow in that same color.
How does Apply Image help the flare blend in?
Add a layer mask to the flare layer, go to Image > Apply Image and leave the defaults (Merged, Multiply, RGB). It puts a snapshot of the photo on the mask, so the glow follows the existing light.
Master Photoshop, Lightroom and Photography
Join PHLEARN PRO for $12.99 a month or $99.99 a year. Cancel anytime, with a 100% money-back guarantee.





