
Download Assets
This tutorial includes 1 PDF guide. Downloads are free with a PHLEARN account.
- Download the sample files from every free tutorial on PHLEARN
- New free tutorials published every week
- One free account: sign up once, then download anything
Free PDF Guide · 3 Pages
This Tutorial as a Step-by-Step PDF
The guide walks through a tan built from three adjustment layers: a light orange Solid Color set to Color Burn and kept off the shadows with an Alt/Option-split Blend If slider, a second orange set to Multiply kept off the highlights, then Selective Color on Reds to balance Cyan, Magenta and Yellow. Use it beside your portrait.
description
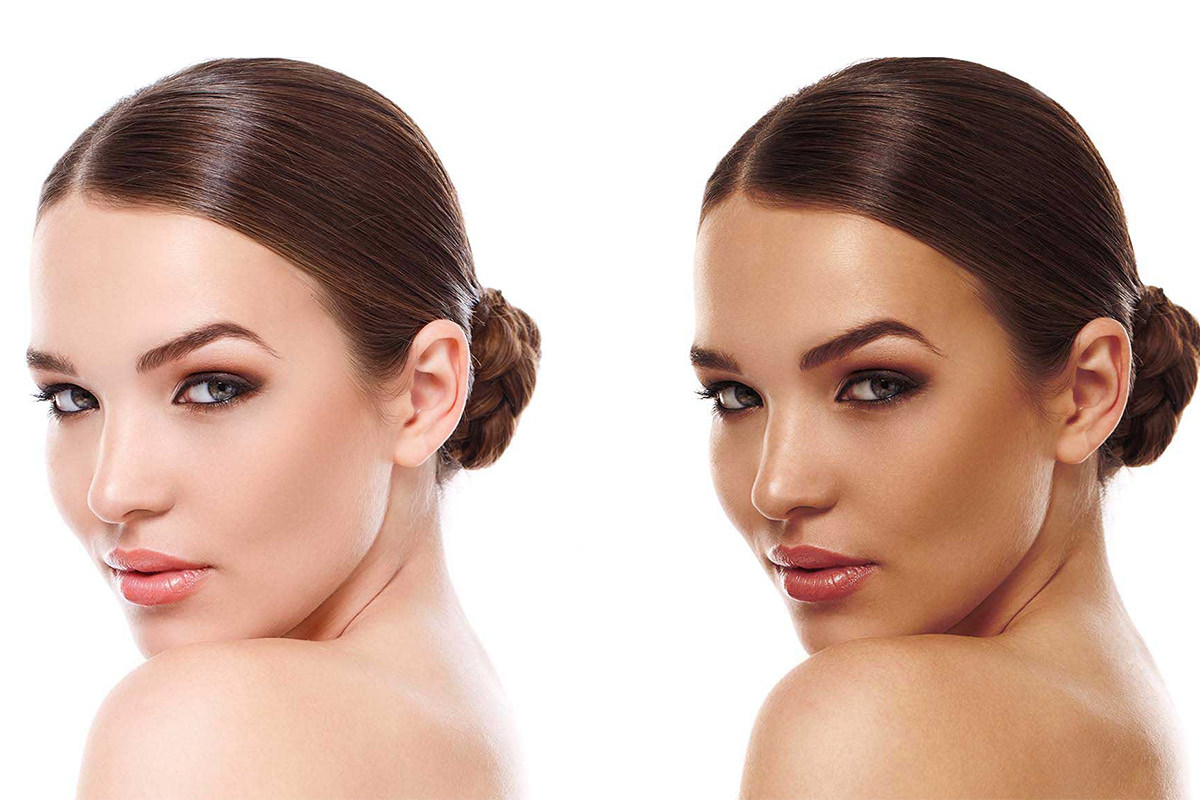
A tan painted on as one flat orange layer reads as a filter. Aaron splits it in two: a Solid Color layer on Color Burn for the highlights, another on Multiply for the shadows, each held to its own half of the tonal range with a split Blend If slider dragged in the opposite direction. A Selective Color layer targeting reds then tunes the skin tone itself rather than the overlay.
Enjoying This Free Tutorial?
We publish a new free tutorial every week, each one with sample images and PSDs you can download and follow along with. Sign up and they land straight in your inbox, along with early word on sales, events and subscriber-only offers.
Adding a believable tan comes down to coloring highlights and shadows separately, since each needs a different blend mode and a different Blend If restriction to look natural. This tutorial covers building a highlight color layer with Color Burn, a shadow color layer with Multiply, restricting each to the correct tonal range, and finishing with a Selective Color adjustment to fine-tune the exact skin tone.
Coloring the Highlights With a Color Burn Layer
A Solid Color adjustment layer set to Color Burn burns a light, desaturated orange into the image, forming the base of the tan before it gets restricted to just the highlights.
-
Add a Solid Color Adjustment Layer
Add a Solid Color adjustment layer and choose a relatively bright, not overly saturated orange.
-
Change the Blend Mode to Color Burn
Change the layer’s blend mode from Normal to Color Burn to burn the orange color into the image.
Restricting the Highlight Color to Just the Highlights
Splitting the Blend If shadow slider and dragging it right removes the Color Burn layer’s effect from the shadows, since Color Burn otherwise darkens and oversaturates them unnaturally.
-
Open Blending Options
Double-click the Solid Color layer, or go to FX > Blending Options, to open its layer style.
-
Split and Drag the Shadow Slider Right
Hold Alt/Option and click the left black slider under Blend If, then drag it to the right until the layer disappears from the shadows.
Why Color Burn Needs to Be Restricted to Highlights Only
Color Burn darkens the underlying colors as it applies, which looks fine in the highlights but turns the shadows too dark and oversaturated once the same orange is burned into them. Restricting the layer to highlights with Blend If keeps the effect exactly where it works, adding warm color to the brighter skin tones without dragging the shadows into an unnatural, muddy color.
Fine-Tuning the Highlight Color and Its Range
Double-clicking the color swatch to adjust hue and saturation, alongside further tweaking the Blend If slider, dials in a highlight tone that looks natural rather than artificial.
-
Adjust the Highlight Color’s Hue
Double-click the color swatch and shift the hue until the tan color lands in the right range instead of looking too orange or too red.
-
Narrow the Blend If Range Further if Needed
Return to Blending Options and drag the shadow slider further right if the color is still affecting too much of the shadow area.
Coloring the Shadows With a Multiply Layer
A second Solid Color layer, this time set to Multiply, adds warmth into the shadows to complete the tan on both ends of the tonal range.
-
Add Another Solid Color Adjustment Layer
Add a second Solid Color adjustment layer and choose a similar orange for the shadows.
-
Change the Blend Mode to Multiply
Change this layer’s blend mode from Normal to Multiply, which is appropriate for darkening and coloring shadow areas.
Restricting the Shadow Color to Just the Shadows
Splitting the Blend If highlight slider and dragging it left this time removes the Multiply layer’s effect from the highlights and background, keeping it isolated to the shadow areas.
-
Open Blending Options for the Multiply Layer
Double-click the second Solid Color layer to open its layer style.
-
Split and Drag the Highlight Slider Left
Hold Alt/Option and click the right white slider under Blend If, then drag it to the left until the layer disappears from the highlights and any bright background.
-
Fine-Tune the Shadow Color
Double-click the color swatch and adjust hue and saturation, staying within a moderate, natural orange range rather than pushing too far toward heavy saturation.
Why the Two Blend If Sliders Move in Opposite Directions
The highlight layer needs its shadow-side slider dragged from left to right to remove the effect from the darks, while the shadow layer needs its highlight-side slider dragged from right to left to remove the effect from the lights. Moving each slider in the direction that excludes the tonal range it shouldn’t affect is what keeps the two color layers working on separate halves of the image instead of overlapping and doubling up in the midtones.
Why Selective Color Succeeds Where the Solid Color Layers Leave Off
The two solid color layers apply a broad orange tint across large tonal ranges, which gets the overall tan close but can leave skin looking slightly flat or artificial. Selective Color instead works within the skin’s own existing red tones, adjusting cyan, magenta, and yellow specifically inside that range, which is what lets the final color feel like a natural variation of the skin rather than a color cast sitting on top of it.
Refining the Overall Skin Tone With Selective Color
A Selective Color adjustment layer targeted at reds fine-tunes the cyan, magenta, and yellow balance within the skin tone itself, correcting the slightly artificial look the two color layers alone can leave behind.
-
Add a Selective Color Adjustment Layer
Add a Selective Color adjustment layer above the two solid color layers.
-
Target the Reds
Set the color range to Reds, since that’s the range most relevant to skin tone.
-
Adjust Cyan, Magenta, and Yellow
Raise Cyan slightly to balance excess red, adjust Magenta up if the skin looks too green, and lower Yellow slightly, tuning each until the tone looks natural.
Balancing the Three Layers Together
Reviewing all three adjustment layers together, and adjusting opacity or reopening individual color swatches, brings the whole effect into balance rather than leaving each layer tuned in isolation.
-
Zoom Out to Judge the Overall Effect
Zoom out to see the skin tone from a normal viewing distance, since some color issues are easier to spot at that scale.
-
Adjust Opacity or Saturation as Needed
Lower a layer’s opacity or reopen its color swatch to reduce saturation if the combined effect looks slightly too strong.
Why This Approach Works
Coloring highlights and shadows on two separate layers, each with its own blend mode and Blend If range, is what allows each half of the tonal range to get the specific treatment it actually needs, since Color Burn and Multiply behave very differently. Moving the two Blend If sliders in opposite directions is what keeps each layer confined to its intended half of the image instead of both piling up in the midtones. Finishing with Selective Color targeted at reds is what corrects the remaining slightly artificial quality left over after the two solid color layers, since it fine-tunes the actual skin tone rather than a broad color overlay.
Final Thoughts
Treating highlights and shadows as two separate problems, rather than one flat color overlay, is what makes this tan look believable instead of like an obvious orange filter. The same three-layer approach, highlight color, shadow color, and Selective Color refinement, works on any subject who needs a more sun-kissed skin tone.
Quick Reference: Keys, Menus and Settings
- Highlight tanAdjustment layer > Solid Color, light orange; blend mode Color Burn
- Keep it off the shadowsFX > Blending Options > Blend If; Alt/Option-drag the black slider from the left to the right
- Shadow tanSecond Solid Color layer, similar orange; blend mode Multiply
- Keep it off the highlightsDouble-click the layer; Alt/Option-drag the white Blend If slider from the right to the left
- Refine the skinAdjustment layer > Selective Color, Colors: Reds; Cyan up, Magenta up slightly, Yellow down slightly
- BalanceZoom out; lower a layer’s opacity or double-click its swatch to desaturate
No AI, no generative credits.

Free Downloads
Take the Guide With You
Get the PDF guide to the tan: a Color Burn layer for the highlights, a Multiply layer for the shadows, Blend If for each and a Selective Color finish. Free with a PHLEARN account.
Adding a Tan in Photoshop: Common Questions
Why color the highlights and shadows separately?
The two halves of the skin need different treatment. A Color Burn layer adds warm color to the highlights, a Multiply layer adds it to the shadows, and Blend If keeps each one on its own half.
What color should I use for the tan?
A light orange that isn’t too saturated. It’s a Solid Color adjustment layer, so you can double-click the swatch and change the color at any time.
Why do the shadows turn dark and muddy with Color Burn?
Color Burn affects the shadows as well as the highlights. Open FX > Blending Options, hold Alt/Option and drag the left (black) Blend If slider to the right until the color leaves the shadows.
How do I add tan to the shadows?
Add a second Solid Color layer in a similar orange and set its blend mode from Normal to Multiply.
The Multiply layer darkens my white background. How do I stop it?
Double-click the layer, hold Alt/Option and drag the right (white) Blend If slider to the left. The layer disappears from the highlights and the bright background.
Which way do the Blend If sliders go?
For the highlight layer, drag from the left to the right to hide it in the shadows. For the shadow layer, drag from the right to the left to hide it in the highlights.
The tan looks a bit fake. How do I fix it?
Add a Selective Color adjustment layer, set Colors to Reds and adjust the skin there: a little more Cyan, Magenta up slightly and Yellow down slightly.
Why does the skin look green after Selective Color?
There’s too little Magenta. Pull the Magenta slider up in the Reds until the green goes away; Cyan balances too much red.
The whole effect is too strong. What should I adjust?
Zoom out to judge it, then lower a layer’s opacity or double-click its swatch for a less saturated color.
Is there a free download?
Yes, with a free PHLEARN account. You get 1 PDF guide with the highlight, shadow and Selective Color steps from the video.
Master Photoshop, Lightroom and Photography
Join PHLEARN PRO for $12.99 a month or $99.99 a year. Cancel anytime, with a 100% money-back guarantee.





