

Download Assets
This tutorial includes 6 sample images, 5 sample PSDs and 1 PDF guide. Downloads are free with a PHLEARN account.
- Download the sample images and PSDs from every free tutorial on PHLEARN
- New free tutorials published every week
- One free account — sign up once, then download anything
Free PDF Guide · 4 Pages
This Tutorial as a Step-by-Step PDF
Every step from the video in order: updating Photoshop, where the three new layers live, the white balance eyedropper, Vibrance vs. Saturation on people, Clarity painted in through an inverted mask, Dehaze on a foggy scene, and the Grain layer’s amount, size and roughness. Keep it next to your keyboard.
description
Photoshop 2026 adds three new adjustment layers: Color & Vibrance, Clarity & Dehaze and Grain as adjustment layers — each with its own mask, and each fully editable afterwards.
Enjoying This Free Tutorial?
We publish a new free tutorial every week, each one with sample images and PSDs you can download and follow along with. Sign up and they land straight in your inbox, along with early word on sales, events and subscriber-only offers.


New Adjustment Layers in Photoshop 2026: What Each One Replaces
Photoshop 2026 added Color & Vibrance, Clarity & Dehaze, and Grain as proper adjustment layers. Each one was previously either a Camera Raw slider you had to leave Photoshop for, or a multi-step manual process that ended up baked into the file.
As adjustment layers they arrive with a mask attached, sit in the stack in any order, and stay editable indefinitely. That last part is the whole story: the tools aren’t new, but being able to reopen them a week later is.
Why Layers Beat Filters
They Come With a Mask
Every adjustment layer arrives with a white mask ready to paint on. Applying an effect to one region rather than the whole frame costs you a brush stroke instead of a selection workflow.
They Stack in Any Order
Grain over a color grade behaves differently from a color grade over grain, and with layers you can try both by dragging. As filters, that ordering was decided the moment you clicked OK.
They Stay Editable
Reopen the Properties panel next week and every slider is where you left it. No Smart Object wrapper required — adjustment layers were always non-destructive by design.
Update and Find Them
-
Update to Version 27.31 or Later
Through the Creative Cloud desktop app. These three don’t appear in earlier builds, so if the list looks the same as it always did, this is why.
-
Open the Adjustment Layer List
Click the half-filled circle at the bottom of the Layers panel, or use Layer > New Adjustment Layer. The new entries sit alongside Curves, Levels and the rest.
-
Note the Mask That Comes With It
Each new layer appears with its own mask already attached. You’ll use it in the Clarity step below, and it’s the reason these are more useful than their Camera Raw equivalents.

Color & Vibrance
This one covers white balance and saturation, and its most useful feature isn’t a slider at all.
-
Fix a Color Cast With the Eyedropper
Select the eyedropper in the Properties panel and click something in the image that should be neutral grey — concrete, a white wall in shade, a grey card. Photoshop corrects the white balance from that one sample, which is far faster and more accurate than nudging temperature and tint by eye.
-
Use Vibrance Rather Than Saturation on People
Vibrance lifts muted tones and largely leaves already-saturated ones alone, which protects skin. Saturation pushes everything equally and turns faces orange. On portraits this distinction matters more than any other setting here.
-
Double-Click a Slider Handle to Reset It
Any parameter, straight back to default. Worth knowing before you drag something back and forth trying to find zero.
Clarity & Dehaze
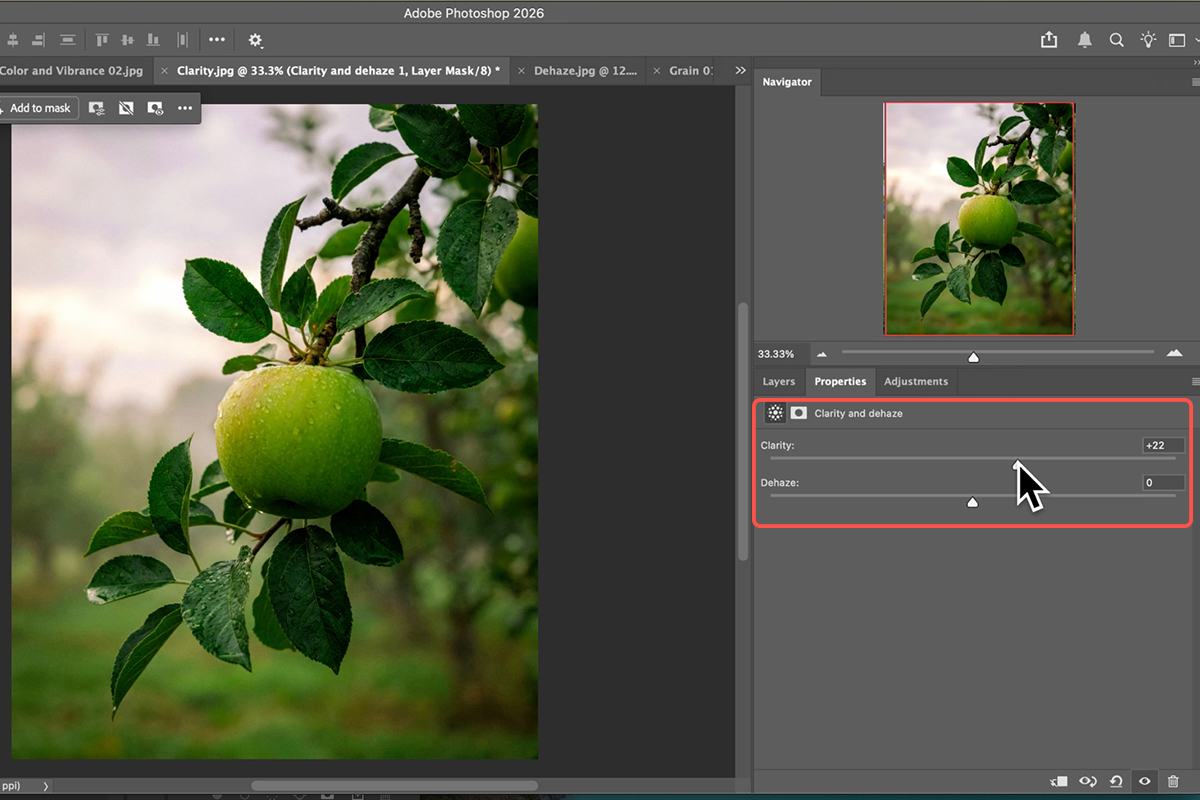
Dehaze cuts atmospheric veil; Clarity adds mid-tone definition. Both benefit enormously from the attached mask.
-
Set Dehaze and Clarity Globally First
Get the amount right while it’s affecting everything, so you can see clearly what each slider does. You’re about to hide all of it anyway.
-
Invert the Mask to Black
Click the layer mask, then Cmd/Ctrl + I. The whole adjustment disappears — the mask is now hiding it everywhere.
-
Paint It Back In With a White Brush
Press B, set the foreground to white, and paint only where you want the effect — usually the subject, or the middle distance of a landscape. This “hide everything, reveal selectively” approach gives far better control than trying to mask out the parts you don’t want, and it’s the same idea as the standalone Clarity and Dehaze workflow.

Grain
Previously this meant a filled layer, Add Noise, a blur, a blend mode and an opacity adjustment. Now it’s one layer with three controls.
-
Set Amount, Size and Roughness
Amount is how much, Size is how large each particle is, and Roughness is how irregular. Larger and rougher reads as film; fine and even reads as digital sensor noise. Match whichever your image is pretending to be.
-
Use It to Unify a Composite
Grain over the whole stack gives elements from different sources a shared surface. This is the single most effective way to make a composite stop looking assembled — the same trick that finishes texture work.
-
Dial It Back With Layer Opacity
Rather than reducing Amount. Opacity gives you a finer, more predictable adjustment at the low end, which is where grain almost always wants to live.
Common Mistakes
Saturation Instead of Vibrance on Portraits
The fastest way to make skin look wrong. Vibrance exists precisely for this.
Global Clarity
Applied everywhere it finds every pore and every bit of noise. Invert the mask and paint it in.
Too Much Grain
At full strength it looks like a fault rather than a finish. Opacity down, considerably.
Forgetting You Can Reorder Them
These are layers. Drag them past each other and see what changes — it’s free, and grain above versus below a color grade genuinely differs.
The Shift Worth Noticing
Adobe has spent several releases moving things that used to be one-way operations into forms that stay editable — Smart Filters, live text shapes, and now these. Each individually is a small convenience.
Together they change how you work. When a decision is cheap to revisit, you make it early and roughly and refine later; when it’s expensive, you agonise up front and then live with it. The second habit is a hangover from software that no longer behaves that way, and these three layers are a good excuse to drop it.
Try All Three
Update to 27.31, add Color & Vibrance and neutralise with the eyedropper, add Clarity & Dehaze then invert its mask and brush the effect back onto your subject, and finish with Grain at reduced layer opacity. Download the free sample images and PSDs — six and five of them — and work through the exact examples, then run the same three-layer stack on a photo of your own. To go further across Photoshop, our PRO Photoshop Learning Path runs to 11 courses.
Quick Reference: Keys, Menus and Settings
- Update firstCreative Cloud > Apps > View Updates (27.3.1 or later)
- Find the threeLayer > New Adjustment Layer > Color and Vibrance, Clarity and Dehaze, Grain; or the adjustment icon in the Layers panel
- White balanceThe eyedropper in Color and Vibrance: click something neutral gray; the reset icon or double-click a slider to undo
- People in the photoVibrance up (around 70–80 at most), leave Saturation alone
- Clarity in one placeClick the mask, Contextual Task Bar > More > Invert Mask (or Cmd/Ctrl + I), then Add to Mask and paint; [ ] for size
- DehazeClarity and Dehaze layer, Dehaze slider to the right; stack a second masked layer for clarity on one object
- GrainAmount, Size, Roughness; lower the layer’s Opacity to soften it
- CompareDrag down the eye icons to toggle several layers at once
Mac first, then Windows where they differ.

Free Downloads
Follow Along on the Same Photos
Get all 6 sample images, the 5 PSDs with every adjustment layer and mask in place, and the PDF guide. Free with a PHLEARN account.
New Adjustment Layers: Common Questions
Which adjustment layers are new in Photoshop 2026?
Color and Vibrance, Clarity and Dehaze, and Grain, all borrowed from Lightroom. You need Photoshop 27.3.1 or later; update through the Creative Cloud app.
Why use an adjustment layer instead of a filter?
They’re nondestructive: toggle them, double-click to change the settings, and every one comes with a mask, so you decide where it shows. The original image is never touched.
Vibrance or Saturation?
Vibrance. Saturation boosts every color evenly and turns skin orange; vibrance protects skin tones. With people in the photo, leave Saturation alone and keep Vibrance under about 70 to 80.
How does the white balance eyedropper work?
Click something that should be neutral gray (a gray shirt, a gray rock) and Photoshop sets the temperature and tint to make it gray. Click a yellow leaf and the whole image goes blue, because it’s trying to make the leaf gray. Reset with the icon or by double-clicking a slider, or just set the balance by eye.
How do I add clarity to just one thing?
Add the Clarity and Dehaze layer, click its mask and invert it to black (Invert Mask in the task bar, or Cmd/Ctrl+I), then click Add to Mask and paint over the apple or the building. Clarity shows only where you painted. It suits products, fruit and landscapes more than faces.
When do I use Dehaze?
On fog, mist or any flat, gray scene. Drag it right and the contrast comes back. You can stack a second Clarity and Dehaze layer, masked, to add clarity to one object on top of the dehaze.
What does the Grain layer do?
Adds film grain with amount, size and roughness sliders, which used to take a long process in Photoshop. If you like the size but it’s too strong, lower the layer’s opacity. It helps composites and double exposures feel like one photograph.
Is there a Texture slider like Lightroom?
Not in the adjustment layer at the time of recording. Aaron hopes Adobe adds it; for now it’s clarity and dehaze only.
Are the sample files free?
Yes, with a free PHLEARN account. You get all 6 sample images, the 5 PSDs and the PDF guide.
Master Photoshop, Lightroom and Photography
Join PHLEARN PRO for $12.99 a month or $99.99 a year. Cancel anytime, with a 100% money-back guarantee.





