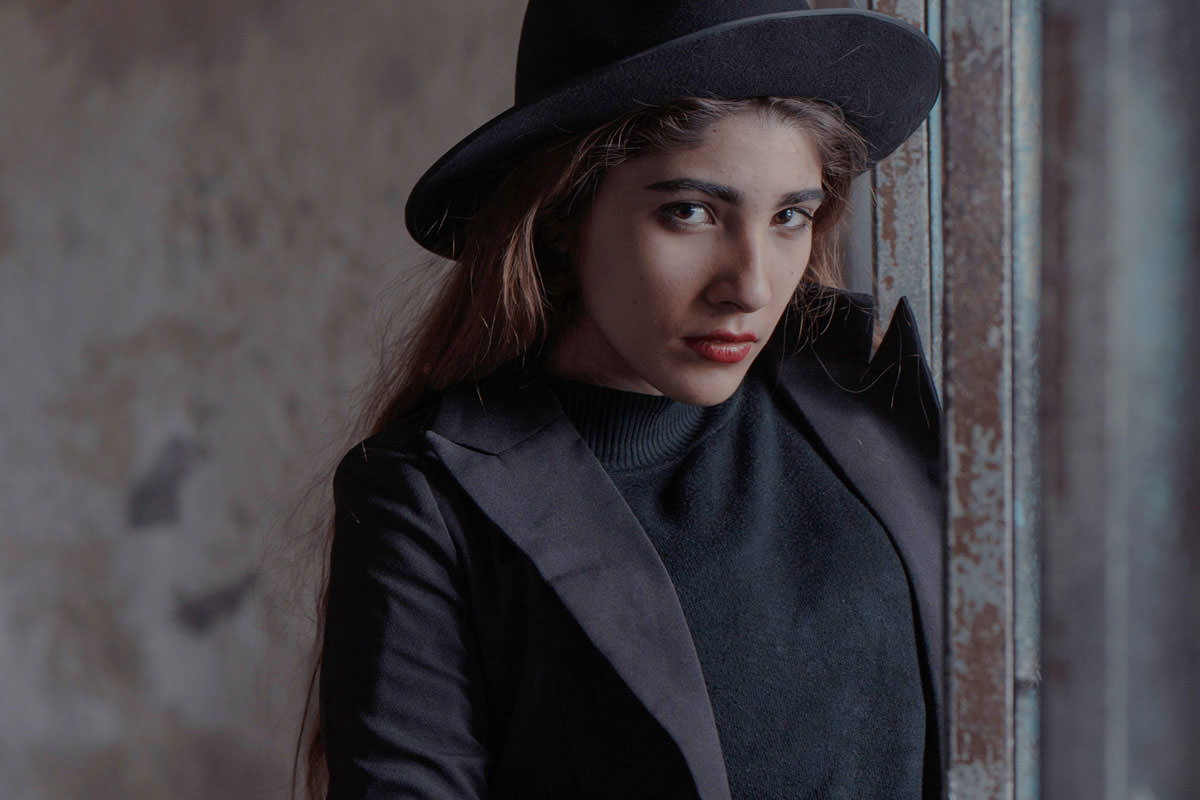

Download Assets
This tutorial includes 1 sample image and 1 PDF guide. Downloads are free with a PHLEARN account.
- Download the sample images and PSDs from every free tutorial on PHLEARN
- New free tutorials published every week
- One free account — sign up once, then download anything
Free PDF Guide · 3 Pages
This Tutorial as a Step-by-Step PDF
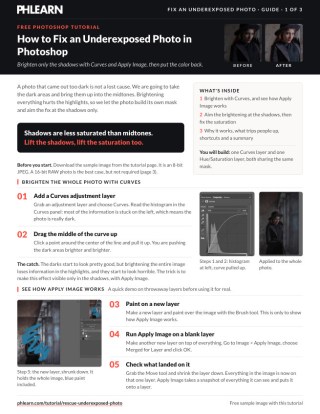
The 3-page guide walks through the whole fix: a Curves layer with the middle of the curve pulled up, a quick Apply Image demo on blank layers, Image > Apply Image on the Curves mask with Invert checked, then a Hue/Saturation layer at about +15 to +18 sharing the same mask. Keep it next to your keyboard.
description
Dragging a Curves layer up brightens an underexposed photo everywhere, including the parts that were already fine. This tutorial aims the correction at the shadows only: run Apply Image on the Curves layer mask with Invert checked so the photo builds its own mask, then copy that same mask onto a Hue/Saturation layer to put colour back into the shadows it just lifted.
Enjoying This Free Tutorial?
We publish a new free tutorial every week, each one with sample images and PSDs you can download and follow along with. Sign up and they land straight in your inbox, along with early word on sales, events and subscriber-only offers.
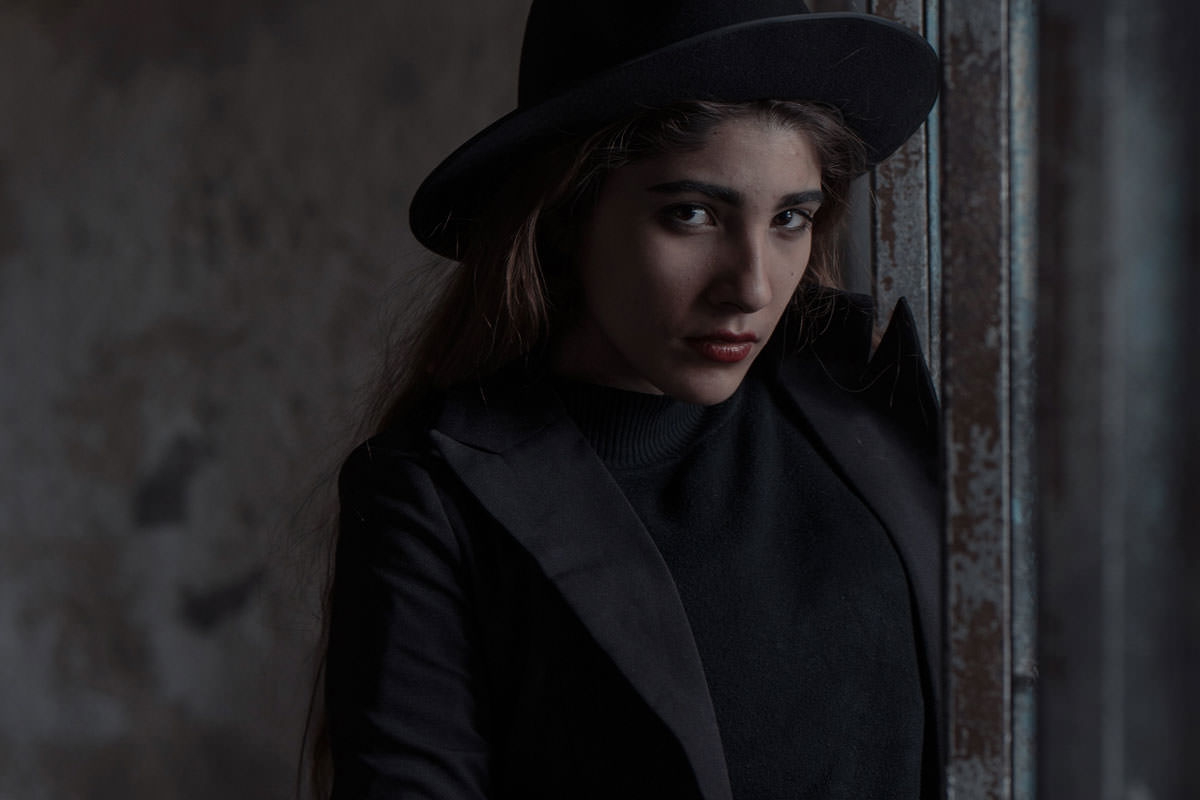
How to Fix and Brighten an Underexposed Dark Photo in Photoshop
An underexposed photo, one that came out of the camera too dark, doesn’t have to be a lost cause. This walkthrough covers how to bring a badly underexposed portrait back to life in Photoshop using a Curves adjustment layer combined with the Apply Image command, targeting the brightening specifically at the shadows rather than washing out the entire image. The same file used in this example is available as a free Download, so the exact photo can be followed along with step by step.
One quick note before starting: the best-case scenario for rescuing an underexposed photo is a 16-bit RAW file, since RAW files hold onto far more shadow detail that can be pulled back without falling apart. This demonstration intentionally uses a more limited 8-bit JPEG instead, both because JPEGs are what most people actually have lying around, and because if this technique works on a JPEG’s much thinner amount of recoverable data, it will work even better on a RAW file.
Open Your Underexposed Photo and Assess the Damage
Start with the underexposed portrait open in Photoshop — in this example, a moody shot of a woman in a hat and dark coat standing near a window, shot noticeably too dark. Click the New Adjustment Layer icon at the bottom of the Layers panel to begin correcting it. 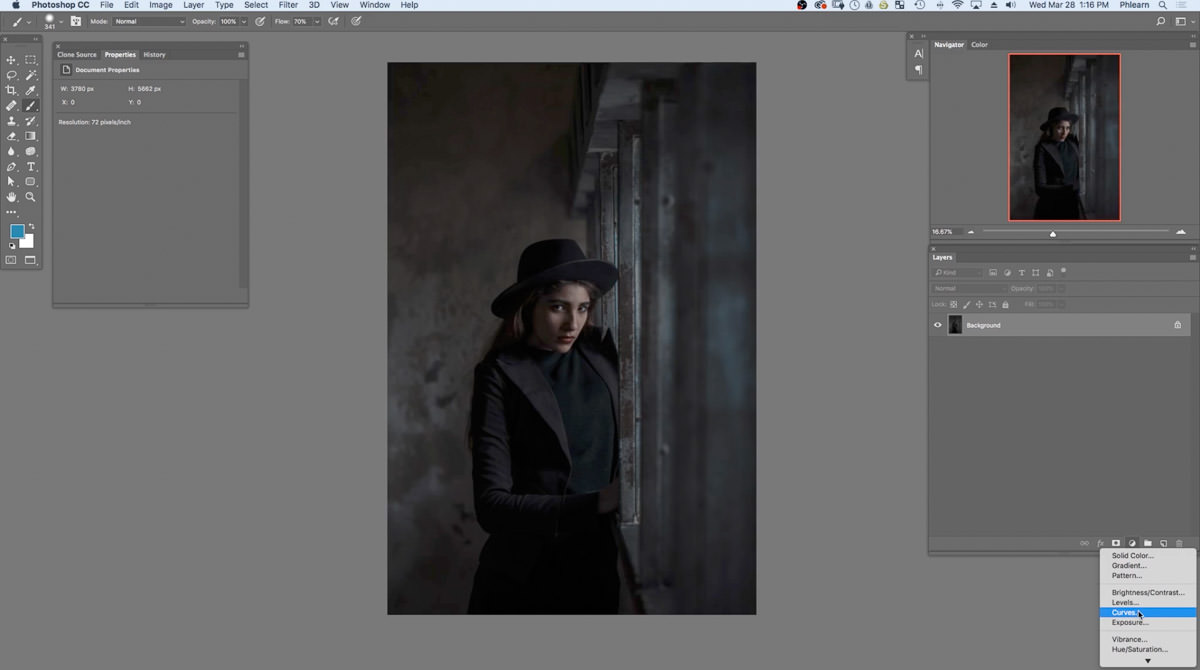
 Before making any adjustment, it’s worth just looking closely at where the detail has gone: in a photo this dark, most of the image data is compressed into the shadow end of the tonal range, which is exactly what the Curves panel’s histogram will confirm in the next step.
Add a Curves Adjustment Layer to Brighten the Image
Choose Curves from the adjustment layer menu to open the Curves panel and its histogram. 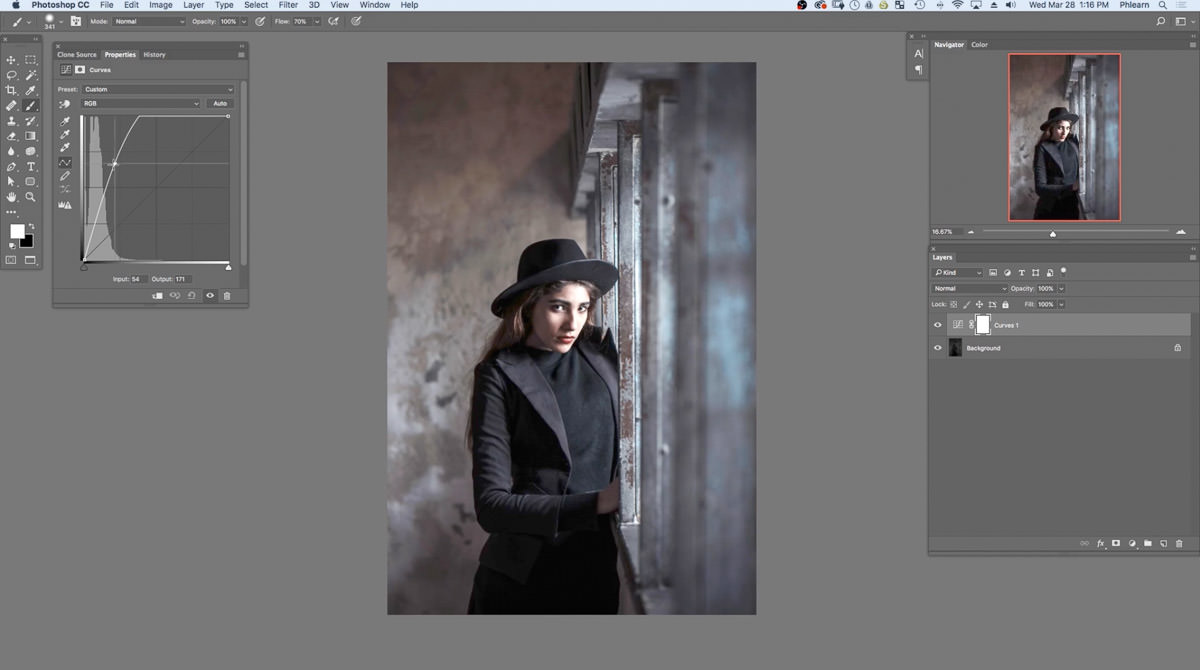 Clicking the middle of the curve line and dragging it upward brightens the image, and the effect on a photo this underexposed is immediate and dramatic — details that were nearly invisible in the shadows start to emerge as soon as the midpoint moves up.
Reading the Histogram Before You Adjust
The histogram inside the Curves panel is worth reading before touching the curve at all. On this photo, almost the entire histogram is bunched up against the left edge, the shadow end, with almost nothing registering in the midtones or highlights. That distribution is the definition of an underexposed photo: there simply isn’t much tonal information anywhere except in the shadows, which is exactly why the fix has to be built around recovering that shadow data specifically, rather than a blanket brightness boost.
Why Brightening the Whole Image Blows Out Highlights
The problem with just dragging the Curves midpoint up and calling it done is that the adjustment affects the entire image uniformly. Any areas that already had reasonable brightness, a bit of window light on the fabric, a highlight on the skin, get pushed even brighter along with the shadows, and can quickly blow out to pure white with no detail left. Since the shadows are what actually needed the correction, the smarter approach is to find a way to apply this exact brightening only where the image is dark, and leave the parts that were already properly exposed alone.
Understand How Apply Image Works Before You Use It
Before aiming this technique at the real photo, it helps to see exactly what the Apply Image command does on something simple. Image > Apply Image takes a flattened snapshot of everything currently visible in the document and places that snapshot onto whichever layer or mask is targeted when the command runs.
Testing Apply Image on a Blank Layer First
To demonstrate this, create a new blank layer and paint a rough blue scribble across it with the Brush tool.  Then make a second new blank layer on top of everything, and with that blank layer selected, go to Image > Apply Image.
 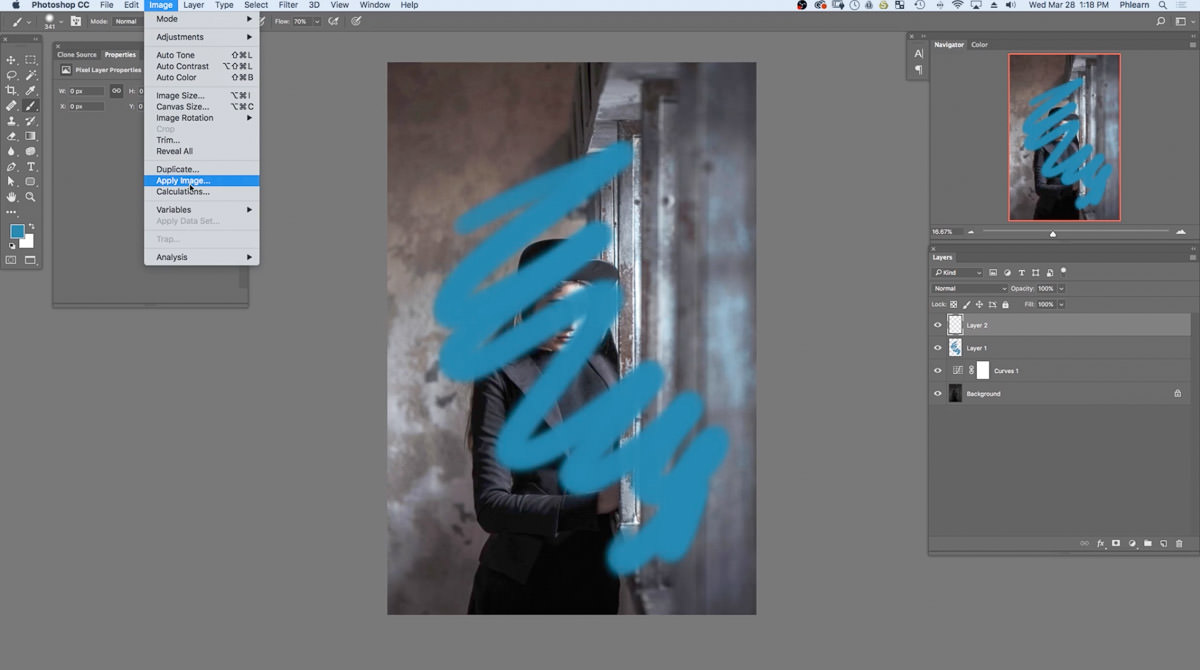 In the Apply Image dialog, choose Merged for Layer.
 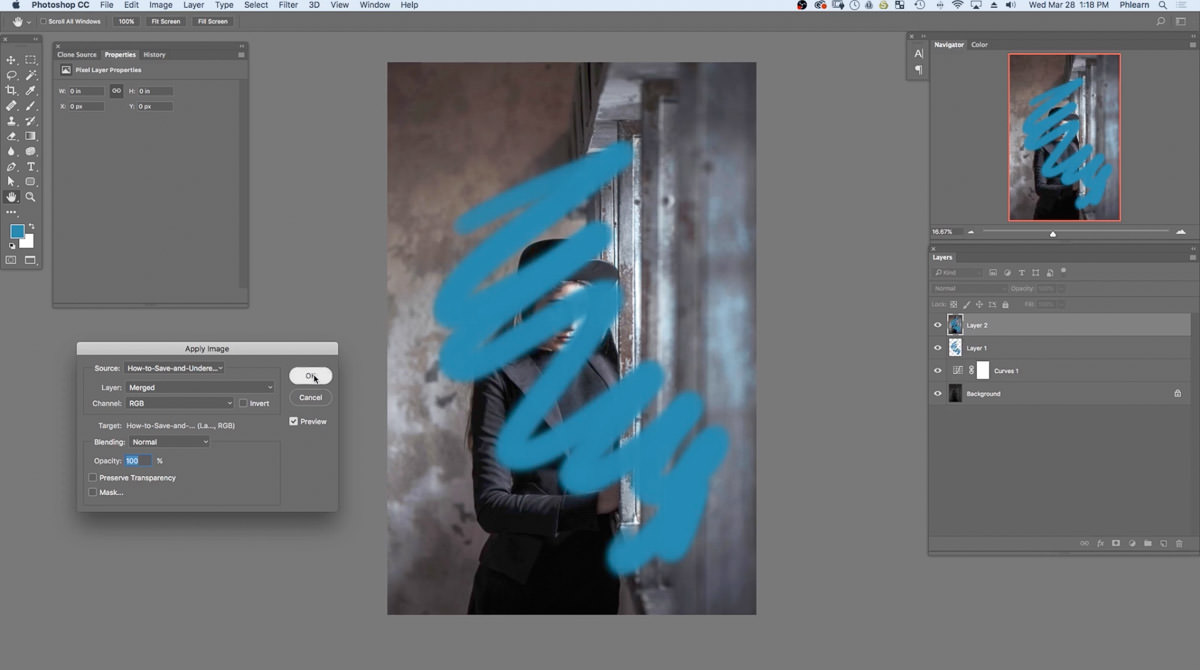 Clicking OK fills the blank layer with a snapshot of everything visible in the document, blue scribble included. Grab the Move tool and shrink the layer down to see it; the scribble layer itself is left as it was.
  That’s the entire mechanic: Apply Image stamps whatever is currently visible onto the active layer or mask, which becomes genuinely useful once it’s aimed at a layer mask instead of a blank layer.
Apply the Curves Brightening Only to the Shadows
Back on the real photo, select the Curves adjustment layer’s mask thumbnail in the Layers panel rather than the layer itself. 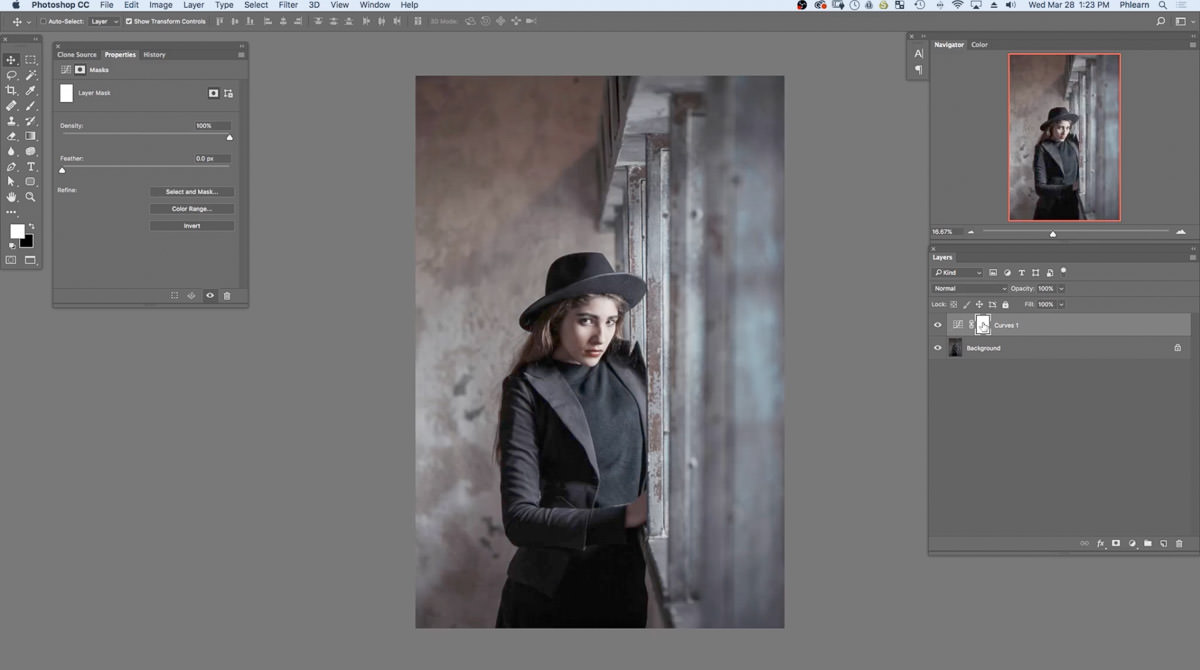 With the mask targeted, go to Image > Apply Image again, this time run against the mask instead of a blank layer, with Layer still set to Merged.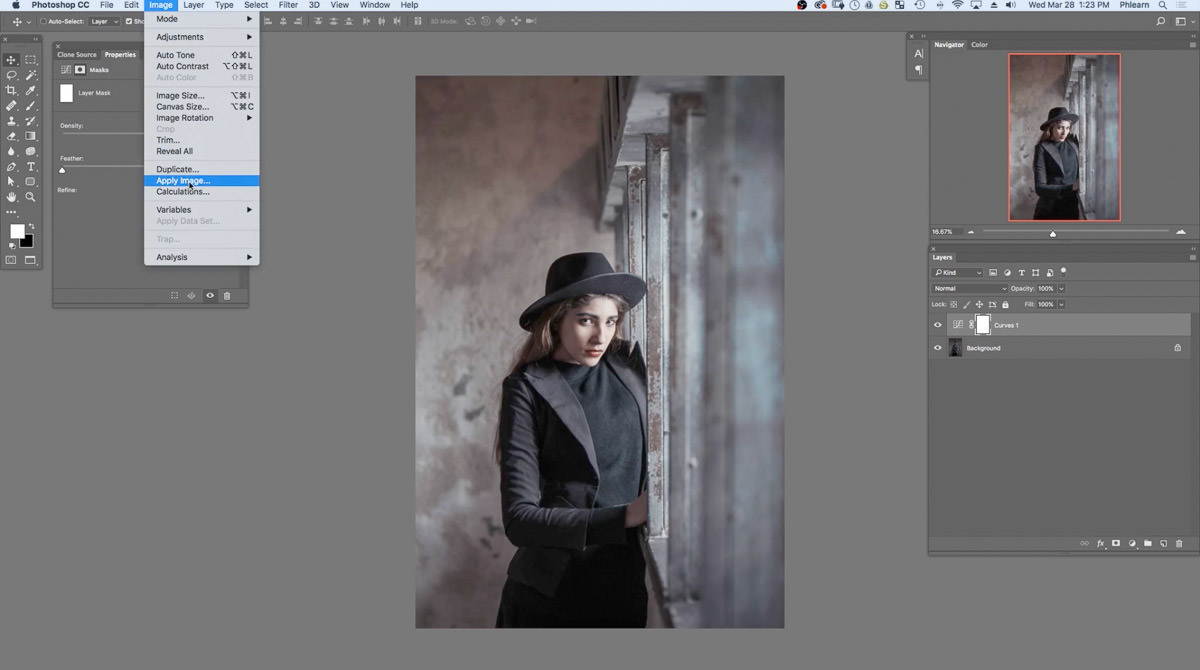
Why You Need to Invert the Mask
Running Apply Image on the mask stamps a grayscale copy of the underlying photo onto that mask, which sounds right but actually comes out backwards at first: since the mask is a copy of the photo, it is dark in the shadows and lighter in the highlights, which hides the Curves brightening exactly where it’s needed and reveals it exactly where it isn’t. The fix is the Invert checkbox inside the Apply Image dialog. 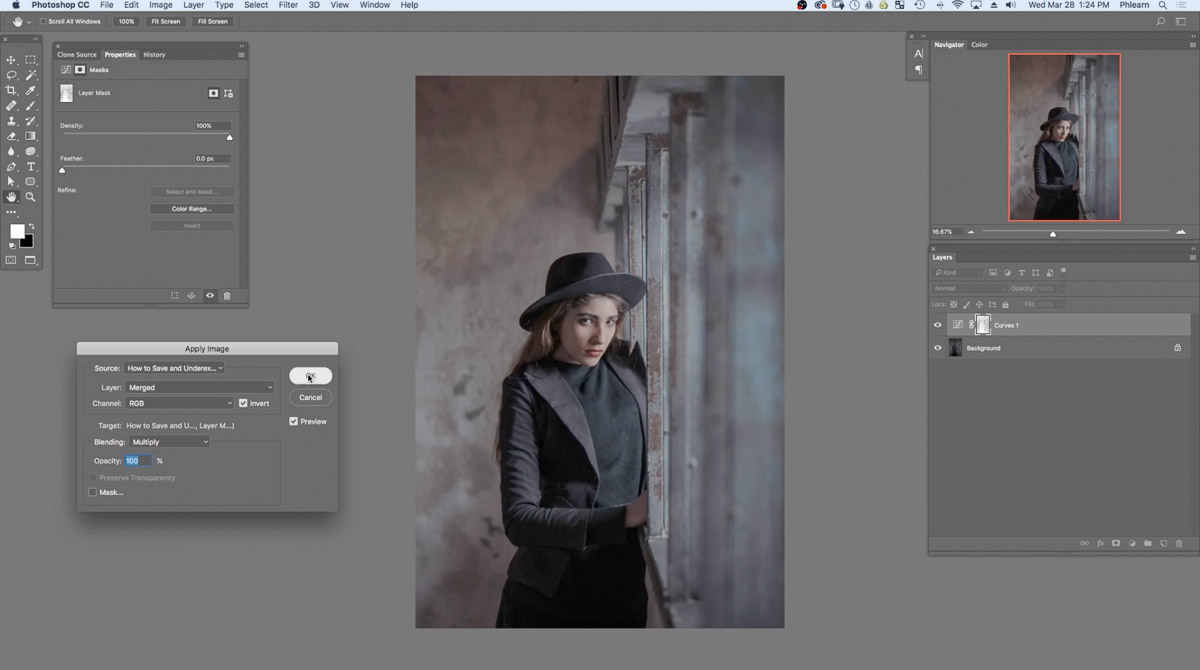 Checking Invert flips that relationship, so the mask becomes bright in the shadow areas and dark in the highlight areas — which means the Curves brightening now shows through only where the image was underexposed, and stays hidden everywhere that was already properly exposed. Click OK, then Alt/Option-click the mask thumbnail to view it: it is an inverted copy of the photo, white where the photo was dark.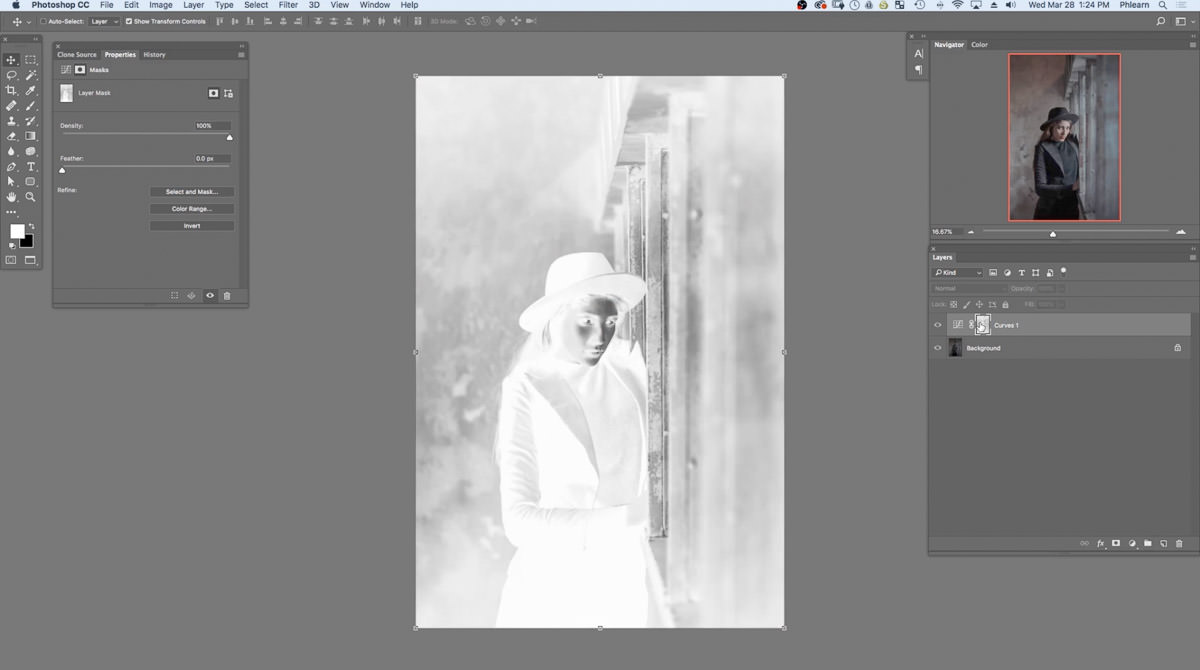
Review the Selectively Brightened Result
With the inverted mask in place, the brightening effect is now confined almost entirely to the areas that were actually underexposed.  The shadow detail on the coat, hat, and face is now visible without the window light or brighter fabric areas blowing out, since those areas were masked out of the adjustment entirely. This is the core payoff of using Apply Image with Invert instead of a plain brightness boost: the correction goes exactly where the photo needed it and nowhere else.
Fix the Desaturated Shadows
Brightening the shadows this much tends to expose a second problem: shadow areas are naturally less saturated than midtones to begin with, so pulling them up into midtone brightness range makes them look noticeably flat and gray by comparison to the rest of the image. That flatness needs its own separate correction rather than being left as-is.
Adding a Hue/Saturation Adjustment Layer
Add a new Hue/Saturation adjustment layer above the Curves layer. 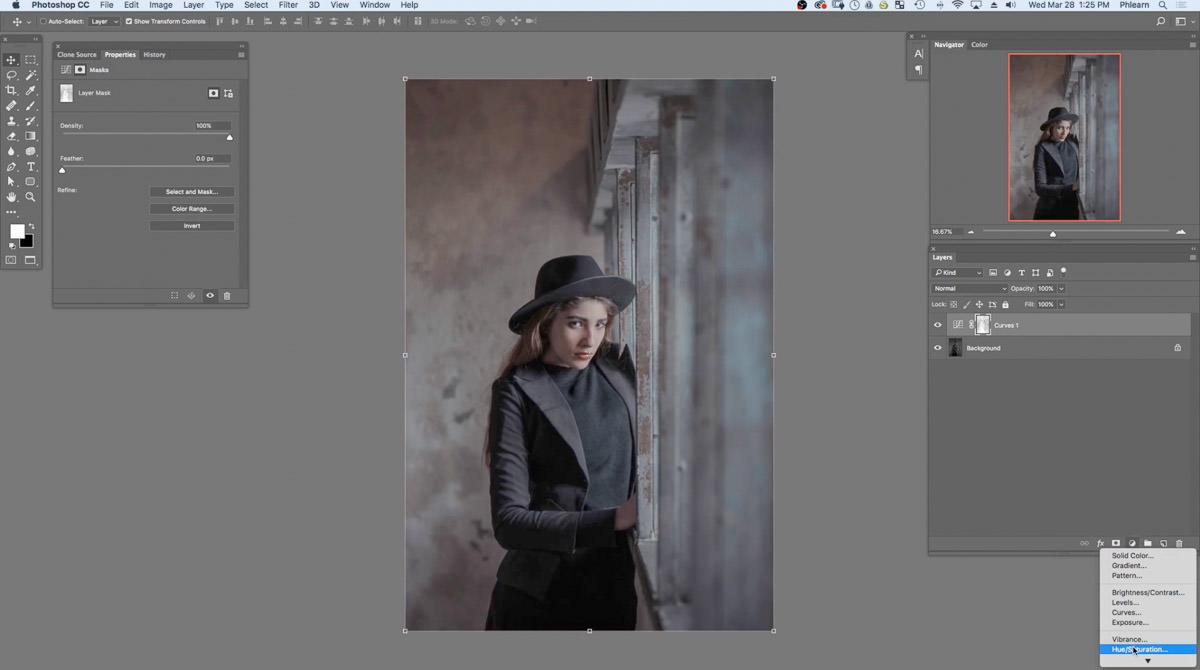 Raise the Saturation slider to about +15. That brings color back into the image, but right now it applies to the entire photo, and applying it globally would oversaturate the parts of the photo that were already correctly exposed and didn’t need any color boost at all.
Copy the Layer Mask to Target Only the Shadows
Rather than building a new mask from scratch, hold Alt (Option on Mac) and click-drag the Curves layer’s mask thumbnail onto the Hue/Saturation layer’s mask thumbnail.  This copies the exact same inverted mask over, so the saturation boost lands on precisely the same shadow areas that were brightened, and nowhere else.
 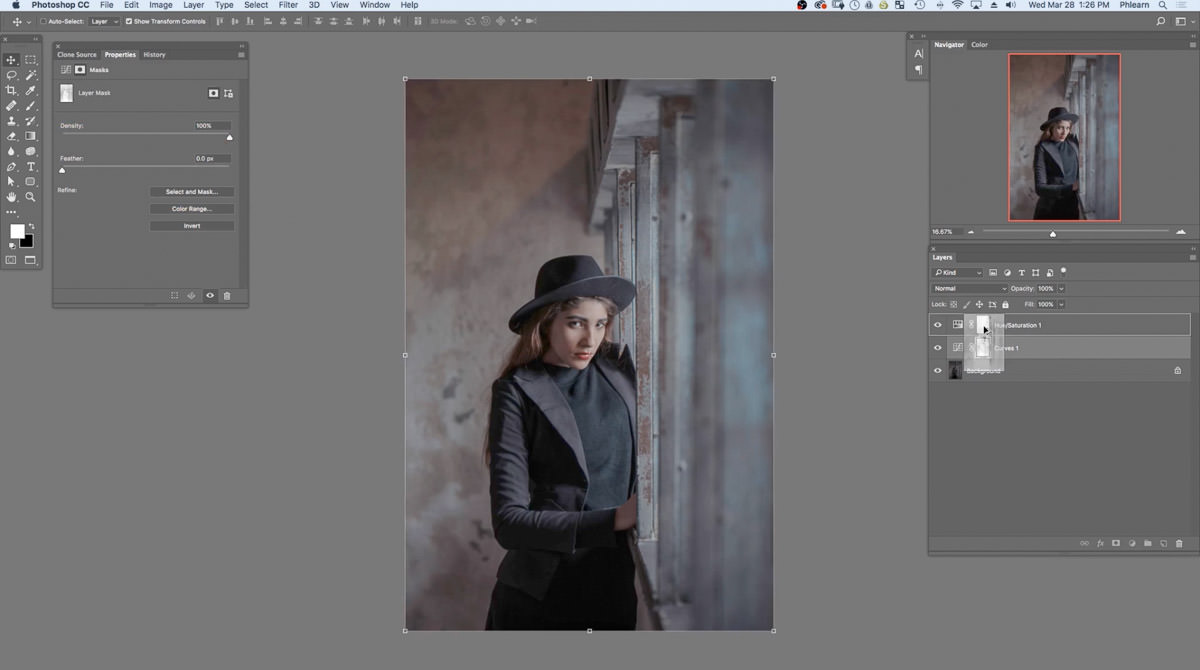 Reusing the mask this way keeps the brightening and the saturation correction perfectly aligned, without having to redraw or reselect anything.
Fine-Tune the Saturation Boost
With the mask copied over, turn the layer off and on and fine-tune the Saturation slider by eye — on this photo there was room for a little more, so it went from +15 up to about +18, which brings the shadow color back to a natural-looking level without tipping into oversaturated territory.  Compared to the original file, the photo now shows real detail and color in the areas that used to be an undifferentiated dark mass, while the parts of the frame that were already well exposed look exactly as they did before any of these adjustments were made.
Why This Technique Works
The reason this approach outperforms a simple brightness or exposure slider comes down to precision: Apply Image with Invert turns the photo’s own tonal information into a custom-built mask, rather than relying on a rough selection or a hand-painted one. Because that mask is generated directly from the image’s actual shadow-to-highlight distribution, the brightening naturally tapers off exactly where the photo was already properly exposed, with no hard edges or visible transitions to clean up afterward. Testing the command first on a blank layer above a scribble, rather than jumping straight to the real photo’s mask, is what makes the mechanic easy to understand: seeing Apply Image stamp the photo and a simple blue scribble onto a blank layer makes it obvious why running the same command against a mask, with Invert checked, produces a mask shaped by the photo’s own shadows. Copying that same mask over to the Hue/Saturation layer afterward, instead of building a second one from scratch, keeps the brightening and the saturation correction perfectly aligned to the same pixels, so the fix reads as one seamless correction rather than two separately targeted edits.
Final Thoughts
An underexposed photo that looks like a lost cause at first often has more recoverable detail hiding in its shadows than it appears to, especially once the correction is aimed only at the areas that actually need it. This same Curves-plus-Apply-Image-with-Invert combination, followed by a saturation pass using a copied mask, works on any underexposed image, and the fact that it holds up even on an 8-bit JPEG means it will perform even better on a 16-bit RAW file with more shadow data to pull from.
Quick Reference: Keys, Menus and Settings
- BrightenNew Adjustment Layer > Curves, drag the middle of the curve up
- See how it worksPaint on a new layer, add a blank layer on top, Image > Apply Image, Layer: Merged
- Target the shadowsClick the Curves mask, Image > Apply Image, Layer: Merged, check Invert
- View the maskAlt/Option-click the mask thumbnail
- Restore colorHue/Saturation adjustment layer, Saturation about +15
- Share the maskAlt/Option-drag the Curves mask onto the Hue/Saturation mask, then fine-tune to about +18
Works on an 8-bit JPEG; a 16-bit RAW file gives you even more to work with.
Free Downloads
Follow Along on the Same Photo
Get the underexposed portrait used in the video, an 8-bit JPEG, and the 3-page PDF guide to the Curves and Apply Image fix. Free with a PHLEARN account.
Fixing Underexposed Photos: Common Questions
Why not just brighten the whole photo with Curves?
Pulling the middle of the curve up brightens everything. The darks start to look good, but the highlights lose information and start to look horrible, so the brightening needs to be aimed at the shadows only.
What does Apply Image actually do?
It takes a snapshot of everything visible in the document and puts it onto the targeted layer or layer mask. On a blank layer you get a merged copy of the image; on a mask you get a grayscale copy.
Which Apply Image settings do I use?
Go to Image > Apply Image, set Layer to Merged and check Invert before you click OK. Make sure the Curves layer mask is selected first.
Why do I need to check Invert?
Without it, the mask is a copy of the photo, so it hides the Curves brightening in the shadows and shows it in the highlights, the opposite of what you want. Invert flips it so the effect shows in the shadows.
How do I check what the mask looks like?
Alt/Option-click the layer mask thumbnail. It should look like a negative of the photo: light where the photo was dark, so the Curves layer shows there, and darker where the photo was bright.
Why do the brightened shadows look gray and flat?
Shadows are less saturated than midtones. When you lift shadows into the midtones, bring the saturation up with them using a Hue/Saturation adjustment layer.
How much saturation should I add?
In the video, Saturation goes to about +15 first, then up to about +18 after the mask is copied over. Turn the layer off and on and judge it by eye.
How do I copy the mask to the Hue/Saturation layer?
Hold Alt/Option, then click and drag the Curves layer mask onto the Hue/Saturation layer mask. The saturation boost then lands only on the areas you brightened.
Does this work on a JPEG or only on RAW files?
A 16-bit RAW photo gives you the most information to work with, but it is not required. The whole demo is done on an 8-bit JPEG.
Are the sample files free?
Yes, with a free PHLEARN account. You get 1 sample image and 1 PDF guide: the underexposed portrait used in the video and the 3-page step-by-step guide.
Master Photoshop, Lightroom and Photography
Join PHLEARN PRO for $12.99 a month or $99.99 a year. Cancel anytime, with a 100% money-back guarantee.





