
description
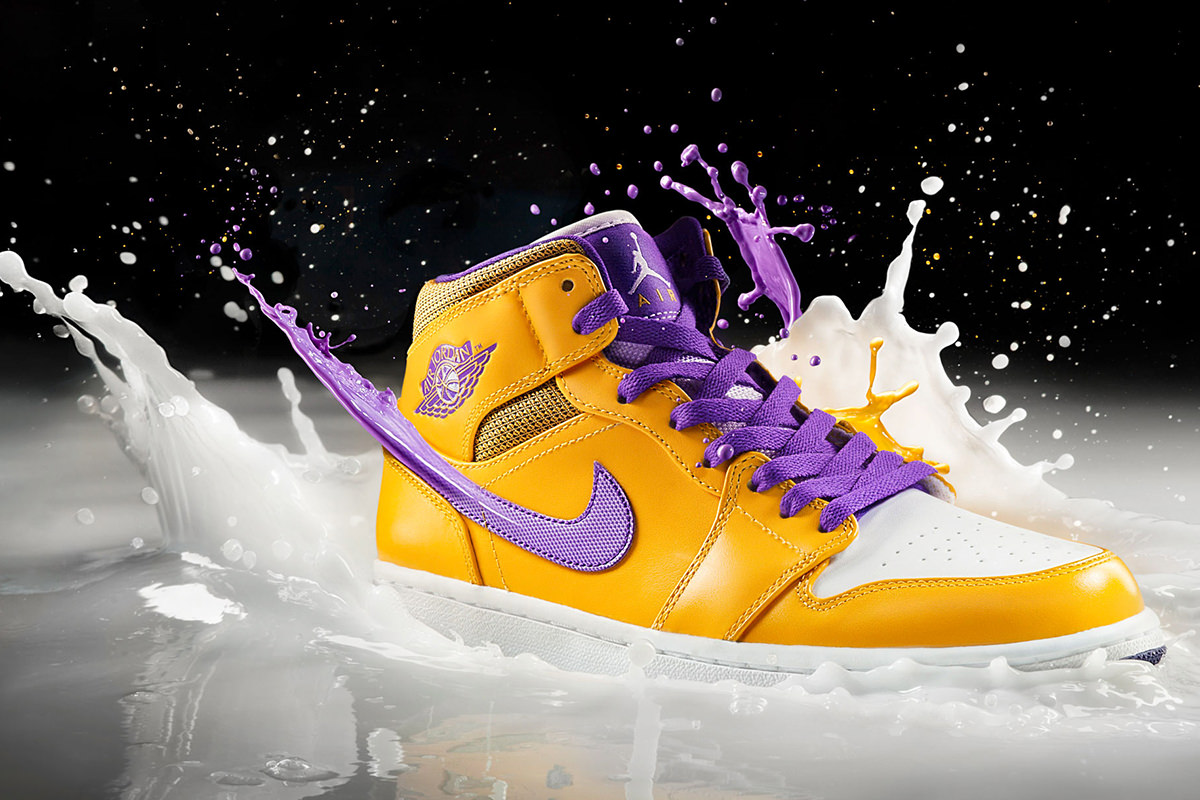
Rather than painting splashes onto a shoe in Photoshop, this shoot made them real. The team built a lumber-and-tarp pool, clamped the shoe to a mini boom so it could be dropped into the paint the same way every time, and kept every light small and gridded so the background fell off to pure black. Focus was locked manually on a pin held over the pool, so anything landing on that plane — splash included — came out sharp.
Enjoying This Free Tutorial?
We publish a new free tutorial every week, each one with sample images and PSDs you can download and follow along with. Sign up and they land straight in your inbox, along with early word on sales, events and subscriber-only offers.

Behind the Scenes: Shooting Real Paint Splashes for “Juicy Kicks”
Instead of faking paint splashes around a shoe entirely in Photoshop, this behind-the-scenes look at the “Juicy Kicks” shoot shows how the PHLEARN team built a rig to drop real shoes into real paint over and over, lit the scene to fade to black, and locked focus so every splash landed sharp. The finished composite is covered in the Juicy Kicks tutorial.
Starting From a Reference Idea, Then Making It Real
The idea began with reference images of athletic shoes surrounded by graphic paint splashes, most of which were built entirely in Photoshop by compositing a paint splatter onto a background. Rather than recreating that look purely in post, the team decided to actually photograph shoes splashing into real paint and build the composite from genuine source material.
Why Shoot Real Splashes Instead of Painting Them on in Photoshop
A splatter brush dropped onto a background carries none of the actual physics of paint hitting a surface — the way it beads, drips, and catches light. Photographing a real splash instead means the final composite starts from genuine light and motion that would be extremely difficult to invent convincingly from scratch.
Building a Simple Splash Pool
Getting from a rough sketch to an actual photograph first required somewhere to put the paint.
-
Build a Frame From 2x4s
Screw together a simple frame out of 2×4 lumber sized for the shot.
-
Line It With a Tarp
Wrap a tarp around the inside of the frame so it can hold liquid without leaking, creating a simple pool to fill with paint.
Rigging the Shoe for a Repeatable Drop
Getting a consistent splash meant the shoe had to hit the same spot every time rather than being dropped by hand.
-
Attach the Shoe to a Mini Boom
Clamp the shoe to one end of a small boom arm.
-
Raise and Lower the Other End by Hand
Have someone lift and lower the opposite end of the boom, which raises and lowers the shoe into the paint in a predictable, repeatable motion each time.
Lighting the Scene to Fade to Black
The lighting had to stay small and controlled so the background behind the shoe would fall off into pure black rather than being lit evenly.
-
Backlight With Strip Boxes
Use a couple of strip boxes behind the shoe to provide even light along the back edge.
-
Add Front Light Through Grids
Light the front of the shoe with lights fitted with grids, which pop a bit of contrast in without spreading light across the whole scene.
-
Keep Every Light Small
Avoid large light sources and stick to grids and small soft boxes, since anything bigger would light the entire pool and prevent the background from fading to black toward the back of the frame.
Why Small, Gridded Lights Were Necessary Here
A large soft box would spread light evenly across the whole pool, which works against the goal of having the white paint fade smoothly into black at the back of the frame. Keeping every light source small and using grids to control spill meant light could be aimed precisely at the shoe and the paint immediately around it, leaving the rest of the scene to go dark on its own.
Camera Settings for Sharp, Frozen Detail
With the shoe as the hero of the shot, the camera settings were chosen to keep as much of it in sharp focus as possible.
-
Shoot at 1/160th of a Second
Use a shutter speed of 1/160th of a second for every shot.
-
Stop Down to Between f/14 and f/16
Set the aperture between f/14 and f/16 to keep a lot of depth in focus, since the shoe and its detail were the main focus, not a shallow depth-of-field look.
-
Shoot at a Low ISO
Keep ISO low, since enough light was already being pumped into the scene from the small, direct light sources.
Locking Focus With a Pin
Because the splash itself moves unpredictably, focus was handled with a simple physical trick rather than trying to autofocus on the splash in the moment.
-
Set Up a Pin Over the Pool
Place a pin directly over the spot in the pool where the splash was expected to happen.
-
Lock Focus on the Pin
Switch to manual focus and lock focus on the pin’s position rather than trying to refocus on each splash.
-
Time the Shot to the Splash
Since anything happening on the same focal plane as the pin stays in focus, simply take the picture at the moment the splash occurs over that spot.
Why Locking Focus to a Fixed Point Beats Trying to Autofocus on the Splash
A splash happens too fast and too unpredictably for a camera to reliably autofocus on it in the moment. Locking manual focus on a stationary pin placed where the splash is expected to occur removes the guesswork entirely, since anything on that same focal plane, splash included, comes out sharp without the camera needing to react to anything in real time.
Protecting the Shoe With a Water-Repellent Coating
Splashing the same shoe into real paint over and over risked ruining it well before the shoot was finished.
-
Treat the Shoe With a Water-Repellent Spray
Apply a water-repellent spray coating (the team used NeverWet) to the shoe before shooting so repeated paint splashes don’t soak in or permanently stain it.
-
Shoot the Clean Shoe Separately
Photograph a second, untreated shoe cleanly on its own, then flip it in post since a pair is mirrored, so its clean look can be combined with the splash from the treated shoe.
Capturing Multiple Splash Colors
Beyond the first white splash, the team also needed matching yellow and purple splashes to composite in later.
-
Experiment With Pouring Methods
Try different containers and pouring techniques, including scooping paint with a bucket and flicking it out with a wrist motion, until a good splash shape comes out.
-
Reuse the Same Pin-and-Focus Setup
Keep the same pin lock and manual focus method for each new paint color so every splash lines up with the earlier shots.
Running a Larger Team on a Non-Model Shoot
With no model on set to manage, the shoot could support a bigger crew than usual, with everyone rotating through different jobs over the course of the day: monitoring the tethered shots coming in, controlling the splash mechanism, running the camera, and adjusting lights, with people swapping roles throughout since there was no tight time pressure from a model getting tired.
Why a Bigger Crew Works Better Without a Model on Set
Coordinating instructions between many people and a model can get confusing fast, since a model only has one set of directions to follow at a time. A shoe, on the other hand, doesn’t get confused by a crowd, which meant a larger team could work simultaneously on the splash mechanism, lighting, and camera without anyone’s job interfering with anyone else’s.
Why This Approach Works
Photographing the paint splashes for real, instead of painting them on in Photoshop from the start, gave the final composite genuine light, physics, and texture that a hand-drawn splatter can’t fully fake. Every piece of the setup exists to make an inherently unpredictable event repeatable: the boom rig drops the shoe in the same place every time, the pin-and-manual-focus trick keeps a moving splash in sharp focus without guessing, and the water-repellent coating means the same shoe can be splashed dozens of times without being ruined partway through. None of it required exotic gear — 2x4s, a tarp, small gridded lights, and a pin were enough to make a genuinely difficult in-camera effect achievable.
Final Thoughts
A shoot like this is a reminder that some effects are worth capturing for real rather than faking entirely in post, as long as you can engineer a way to make an unpredictable moment repeatable. The pin-focus trick and the small-lights-for-a-fade-to-black setup are both simple enough to reuse on any product shot involving liquid, motion, or an unpredictable moment that needs to land in focus every time.
Quick Reference: Settings and Tips
- Shutter speed1/160th of a second
- Aperturef/14 to f/16, to keep the shoe sharp
- ISOLow; the lights supply plenty of light
- BacklightTwo strip boxes behind the shoe
- Front lightLights with grids; small sources only, so the back of the pool fades to black
- FocusA pin over the splash spot, focus locked in manual
- Rig2×4 frame lined with a tarp; shoe clamped to a mini boom
This video covers the shoot; the composite itself is built in the Juicy Kicks tutorial.
Paint Splash Product Shoot: Common Questions
Why shoot real paint splashes instead of adding them in Photoshop?
Most of the reference images were a shoe with a paint splatter added in Photoshop. The team wanted to do it for real, splashing shoes into actual paint and building the composite from those photos.
How was the paint pool built?
From 2x4s screwed together into a frame, with a tarp wrapped around it. The tarp holds the liquid inside, so the frame works as a small pool.
How did the shoe land in the same place every time?
It was clamped to one end of a mini boom. Someone lifted and lowered the other end, which raised the shoe and dropped it into the paint in a predictable way.
How was the shoot lit?
Two strip boxes behind the shoe for an even backlight and front lights with grids for a bit of contrast. Every source was small, since a big light would light the whole pool instead of letting the paint fade to black.
What camera settings were used?
1/160th of a second for nearly every shot, f/14 to f/16 to keep a lot in focus, and a low ISO because the lights put plenty of light into the scene.
How do you keep a splash in focus?
Set a pin over the spot where the splash should happen, focus on it and switch to manual focus. Anything on the same focal plane as the pin will be sharp, so you only have to time the shot.
How did the shoe survive being dipped in paint over and over?
It was treated with NeverWet. A second, clean shoe was photographed at many angles to match the hero shot; it’s the other foot of the pair, so it gets flipped and combined with the splash.
How were the yellow and purple splashes made?
By trial and error with different containers. In the end they scooped paint with a paint bucket and flicked it out with a wrist motion, using the same pin and locked focus.
Why was there such a big crew?
Shoes don’t get confused by a crowd the way a model can. People watched the tethered shots, ran the splash, took pictures and moved lights, and swapped jobs through the day.
Master Photoshop, Lightroom and Photography
Join PHLEARN PRO for $12.99 a month, or $99.99 a year (save 36%). Cancel anytime, with a 100% money-back guarantee.





