Free Tutorials – Popular

One of the most useful navigational tools when doing closeup, detailed work, The Hand Tool allows you to easily move around your images.
Photoshop | Photo Editing | Easy | 1 video
1 Sample Image

The Custom Shape Tool is great because you can create any shape you want, and since they are vector, they can be scaled infinitely up and down without losing resolution.
Photoshop | Photo Editing | Easy | 1 video
1 Sample Image
Layer masks give you the ability to hide or show certain parts of layers. Best of all, they are completely reversible, so you can always bring back whatever you have hidden.
Photoshop | Photo Editing | Easy | 1 video
1 Sample Image

Color Balance is a great way to make color adjustments to your images and can also be used to introduce some new colors as well.
Photoshop | Photo Editing | Easy | 1 video
1 Sample Image

A Levels Adjustment Layer gives you control over color balance, tone and exposure. After you master it, Levels will become one of your go-to tools.
Photoshop | Photo Editing | Easy | 1 video
1 Sample Image

Hue/Saturation gives you the power to adjust, change, and add colors to your images. Colors have a ton of control over the look and feel of your images, so this is a great tool to be familiar with.
Photoshop | Photo Editing | Easy | 1 video
1 Sample Image

Black and White Adjustment Layers give you the most control when transfering a color image to Black and White. You can even adjust the light values for each individual color in your image.
Photoshop | Photo Editing | Easy | 1 video
1 Sample Image

Curves are an awesome tool that give you control over the exposure and color in your images. Curves are very similar to Levels, but with some practice, they can give you a lot more control.
Photoshop | Photo Editing | Easy | 1 video
1 Sample Image

Easily one of Aaron’s favorite tools in Photoshop! The Brush Tool can be one of the most powerful and versatile tools, capable of retouching, compositing, and stunning special effects.
Photoshop | Photo Editing | Medium | 1 video
1 Sample Image

Adjustment Layers allow you to apply effects and changes to your images that are not permanent and can be adjusted or reversed. Adjustment Layers are key to non-destructive editing.
Photoshop | Photo Editing | Medium | 1 video
1 Sample Image

Perfect for graphics designers and web developers, learn to use the Slice Tool to cut up a high resolution image into multiple pieces to prepare it for the web.
Photoshop | Photo Editing | Easy | 1 video
1 Sample Image

Photoshop Actions allow you to record a series of editing steps, and then apply that same series of edits to anything else. Actions can save you a ton of time when it comes to complex processes like sharpening.
Photoshop | Photo Editing | Medium | 1 video
1 Sample Image

As opposed to directly affecting your image, a smart object creates a reference file of the original, so you are never directly changing the original file.
Photoshop | Photo Editing | Medium | 1 video
1 Sample Image

Push and pull pixels in your image with the Liquify Tool. This tool is great for reshaping or restructuring objects that seem a little off or out of place. This tool can be a Photographer’s best friend, but the key is moderation.
Photoshop | Photo Editing | Medium | 1 video
1 Sample Image

Edit faster and more efficiently by utilizing Keyboard Shortcuts in Photoshop. Easily access the tools you need and spend less time searching through menus.
Photoshop | Photo Editing | Easy | 1 video
1 Sample Image

All of your images are made up of a ton of color information, Channels allows you to separate, select, and view this information in 3 primary colors, red, green, and blue.
Photoshop | Photo Editing | Advanced | 1 video
1 Sample Image
Strategically and artfully merger and blend your layers in Photoshop with Clipping Masks. Great for combining multiple images, or being selective with an adjustment layer.
Photoshop | Photo Editing | Medium | 1 video
1 Sample Image
Sometimes you can end up with a bunch of different layer while editing in Photoshop. Groups are a great way to stay organized and edit multiple layers at once.
Photoshop | Photo Editing | Easy | 1 video
1 Sample Image

Previously known as the Refine Edge Tool, Select and Mask has evolved to make getting the perfect selection or mask even easier.
Photoshop | Photo Editing | Medium | 1 video
1 Sample Image

From drop shadows to strokes, Layer Effects are the easiest way to apply 2 dimensional styles to your layers. When used correctly, they can create some awesome looking effects in your images.
Photoshop | Photo Editing | Medium | 1 video
1 Sample Image

Understanding how foreground and background colors work in Photoshop will speed up your workflow and help you use Layer Masks more efficiently. Learn some commonly used keyboard shortcuts and how to get the most out of the Color Picker and Swatches.
Photoshop | Photo Editing | Easy | 1 video
1 Sample Image

One of the few vector based features in Photoshop, Paths create line segments that can be scaled up and down without losing resolution.
Photoshop | Photo Editing | Medium | 1 video
1 Sample Image

The building block of creating great images and a speedy workflow, understanding Layers is key to mastering Photoshop. Learn all of the layer types, how to work non-destructively, and how to organize your projects like a pro.
Photoshop | Photo Editing | Easy | 1 video
1 Sample Image

There are a ton of uses for the Pen Tool, but it is most commonly used graphically or to make selections. Whether you’re making shapes or sections, The Pen Tool can definitely help.
Photoshop | Photo Editing | 501.75 hours | 1 video
1 Sample Image
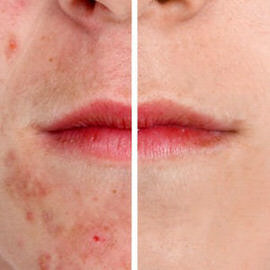
The key to removing acne in Photoshop is to Divide the process into two steps. The first step is to get rid of redness and the second step is to remove the blemishes.
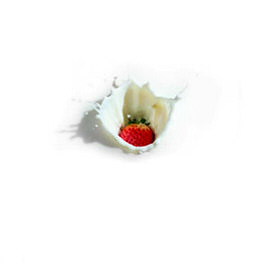
An image with a pure white background will blend perfectly into web pages, mailers, graphics, and anything else that combines images with text.
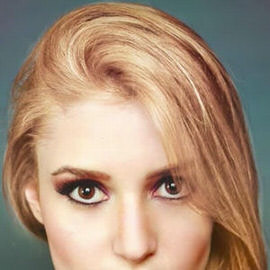
Changing Hair Color in Photoshop is much easier than doing it in real life and by the time this episode is over you will be on your way to Color city! Join us as we show you how to Change Hair Color in Photoshop.
In today’s episode we will show you how to use the new blur gallery in Photoshop cc 2014.

We will show you the amazing power of focus area selections in Photoshop cc 2014 as well as new Type Tools. We are also throwing in one of our old favorites – Content Aware Scale with Skin Tone Protection.

A watermark can ruin an image of not designed and placed well. In this episode you will learn how to place your Logo on your images in a way that won’t destroy your image.
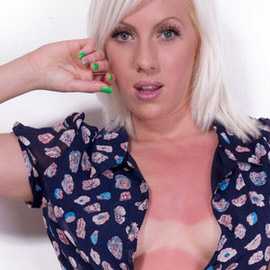
Here are some quick and easy tips for removing sunburn and tan lines, while also creating a tan. No need for sunscreen! We can take care of all of this in Photoshop.