

Download Assets
Download Assets
This tutorial includes 1 sample image. Downloads are free with a PHLEARN account.
- Free sample files with every tutorial on PHLEARN
- New tutorials published every week
- Unlimited downloads with your free PHLEARN account
Watch the Full Series
description
Adaptive presets read the photograph first. An ordinary preset applies the same adjustments to every photograph regardless of what is in it. An adaptive preset runs an AI selection first, then edits only the area it found.
On Day 30 of 30 Days of Lightroom Classic we finish the series with the Sky, Subject, Portrait and Blur Background groups, dial each one back with the Amount slider, and read the panel indicators to see exactly which sliders a preset moved so you can adjust or unpick any part of it.
This is Day 30 of our 30 Days of Lightroom Classic series. Follow along with all 30 episodes as we explore the magic of Lightroom together!
JOIN 30 DAYS OF LIGHTROOM CHALLENGE (FOR FREE!)
Ready to jump in? Sign up and we’ll email you a printable calendar and daily class schedule so you can get started right away!
Image Source


Adaptive Presets Read the Photograph First
Here we are at day thirty. Over the last month you have built a catalog, learned the Develop module slider by slider, worked through masking, color, retouching and export, and taken the same library onto a phone. For the last day, something that puts a lot of that work behind a single click: adaptive presets.
An ordinary preset applies the same adjustments to every photograph regardless of what is in it. An adaptive preset runs an AI selection first — sky, subject, portrait, background — and then applies its adjustments only inside that selection. The result is a preset that responds to your specific image instead of steamrolling it.
They work in Lightroom Classic, in the Lightroom desktop app and on mobile, so whichever version you settled on after Day 24, this applies to you.
Where to Find Them
-
Open the Develop module
In Classic, adaptive presets live alongside your own presets in the left panel.
-
Expand the Presets panel
Your User Presets — the ones you built back on Day 12 — are at the top. Collapse them to get them out of the way.
-
Look for the Adaptive groups
You will see Adaptive: Portrait, Adaptive: Sky, Adaptive: Subject and Adaptive: Blur Background.
-
Hover to preview
Moving over each one previews it on your image, so you can browse the whole set without committing to anything.
Adaptive: Sky
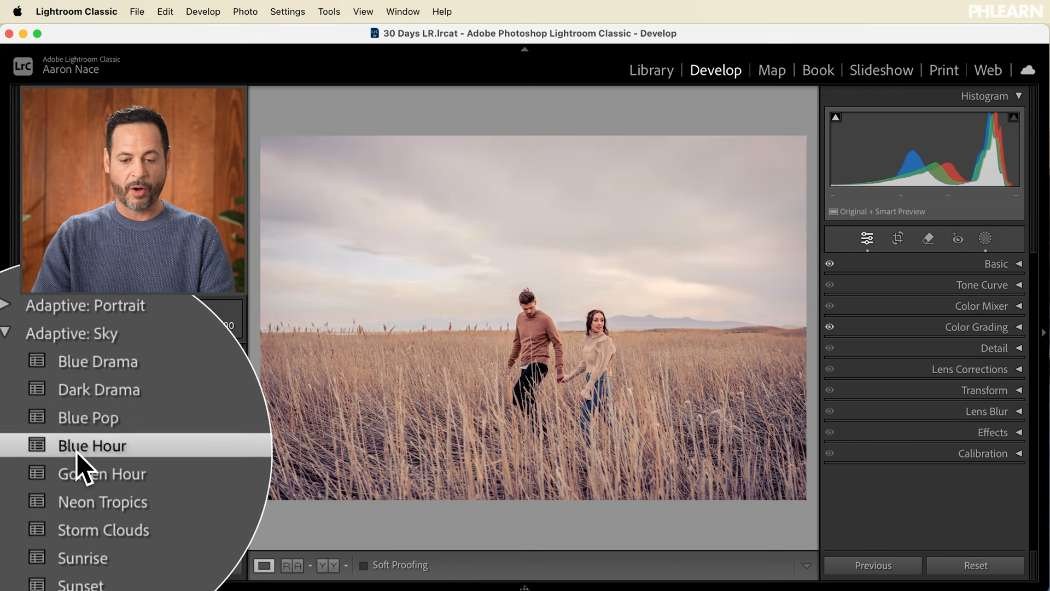
Click any preset in this group and Lightroom finds the sky, masks it, and treats it on its own. Move down the list and you can watch a flat gray sky turn warm, dramatic or deeply saturated while everything below the horizon stays untouched.
What makes these worth using is not that they are finished looks — most of them are stronger than you would choose yourself. It is that they are a fast way to answer the harder question: what direction should this photograph go in? Click through eight of them in fifteen seconds and one will usually suggest something you would not have tried.
Adaptive: Subject and Portrait
The Subject group identifies whoever or whatever is the focus of the frame and adjusts them separately from the background. It holds up surprisingly well on subjects that are small in the frame or far from the camera — the same Select Subject technology you used on Day 5, doing the selection work invisibly.
The Portrait group is the specialised version, targeting skin, eyes, teeth and hair. It is a reasonable starting point for the kind of retouching you did on Day 15, and everything it does remains adjustable afterwards.
Adaptive: Blur Background
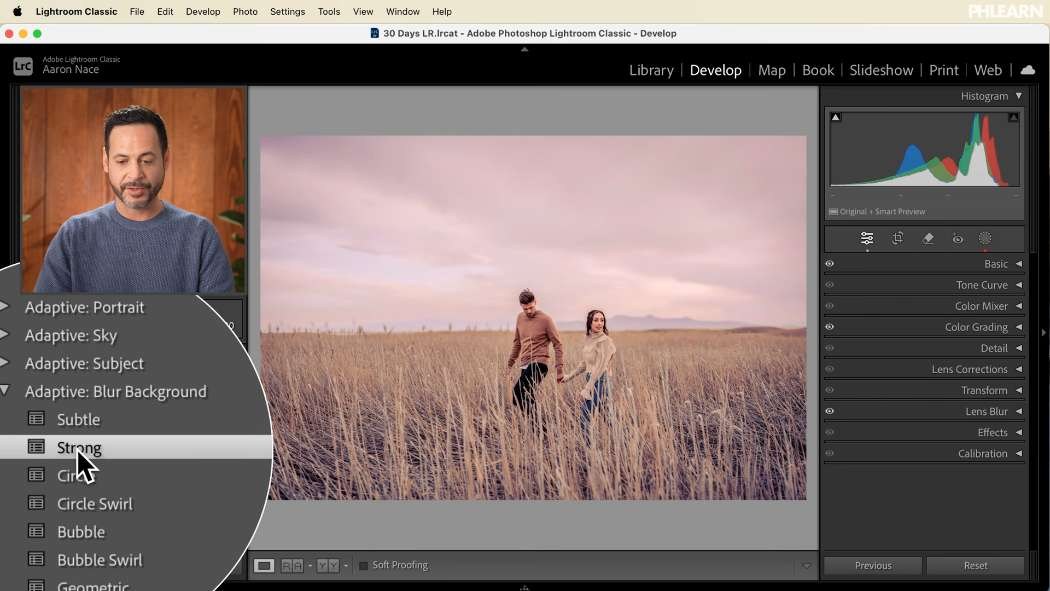
This one is the most impressive of the set. It builds a depth map of the scene and blurs the background behind your subject — the Lens Blur tool from Day 21, applied automatically.
There are strength variants to choose from, and once applied you get an Amount slider to dial the effect up or down. Pushed too far it looks artificial; kept subtle it does a convincing job of separating a subject from a busy background that you could not blur in camera.
See Exactly What a Preset Did
This is the part that turns adaptive presets from a shortcut into a teaching tool. After applying one, look down the panels on the right of the Develop module. Where a preset has made changes, the panel’s indicator lights up — so you can see at a glance that it touched Basic, Color Grading and Lens Blur but left Detail alone.

Open those panels and every slider the preset moved is sitting there at its new value. You can:
- Adjust anything you disagree with. The preset is a starting point, not a finished edit.
- Study how the look was built. Which sliders, in which direction, by how much. This is the fastest way to reverse-engineer a style.
- Turn individual panels off. Keep the color grading, drop the blur, or the other way round.
- Layer your own work on top. Stack a user preset, then an adaptive one, then hand-adjust.
Hit the backslash key to flip between before and after, and you can judge in a second whether the whole thing is an improvement.
Where Adaptive Presets Actually Help
They are not a replacement for what you have learned this month. What they are genuinely good at is narrower and more useful than that:
- Finding a direction. When you have no idea what you want an image to look like, clicking through a group is faster than guessing with sliders.
- Volume work. A rough first pass over a large set, refined by hand afterwards.
- Doing the selection for you. Even if you throw the adjustments away, the mask it built is still there to work with.
- Learning. Reading back what a preset changed teaches you more than any slider-by-slider explanation.
And more of them keep arriving. Adobe adds to the adaptive set regularly, so it is worth checking the panel every so often.
That’s Thirty Days
You started this series with an empty catalog. You now know how to import and organise a shoot, cull it, develop RAW files properly, mask precisely, grade color, retouch portraits, remove objects, work in black and white, round-trip to Photoshop, edit on your phone, and export files that are correct for wherever they are going.
That is a complete workflow. The tools will keep changing — the AI features in today’s lesson did not exist a few years ago — but the foundation underneath them does not.
If you are picking this up part-way through, everything is here and stays here. Start at Day 1 and work forward at whatever pace suits you.
Quick Reference: Keys, Menus and Settings
- Find the presetsDevelop module > Presets panel; collapse User Presets
- Edit the skyAdaptive: Sky, click through the looks
- Make the subject popAdaptive: Subject, then the Amount slider to tone it down or up
- Blur the backgroundAdaptive: Blur Background > Subtle or Strong, then Amount
- Before and after\ (backslash, above Enter or Return)
- See what changedA white eye icon marks each edited panel: Basic, Color Grading, Lens Blur
- Fix the blurLens Blur panel: drag the focus tool around the subject, paint with the Blur brush at a lower Flow
Adaptive presets are in Lightroom Classic, Lightroom desktop and Lightroom Mobile.

Free Downloads
Follow Along on the Same Photo
Get the JPEG from the video, with a sky, subjects and a background, so you can try every adaptive preset group on the same photo. Free with a PHLEARN account.
Adaptive Presets in Lightroom: Common Questions
What is an adaptive preset in Lightroom?
A preset that uses AI to find part of the photo first, like the sky or your subject, and then edits based on that. A regular preset applies the same settings to every image.
Where do I find adaptive presets in Lightroom Classic?
In the Develop module, expand the Presets panel on the left and collapse your User Presets. The groups are Adaptive: Portrait, Sky, Subject and Blur Background.
Are adaptive presets only in Lightroom Classic?
No. The video uses Lightroom Classic, and they are also available in Lightroom Mobile and the Lightroom desktop app.
How do I change the sky with one click?
Open Adaptive: Sky and click through the presets. Lightroom finds the sky and edits only that area, so you can try looks like a purple sunset in seconds.
Does Adaptive: Subject work when people are far away?
Yes. In the video the subjects are not close to the camera and the Subject presets still find them and edit them separately.
How do I make an adaptive preset less strong?
Use the Amount slider that appears under the preset after you apply it. Drag it down to tone the effect down, or up to push it.
How do I blur the background with a preset?
Click Adaptive: Blur Background and choose Subtle or Strong. Lightroom estimates the depth of the image and blurs behind your subject, and the Amount slider sets how much.
How can I see what a preset changed?
Look down the panels on the right of the Develop module. Where the eye icon turns white, that panel was edited, such as Basic, Color Grading or Lens Blur, and you can open it to adjust the sliders.
How do I fix a spot the background blur missed?
Open the Lens Blur panel, use the focus tool to drag around your subject, then paint the missed area with the Blur brush. Lower the Flow for a gentler result.
Is the sample file free?
Yes, with a free PHLEARN account. You get 1 sample image (JPEG) with a sky, subjects and a background for the adaptive presets to find.
Master Photoshop, Lightroom and Photography
Join PHLEARN PRO for $12.99 a month or $99.99 a year. Cancel anytime, with a 100% money-back guarantee.





