

description
Strong contrast usually means real detail is still hiding in the shadows. This free tutorial pulls it back with Shadows/Highlights — using Show More Options for tonal width, radius and color control rather than one blunt brightness slider — then builds the image up from there: warm Curves layers masked with Apply Image so they land in the shadows or highlights, a glowing headlamp, and a soft blurred vignette.
Enjoying This Free Tutorial?
We publish a new free tutorial every week, each one with sample images and PSDs you can download and follow along with. Sign up and they land straight in your inbox, along with early word on sales, events and subscriber-only offers.
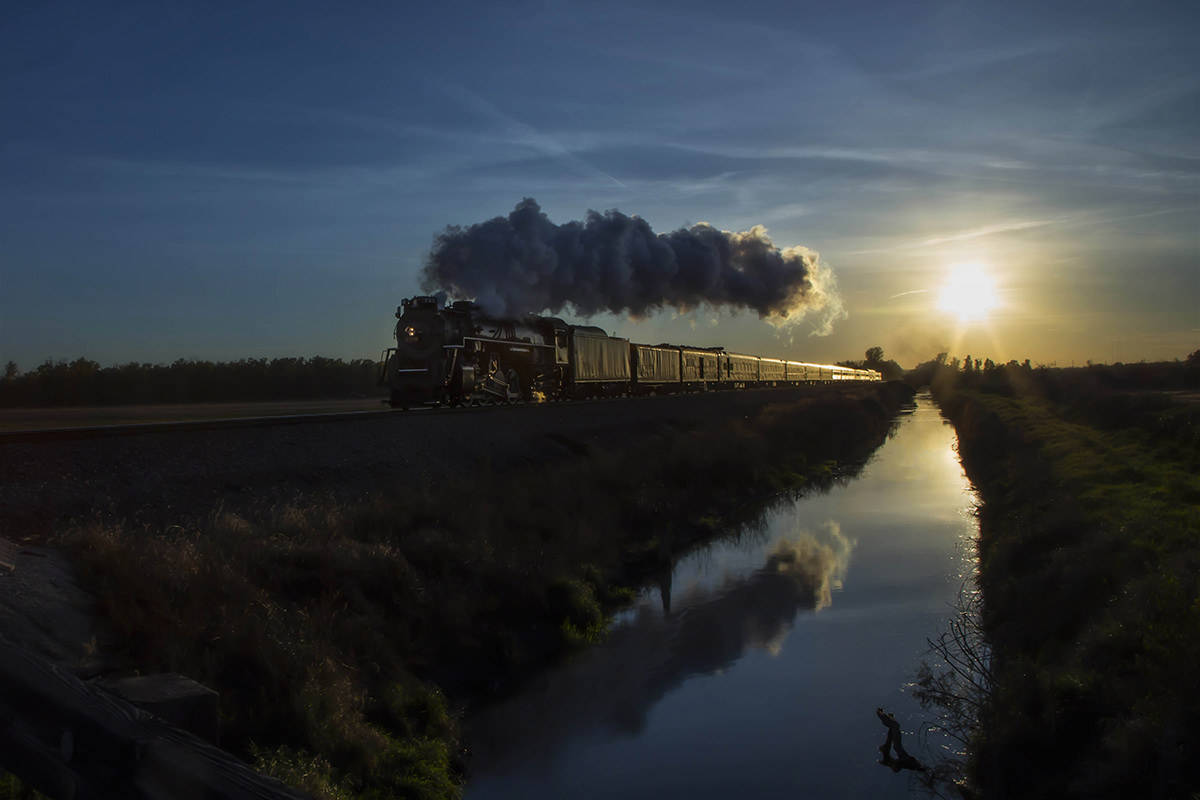
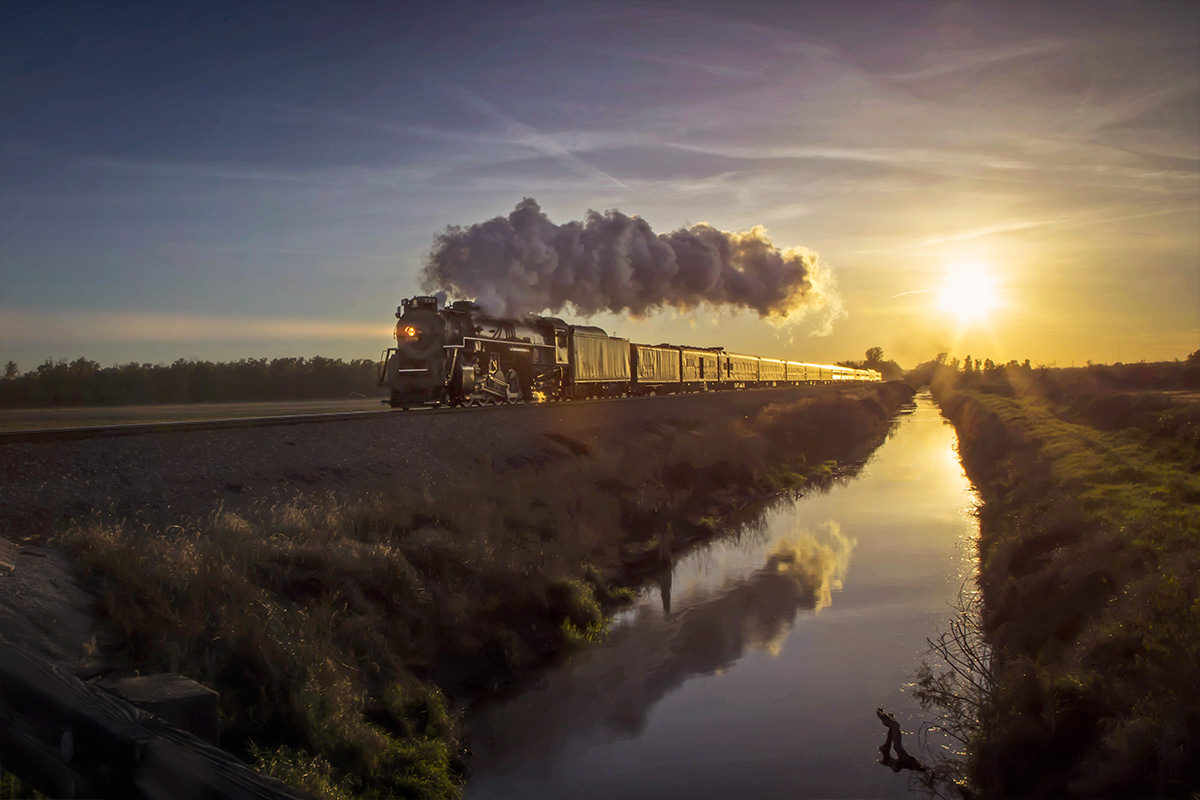
Bringing Back Shadow Detail in Photoshop
A photo with strong contrast often has real detail hiding in its shadows, and Photoshop’s Shadows/Highlights tool can pull that information back out with a surprising amount of control. This tutorial recovers shadow detail on a moody train photograph, then builds up warm color, a glowing light source, and a soft vignette to bring the whole image to life.
Recovering Shadow Detail With Shadows/Highlights
Photoshop’s Shadows/Highlights adjustment is built specifically for pulling hidden detail out of an image’s darkest areas.
-
Duplicate the Layer and Open Shadows/Highlights
Press Cmd/Ctrl+J to duplicate the background layer, then go to Image > Adjustments > Shadows/Highlights.
-
Show More Options and Adjust the Shadows
Click Show More Options, then increase the Shadows amount and adjust the tonal width to bring up detail in the darkest parts of the image, leaving the highlights alone.
-
Fine-Tune Color Correction and Saturation
Use the Color Correction slider to add or reduce saturation (a little less works here) and the Midtone Contrast slider to adjust contrast, then click OK.
-
Lower the Layer’s Opacity
Reduce the layer’s opacity slightly so the recovered shadow detail doesn’t look overly bright.
Why Show More Options Gives Finer Shadow Control
The basic Shadows/Highlights dialog only offers simple amount sliders, while Show More Options reveals tonal width, radius, and color correction controls that determine exactly how the recovered detail blends back into the image. That extra control is what makes it possible to pull up shadow detail with real nuance instead of a single blunt brightness boost.
Warming the Image With Curves and Apply Image
A push of warm color into the shadows or highlights, controlled with Apply Image, adds mood without affecting the whole image evenly.
-
Add a Curves Layer and Push Warm Tones
Add a Curves adjustment layer, increase the RGB curve slightly, increase the Red channel, and decrease the Blue channel to warm the image up.
-
Apply Image to the Mask
Click the layer mask, go to Image > Apply Image, set Channel to Merged RGB and Blending to Multiply at 100%, then check or uncheck Invert depending on whether you want the effect to show in the shadows or the highlights.
Why Invert Determines Shadows Versus Highlights
Apply Image without Invert concentrates an effect on an image’s lighter areas, since Multiply blending shows more of the layer where the underlying image is already bright. Checking Invert flips that relationship so the effect instead shows up most strongly in the darkest areas, which is what lets the same technique target either shadows or highlights depending on the goal.
Adding a Second Warm Tone With a Radial Gradient Mask
A second, more localized push of warm color adds another layer of mood focused on a specific part of the frame.
-
Add Another Curves Layer With Red and Reduced Blue
Add a Curves adjustment layer, increase the Red channel, and decrease the Blue channel.
-
Invert the Mask and Paint a Radial Gradient
Press Cmd/Ctrl+I to invert the mask to black, press G for the Gradient tool, choose the radial, foreground-to-transparent gradient with white as the foreground color, then click and drag out from the desired center point.
-
Refine the Color Balance
If the resulting color looks too yellow or too red, adjust the Curves layer’s channels further, such as pulling blue back up slightly to correct an overly warm cast.
Darkening the Top and Bottom With a Linear Gradient
A linear gradient mask darkens the edges of the frame while leaving the center area untouched.
-
Add a Darkening Curves Layer
Add a Curves adjustment layer and drag the curve down to darken the image.
-
Invert the Mask and Paint a Linear Gradient
Press Cmd/Ctrl+I to invert the mask, select the linear gradient, and hold Shift while dragging from the top down and from the bottom up to constrain the gradient to straight vertical lines.
-
Lower Opacity to Taste
Reduce the layer’s opacity so the darkening reads as subtle rather than heavy-handed.
Why Editing in 16-Bit Avoids Color Banding
Pushing color and light adjustments as far as this tutorial does can reveal banding and compression artifacts, especially on an image pulled from the internet that’s already been compressed. Working in 16-bit, such as an image coming straight from a raw file through Lightroom, gives Photoshop far more tonal information to work with, which avoids this kind of banding even under heavy adjustments.
Creating a Glowing Light Source
A small, glowing light effect added to an existing light source, like a train’s headlamp, adds a fun finishing touch.
-
Add a Curves Layer and Boost Red
Add a Curves adjustment layer, brighten the RGB curve, increase Red, and decrease Blue.
-
Select the Light Source With the Polygonal Lasso
Use the Polygonal Lasso tool to roughly outline the area where the light beam should appear, then invert the mask so the effect shows only inside that selection.
-
Blur and Fade the Glow
Go to Filter > Blur > Gaussian Blur to soften the glow, then use a large, soft black brush to paint the effect away farther from the light source, since light naturally gets stronger closer to its origin.
-
Duplicate the Layer for More Strength
Press Cmd/Ctrl+J to duplicate the layer, fill its mask with black, and paint white directly around the light source to intensify the glow right at its origin.
Adding a Soft Vignette to Finish
A final darkening pass around the frame’s edges pulls everything together and reinforces the mood.
-
Add a Darkening Curves Layer
Add a Curves adjustment layer and drag the curve down to darken the image, bringing back some contrast.
-
Invert and Use the Elliptical Marquee
Press Cmd/Ctrl+I to invert the mask, then use the Elliptical Marquee tool to select an area around the frame’s edges and fill it in on the mask.
-
Blur the Vignette for a Natural Look
Go to Filter > Blur > Gaussian Blur and apply a large blur to the mask so the vignette fades in naturally rather than showing a hard edge.
Why This Approach Works
Shadows/Highlights does the heavy lifting of recovering hidden detail in a single, purpose-built dialog, while Apply Image and Invert give every Curves layer that follows precise control over whether it affects shadows or highlights. Building color in several separate, gradient-masked layers rather than one global adjustment is what allows each push of warmth to be independently refined or toned back, and the same layered approach makes the glowing light source and closing vignette easy to add without disturbing anything built before them. None of these adjustments are destructive, which is exactly why it’s worth circling back to nudge individual channels even after each layer already looks finished.
Final Thoughts
Recovering shadow detail is often just the starting point rather than the whole edit — once that information is back, it opens up room for color grading, added light sources, and a vignette that wouldn’t read as convincingly on a flatter, less detailed image. Keep adjustment layers non-destructive throughout, since being able to go back and dial down a channel that turned out too red or too yellow is what makes an ambitious edit like this one forgiving to work through.
Quick Reference: Keys, Menus and Settings
- Recover shadowsCmd/Ctrl + J, Image > Adjustments > Shadows/Highlights, Show More Options; lower the opacity after
- Warm the highlightsCurves: RGB up a little, Red up, Blue down; Image > Apply Image, Merged RGB, Multiply, 100%
- See the maskAlt/Option-click the mask thumbnail
- Radial warmthCmd/Ctrl + I, G, radial Foreground to Transparent, D for white
- Darken top and bottomCurves down, linear gradient, Shift-drag from the top and from the bottom
- Headlamp glowPolygonal Lasso, Filter > Blur > Gaussian Blur; Cmd/Ctrl + J for more
- VignetteCurves down, Elliptical Marquee on the mask, large Gaussian Blur
No AI, no generative credits.
Recovering Shadow Detail: Common Questions
How do I bring back detail in dark shadows?
Duplicate the layer with Cmd/Ctrl + J, then go to Image > Adjustments > Shadows/Highlights. Raise the Shadows amount and leave the highlights where they are.
What does Show More Options add?
Controls like Tonal Width, Color Correction and Midtone Contrast. They decide how the recovered detail looks, and pushed far you can get an almost HDR effect.
The recovered shadows look too bright. What now?
Lower the opacity of the Shadows/Highlights layer a little. Because you worked on a duplicate, the original stays underneath.
How do I make a Curves layer affect only the highlights?
Click its mask and choose Image > Apply Image with Merged RGB, Multiply and 100%. Leave Invert unchecked for the highlights, or check it for the shadows. Alt/Option-click the mask to see it.
How do I add warm color to just one area?
Make a Curves layer with Red up and Blue down, press Cmd/Ctrl + I to turn the mask black, then press G and drag a radial Foreground to Transparent gradient in white (press D) from the center of the area.
My warm color looks too yellow or red. Do I start over?
No. Double-click the Curves layer and adjust the channels again, for example pull Blue back up a little. Adjustment layers can be changed at any point.
Why am I seeing banding after big adjustments?
The image was already compressed, like a photo taken from the internet. Working from a RAW file and editing in 16-bit avoids it.
How do I make a light look like it’s glowing?
Make a bright, warm Curves layer, outline the beam with the Polygonal Lasso and mask the effect to that shape. Add a Gaussian Blur, fade it away from the source with a large black brush, then duplicate it to strengthen the glow near the light.
How do I add a soft vignette?
Add a darkening Curves layer, mask the edges with an elliptical selection, then blur the mask with a large Gaussian Blur so there’s no hard edge.
Master Photoshop, Lightroom and Photography
Join PHLEARN PRO for $12.99 a month or $99.99 a year. Cancel anytime, with a 100% money-back guarantee.





