
Color Grading Lightroom Presets: 15 Looks + 5 Skin Tone Fixes
-

-
Add to
favorites
-
Software
-
CompatibilityLightroom & Camera Raw
-
Lightroom presets15 Looks + 5 Skin Fixes
-
Works in every Lightroom.xmp for Classic, Desktop & Mobile
-
Backup for older app versions.dng for Lightroom Mobile
-
In the downloadInstall & Usage Guide (PDF)
Install & Usage Guide
How to Install and Use Your Presets
A short PDF that walks you through installing the pack in Lightroom Classic, Lightroom on your computer, Lightroom on your phone and Camera Raw in Photoshop, then shows how to use the looks the way the course does.
DESCRIPTION
Twenty color grading Lightroom presets, for Lightroom Classic, mobile and Camera Raw, built so skin stays natural while the rest of the photo changes. Fifteen looks come in three groups, Natural, Warm and Cool & Moody, plus five Skin Fixes that correct orange, red, yellow, green or ashy skin. They come with the PRO course Skin Tones, Color Grading & Presets in Photoshop & Lightroom, where lesson 10 shows how to import them and how to build your own.
The looks only change the Tone Curve, Color Mixer and Color Grading panels. They never touch White Balance, Exposure, masks or crop, so you correct the photo first and then click a look, and it doesn’t drift from photo to photo. The Skin Fixes only use the Calibration panel, so one stacks on top of any look. Every preset was tested on faces from light to deep skin. As Aaron says in the course, “we purposely kept these on the relatively subtle side, so they’re gonna work with more images.”
One zip holds the 20 color grading Lightroom presets as .xmp files, which work in Lightroom Classic 10 and newer, Lightroom on your computer, Lightroom on your phone and Camera Raw in Photoshop, plus .dng versions for older releases of the mobile app, each in its own labeled folder, with the PDF install and usage guide.


PHLEARN PRO · Lightroom Presets
Color Grading Lightroom Presets
20 presets5 skin fixesLightroom & Camera Raw
PHLEARN Color Grading Lightroom Presets · 20 Looks
Color Grades That Keep Skin Natural
Fifteen color grading Lightroom presets for natural, warm and moody photos, plus five Skin Fixes you stack on top. Pick one below to see it on the same portrait, then drag the slider to compare.
Now showing
Teal ShadowsTeal in the shadows, warm highlights and greens pushed toward teal.


Natural
Warm
Cool & Moody
Skin Fixes


Natural: Five Clean, Everyday Looks
The Natural group is Clean, Soft, Bright & Airy, Crisp and Matte, the color grading Lightroom presets for weddings, family photos, headshots and true color. Here Bright & Airy opens up the field portrait without turning her skin pale.
A Lighter Curve, Paler Greens
Bright & Airy raises the midtones on the tone curve, from 128 to 150, and lifts the black point to 10, so shadows open up and the frame feels light. Green saturation drops by 40 and yellows by 25, which turns busy grass and leaves soft and pastel.
Skin Held on Purpose
Brightening a photo usually washes skin out, so this preset raises orange saturation by 31 to keep the warmth in faces. Matte and Soft take the other road: they fade the blacks and mute the other colors much more than orange.
Best on: bright outdoor portraits, weddings, family sessions and any photo that should stay true to life.
Preset shown: Bright & Airy.


Warm: Sunlight Without Orange Skin
The Warm group is Golden Hour, Amber Light, Peach Glow, Sunset Soft and Warm Fade. Warm looks are where most color grading Lightroom presets turn skin orange, so each of these warms the scene and holds orange back. Warm Fade on this sunset portrait shows how.
Faded Blacks, Quiet Blues
Warm Fade lifts the black point to 28 and rolls the brightest whites down to 242 for a soft, faded finish. Blue saturation drops by 55 and greens by 45, so the sky and background calm down.
Orange Pulled Back
The warmth comes from Color Grading, with amber in the shadows and highlights. To keep that from piling onto skin, orange saturation goes down by 17. Golden Hour and Amber Light work the same way: warm highlights, orange held in check.
Best on: golden hour, sunsets, warm indoor light and beach photos.
Preset shown: Warm Fade.

Cool & Moody: Dark Color, Natural Faces
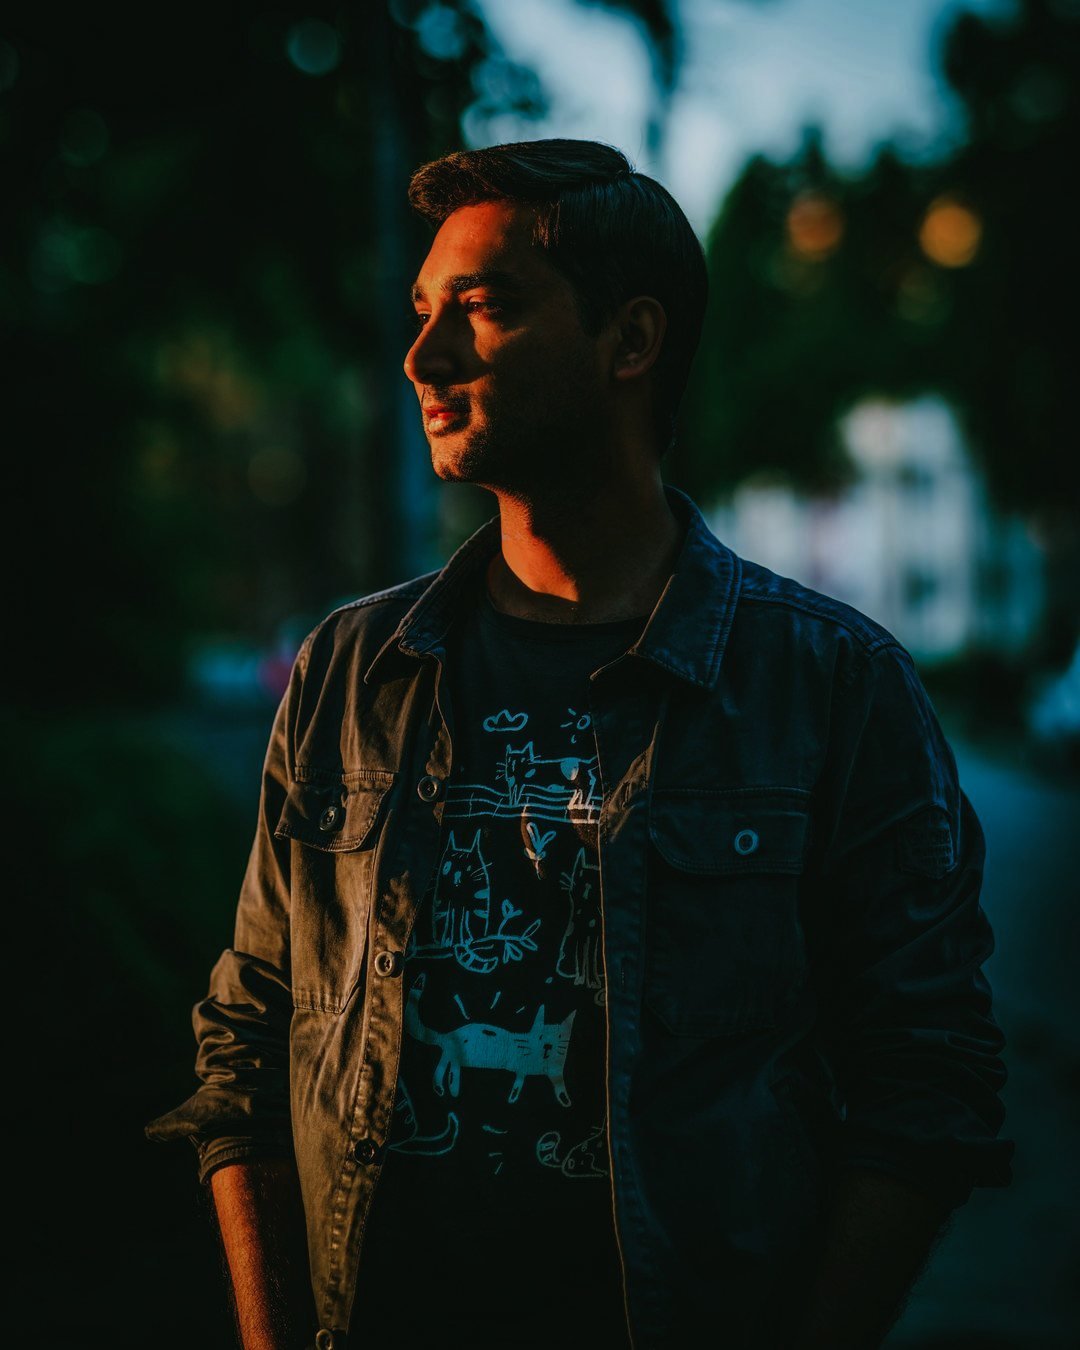
The Cool & Moody group is Teal Shadows, Cinematic, Blue Hour, Moody Green and Night Blue. The cool mood comes from the background colors, with greens and blues pushed toward teal, so faces stay warm. Moody Green deepens this evening portrait.
Darker Greens, Deeper Midtones
Moody Green darkens greens by 35 and cuts their saturation by 40, and the tone curve pulls the midtones down from 128 to 118. A green-teal tint goes into the shadows only, so the trees turn dark and rich.
The Shadow Tint Stays Low
The tint is kept to the deepest tones, and orange gets a small brightness lift of 6, so his face keeps its color. Teal Shadows and Night Blue push the same idea further with stronger blue in the shadows.
Best on: evening, forest, city and night portraits.
Preset shown: Moody Green.

Skin Fixes: One Click, on Top of Any Look
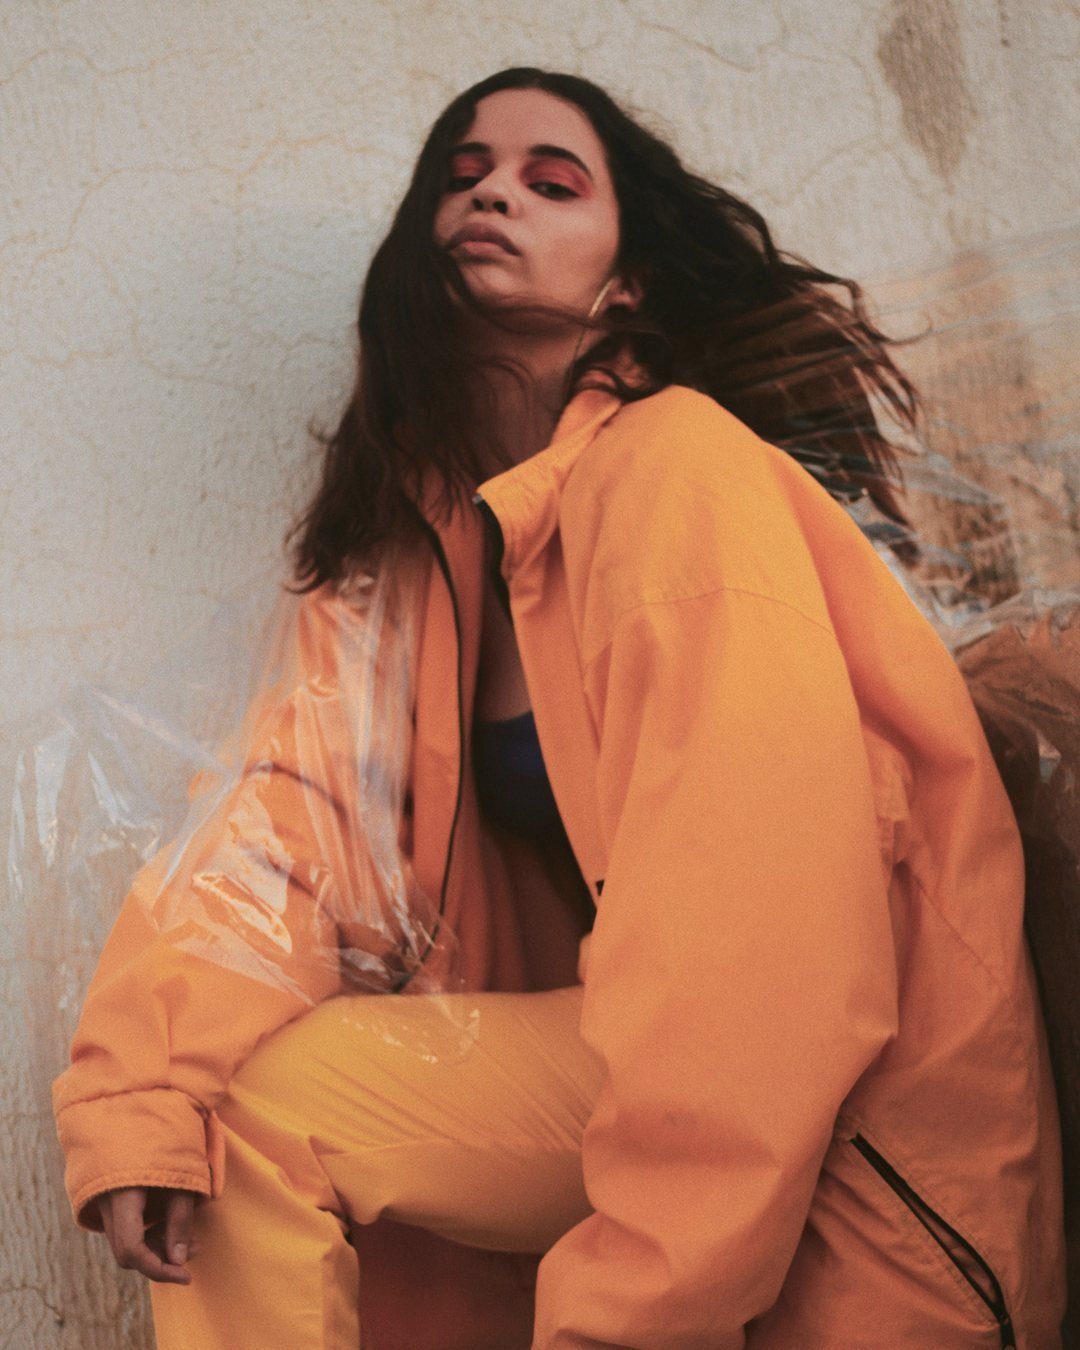
The five Skin Fixes are Fix Orange Skin, Fix Red Skin, Fix Yellow Skin, Fix Green Skin and Fix Ashy Skin. Use them last: click a look first, then the fix that matches what went wrong. Here Fix Orange Skin calms skin that went orange next to a bright jacket.
Calibration Only
The fixes only change the Calibration panel, which the looks never touch. A preset only changes what is saved in it, so a fix stacks on any look and both stay. Fix Orange Skin lowers the red primary saturation by 18 and nudges its hue by 3.
Small, Measured Moves
In testing, each fix moved skin 4 to 6 degrees in its stated direction on the vectorscope, or changed skin saturation by 12 to 15 percent. Fix Ashy Skin adds saturation back to gray-looking skin.
Best on: skin that turned orange, red, yellow, green or gray, on top of any of the color grading Lightroom presets in the pack.
Preset shown: Fix Orange Skin.
What’s in the Download
One zip, desktop and mobile
One zip with both versions in labeled folders: .xmp presets for Lightroom Classic, desktop, mobile and Camera Raw, and .dng backups for older releases of the mobile app, plus the install and usage guide. In Lightroom they show up in four groups named PHLEARN Color Grading.
- ZIPPHLEARN Color Grading Lightroom Presets 2026.zipDesktop and mobile presets in one download, 9.7 MB
- XMPLightroom Classic & Desktop (.xmp)20 presets for every Lightroom app and Camera Raw
- DNGLightroom Mobile (.dng)The same 20 for older releases of the mobile app
- PDFPHLEARN Color Grading Presets - Install and Usage Guide (2026).pdfInstall steps for every app, plus how to use the looks
Photos on this page from Unsplash: Anna Blake, Freddie Addery, JR Clavant, Jahanzeb Ahsan and Cesar La Rosa.
- PHLEARN-Color Grading-Blue Hour
- PHLEARN-Color Grading-Cinematic
- PHLEARN-Color Grading-Moody Green
- PHLEARN-Color Grading-Night Blue
- PHLEARN-Color Grading-Teal Shadows
- PHLEARN-Color Grading-Bright & Airy
- PHLEARN-Color Grading-Clean
- PHLEARN-Color Grading-Crisp
- PHLEARN-Color Grading-Matte
- PHLEARN-Color Grading-Soft
- PHLEARN-Color Grading-Fix Ashy Skin
- PHLEARN-Color Grading-Fix Green Skin
- PHLEARN-Color Grading-Fix Orange Skin
- PHLEARN-Color Grading-Fix Red Skin
- PHLEARN-Color Grading-Fix Yellow Skin
- PHLEARN-Color Grading-Amber Light
- PHLEARN-Color Grading-Golden Hour
- PHLEARN-Color Grading-Peach Glow
- PHLEARN-Color Grading-Sunset Soft
- PHLEARN-Color Grading-Warm Fade
Color Grading Preset Questions, Answered
What’s included in the PHLEARN Color Grading Lightroom Presets?
The pack includes 20 presets in four groups. Natural: Clean, Soft, Bright & Airy, Crisp and Matte. Warm: Golden Hour, Amber Light, Peach Glow, Sunset Soft and Warm Fade. Cool & Moody: Teal Shadows, Cinematic, Blue Hour, Moody Green and Night Blue. Skin Fixes: Fix Orange Skin, Fix Red Skin, Fix Yellow Skin, Fix Green Skin and Fix Ashy Skin. They come as .xmp presets for Lightroom Classic, Lightroom, Lightroom on your phone and Camera Raw, plus .dng versions for older releases of the mobile app.
Why don’t these presets turn skin orange?
The looks only change the Tone Curve, Color Mixer and Color Grading panels, and never White Balance or Exposure, so they don’t carry someone else’s light onto your photo. The warm looks pull orange saturation back, and the cool looks put their color in the background and the deepest shadows. Every preset was tested on faces from light to deep skin, and on the final test renders each look kept skin hue within about 3 degrees of where it started.
How do I use the Skin Fixes?
Correct White Balance and Exposure first, click a look, then click the fix that matches the problem: orange, red, yellow, green or ashy skin. The fixes only use the Calibration panel, which the looks never touch, so a fix stacks on top of the look and both stay. Use one only when skin has that cast.
Which course are these presets from?
They come with the PRO course Skin Tones, Color Grading & Presets in Photoshop & Lightroom. Lesson 10 shows how to import all 20 into Lightroom Classic and how to save your own preset with only the Tone Curve, Color Mixer and Color Grading boxes checked.
Are Lightroom Presets included in my PHLEARN PRO subscription?
Yes. A PHLEARN PRO membership includes every Lightroom Preset pack, plus PRO Tutorials, LUTs, Photoshop Actions and Photoshop Brushes.
Which version of Lightroom do I need?
The .xmp presets work in Lightroom Classic 10 and newer (they use the Color Grading panel), in Lightroom on your computer, in Lightroom on your phone and in Camera Raw in Photoshop. For older versions of the mobile app, use the .dng files in the download. We recommend the latest version.
How do I install Lightroom Presets?
In Lightroom Classic, open the Develop module, click the + in the Presets panel, choose Import Presets and select the .xmp files. The PDF guide in your download also covers Lightroom on your computer, your phone and Camera Raw in Photoshop, and every method is on our Lightroom Presets install guide.
I imported the pack, but I can’t see it.
The four new groups arrive collapsed and sit in alphabetical order. Scroll the Presets panel to the groups named PHLEARN Color Grading and click their arrows.
Do I have to install the presets on my phone separately?
Not if you import them into Lightroom on your computer: within a few minutes they show up in Lightroom on any device signed in to the same Adobe account. If you use Lightroom Classic, import the .XMP files in the mobile app: open a photo, tap Presets, then Yours, then the three-dot menu and Import Presets.
Do the presets work on RAW and JPEG photos?
Yes. Every preset is built to work on both RAW and JPEG files, and each one can be adjusted after you apply it.
The preset looks too strong. What do I do?
Lower the Amount slider at the top of the Presets panel, then adjust White Balance and Exposure for that photo. Every photo starts from different light.
Do you offer refunds?
Because these are downloadable products, all sales are final and we are not able to offer refunds.
Terms of Use
These Presets are licensed for personal and professional use by the individual who purchased or downloaded them. The license does not extend to companies or partnerships, and the files may not be resold, loaned, gifted, shared, copied or redistributed. All PHLEARN Presets are copyright protected.
Master Photoshop, Lightroom and Photography
Join PHLEARN PRO for $12.99 a month, or $99.99 a year (save 36%). Cancel anytime, with a 100% money-back guarantee.





