
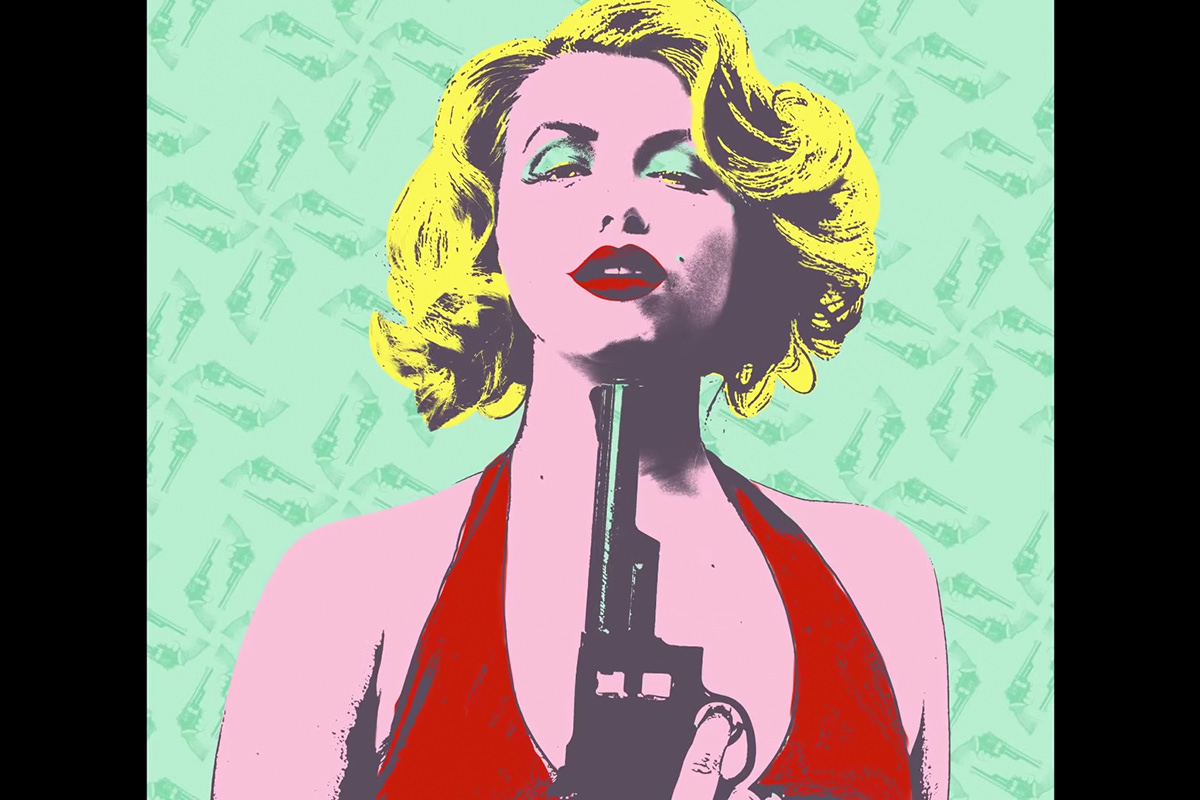

description
Part two of this free Photoshop pop art project adds the color. Starting from the black-and-white silhouette, a Pen tool path isolates the subject and gets loaded onto a group mask, so every new color layer stays inside her outline no matter how loosely it’s painted. Flat, hand-sampled patches of color recreate the slightly imperfect feel of a real screen print, and a step-and-repeat pattern built from one photographed object fills the background.
Enjoying This Free Tutorial?
We publish a new free tutorial every week, each one with sample images and PSDs you can download and follow along with. Sign up and they land straight in your inbox, along with early word on sales, events and subscriber-only offers.


Creating Pop Art in Photoshop, Part 2
With the black-and-white silhouette built in part one, this second half adds color the way classic screen prints were actually made: flat, hand-painted patches of color layered underneath a masked outline. This tutorial cuts the subject out with the Pen tool, uses a group mask to paint color freely without redoing selections, and finishes with a step-and-repeat pattern built from a single photographed object.
Lighting the Shoot for a Defined Shadow Side
Matching the reference image’s lighting started on set, well before any Photoshop work began.
-
Study the Reference’s Lighting Pattern
Look closely at how light and shadow fall across the reference image, noting details like one side of the face being distinctly darker than the other.
-
Use a Harder Main Light for Defined Shadows
Choose a harder light source, such as a beauty dish, as the main light so it creates the kind of defined shadow shape seen in the reference.
-
Add Fill Lights to Control Shadow Depth
Bring in two fill lights to keep the shadows from going too dark, adjusting them until the shadow side still reads clearly without losing all detail.
Pulling a Flat Color Shape From the Silhouette
The black-and-white silhouette from part one gets converted into a single flat color shape ready to sit underneath the final coloring.
-
Group the Silhouette Layers
Select all the multiply-blended silhouette layers from part one and press Cmd/Ctrl+G to group them.
-
Select the Darks With Color Range
Create a new layer, go to Select > Color Range, switch the preview to grayscale, and adjust the fuzziness so the darker areas of the silhouette are selected.
-
Sample a Color and Fill the Selection
Sample a color, such as one from the original pop art reference, by holding Alt/Option with the brush tool, then press Shift+Delete to fill the selection with that sampled foreground color.
Cutting Out the Subject With the Pen Tool
A Pen tool selection isolates the subject so color work can be contained entirely to her outline rather than the whole canvas.
-
Trace Around the Subject
Press P for the Pen tool and click-and-drag around the subject’s outline, holding Alt/Option to adjust individual curve handles as you go.
-
Convert the Path to a Selection
Right-click the finished path and choose Make Selection.
Why Precision Matters Less for This Kind of Pen Tool Cutout
A cutout meant for a literal object like a car benefits from a highly accurate Pen tool path, but hair and other organic shapes are inherently irregular, and this project is a stylized pop art piece rather than a photorealistic composite. That combination means small imperfections in the path are both hard to notice and, for this particular effect, essentially irrelevant to the final result.
Using a Group Mask to Paint Color Freely
Loading the Pen tool selection onto a group’s mask, rather than onto individual color layers, means every new color layer inherits the same boundary automatically.
-
Create a New Group
Create a new layer, then press Cmd/Ctrl+G to turn it into a group.
-
Add the Pen Tool Selection as the Group’s Mask
With the Pen tool selection still active, add a layer mask to the group so only that selected area will ever be visible inside it.
-
Paint New Color Layers Freely Inside the Group
Create new layers inside the group and paint with a regular brush without worrying about staying inside the lines, since the group’s mask automatically contains every layer to the subject’s outline.
Why a Group Mask Saves Repeated Selection Work
Without a shared group mask, every single new color layer would need its own fresh selection made from the same Pen tool path, which becomes tedious once several different colors are involved. Putting the mask on the group itself means any number of new layers can be painted loosely and freely while still automatically staying within the subject’s outline.
Painting Flat Color Patches Like a Screen Print
Sampling colors and painting loosely underneath the outline recreates the flat, slightly imperfect look of an actual screen print.
-
Sample and Paint a Base Skin Tone
Sample a skin tone directly from the reference or original photo and paint it loosely across all the visible skin areas.
-
Add Additional Colors for Hair, Clothing, and Props
Create additional layers for other colors, such as hair, clothing, or an added prop, painting each one loosely without concern for overlapping edges.
-
Clean Up Obvious Overpainting With the Eraser
Use the Eraser tool to remove color that clearly strayed too far outside where it belongs, while leaving small imperfections that read as part of the screen-print style.
Why Imprecise Painting Actually Suits This Style
A real screen print often has small registration errors where one color slightly misses its intended area, and that imperfection is part of the aesthetic rather than a flaw to eliminate. Painting loosely and only cleaning up genuinely distracting mistakes, rather than aiming for pixel-perfect precision, keeps the result feeling authentic to the technique it’s imitating.
Building a Background Pattern From a Photographed Object
A separately photographed prop becomes an abstract, repeating background pattern using Free Transform’s step-and-repeat technique.
-
Isolate the Prop on Its Own Layer
Cut out the photographed prop and desaturate it, then use Levels to push its background to pure white, making it easy to select cleanly.
-
Select and Duplicate the Isolated Object
Use Select > Color Range to select the dark object against its light background, then press Cmd/Ctrl+J to duplicate it onto its own transparent layer.
-
Set a Custom Pivot Point for Rotation
Cmd/Ctrl-click the layer thumbnail to load the object as a selection, press Option/Alt+Cmd/Ctrl+T, and drag the transform’s pivot point to a specific corner or edge of the object rather than its center.
-
Step and Repeat With a Keyboard Shortcut
Rotate the object once around the new pivot point, then press Shift+Option/Alt+Cmd/Ctrl+T repeatedly to duplicate and rotate identical copies automatically into a radial pattern.
-
Repeat the Pattern Across the Background
Duplicate the finished pattern cluster, reposition each copy, and set the layer’s blend mode to Soft Light so the pattern sits subtly behind the subject.
Why a Custom Pivot Point Is Essential for Step and Repeat
Free Transform normally rotates an object around its own center, but moving that pivot point to an edge or corner instead means each repeated rotation swings the object around an external point, producing a radial, flower-like arrangement rather than the object simply spinning in place. Once that custom pivot is set, the same rotation can be repeated instantly and identically with a single keyboard shortcut.
Why This Approach Works
Loading the Pen tool selection onto a group mask, rather than remaking a selection for every color, is the single decision that makes painting a multi-color pop art piece manageable instead of tedious. Deliberately allowing small imprecisions in both the cutout and the color painting keeps the result feeling like an actual screen print rather than an overly clean digital illustration. The step-and-repeat background pattern shows how a completely unrelated technique, built around a custom Free Transform pivot point, can turn one photographed object into an entirely original decorative element.
Final Thoughts
Once the silhouette and the group-masked color layers are in place, the actual coloring becomes fast and almost playful, since there’s no need to worry about staying perfectly inside the lines. Between the flat, imperfect color patches and the radial step-and-repeat pattern in the background, this project is a good reminder that stepping outside a usual editing routine, even just for fun, tends to leave you with new techniques worth reusing on completely different projects later.
Quick Reference: Keys, Menus and Settings
- Group the silhouetteShift-click the layers, Cmd/Ctrl + G
- Select the darksSelect > Color Range, Preview: Grayscale, adjust Fuzziness
- Fill with a sampled colorAlt/Option-click with the Brush to sample; Shift + Delete to fill; Cmd/Ctrl + D deselects
- Cut her outP for the Pen tool, click and drag; right-click > Make Selection
- Clean up the prop photoShift + Cmd/Ctrl + U to desaturate; Cmd/Ctrl + L, white eyedropper on the background
- Step and repeatCmd/Ctrl-click the thumbnail, Option/Alt + Cmd/Ctrl + T, then Shift + Option/Alt + Cmd/Ctrl + T to repeat
- Blend the patternNormal to Soft Light, below the subject
Coloring Pop Art: Common Questions
How was the shoot lit?
A beauty dish as the harder main light, to give one side of the face a defined shadow like the reference, plus a background light and two fill lights that keep the shadows from going too dark.
How do I pull the dark outline onto its own layer?
Group the Multiply silhouette layers, make a new layer and go to Select > Color Range. Set the preview to Grayscale, adjust Fuzziness so the darks are selected, then press Shift + Delete and fill with your foreground color.
Where do the colors come from?
They are sampled from the Warhol reference. With the Brush tool active, hold Alt/Option and click a color to make it your foreground color.
Does the Pen tool cutout need to be perfect?
No. Hair can be any shape and the piece is stylized, so small misses don’t show. Click and drag to make curves, Alt/Option-drag a handle to change direction, then right-click the path and choose Make Selection.
Why put the mask on a group?
Make a new layer, press Cmd/Ctrl + G to group it and add the Pen tool selection as the group’s mask. Every color layer you paint inside the group stays inside her outline, with no new selection each time.
What if I paint outside the lines?
Erase what strays too far with the Eraser tool. Small misses can stay; they look like the slightly off colors of a real screen print.
How was the eyeshadow done?
With a layer mask on the skin layer. Painting black there lets the background color show through, the way a screen print leaves an area uncovered.
How do I make the step and repeat pattern?
Cmd/Ctrl-click the object’s layer thumbnail, press Option/Alt + Cmd/Ctrl + T, move the pivot point to a corner and rotate once, then press Enter. Each press of Shift + Option/Alt + Cmd/Ctrl + T adds another rotated copy.
How does the pattern sit behind her without fighting the colors?
The pattern layer is set to Soft Light and placed below the cut-out subject, so it only shows in the background.
Master Photoshop, Lightroom and Photography
Join PHLEARN PRO for $12.99 a month, or $99.99 a year (save 36%). Cancel anytime, with a 100% money-back guarantee.





