Download Sample Images
Click the link below to download the sample images and follow along with this tutorial.
DownloadThe winners have been announced! View the Winners
This tutorial is a part of the Horror Movie Poster Collection
How to Photograph a Horror Movie Poster
There is no right or wrong way to photograph a horror movie poster, but for this contest, we ask that you keep your entries DIY. That means creativity over cost – think about how you can make, build, adapt, and scrap together objects for a great photo.
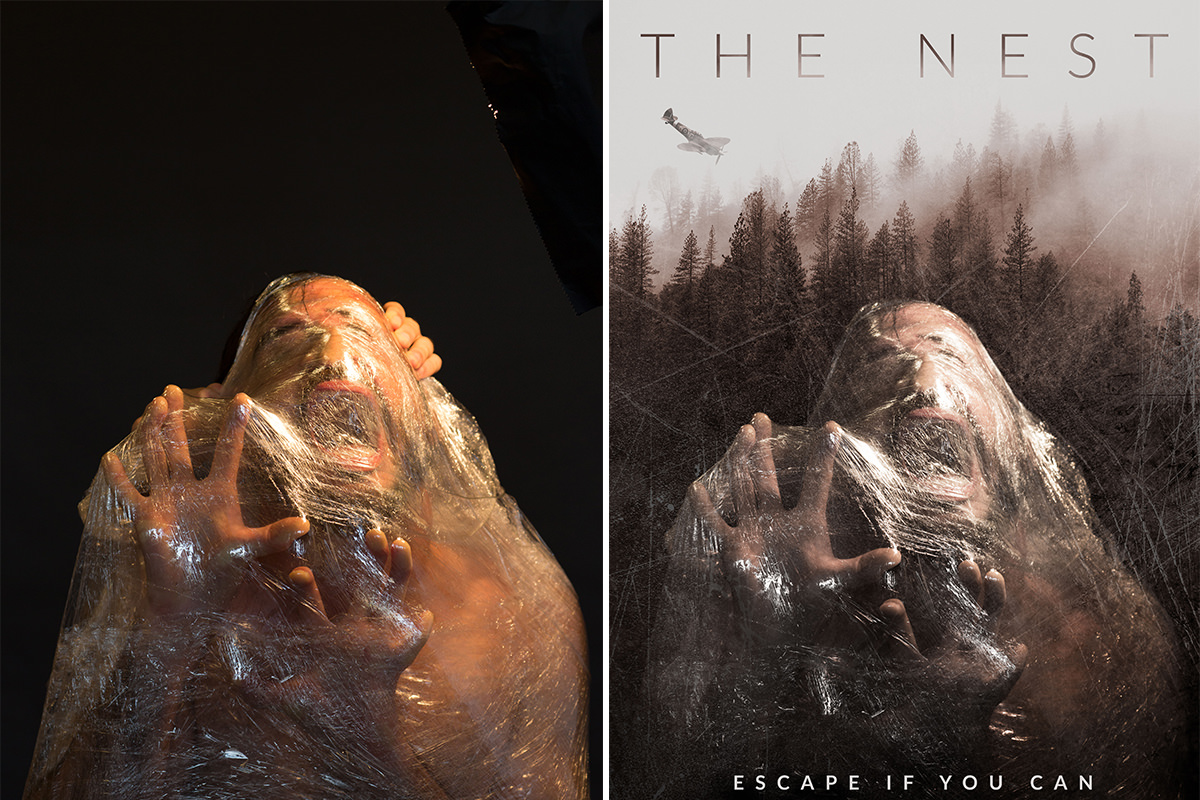
For this image we used a bare 200W light bulb as the light source. This lightbulb was set in a simple housing and clamped to a light stand.
To block the light coming into the camera, we used a bit of Cinefoil wrapped around the bulb and clamp. We happened to have some Cinefoil laying around, but you could use aluminum foil or anything else that blocks light.
The only other prop was the plastic wrap that we covered Aaron in.

DISCLAIMER: Be Careful! If you decide to cover your face in plastic wrap – keep in mind you won’t be able to breathe. Only do this with people you trust and always keep the back open, so you can remove the plastic wrap easily and BREATHE. Seriously – Don’t hurt yourself or anyone else for a photo.
We used a black seamless backdrop for the background. You can use any dark wall or just shoot this outside at night for a black background.
Little Photoshop of Horrors
In Photoshop, we’ll show you how to take a simple photographic concept and expand on it to build a world around your subject. These techniques are perfect if you want to take a strange and interesting portrait of your subject and then place them in a new environment.
To begin, we need to mask out the background so that our subject will blend seamlessly into the new background that we’ve chosen. First, place a Fill Layer on the bottom of the Layer Stack and fill it with black. Make that black background visible by selecting the layer with your subject and clicking on the Layer Mask icon. Use the Brush Tool to paint black on the layer mask, carefully painting over the areas of the background that you wish to remove.
Don’t worry about creating a perfect mask using this method! If you photographed your subject in front of a dark\black background, we’ll show you an easy technique to get a near-perfect cutout.
Start by creating a new Levels Adjustment Layer and clip it to the layer with your subject. In the levels adjustment window, drag the black point to the right until the dark areas around your subject become completely black. Select the Layer Mask of the Levels Adjustment Layer and Invert it by hitting CTRL or CMD + I. Then use the brush tool to paint white around the areas that you want to change to black. This will darken the background to black without cutting out any parts of your subject.
And lastly, If there are any distractions on or around your subject, you can use the Healing Brush Tool and/or the Clone Stamp Tool to do a bit of retouching.
Once you’ve cleanly removed your subject from the original background, you’ll be ready to place them on the new background and apply some textures.
To apply textures, add them as new layers on top of your subject layer and change their Layer Blending Modes. In our case, we used the Screen blending mode to remove the dark background, leaving only the details of the texture behind. If the textures are too distracting or are interfering with other parts of your image, we recommend adjusting the Opacity until they blend in more naturally. By using CTRL or CMD + T to Transform the texture layers, you can adjust your composition as well. We used the same technique to bring in the new background. Simply add it as a new layer and change the layer blending mode to screen.
Coloring is extremely important if you want your composite to look as if everything was photographed in the same environment.
First, we adjusted the color temperature of some of the light reflections on our subject. To do this, choose the Brush Tool and Sample (by holding ALT or OPTN) a color from your subject that matches the color temperature that you want. On a new layer, paint with the brush tool in the sampled color over the areas you wish to adjust. Then change the blending mode on that layer to Hue.
If you’re using Smart Objects, you can apply Hue/Saturation and Levels Adjustments as Smart Filters. We recommend adjusting the hue of your textures and background to more closely match that of your subject. Once you’ve applied one filter that you’re happy with, you can Duplicate that Smart Filter by holding ALT or OPTN and dragging it over the other layers you wish to apply it to.
Use additional Adjustment Layers or Smart Filters to further blend areas of your image. Be sure to utilize Hue/Saturation, Levels, and Curves Adjustment Layers as needed.
Gradient Maps are a great way to finish the coloring process. Add a Gradient Map Adjustment Layer to the top of your Layer Stack and click on the Gradient Editor. Here we chose a gradient from black to a very light orange. Change the layer blending mode to color and lower the opacity to bring out a bit of the original color. This technique is extremely effective at unifying different layers of a composite.
It wouldn’t be a movie poster without a title, tagline, and some credits (technically, it isn’t a movie poster without an actual movie but stop asking questions.) Hit T for the Type Tool and use a font that matches your theme and story. Be sure to color the text so it fits with the other elements of the poster. We chose to integrate our text into the background using our Fog and Smoke Brush. You can download that brush for FREE right here.
Now it’s your turn, fellow Phrighteners!
(See what we did there?)
Create something equal parts awesome and terrifying and send it our way. Use whatever tools and techniques you want to create your poster – we just want to inspire ideas and provide a toolbox for you to choose from.