

Watch the Full Series
30 Days of Photoshop · 2025 EditionOur most-watched series, updated for 2025 — watch all 30 free
description
Liquify has a reputation it has largely outgrown. Its most useful modern job is unglamorous and quietly transformative: tidying the outline of clothing so the silhouette reads cleanly instead of bulging and denting its way down the frame.
Day 15 covers every brush in the panel, the freeze mask that protects what you do not want moved, and the reconstruct slider that lets you dial a whole session of warping back to a sensible strength — then finishes the creases with Generative Fill.
This is Day 15 of 30 Days of Photoshop, 2025 Edition — our most-watched series, rebuilt from the ground up for today’s tools.
Continue Watching 30 Days of Photoshop
JOIN 30 DAYS OF PHOTOSHOP (FOR FREE!)
Ready to jump in? Sign up and we’ll email you a printable calendar and daily class schedule so you can get started right away!


Your Secret to a Polished Look
Liquify pushes pixels around like wet paint. That capability has a loud reputation and a much more useful quiet one: cleaning up the silhouette of clothing, where fabric bunches, a pocket juts out, and the outline of a garment wanders in and out down the length of the frame.
That is what this day is about — the outline of the clothes rather than the shape of the person inside them.
Convert to a Smart Object First
Before opening the filter, select the layer and choose Filter > Convert for Smart Filters. Liquify then applies as a Smart Filter, which means you can toggle the entire result off, compare it against the original, and reopen the panel later with all of your warping still in place.
Skip this and the warp is permanent the moment you click OK. Then open it: Filter > Liquify.

Forward Warp Is the One You Will Use
Top left of the toolbar, and it does ninety percent of the work. Click and drag, and the pixels under the brush move with you — push an edge in, pull one out, smooth a line straight.
Size
Match the brush to the size of the thing you are moving. A small brush for a jutting pocket corner, a large one for a long sweep of hem. The [ and ] keys change it without leaving the canvas, and getting this right is most of the difference between a smooth result and a lumpy one.
Pressure
How strongly each stroke pushes. Lower pressure with several passes gives you far more control than one heavy stroke, in exactly the same way it does with a brush.
Density
How the effect falls off from the center of the brush toward its edge — the equivalent of hardness. Softer density blends the warp into the surrounding pixels instead of leaving a visible boundary.

Reconstruct Is an Undo You Can Paint
The second brush down. Paint over an area you went too far on and it eases back toward its original position, progressively, with each pass.
This is better than Ctrl/Cmd + Z for the common case, because undo removes an entire stroke while Reconstruct lets you keep most of a stroke and walk back just the part that overshot.
Pucker and Bloat
Pucker draws pixels inward toward the center of the brush; Bloat pushes them outward. Click and hold rather than drag — the effect builds while the button is down.
They are situational. Pucker can take in a wide trouser leg in one place faster than warping the edge from both sides, though you will usually need a pass of Forward Warp afterwards to re-straighten the outline. Bloat is the one to reach for when something needs to look inflated. Neither offers the directional control that makes Forward Warp the default.
Freeze Mask Protects What Should Not Move
Liquify does not know where your subject ends. Push an edge in with a large brush and the background comes with it, which on anything with structure — a wall, a doorframe, a horizon — is immediately obvious.
Paint a Freeze Mask over the area you want left alone and it becomes immovable. Warp right up against it and the frozen pixels stay exactly where they are. There is a matching eraser to release parts of it again.
This is also what makes Liquify useful for pattern mockups — freeze the surroundings, then stretch a flat graphic so it follows the folds of a garment.
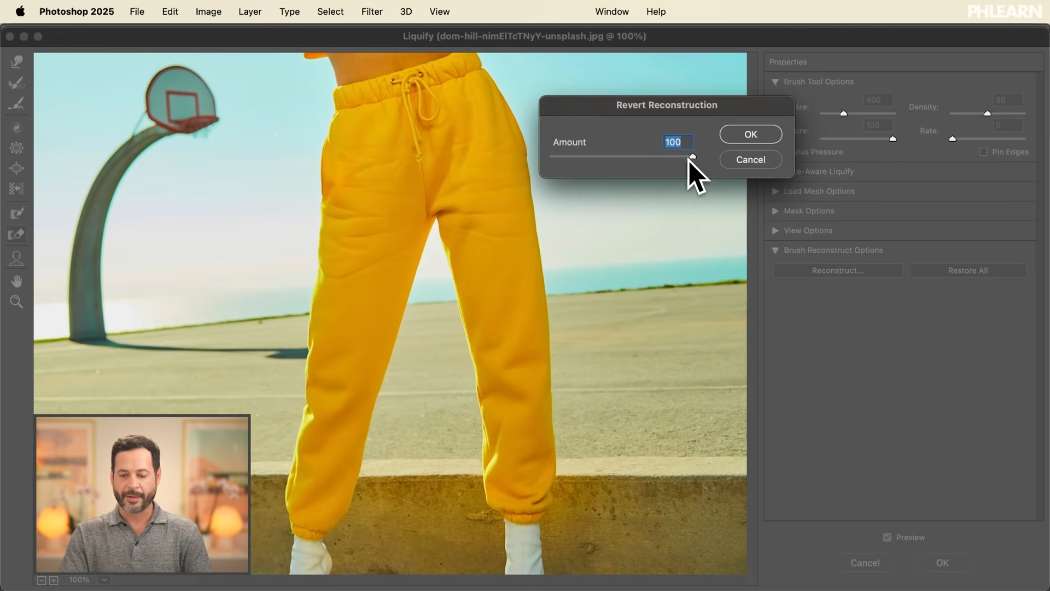
The Reconstruct Slider Is the Best Thing in the Dialog
Down the right-hand side, under Brush Reconstruct Options, there is a Reconstruct button with an amount slider. It is a global strength control for everything you have done in the session.
Warp freely, be too aggressive, then pull the slider back until it looks right — somewhere around 70–75% is often the sweet spot. Every stroke eases proportionally toward its original position at once.
This changes how you should work: stop trying to be exactly right on the first pass. Overshoot deliberately, then dial the whole thing back. It is much faster than nudging each edge by eye and much more likely to end up subtle.
A Word on What to Reshape
Liquify will happily reshape a body, and there is a reason a lot of retouchers keep it to garments, hair and objects. Clothing genuinely does bunch and crease in ways that have nothing to do with the person wearing it, and tidying that is closer to steaming a shirt than to altering someone.
Where the tool is used is a judgement call and not a technical one. It is worth making that call deliberately rather than by default.
Finish the Creases With Generative Fill
Liquify fixes the outline. It does nothing for the folds inside a garment, and those are a separate job that used to take a long time.
-
Take the Selection Brush
Nested under the Move tool. Paint directly over each crease you want gone — you do not need to be precise, just cover them.
-
Click Generative Fill and Generate With No Prompt
An empty prompt tells Photoshop to remove. It rebuilds the fabric from the surrounding material, keeping the color and weave.
-
Check the Variations
Three results, and on fabric the differences can be noticeable. Pick the one where the remaining folds still look like cloth.
Together the two passes do different halves of the same job: Liquify fixes the shape of the garment, Generative Fill fixes its surface.
Where This Really Pays Off
Fashion and Product Work
When the clothing is the subject, an outline that wanders is a flaw in the product shot. This is the main professional use of the tool.
Hair
Hair that has flattened on one side and stayed full on the other is a common portrait problem with no camera-side fix after the fact. A few gentle Forward Warp strokes balances it.
Anything Soft-Edged
Cushions, bedding, packaging, bags — any surface with give in it photographs with dents that were not there in the room.
Download the sample image and work the outline of the trousers, then use the reconstruct slider to pull the whole thing back to about three-quarters strength. Compare it against the untouched Smart Object and you will see how much a small, restrained pass is worth.
Day 14 covered type and Dynamic Text. Tomorrow, Day 16 is about Smart Objects — the feature that made this edit reversible in the first place.







Enjoying This Free Tutorial? Go Further with PRO.
Unlock Full Sample Files, PSDs, and Hundreds of Masterclasses!

Download full project assets, original PSDs, and RAW images for every lesson
Unlimited access to our complete library of PRO Photoshop & Lightroom courses
Instant 4K Ultra HD streaming on all devices, anytime, anywhere
Full access to our entire library of Photoshop Actions, Presets, and LUTs
Flexible monthly and annual membership plans
Cancel anytime with zero hassle or commitments